spring安全代码学习
源代码地址
登录的时候调用整个代码的过程为:
1.在注入的时候,先运行两个Bean注入PasswordEncoder和AuthenticationManagerBean,然后运行configure函数
@Configuration
public class SecurityConfig extends WebSecurityConfigurerAdapter {

    @Autowired
    private JwtAuthenticationTokenFilter jwtAuthenticationTokenFilter;

    @Bean
    public PasswordEncoder passwordEncoder(){
        //只需要把BCryptPasswordEncoder对象注入Spring容器中
        //SpringSecurity就会使用PasswordEncoder来进行校验
        return new BCryptPasswordEncoder();
    }

    //自定义AuthenticationManager
    @Override
    protected void configure(HttpSecurity http) throws Exception {
        http
                //关闭csrf
                .csrf().disable()
                //不通过Session获取SecurityContext
                .sessionManagement().sessionCreationPolicy(SessionCreationPolicy.STATELESS)
                .and()
                .authorizeRequests()
                //对于登录接口允许匿名访问
                .antMatchers("/user/login").anonymous()
                //除上面外所有请求需要鉴权认证
                .anyRequest().authenticated();
        http.addFilterBefore(jwtAuthenticationTokenFilter,UsernamePasswordAuthenticationFilter.class);
    }

    //调用
    //暴露自定义的AuthenticationManager
    @Bean
    @Override
    public AuthenticationManager authenticationManagerBean() throws Exception{
        return super.authenticationManagerBean();
    }
}
2.点击postman发送之后
(1)先运行OncePerRequestFilter实现类JwtAuthenticationTokenFilter中的doFilterInternal函数中的doFilterInternal函数方法进行过滤
@Component
public class JwtAuthenticationTokenFilter extends OncePerRequestFilter {

    //redis的内容直接从容器中获取即可
    @Autowired
    private RedisCache redisCache;

    @Override
    protected void doFilterInternal(HttpServletRequest httpServletRequest, HttpServletResponse httpServletResponse, FilterChain filterChain) throws ServletException, IOException {
        //1.获取token
        String token = httpServletRequest.getHeader("token");
        if(!StringUtils.hasText(token))
        {
            //放行
            filterChain.doFilter(httpServletRequest,httpServletResponse);
            //这里可以放行的原因在于后面还有FilterSecurityInterceptor等其他过滤器,
            //如果没有认证后面还会被拦截下来
            return;
            //这里如果没有return,响应回来之后还会调用后面的代码
        }

        String userId;
        //2.解析token(响应不为空)
        try {
            Claims claims = JwtUtil.parseJWT(token);
            userId = claims.getSubject();
            //这里parseJWT就是一个解析过程,不需要过多深究
        } catch (Exception e) {
            e.printStackTrace();
            throw new RuntimeException("token非法");
        }

        //3.从redis中获取用户信息
        String rediskey = "login:"+userId;
        LoginUser loginUser = redisCache.getCacheObject(rediskey);
        if(Objects.isNull(loginUser))
        {
            throw new RuntimeException("用户未登录");
        }
        //前面存入的是loginUser类型,因此这里不需要强转

        //4.存入SecurityContextHolder,这里setAuthentication需要传入
        //TODO 获取权限信息封装到Authentication之中
        //Authentication类,因此loginUser不能直接放入进去,需要转换
        //成Authentication类
        UsernamePasswordAuthenticationToken usernamePasswordAuthenticationToken = new UsernamePasswordAuthenticationToken(loginUser,null,null);
        //!!!这里必须调用带有三个参数的UsernamePasswordAuthenticationToken,因为带有三个参数的UsernamePasswordAuthenticationToken
        //是已经认证过的UsernamePasswordAuthenticationToken
        //第三个属于权限信息
        SecurityContextHolder.getContext().setAuthentication(usernamePasswordAuthenticationToken);
        //放行
        filterChain.doFilter(httpServletRequest,httpServletResponse);
        //放行之后到下一个过滤器
    }
    /***
     * 定义jwt认证过滤器:
     * 获取token、解析token获取其中的userid
     * 从redis中获取用户信息、存入SecurityContextHolder
     * 之前继承filter,可以实现filter接口 implements Filter
     * 默认的implements Filter可能会存在一定的问题,导致一个请求过来会被调用多次
     *
     * 这个过滤器肯定要在FilterSecurityInterceptor前面,否则直接发现未认证之后
     * 就会抛出异常,因此选择放在UsernamePasswordAuthenticationFilter前面的
     * 位置,配置放在继承WebSecurityConfigurerAdapter的SecurityConfig之中
     */
}
如果是第一次登录的情况下,这里运行的时候因为Header中没有token,

因此会在这直接返回
if(!StringUtils.hasText(token))
{
   //放行
   filterChain.doFilter(httpServletRequest,httpServletResponse);
   //这里可以放行的原因在于后面还有FilterSecurityInterceptor等其他过滤器,
   //如果没有认证后面还会被拦截下来
   return;
   //这里如果没有return,响应回来之后还会调用后面的代码
}
如果是第二次登录的时候,则这里会将输入的token转化成为之前的userId,
然后从redis之中去找userId对应的类是否为空,
如果为空的时候抛出异常,否则调用UsernamePasswordAuthenticationToken进行授权操作
//3.从redis中获取用户信息
String rediskey = "login:"+userId;
LoginUser loginUser = redisCache.getCacheObject(rediskey);
if(Objects.isNull(loginUser))
{
   throw new RuntimeException("用户未登录");
}
//前面存入的是loginUser类型,因此这里不需要强转
//4.存入SecurityContextHolder,这里setAuthentication需要传入
//TODO 获取权限信息封装到Authentication之中
//Authentication类,因此loginUser不能直接放入进去,需要转换
//成Authentication类
UsernamePasswordAuthenticationToken usernamePasswordAuthenticationToken = new UsernamePasswordAuthenticationToken(loginUser,null,null);
(2)调用完之后返回接口的结果
如果是第一次调用完成之后(调用完/user/login接口之后),直接返回调用成功提示
Map<String,String> map = new HashMap<>();
map.put("token",jwt);
//把完整的用户信息存入redis,userId作为key,这里面的键值对键为token
//值为jwt
redisCache.setCacheObject("login:"+userid,loginUser);
//这里必须打开redis,才能够保存得上
return new ResponseResult(200,"登录成功",map);
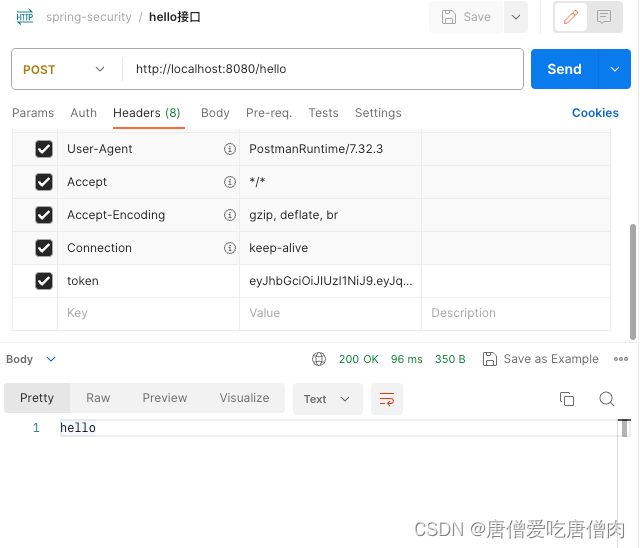
如果是第二次调用完成之后(调用完/hello接口之后),返回hello的内容
@RestController
public class HelloController {
    //加入spring-security包会进入一个默认的拦截页面
    //前后端校验的关键:token,根据token来看是否是需要的用户,
    //登录后再访问其他请求是否需要在请求头中携带token内容
    @RequestMapping("/hello")
    public String hello(){
        System.out.println("!!!Hello!!!");
        return "hello";
    }
}
注意:/login为系统自带的默认接口,跟/user/login无关,只不过/login这个接口能够在浏览器上打开
注意:如果SecurityConfig.java中的configure函数中的http.addFilterBefore(jwtAuthenticationTokenFilter,UsernamePasswordAuthenticationFilter.class)忘记加上了之后,则登录完再去运行hello接口仍然无法调用,因为JwtAuthenticationTokenFilter extends OncePerRequestFilter这个接口会在运行完成所有Filter之后调用

而在FilterSecurityInterceptor这一个拦截器中因为hello接口没有权限已经被拦截了,因此这里会报403 Forbidden的错误