Seata 源码篇之AT模式启动流程 - 上 - 02
Seata 源码篇之AT模式启动流程 - 02
- 自动配置
-
- 两个关键点
- 初始化
-
- 初始化TM
- 初始化RM
- 初始化TC
- 全局事务执行流程
-
- TM 发起全局事务
-
- GlobalTransactional 注解处理
-
- 全局事务的开启
- TM 和 RM 执行分支事务
-
- Introduction
-
- DelegatingIntroductionInterceptor
- DelegatePerTargetObjectIntroductionInterceptor
- Introduction 切面
- 数据源自动代理创建器
- 小结
上一篇 文章我们介绍了Seata AT模式解决分布式事务的核心思想,本文我们来看看具体通过源码来看看AT模式运行的具体流程。
本文基于Seata源码版本如下所示:
拉取日期: 2023-09-14
下面是本文的流程:
- Seata与Spring结合使用的自动配置类
- TM,RM,TC等组件初始化流程
- 全局事务执行流程
本文核心是梳理一遍AT模式启动的整体流程,所以不会过多侧重细节的分析,更多在全局的掌控和理解上。
自动配置
Seata的AT模式目标是做到业务无侵入,只需要一个简单的注解,即可完成声明式分布式事务管理,为了做到这一点,就需要与Spring AOP模块结合使用。
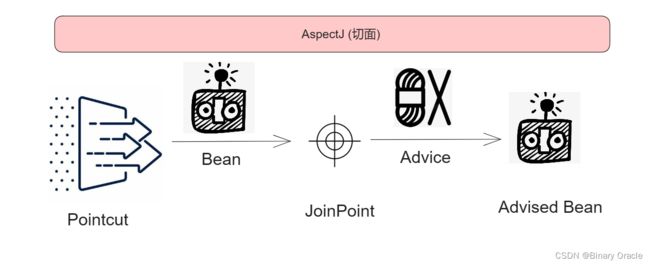
AOP 通常会和 IOC 结合使用, 其中 AOP 工作流程通常分为三步,这里结合Spring提供的IOC进行叙述:
- 选择切入哪些对象 : 借助Spring在每个Bean创建流程中的回调埋点,依次获取到每个创建完毕的Bean,然后利用JointPoint进行切入过滤,这里回调埋点指的就是BeanPostProcessor,Spring为AOP拦截判断专门提供了一个现成的Bean后置处理器,我们称之为自动代理创建器。
- 选择在哪些时机点处织入逻辑 : 这里时机点指的是方法调用前后,属性读取前后,构造方法调用前后,Spring中只支持方法调研前后织入拦截逻辑
- 织入拦截逻辑 : 可以是通过更改字节码的方式,或者是像Spring这样,为每个Bean创建一个代理对象,代理对象会拦截目标对象所有方法调用,并在每个方法调用前,搜集到所有能应用在当前方法上的拦截器,然后将所有拦截器组成一个调用链,等到前置拦截调用链执行完毕后,再执行目标方法
AspectJ在Spring中对应Advisor,PointCut还是PointCut,JoinPoint没有单独定义一个类,因为Spring只支持方法调用前后拦截,Advice还是Advice,但是最后会通过适配器统一转化MethodInterceptor。
在Seata的项目工程中,提供了一个seata-spring-boot-starter自动配置包,该自动配置包负责向Spring IOC中注入一些核心的Bean完成上述流程 :

此处我们先重点关注SeataAutoConfiguration类,该自动配置类往容器中注入了一个十分重要的Bean: GlobalTransactionScanner,见名知意,该类负责完成@GlobalTransactional等注解的扫描和Bean代理等工作 :
    @Bean
    @DependsOn({BEAN_NAME_SPRING_APPLICATION_CONTEXT_PROVIDER, BEAN_NAME_FAILURE_HANDLER})
    @ConditionalOnMissingBean(GlobalTransactionScanner.class)
    public static GlobalTransactionScanner globalTransactionScanner(SeataProperties seataProperties, FailureHandler failureHandler,
            ConfigurableListableBeanFactory beanFactory,
            @Autowired(required = false) List<ScannerChecker> scannerCheckers) {
        ...
        // 1.获取IOC引用
        GlobalTransactionScanner.setBeanFactory(beanFactory);
        // 2.从各个来源添加bean过滤器: SPI,IOC,属性配置
        GlobalTransactionScanner.addScannerCheckers(EnhancedServiceLoader.loadAll(ScannerChecker.class));
        GlobalTransactionScanner.addScannerCheckers(scannerCheckers);
        GlobalTransactionScanner.addScannablePackages(seataProperties.getScanPackages());
        GlobalTransactionScanner.addScannerExcludeBeanNames(seataProperties.getExcludesForScanning());
        ...
        // 3.完成Seata目标Bean扫描器的创建
        return new GlobalTransactionScanner(seataProperties.getApplicationId(), seataProperties.getTxServiceGroup(), failureHandler);
    }
下面我们会看到GlobalTransactionScanner其实就是Seata在Spring已有基础设施上实现的一个自动代理创建器罢了,主要是重写是否对Bean进行代理的判断逻辑,只对Seata感兴趣的目标Bean进行代理。
下面我们先来看一下GlobalTransactionScanner的继承关系:

GlobalTransactionScanner在Spring已有的AbstractAutoProxyCreator抽象自动代理创建器基础上,重写了其判断Bean是否代理的核心方法:
    @Override
    protected Object wrapIfNecessary(Object bean, String beanName, Object cacheKey) {
        // 1. 过滤掉Seata不感兴趣的Bean
        if (!doCheckers(bean, beanName)) {
            return bean;
        }

        try {
            synchronized (PROXYED_SET) {
                // 2. bean如果已经代理过了,则跳过代理
                if (PROXYED_SET.contains(beanName)) {
                    return bean;
                }
                interceptor = null;
                // 3. Seata提供的Advice,通过Bean所开启的模式不同,会返回AT模式对应的增强器或者TCC模式对应的增强器
                ProxyInvocationHandler proxyInvocationHandler = DefaultInterfaceParser.get().parserInterfaceToProxy(bean);
                // 4. 返回空,说明当前bean无需代理
                if (proxyInvocationHandler == null) {
                    return bean;
                }
                // 5. Advice最终都需要被适配为MethodInterceptor,要么第三方提供的就是MethodInterceptor类型的拦截器,否则需要额外向Spring中注册一个适配器,用于将自定义的Advice转化为MethodInterceptor
                interceptor = new AdapterSpringSeataInterceptor(proxyInvocationHandler);
                LOGGER.info("Bean [{}] with name [{}] would use interceptor [{}]", bean.getClass().getName(), beanName, interceptor.toString());
                // 6. 如果当前Bean还没有被代理过,那么直接调用父类现成逻辑进行代理
                if (!AopUtils.isAopProxy(bean)) {
                    bean = super.wrapIfNecessary(bean, beanName, cacheKey);
                } else {
                // 7. 如果当前Bean已经被代理过了,那就只需要在当前代理对象已有的拦截器链中再加入Seata提供的interceptor即可
                    // 7.1 AdvisedSupport是Spring中所有代理对象都会继承的接口,同时代理对象内部持有一个AdvisedSupport对象实例,该对象持有当前被代理对象的所有上下文信息
                    AdvisedSupport advised = SpringProxyUtils.getAdvisedSupport(bean);
                    // 7.2 构建Seata需要额外应用到当前代理对象上的增强器链,Seata重写了getAdvicesAndAdvisorsForBean方法,该方法重写后只会返回Seata提供的interceptor
                    Advisor[] advisor = buildAdvisors(beanName, getAdvicesAndAdvisorsForBean(null, null, null));
                    int pos;
                    // 7.3 将Seata提供的增强器插入到当前Bean已有增强器链指定位置
                    for (Advisor avr : advisor) {
                        pos = findAddSeataAdvisorPosition(advised, avr);
                        advised.addAdvisor(pos, avr);
                    }
                }
                PROXYED_SET.add(beanName);
                return bean;
            }
        } catch (Exception exx) {
            throw new RuntimeException(exx);
        }
    }
Spring AOP模块比较好理解,如果有对这块不太清楚的小伙伴,可以参考我之前写的AOP源码剖析系列文章:
Spring源码剖析专栏
专栏前半部分系列文章是笔者探索Spring源码初期所写,所以可能存在部分理解错误,大家可以理性看待,后期有空,可能会对该专栏前半部门文章进行重写。
两个关键点
- Seata需要对哪些Bean进行代理,这个过滤由doCheckers和DefaultInterfaceParser共同负责完成
   private boolean doCheckers(Object bean, String beanName) {
        // 1. 已经代理过的Bean跳过代理 / 排除集合中包含的bean不进行代理 / 工厂Bean不进行代理
        if (PROXYED_SET.contains(beanName) || EXCLUDE_BEAN_NAME_SET.contains(beanName)
                || FactoryBean.class.isAssignableFrom(bean.getClass())) {
            return false;
        }
        // 2. 借助Bean扫描器过滤掉那些Seata不感兴趣的Bean
        if (!SCANNER_CHECKER_SET.isEmpty()) {
            for (ScannerChecker checker : SCANNER_CHECKER_SET) {
                try {
                    if (!checker.check(bean, beanName, beanFactory)) {
                        // failed check, do not scan this bean
                        return false;
                    }
                } catch (Exception e) {
                    LOGGER.error("Do check failed: beanName={}, checker={}",
                            beanName, checker.getClass().getSimpleName(), e);
                }
            }
        }

        return true;
    }
doCheckers属于Seata的前置过滤,负责过滤掉一些内部Bean;DefaultInterfaceParser作为后置过滤
,负责过滤掉那些没有标注@GlobalTransactional或者@TwoPhaseBusinessAction注解的Bean。
关于ScannerChecker的实现,大家感兴趣可以自己看看它有哪些实现,反正代码都很短,也很容易理解。
- 为什么Seata需要区别对待已经代理过的Bean和没有被代理过的Bean呢?
这里可以简单看看父类中的wrapIfNecessary方法实现:
	protected Object wrapIfNecessary(Object bean, String beanName, Object cacheKey) {
		// 一些Spring内部Bean无需代理 /  当前代理创建器会缓存其已经代理过的对象,避免重复代理
		. . .

		// 由子类实现,返回能应用到当前Bean上所有的增强器
		// 常用实现: 从IOC得到所有类型为Advisor的Bean,依次判断是否能应用到当前Bean上
		Object[] specificInterceptors = getAdvicesAndAdvisorsForBean(bean.getClass(), beanName, null);
		// 如果返回空,说明当前Bean无需代理,因为没有Advisor能应用到当前Bean上
		// 如果不为空,则对当前Bean进行代理
		if (specificInterceptors != DO_NOT_PROXY) {
			...
			// 为当前Bean创建代理对象
			Object proxy = createProxy(
					bean.getClass(), beanName, specificInterceptors, new SingletonTargetSource(bean));
			...
			// 返回代理对象
			return proxy;
		}
		...
		// 无需代理,返回原样Bean
		return bean;
	}
AbstractAutoProxyCreator类的wrapIfNecessary方法问题在于会产生重复代理问题 :

Seata通过对已经代理过的bean单独处理,避免了重复代理问题的产生。同时Seata实现了getAdvicesAndAdvisorsForBean方法,目前只返回AdapterSpringSeataInterceptor。
    @Override
    protected Object[] getAdvicesAndAdvisorsForBean(Class beanClass, String beanName, TargetSource customTargetSource)
            throws BeansException {
        return new Object[]{interceptor};
    }
buildAdvisors方法中会为当前AdapterSpringSeataInterceptor构建一个默认的DefaultPointcutAdvisor,其持有的PointCut在类过滤器和方法过滤器中都返回True。
初始化
GlobalTransactionScanner 类还继承了 InitializingBean 接口,实现了该接口的Bean,会在Bean初始化阶段回调其实现的afterPropertiesSet方法。GlobalTransactionScanner 在该方法中完成相关组件的初始化工作 :
    @Override
    public void afterPropertiesSet() {
        ...
        // 每个Client都需要去初始化 RM 和 TM
        if (initialized.compareAndSet(false, true)) {
            initClient();
        }
    }

    private void initClient() {
        ...
        //init TM
        TMClient.init(applicationId, txServiceGroup, accessKey, secretKey);
        ...
        //init RM
        RMClient.init(applicationId, txServiceGroup);
        ...
        registerSpringShutdownHook();
    }
初始化TM
TM - 事务管理器(定义全局事务的范围:开始全局事务、提交或回滚全局事务),TM 的初始化方法被包含在 seata-tm 和 seata-core 包中,初始化逻辑主要是构建由Netty实现的RPC客户端 ,并调用其init方法 。
下面来看一下TMClient的init方法:
    public static void init(String applicationId, String transactionServiceGroup, String accessKey, String secretKey) {
        // 1. 创建TM对应的Netty客户端
        TmNettyRemotingClient tmNettyRemotingClient = TmNettyRemotingClient.getInstance(applicationId, transactionServiceGroup, accessKey, secretKey);
        // 2. 初始化Netty客户端相关资源
        tmNettyRemotingClient.init();
    }
继续往下追踪AbstractNettyRemotingClient的init方法,看看初始化哪些Netty客户端资源:
    @Override
    public void init() {
        // 注册消息类型处理器,当从Netty接收到不同类型msg后,会分发给不同的消息处理器处理
        registerProcessor();
        if (initialized.compareAndSet(false, true)) {
            // 负责启动Netty客户端和相关线程池,用于定时发送心跳消息和处理消息
            super.init();
            // 尝试与TC建立连接
            if (io.seata.common.util.StringUtils.isNotBlank(transactionServiceGroup)) {
                getClientChannelManager().reconnect(transactionServiceGroup);
            }
        }
    }
RPC模块属于Seata设计的比较优雅的一个模块,此处细节暂时不用深究,后续会专门出一篇文章好好唠唠其设计哲学。
初始化RM
RM - 资源管理器(管理分支事务处理的资源,与TC通信以注册分支事务和报告分支事务的状态,并驱动分支事务提交或回滚),RM 的初始化方法同样在 seata-rm 和 seata-core 包中,其核心初始化方式与TM是共用的,都是通过AbstractNettyRemotingClient的init方法。
下面来看看RMClient的init方法
    public static void init(String applicationId, String transactionServiceGroup) {
        // 1. 创建RM对应的Netty客户端
        RmNettyRemotingClient rmNettyRemotingClient = RmNettyRemotingClient.getInstance(applicationId, transactionServiceGroup);
        rmNettyRemotingClient.setResourceManager(DefaultResourceManager.get());
        rmNettyRemotingClient.setTransactionMessageHandler(DefaultRMHandler.get());
        // 2. 初始化Netty客户端相关资源
        rmNettyRemotingClient.init();
    }
RMClient初始化方法和TM初始化方法都是调用父类AbstractNettyRemotingClient的init方法,所以此处就不再过多赘述。
初始化TC
TC - 事务协调者(维护全局和分支事务的状态,驱动全局事务提交或回滚),TC是以中间件的形式存在的,它不同于TM和RM是以SDK的形式寄生在业务服务中的,它是一个独立的Java服务,在seata-server包下。
TC 是一个SpringBoot项目,由@SpringBootApplication标记的main方法启动 :
@SpringBootApplication(scanBasePackages = {"io.seata"})
public class ServerApplication {
    public static void main(String[] args) throws IOException {
        // run the spring-boot application
        SpringApplication.run(ServerApplication.class, args);
    }
}
TC服务端对外会提供一个Web界面用于查询运行情况,所以需要启动一个SpringBoot Web项目工程,而启动Netty则是用于与TM和RM进行通信的。
TC 启动基于Netty的RPC服务端,它是通过实现CommandLineRunner的run方法实现初始化 :
    @Override
    public void run(String... args) {
          ...
          Server.start(args);
          ...
    }
Server的start方法负责完成TC核心的Netty客户端启动流程 :
    public static void start(String[] args) {
        ...
        // 1. 创建Netty服务端
        NettyRemotingServer nettyRemotingServer = new NettyRemotingServer(workingThreads);
        XID.setPort(nettyRemotingServer.getListenPort());
        // 2. UUIDGenerator: 用于生成全局唯一的全局事务ID和分支事务ID,采用雪花算法实现
        UUIDGenerator.init(parameterParser.getServerNode());
        // 3. SessionHodler负责事务日志(状态)的持久化存储
        SessionHolder.init();
        // 4. 锁管理器工厂初始化
        LockerManagerFactory.init();
        // 5. 事务协调器的核心,通过RpcServer与远程TM,RM通信来实现分支事务的提交,回滚等。
        DefaultCoordinator coordinator = DefaultCoordinator.getInstance(nettyRemotingServer);
        coordinator.init();
        nettyRemotingServer.setHandler(coordinator);
        ...
        // 6. 启动Netty服务端
        nettyRemotingServer.init();
    }
Netty服务端的启动逻辑也是注册一系列消息处理器,然后启动Netty Server,这里就不过多赘述了。
全局事务执行流程
TM 发起全局事务
TM 发起全局事务的流程分为三个步骤 :
- 拦截标注了@GlobalTransactional注解的Bean的方法执行
- TM 向 TC 发送全局事务开启申请,然后获得 TC 返回的全局事务 XID
- 全局事务开启,绑定 XID
上面说过,Seata采用AOP实现对Bean方法执行的拦截,拦截逻辑体现在AdapterSpringSeataInterceptor的invoke方法中:
    @Override
    public Object invoke(@Nonnull MethodInvocation invocation) throws Throwable {
        // 简单封装了一层,便于获取当前代理对象的某些信息
        AdapterInvocationWrapper adapterInvocationWrapper = new AdapterInvocationWrapper(invocation);
        // 核心拦截逻辑还是汇聚在proxyInvocationHandler中
        Object result = proxyInvocationHandler.invoke(adapterInvocationWrapper);
        return result;
    }
GlobalTransactionScanner的wrapIfNecessary方法中,会通过DefaultInterfaceParser方法解析当前Bean,判断其开启了 TCC 还是 AT ( 或XA ) 模式 ,然后返回对应不同的proxyInvocationHandler,如下图所示:
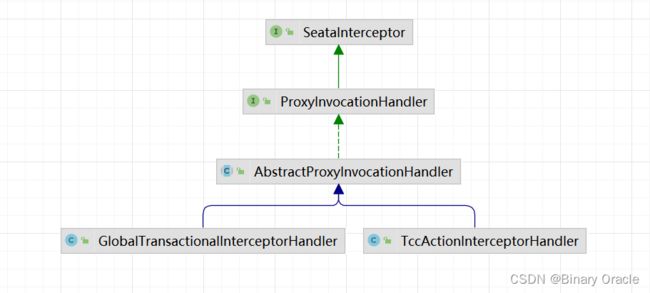
本文我们重点关注AT模式,因此我们来看看GlobalTransactionalInterceptorHandler类的invoke方法实现:
    @Override
    protected Object doInvoke(InvocationWrapper invocation) throws Throwable {
        // 1. 获取目标对象类型
        Class<?> targetClass = invocation.getTarget().getClass();
        // 2. 获取当前拦截的目标方法调用
        Method specificMethod = ClassUtils.getMostSpecificMethod(invocation.getMethod(), targetClass);
        if (specificMethod != null && !specificMethod.getDeclaringClass().equals(Object.class)) {
            // 3. 获取当前方法上标注的目标注解
            final GlobalTransactional globalTransactionalAnnotation = getAnnotation(specificMethod, targetClass, GlobalTransactional.class);
            final GlobalLock globalLockAnnotation = getAnnotation(specificMethod, targetClass, GlobalLock.class);
            boolean localDisable = disable || (ATOMIC_DEGRADE_CHECK.get() && degradeNum >= degradeCheckAllowTimes);
            if (!localDisable) {
                // 4. 优先处理GlobalTransactional注解情况
                if (globalTransactionalAnnotation != null || this.aspectTransactional != null) {
                    AspectTransactional transactional;
                    if (globalTransactionalAnnotation != null) {
                        // 4.1 填充全局事务上下文信息(超时时间,传播级别,重试次数,回滚异常)
                        transactional = new AspectTransactional(globalTransactionalAnnotation.timeoutMills(),
                                globalTransactionalAnnotation.name(), globalTransactionalAnnotation.rollbackFor(),
                                globalTransactionalAnnotation.rollbackForClassName(),
                                globalTransactionalAnnotation.noRollbackFor(),
                                globalTransactionalAnnotation.noRollbackForClassName(),
                                globalTransactionalAnnotation.propagation(),
                                globalTransactionalAnnotation.lockRetryInterval(),
                                globalTransactionalAnnotation.lockRetryTimes(),
                                globalTransactionalAnnotation.lockStrategyMode());
                    } else {
                        transactional = this.aspectTransactional;
                    }
                    // 4.2 处理标注了GlobalTransactional注解的全局事务
                    return handleGlobalTransaction(invocation, transactional);
                } else if (globalLockAnnotation != null) {
                    // 5. 处理GlobalLock注解
                    return handleGlobalLock(invocation, globalLockAnnotation);
                }
            }
        }
        // 6. 执行本地事务
        return invocation.proceed();
    }
GlobalTransactional 注解处理
如果当前拦截的方法上标注了GlobalTransactional注解,则会由handleGlobalTransaction方法进行处理:
    Object handleGlobalTransaction(final InvocationWrapper methodInvocation,
                                   final AspectTransactional aspectTransactional) throws Throwable {
        boolean succeed = true;
        try {
            // transactionalTemplate 使用了典型的模版方法加回调的设计模式
            // TransactionalExecutor 负责提供当前事务相关处理接口
            return transactionalTemplate.execute(new TransactionalExecutor() {
                // 执行当前分支事务的本地事务
                @Override
                public Object execute() throws Throwable {
                    return methodInvocation.proceed();
                }
                ...
                // 获取当前事务的上下文信息 -- 这里事务上下文信息由aspectTransactional 转换而来
                @Override
                public TransactionInfo getTransactionInfo() {
                    // reset the value of timeout
                    int timeout = aspectTransactional.getTimeoutMills();
                    if (timeout <= 0 || timeout == DEFAULT_GLOBAL_TRANSACTION_TIMEOUT) {
                        timeout = defaultGlobalTransactionTimeout;
                    }

                    TransactionInfo transactionInfo = new TransactionInfo();
                    transactionInfo.setTimeOut(timeout);
                    transactionInfo.setName(name());
                    transactionInfo.setPropagation(aspectTransactional.getPropagation());
                    transactionInfo.setLockRetryInterval(aspectTransactional.getLockRetryInterval());
                    transactionInfo.setLockRetryTimes(aspectTransactional.getLockRetryTimes());
                    transactionInfo.setLockStrategyMode(aspectTransactional.getLockStrategyMode());
                    Set<RollbackRule> rollbackRules = new LinkedHashSet<>();
                    for (Class<?> rbRule : aspectTransactional.getRollbackFor()) {
                        rollbackRules.add(new RollbackRule(rbRule));
                    }
                    for (String rbRule : aspectTransactional.getRollbackForClassName()) {
                        rollbackRules.add(new RollbackRule(rbRule));
                    }
                    for (Class<?> rbRule : aspectTransactional.getNoRollbackFor()) {
                        rollbackRules.add(new NoRollbackRule(rbRule));
                    }
                    for (String rbRule : aspectTransactional.getNoRollbackForClassName()) {
                        rollbackRules.add(new NoRollbackRule(rbRule));
                    }
                    transactionInfo.setRollbackRules(rollbackRules);
                    return transactionInfo;
                }
            });
        } catch (TransactionalExecutor.ExecutionException e) {
            ....
        }
        ...
    }
Seata这里使用了典型的模版方法加回调接口的设计模式,包括TransactionInfo以及TransactionalTemplate的命名方式其实都是借鉴了Spring事务模块的实现。
下面来看看TransactionalTemplate所设定的模版流程具体实现:
    public Object execute(TransactionalExecutor business) throws Throwable {
        // 1. 获取当前全局事务的上下文信息
        TransactionInfo txInfo = business.getTransactionInfo();
        ...
        // 1.1 判断当前是否已经存在一个全局事务
        GlobalTransaction tx = GlobalTransactionContext.getCurrent();

        // 1.2 根据不同的全局事务传播行为进行处理
        Propagation propagation = txInfo.getPropagation();
        SuspendedResourcesHolder suspendedResourcesHolder = null;
        try {
            switch (propagation) {
                // 如果当前存在全局事务,则将当前全局事务挂起,然后直接无事务执行,执行完毕后,再恢复先前挂起的全局事务
                case NOT_SUPPORTED:
                    if (existingTransaction(tx)) {
                        suspendedResourcesHolder = tx.suspend(false);
                    }
                    return business.execute();
                // 如果当前存在全局事务,则将当前全局事务挂起,然后自己新创建一个全局事务执行,执行完毕后,再恢复先前挂起的全局事务
                case REQUIRES_NEW:
                    if (existingTransaction(tx)) {
                        suspendedResourcesHolder = tx.suspend(false);
                    }
                    tx = GlobalTransactionContext.createNew();
                    break;
                // 如果当前存在全局事务,则加入当前全局事务,否则无事务执行
                case SUPPORTS:
                    if (notExistingTransaction(tx)) {
                        return business.execute();
                    }
                    break;
                // 如果当前存在全局事务,则加入当前全局事务,否则新创建一个全局事务
                case REQUIRED:
                    tx = GlobalTransactionContext.getCurrentOrCreate();
                    break;
                // 如果当前存在全局事务,则抛出异常,否则无事务执行
                case NEVER:
                    if (existingTransaction(tx)) {
                        throw new TransactionException(
                                String.format("Existing transaction found for transaction marked with propagation 'never', xid = %s"
                                        , tx.getXid()));
                    } else {
                        return business.execute();
                    }
                // 如果当前不存在全局事务,则抛出异常,否则加入当前全局事务
                case MANDATORY:
                    if (notExistingTransaction(tx)) {
                        throw new TransactionException("No existing transaction found for transaction marked with propagation 'mandatory'");
                    }
                    break;
                default:
                    throw new TransactionException("Not Supported Propagation:" + propagation);
            }

            // 1.3 将当前全局锁配置设置到本地线程缓存中,然后返回先前的配置
            GlobalLockConfig previousConfig = replaceGlobalLockConfig(txInfo);

            if (tx.getGlobalTransactionRole() == GlobalTransactionRole.Participant) {
                LOGGER.info("join into a existing global transaction,xid={}", tx.getXid());
            }

            try {
                // 2. 如果当前线程是全局事务的发起者,即TM,则给TC发送一个开启全局事务的请求,否则只是简单回调相关钩子方法
                beginTransaction(txInfo, tx);

                Object rs;
                try {
                    // 3. 执行当前分支事务对应的本地事务
                    rs = business.execute();
                } catch (Throwable ex) {
                    // 4. 分支事务执行发生异常,判断对应异常是否需要回滚,如果需要则回滚当前全局事务
                    completeTransactionAfterThrowing(txInfo, tx, ex);
                    throw ex;
                }

                // 5. 当前分支事务执行正常,发送提交分支事务的请求
                commitTransaction(tx, txInfo);

                return rs;
            } finally {
                // 6. 资源清理和恢复,同时触发钩子回调
                resumeGlobalLockConfig(previousConfig);
                triggerAfterCompletion();
                cleanUp();
            }
        } finally {
            // 7. 如果存在被挂起的全局事务,则进行恢复
            if (suspendedResourcesHolder != null) {
                tx.resume(suspendedResourcesHolder);
            }
        }
    }
Seata将整个全局事务的执行流程划分为了两个阶段:
- 根据传播行为决定是新建,加入还是挂起当前全局事务
- 如果当前分支事务是全局事务首位发起者,那么当前分支事务作为TM,其他后面加入的分支事务作为RM,然后执行自己的本地事务,最后根据执行结果,上报状态。
全局事务的开启
下面我们先来看看全局事务是如何开启的 :
    private void beginTransaction(TransactionInfo txInfo, GlobalTransaction tx) throws TransactionalExecutor.ExecutionException {
        // 前后钩子方法调用
        triggerBeforeBegin();
        // 向TC发送开启全局事务的请求
        tx.begin(txInfo.getTimeOut(), txInfo.getName());
        triggerAfterBegin();
        ...
    }
DefaultGlobalTransaction 负责完成全局事务的开启:
    @Override
    public void begin(int timeout, String name) throws TransactionException {
        this.createTime = System.currentTimeMillis();
        // 如果当前分支事务不是首个发起全局事务的,即是RM,则啥也不干,直接返回
        if (role != GlobalTransactionRole.Launcher) {
            ...
            return;
        }
        // 如果当前分支事务是首个发起全局事务的,即是TM
        assertXIDNull();
        String currentXid = RootContext.getXID();
        if (currentXid != null) {
            throw new IllegalStateException("Global transaction already exists," +
                " can't begin a new global transaction, currentXid = " + currentXid);
        }
        // 向 TC 发送全局事务开启请求
        xid = transactionManager.begin(null, null, name, timeout);
        status = GlobalStatus.Begin;
        // 绑定XID到本地线程空间
        RootContext.bind(xid);
        ...
    }
DefaultTransactionManager 负责帮助TM开启本次全局事务:
    @Override
    public String begin(String applicationId, String transactionServiceGroup, String name, int timeout)
        throws TransactionException {
        // 向 TC 发起全局事务开启请求
        GlobalBeginRequest request = new GlobalBeginRequest();
        request.setTransactionName(name);
        request.setTimeout(timeout);
        // 同步等待TC返回结果
        GlobalBeginResponse response = (GlobalBeginResponse) syncCall(request);
        if (response.getResultCode() == ResultCode.Failed) {
            throw new TmTransactionException(TransactionExceptionCode.BeginFailed, response.getMsg());
        }
        // 从结果中取出本次全局事务ID
        return response.getXid();
    }

    private AbstractTransactionResponse syncCall(AbstractTransactionRequest request) throws TransactionException {
         return (AbstractTransactionResponse) TmNettyRemotingClient.getInstance().sendSyncRequest(request);
         ...
    }
DefaultTransactionManager 最终是通过调用TmNettyRemotingClient的sendSyncRequest方法向TC发出全局事务开启请求的;然后TC做出响应,返回一个新的全局唯一的全局事务ID。
TM 和 RM 执行分支事务
分支事务执行流程总共可以分为以下九步:
- 数据源代理对象注入 ( Seata 自动配置类中完成 )
- 解析SQL,得到SQL的类型 ( UPDTAE ),表名,条件 ( where name = “大忽悠” ) 等相关的信息
- 根据解析得到的条件信息,生成查询语句,定位数据,获得 before-image
- 执行对应的业务代码中的SQL
- 根据before-image的结果,通过主键定位数据,获取after-image
- 把前后镜像数据以及业务SQL相关的信息组成一条回滚日志记录,插入到UNDO_LOG表中
- 提交前,向TC注册当前分支事务
- 业务数据相关的SQL更新和生成UNDO LOG的SQL更新语句作为一个本地事务原子提交
- 将本地事务提交的结果上报给TC
分支事务执行的拦截逻辑就不是体现在 AdapterSpringSeataInterceptor 中了,该拦截器模版方法中只是简单调用业务方法;我们这里需要重新回过头来看一下数据源代理的注入过程。
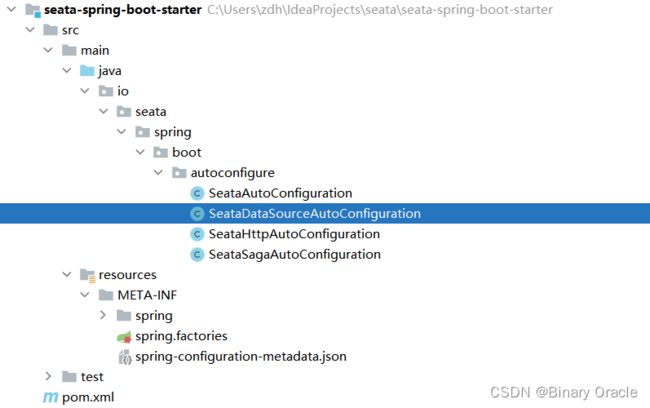
数据源代理注入的过程逻辑存在于SeataDataSourceAutoConfiguration类中,我们一起来看一下:
    @Bean(BEAN_NAME_SEATA_AUTO_DATA_SOURCE_PROXY_CREATOR)
    @ConditionalOnMissingBean(SeataAutoDataSourceProxyCreator.class)
    public static SeataAutoDataSourceProxyCreator seataAutoDataSourceProxyCreator(SeataProperties seataProperties) {
        return new SeataAutoDataSourceProxyCreator(seataProperties.isUseJdkProxy(),
            seataProperties.getExcludesForAutoProxying(), seataProperties.getDataSourceProxyMode());
    }
Seata这里还是老套路,向IOC中注入一个数据源自动代理创建器,只针对类型为DataSource的Bean进行代理,但是不同的一点在于SeataAutoDataSourceProxyCreator提供的切面类型为DefaultIntroductionAdvisor,下面我们先来简单了解一下IntroductionAdvisor的前世今生。
Introduction
Spring中的增强器体系分为两类:
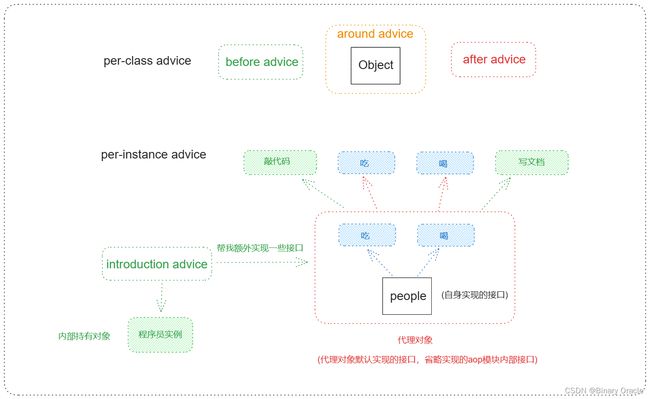
- 一类以 Advice 为首的 per-class 类型,该类型Advice的实例可以在目标对象类的所有实例间共享,该类型拦截器通常只提供方法拦截功能,不会为目标对象类保存任何状态或者添加新的特性。
- 另一类以 Introduction 为首的 per-instance 类型,该类型Advice不会在目标类所有对象实例之间共享,而是会为不同的实例对象保存它们各自的状态以及相关逻辑。

Introduction 类型的 Adivce 在 AspectJ 中被称为 Inter - Type Declaration ,在 JBoss AOP 中称 Mix-in ; Introduction 不是根据横切逻辑在Joinpoint处的执行时机来区分的,而是根据它可以完成的功能而区别于其他Advice类型。
Introduction 不是根据横切逻辑在Joinpoint处的执行时机来区分的,而是根据它可以完成的功能而区别于其他Advice类型。Introduction 可以为原有的对象添加新的特性或者行为 , 这一点在Spring中的含义就是为代理对象额外添加需要实现的接口,这样我们就可以在获得代理对象后,将代理对象转化为其他顶层接口类型进行调用了。
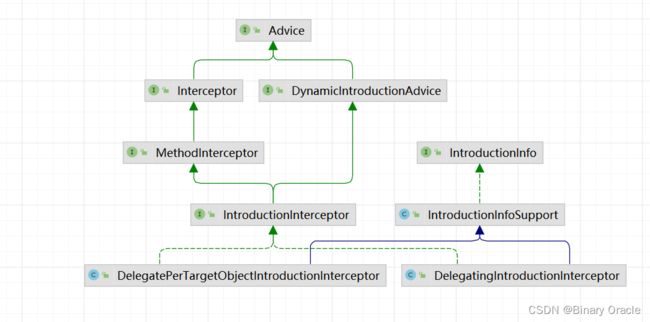
IntroductionInterceptor继承了MethodInterceptor以及DynamicIntroductionAdvice。通过DynamicIntroductionAdvice,我们可以界定当前的IntroductionInterceptor为哪些接口类提供相应的拦截功能:
public interface DynamicIntroductionAdvice extends Advice {
    // 当代理对象方法调用被拦截时,通过调用增强器该方法判断方法所属接口是否是增强器提供的
    // 如果是,则将方法调用请求转发给增强器内部持有的实例对象
	boolean implementsInterface(Class<?> intf);
}
通过MethodInterceptor,IntroductionInterceptor就可以处理新添加的接口上的方法调用了。毕竟,原来的目标对象不会处理自己认为没有的东西啊。另外,通常情况下,对于IntroductionInterceptor来说,如果是新增加的接口上的方法调用,不必去调用MethodInterceptor的proceed()方法。毕竟,当前位置已经是“航程”的终点了(当前被拦截的方法实际上就是整个调用链中要最终执行的唯一方法)。
因为Introduction较之于其他Advice有些特殊,所以,我们有必要从总体上看一下Spring中对Introduction的支持结构 :
Introduction型的Advice有两条分支:
- 以DynamicIntroductionAdvice为 首的动态分支
- 以IntroductionInfo为首的静态可配置分支
从上面DynamicIntroductionAdvice 的定义中可以看出,使用DynamicIntroductionAdvice,我们可以到运行时再去判定当前Introduction 可应用到的目标接口类型,而不用预先就设定。而IntroductionInfo类型则完全相反,其定义如下:
public interface IntroductionInfo {
	Class<?>[] getInterfaces();
}
IntroductionInfo 接口的实现类必须返回预定的目标接口类型,这样,在对IntroductionInfo型的Introduction进行织入的时候,实际上就不需要指定目标接口类型了,因为它自身就带有这些必要的信息。
要对目标对象进行拦截并添加Introduction逻辑,我们可以直接扩展IntroductionInterceptor,然后在子类的invoke方法中实现所有的拦截逻辑。不过,除非特殊状况下需要去直接扩展IntroductionInterceptor,大多数时候,直接使用Spring提供的两个现成的实现类就可以了。
DelegatingIntroductionInterceptor
从名字也可以看的出来,DelegatingIntroductionInterceptor不会自己实现将要添加到目标对象上的新的逻辑行为,而是委派(delegate)给其他实现类。
下面可以简单看看拦截器核心的invoke方法实现:
	@Override
	public Object invoke(MethodInvocation mi) throws Throwable {
	    // 1. 当前被调用的目标方法是否是Introduction增强器提供接口中包含的
		if (isMethodOnIntroducedInterface(mi)) {
		    // 1.1 调用接口实现对象的指定方法,获取返回值
		    Object retVal = AopUtils.invokeJoinpointUsingReflection(this.delegate, mi.getMethod(), mi.getArguments());
		    // 1.2 感觉类似一个trick,如果实现返回的是delegate对象,那么这里会替换为返回目标对象
			if (retVal == this.delegate && mi instanceof ProxyMethodInvocation) {
				Object proxy = ((ProxyMethodInvocation) mi).getProxy();
				// 1.3 再确保当前方法返回值兼容目标对象类型时,该trick才会生效
				if (mi.getMethod().getReturnType().isInstance(proxy)) {
					retVal = proxy;
				}
			}
			return retVal;
		}
        // 2. 当前被调用的方法不是Introduction增强器提供接口中包含的,走正常流程
		return doProceed(mi);
	}
懂了原理后,下面给出一个具体使用案例说明:
public class TestMain {
    public static void main(String[] args) {
        // 1. 准备被代理的目标对象
        People peo = new People() {
            @Override
            public void eat() {
                System.out.println("吃饭");
            }

            @Override
            public void drink() {
                System.out.println("喝水");
            }
        };
        // 2. 准备代理工厂
        ProxyFactory pf = new ProxyFactory();
        // 3. 准备introduction增强器,增强器持有需要额外添加的接口Developer和Developer接口的实现类
        DelegatingIntroductionInterceptor dii=new DelegatingIntroductionInterceptor((Developer) () -> System.out.println("编码"));
        // 4. 添加增强器和代理对象需要继承的接口
        pf.addAdvice(dii);
        pf.addInterface(People.class);
        // 5. 设置被代理对象
        pf.setTarget(peo);
        // 6. 代理对象继承了People接口,Developer接口和Spring AOP内部接口
        peo = (People)pf.getProxy();
        peo.drink();
        peo.eat();
        // 7. 强制转换为Developer接口,实际方法调用会被introduction增强器拦截,调用请求转发给了增强器内部持有的Developer接口实现类
        Developer developer=(Developer) peo;
        developer.code();
    }

    public interface People {
        void eat();
        void drink();
    }

    public interface Developer{
        void code();
    }
}
- spring 是否采用jdk代理大部分时候都取决于我们要代理的目标对象是否存在实现的接口,如果不存在则走cglib代理,否则走jdk动态代理
- 但是,这里introduction增强器会将其额外添加的接口设置到interfaces集合中,所以这里即使目标对象没有实现接口,还是会走jdk动态代理,这就导致了我们得到的代理对象无法转换为目标对象类型
感觉Spring AOP模块这里的判断逻辑应该存在漏洞,算是一个小bug。
虽然,DelegatingIntroductionInterceptor是Introduction型Advice的一个实现,但你可能料想不到的是,它 其实是个“伪军”,因为它的实现根本就没有兑现Introduction作为per-instance型Advice的承诺。
实际上, DelegatingIntroductionInterceptor会使用它所持有的同一个“delegate”接口实例,供同一目标类的所有实例共享使用。你想啊,就持有一个接口实现类的实例对象,它往哪里去放对应各个目标对象实例的状态啊?所以,如果要真的想严格达到Introduction型Advice所宣称的那样的效果,我们不能使用DelegatingIntroductionInterceptor,而是要使用它的兄弟,DelegatePerTargetObjectIntroductionInterceptor。
DelegatePerTargetObjectIntroductionInterceptor
与DelegatingIntroductionInterceptor不同,DelegatePerTargetObjectIntroductionInterceptor会在内部持有一个目标对象与相应Introduction逻辑实现类之间的映射关系。当每个目标对象上的新定义的接口方法被调用的时候,DelegatePerTargetObjectIntroductionInterceptor会拦截这些调用,然后以目标对象实例作为键,到它持有的那个映射关系中取得对应当前目标对象实例的Introduction实现类实例。剩下的当然就是,让当前目标对象实例吃自己家锅里的饭了:
	@Override
	public Object invoke(MethodInvocation mi) throws Throwable {
	    // 1. 当前被调用的目标方法是否是Introduction增强器提供接口中包含的
		if (isMethodOnIntroducedInterface(mi)) {
		    // 1.1 获取增强器内部持有的接口实现对象
			Object delegate = getIntroductionDelegateFor(mi.getThis());
			// 1.2 调用实现对象对应的方法,并获取其返回值
			Object retVal = AopUtils.invokeJoinpointUsingReflection(delegate, mi.getMethod(), mi.getArguments());
			// 1.3 感觉类似一个trick,如果实现返回的是delegate对象,那么这里会替换为返回目标对象
			if (retVal == delegate && mi instanceof ProxyMethodInvocation) {
				retVal = ((ProxyMethodInvocation) mi).getProxy();
			}
			return retVal;
		}
        // 2. 当前被调用的方法不是Introduction增强器提供接口中包含的,走正常流程
		return doProceed(mi);
	}
如果根据当前目标对象实例没有找到对应的Introduction实现类实例,DelegatePerTargetobjectIntroductionInterceptor将会为其创建一个新的,然后添加到映射关系中:
	private Object getIntroductionDelegateFor(@Nullable Object targetObject) {
		synchronized (this.delegateMap) {
			if (this.delegateMap.containsKey(targetObject)) {
				return this.delegateMap.get(targetObject);
			}
			else {
				Object delegate = createNewDelegate();
				this.delegateMap.put(targetObject, delegate);
				return delegate;
			}
		}
	}
使用DelegatePerTargetObjectIntroductionInterceptor与使用DelegatingIntroductionInterceptor没有太大的差别,唯一的区别可能就在于构造方式上。现在我们不是自己构造delegate接口实例,而只需要告知DelegatePerTargetObjectIntroductionInterceptor相应的delegate接 口类型和对应实现类的类型。剩下的工作留给DelegatePerTargetObjectIntroductionInterceptor就可以了,如以下代码所示:
public class TestMain {
    public static void main(String[] args) {
        // 1. 准备被代理的目标对象
        People peo = new People() {
            @Override
            public void eat() {
                System.out.println("吃饭");
            }

            @Override
            public void drink() {
                System.out.println("喝水");
            }
        };
        // 2. 准备代理工厂
        ProxyFactory pf = new ProxyFactory();
        // 3. 准备introduction增强器
        DelegatePerTargetObjectIntroductionInterceptor dii=new DelegatePerTargetObjectIntroductionInterceptor(DeveloperImpl.class,Developer.class);
        // 4. 添加增强器和代理对象需要继承的接口
        pf.addAdvice(dii);
        pf.addInterface(People.class);
        // 5. 设置被代理对象
        pf.setTarget(peo);
        // 6. 代理对象继承了People接口,Developer接口和Spring AOP内部接口
        peo = (People)pf.getProxy();
        peo.drink();
        peo.eat();
        // 7. 强制转换为Developer接口,实际方法调用会被introduction增强器拦截,调用请求转发给了增强器内部持有的Developer接口实现类
        Developer developer=(Developer) peo;
        developer.code();
    }

    public interface People {
        void eat();
        void drink();
    }

    public interface Developer{
        void code();
    }

    public static class DeveloperImpl implements Developer{
        @Override
        public void code() {
            System.out.println("编码");
        }
    }
}
注意点和上面说的一样
Introduction 切面
在Spring中,AOP规范中提到的Aspect切面对应这里的Advisor,切面通常由PointCut和Advice组成,PointCut负责完成目标Bean的过滤,Advice负责承载拦截逻辑的实现;Spring中的Advisor也分为如下两个流派:

IntroductionAdvisor与Pointcutadvisor最本质上的区别就是,IntroductionAdvisor只能应 用于类级别的拦截,只能使用Introduction型的Advice,而不能像PointcutAdvisor那样,可以使用任 何类型的Pointcut,以及差不多任何类型的Advice。也就是说,IntroductionAdvisor纯粹就是为 Introduction而生的。
IntroductionAdvisor的类层次比较简单,只有一个默认实现DefaultIntroductionAdvisor,Seata 中使用到的IntroductionAdvisor就是该类型。
数据源自动代理创建器
在了解完DefaultIntroductionAdvisor后,再来看SeataAutoDataSourceProxyCreator的实现就比较容易了,SeataAutoDataSourceProxyCreator首先重写了getAdvicesAndAdvisorsForBean返回类型为DefaultIntroductionAdvisor的增强器:
public class SeataAutoDataSourceProxyCreator extends AbstractAutoProxyCreator {
    ...
    private final Object[] advisors;

    public SeataAutoDataSourceProxyCreator(boolean useJdkProxy, String[] excludes, String dataSourceProxyMode) {
        ...
        this.advisors = buildAdvisors(dataSourceProxyMode);
    }

    private Object[] buildAdvisors(String dataSourceProxyMode) {
        Advice advice = new SeataAutoDataSourceProxyAdvice(dataSourceProxyMode);
        return new Object[]{new DefaultIntroductionAdvisor(advice)};
    }

    @Override
    protected Object[] getAdvicesAndAdvisorsForBean(Class<?> beanClass, String beanName, TargetSource customTargetSource) {
        return advisors;
    }
    ...
 }
DefaultIntroductionAdvisor只支持类级别过滤,并且其ClassFilter默认返回true,这意味着该切面会切中自动代理创建器过滤下来的所有Bean,并将自身提供的advice放入所有被切中目标对象的代理对象的拦截器链中。
从上面源码可知,数据源自动代理创建器会为其感兴趣的所有Bean进行代理,并往代理对象的拦截器链中添加一个SeataAutoDataSourceProxyAdvice拦截器。
下面我们进入数据源自动代理创建器的WrapIfNecessary方法,看看判断是否代理的逻辑具体是如何实现的:
    @Override
    protected Object wrapIfNecessary(Object bean, String beanName, Object cacheKey) {
        // 1. 只针对类型为DataSource的Bean进行代理
        if (!(bean instanceof DataSource)) {
            return bean;
        }

        // 2. 不对类型为SeataDataSourceProxy的数据源再次进行代理
        if (!(bean instanceof SeataDataSourceProxy)) {
            // 3. 调用抽象自动代理创建器的方法对当前数据源进行代理
            Object enhancer = super.wrapIfNecessary(bean, beanName, cacheKey);
            // 4. 如果当前Bean无需代理,直接返回原本的Bean
            if (bean == enhancer) {
                return bean;
            }
            // 5. 当前数据源对应的代理对象已经添加了SeataAutoDataSourceProxyAdvice
            // 但是真正负责对数据源进行代理的是SeataDataSourceProxy,这一点在SeataAutoDataSourceProxyAdvice的invoke方法中会体现出来
            DataSource origin = (DataSource) bean;
            // 建立好原始数据源和其代理数据源的映射关系
            SeataDataSourceProxy proxy = buildProxy(origin, dataSourceProxyMode);
            DataSourceProxyHolder.put(origin, proxy);
            return enhancer;
        }
        // 3. 如果手动向容器中注入了数据源代理,依旧取出其中原始数据源,进行动态代理,然后返回
        // 这里是为了将自动和手动设置代理数据源的逻辑统一起来,不然可能会产生重复代理的问题
        SeataDataSourceProxy proxy = (SeataDataSourceProxy) bean;
        DataSource origin = proxy.getTargetDataSource();
        Object originEnhancer = super.wrapIfNecessary(origin, beanName, cacheKey);
        if (origin == originEnhancer) {
            return origin;
        }
        DataSourceProxyHolder.put(origin, proxy);
        return bean
    }

    // 根据不同的代理模式创建不同的数据源代理对象
    SeataDataSourceProxy buildProxy(DataSource origin, String proxyMode) {
        if (BranchType.AT.name().equalsIgnoreCase(proxyMode)) {
            return new DataSourceProxy(origin);
        }
        if (BranchType.XA.name().equalsIgnoreCase(proxyMode)) {
            return new DataSourceProxyXA(origin);
        }
        throw new IllegalArgumentException("Unknown dataSourceProxyMode: " + proxyMode);
    }
当代理对象方法执行时,SeataAutoDataSourceProxyAdvice会拦截目标方法执行,并应用数据源代理:
   @Override
    public Object invoke(MethodInvocation invocation) throws Throwable {
        // 1. 检查当前是否存在全局事务,或者是否需要获取全局锁
        if (!inExpectedContext()) {
            return invocation.proceed();
        }

        // 2. 获取当前调用的是数据源的哪个方法
        Method method = invocation.getMethod();
        String name = method.getName();
        Class<?>[] parameterTypes = method.getParameterTypes();

        Method declared;
        try {
            declared = DataSource.class.getDeclaredMethod(name, parameterTypes);
        } catch (NoSuchMethodException e) {
            return invocation.proceed();
        }

        // 3. 取出当前数据源对应的SeataDataSourceProxy,然后调用代理数据源对应的方法
        DataSource origin = (DataSource) invocation.getThis();
        SeataDataSourceProxy proxy = DataSourceProxyHolder.get(origin);
        Object[] args = invocation.getArguments();
        return declared.invoke(proxy, args);
    }
当我们的数据源被代理后,代理数据源方法调用会走AOP拦截逻辑,也就是被SeataAutoDataSourceProxyAdvice的invoke方法拦截;拦截后,会取出对应的SeataDataSourceProxy ,因为SeataDataSourceProxy实现了DataSource接口,所以这里调用目标对象什么方法,就同样调用SeataDataSourceProxy对应的方法。
SeataDataSourceProxy内部持有目标DataSource,其内部还会执行connection,statement等对象的代理逻辑,层层代理,目标是拦截sql语句的执行。
小结
由于篇幅有限,所以本文将分成上下两部分;下部分主要针对数据源代理这块,分支事务提交和回滚三部分进行讲述。
笔者实力有限,对Seata目前了解也不是特别深入,本文也是笔者初次研究Seata源码所记录的研究心得,如果有大佬发现行文错误,欢迎评论区指出。

