xxl-job 原理:
quarts的缺点:
随机负载(for update );不能分片
阻塞处理策略:
分片原理:
for (int i = 0; i < group.getRegistryList().size(); i++) {
                // 同时给多个客户端发送命令
                processTrigger(group, jobInfo, finalFailRetryCount, triggerType, i, group.getRegistryList().size());
            }
在代码中可以通过工具类 获得 当前 是第几个分片 n 执行任务:
取数据需要自己从SQL 中处理,保证同一条数据 不会被不同的执行器取到就可以
在 查询数据的时候,将 n 作为 参数
select * from my_job where mod(id,n) = #{n} 作为当前分片要执行的任务
select  * from   XXL_JOB_QRTZ_TRIGGER_INFO  where mod(sha1(id),3) = 1  ;

select  * from   XXL_JOB_QRTZ_TRIGGER_INFO  where mod(id,3) = 1  ;
原理:
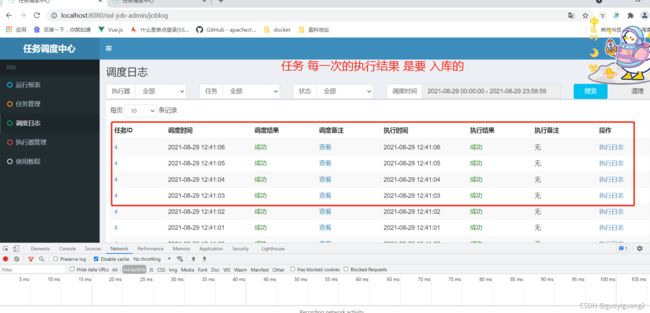
 执行器 怎么 将  线程的运行日志发送给 调度器? 执行器 会将 执行任务日志放到 自己的队列里,有一个线程会消费这个队列,
    并通过 http 请求 传给 调度器,调度器去 更新 日志表。
1.
 调度中心(注册中心): 当一个job 可以执行的时候,调度中心 通过 http 请求 将 任务 传给 某个 worker


  注册:

  HashMap> appAddressMap = new HashMap>();

  key  是 appName ;
  value  是: ip 端口 ;


  while 循环
             ------> JobScheduleHelper : select * from xxl_job_lock where lock_name = 'schedule_lock' for update

			 ------> 系统当前时间 大于  jobInfo.getTriggerNextTime()
			          ------>  触发
                      ------>   更新下一次的触发时间
                                  jobInfo.setTriggerLastTime(jobInfo.getTriggerNextTime());
                                  jobInfo.setTriggerNextTime(nextValidTime.getTime());
                                      UPDATE xxl_job_info
		                                      SET
												trigger_last_time = #{triggerLastTime},
												trigger_next_time = #{triggerNextTime},
												trigger_status = #{triggerStatus}
		                                      WHERE id = #{id}


    while 循环 里的伪代码如下:

         try  {

		 Connection conn = null;
                    Boolean connAutoCommit = null;
                    PreparedStatement preparedStatement = null;

		 // 注册中心(调度中心) 有多台机器,防止多个机器 同时给 一个 执行器发送 http 请求,此处需要加 悲观锁,
		 // 同一时刻只能 有 一个 注册中心,给某一个  worker 发送任务
		 select * from xxl_job_lock where lock_name = 'schedule_lock' for update

		 // 获取 job 集合

		  for (XxlJobInfo jobInfo: scheduleList) {
		       // 触发   ThreadPoolExecutor 线程池 中 去执行任务(向客户端发送请求)------>   分片的话,一个时间 选择一台机器发送请求

			   // 更新 xxl_job_info 中 ,下一次任务的执行时间(long 类型的)

		  }


		 } catch(Exception e){

		 } finally(){
		    {

                        // commit
                        if (conn != null) {
                            try {
							// 释放锁
                                conn.commit();
                            } catch (SQLException e) {
                                if (!scheduleThreadToStop) {
                                    logger.error(e.getMessage(), e);
                                }
                            }
                            try {
                                conn.setAutoCommit(connAutoCommit);
                            } catch (SQLException e) {
                                if (!scheduleThreadToStop) {
                                    logger.error(e.getMessage(), e);
                                }
                            }
                            try {
                                conn.close();
                            } catch (SQLException e) {
                                if (!scheduleThreadToStop) {
                                    logger.error(e.getMessage(), e);
                                }
                            }
                        }

                        // close PreparedStatement
                        if (null != preparedStatement) {
                            try {
                                preparedStatement.close();
                            } catch (SQLException e) {
                                if (!scheduleThreadToStop) {
                                    logger.error(e.getMessage(), e);
                                }
                            }
                        }
                    }
		 }


   调度中心:  通过 http 向 客户端发送 请求后(URI 为  /run)
客户端接收到请求后:
  客户端在收到 服务端的执行任务指令后如何操作的?

    ① 客户端引入了  xxl-job-core 包,这个包在 spring bean注册完之后,会有一个回调函数,
	   将 bean 中 含有 @xxlJob 注解  的Component 和 method 方法 组装成一个 MethodJobHandler 对象
	   同事以 @xxlJob 上的value 为key ,MethodJobHandler 实例 为value 放到一个 ConcurrentHashMap 中

	② 服务端的执行任务指令过来,会根据 服务端传来的 xxlJob 注解上的value 从 ConcurrentHashMap 获取对应的 Handler 对象

	③ 注册并开启一个工作线程,执行任务,并在 jobHandler 方法里 写入执行结果(不是return success ) ,而是调用官方的方法,通过 InhertableTheadLocal
      将执行结果写入到线程私有变量里,并将finally 代码块将执行结果 推到  回调线程里

	④  回调线程 反馈任务运行结果,服务端接受到结果后根据日志id 更新日志 表
客户端在服务启动的时候,将被xxlJob 标记的method 和相关Component 组成对象,并保存到map里,供调用(有点类似策略模式)
// 伪代码如下:
  xxl job  core  项目 在 bean 注册到容器 里后,有一个回调方法(通过实现 SmartInitializingSingleton 接口实现,重写方法)
   回调方法的作用:
     获取 容器中 的bean ,主要是  方法被   @XxlJob 注解标记的  bean,


 // bean  spring 中的bean ,executeMethod 被 xxlJob 标注的方法,
                registJobHandler(name, new MethodJobHandler(bean, executeMethod, initMethod, destroyMethod));

  // name  是  Bean 里 加在方法上的 XxlJob 注解
  public static IJobHandler registJobHandler(String name, IJobHandler jobHandler){
        logger.info(">>>>>>>>>>> xxl-job register jobhandler success, name:{}, jobHandler:{}", name, jobHandler);
        return jobHandlerRepository.put(name, jobHandler);
    }

  map 结构如下:
     private static ConcurrentMap jobHandlerRepository = new ConcurrentHashMap();
反射调用目标方法:
MethodJobHandler extends IJobHandler 中有如下方法:

    @Override
    public void execute() throws Exception {
        Class[] paramTypes = method.getParameterTypes();
        if (paramTypes.length > 0) {
            method.invoke(target, new Object[paramTypes.length]);       // method-param can not be primitive-types
        } else {
		    // 反射调用  被 xxlJob 标注的目标方法
			// method 是目标方法,target 是目标方法所在的bean
            method.invoke(target);
        }
    }
③ 注册并开启 工作线程
 public static JobThread registJobThread(int jobId, IJobHandler handler, String removeOldReason){
        JobThread newJobThread = new JobThread(jobId, handler);
		 // 开启新线程
        newJobThread.start();
        logger.info(">>>>>>>>>>> xxl-job regist JobThread success, jobId:{}, handler:{}", new Object[]{jobId, handler});

		 // 获取上传一次的 旧线程
        JobThread oldJobThread = jobThreadRepository.put(jobId, newJobThread);	// putIfAbsent | oh my god, map's put method return the old value!!!
        if (oldJobThread != null) {
		    // 通过变量 让线程 终止(线程执行完也算是终止)
            oldJobThread.toStop(removeOldReason);
            oldJobThread.interrupt();
        }

        return newJobThread;
    }
工作线程:
public class JobThread extends Thread{
	private static Logger logger = LoggerFactory.getLogger(JobThread.class);

	private int jobId;
	 // 封装了Bean 和目标方法 ,这样反射就可以 调用目标方法
	private IJobHandler handler;
	private LinkedBlockingQueue triggerQueue;
	private Set triggerLogIdSet;		// avoid repeat trigger for the same TRIGGER_LOG_ID

    // 通过一个变量 让一个线程 结束运行,运行完就算线程销毁了(不会旧线程一直 while 循环)
	private volatile boolean toStop = false;
	private String stopReason;

    private boolean running = false;    // if running job
	private int idleTimes = 0;			// idel times


	public JobThread(int jobId, IJobHandler handler) {
		this.jobId = jobId;
		this.handler = handler;
		// 每个线程 都有自己的私有 队列
		this.triggerQueue = new LinkedBlockingQueue();
		this.triggerLogIdSet = Collections.synchronizedSet(new HashSet());
	}
	public IJobHandler getHandler() {
		return handler;
	}

    /**
     * new trigger to queue
     *
     * @param triggerParam
     * @return
     */
	public ReturnT pushTriggerQueue(TriggerParam triggerParam) {
		// avoid repeat
		if (triggerLogIdSet.contains(triggerParam.getLogId())) {
			logger.info(">>>>>>>>>>> repeate trigger job, logId:{}", triggerParam.getLogId());
			return new ReturnT(ReturnT.FAIL_CODE, "repeate trigger job, logId:" + triggerParam.getLogId());
		}

		triggerLogIdSet.add(triggerParam.getLogId());
		triggerQueue.add(triggerParam);
        return ReturnT.SUCCESS;
	}

    /**
     * kill job thread
     *
     * @param stopReason
     */
	public void toStop(String stopReason) {
		/**
		 * Thread.interrupt只支持终止线程的阻塞状态(wait、join、sleep),
		 * 在阻塞出抛出InterruptedException异常,但是并不会终止运行的线程本身;
		 * 所以需要注意,此处彻底销毁本线程,需要通过共享变量方式;
		 */
		this.toStop = true;
		this.stopReason = stopReason;
	}

    /**
     * is running job
     * @return
     */
    public boolean isRunningOrHasQueue() {
        return running || triggerQueue.size()>0;
    }
重点看下执行任务的 run 方法:
// 没有终止就一直运行
	 while(!toStop){


	   try{


			      // log filename, like "logPath/yyyy-MM-dd/9999.log"
					String logFileName = XxlJobFileAppender.makeLogFileName(new Date(triggerParam.getLogDateTime()), triggerParam.getLogId());
					XxlJobContext xxlJobContext = new XxlJobContext(
							triggerParam.getJobId(),
							triggerParam.getExecutorParams(),
							logFileName,
							triggerParam.getBroadcastIndex(),
							triggerParam.getBroadcastTotal());

					// init job context
					//底层:  InheritableThreadLocal contextHolder = new InheritableThreadLocal()
					// 线程私有变量的传递  ; 在自定义的  jobHandler 方法里写的日志 要用官方的日志 组件  ,会将 日志内容写入到日志文件里

					// eg:他获取文件名称的方法  String logFileName = xxlJobContext.getJobLogFileName();
					XxlJobContext.setXxlJobContext(xxlJobContext);

					// execute
					XxlJobHelper.log("
----------- xxl-job job execute start -----------
----------- Param:" + xxlJobContext.getJobParam());


	         // 有过期时间用 FutureTask  (这个可以设置超时时间)
	      if (triggerParam.getExecutorTimeout() > 0) {
						// limit timeout
						Thread futureThread = null;
						try {
							FutureTask futureTask = new FutureTask(new Callable() {
								@Override
								public Boolean call() throws Exception {

									// init job context
									XxlJobContext.setXxlJobContext(xxlJobContext);
                                     // 反射调用 目标方法
									handler.execute();
									return true;
								}
							});
							futureThread = new Thread(futureTask);
							futureThread.start();

							Boolean tempResult = futureTask.get(triggerParam.getExecutorTimeout(), TimeUnit.SECONDS);
						} catch (TimeoutException e) {

							XxlJobHelper.log("
----------- xxl-job job execute timeout");
							XxlJobHelper.log(e);

							// handle result
							XxlJobHelper.handleTimeout("job execute timeout ");
						} finally {
							futureThread.interrupt();
						}
					} else {
					     // 没有过期时间
						// just execute
						//  反射调用 目标方法
						handler.execute();
					}

	   }catch{


	   }finally{

	          if(triggerParam != null) {
                    // callback handler info
                    if (!toStop) {
                        //  往回调线程里 push 消息,通知执行完结果
                        TriggerCallbackThread.pushCallBack(new HandleCallbackParam(
                        		triggerParam.getLogId(),
								triggerParam.getLogDateTime(),
								 // 这个是在哪里设置的值? 在  自己写的任务 xxJobHandler   方法里(底层 调用  InheritableThreadLocal 获取当前线程的私有属性,然后设置成功吗)
								 // 代码如下:
								 //  if (exitValue == 0) {
                                    // default success
									//} else {
									//	XxlJobHelper.handleFail("command exit value("+exitValue+") is failed");
									//}
								XxlJobContext.getXxlJobContext().getHandleCode(),
								XxlJobContext.getXxlJobContext().getHandleMsg() )
						);
                    } else {
                        // is killed
                        TriggerCallbackThread.pushCallBack(new HandleCallbackParam(
                        		triggerParam.getLogId(),
								triggerParam.getLogDateTime(),
								XxlJobContext.HANDLE_COCE_FAIL,
								stopReason + " [job running, killed]" )
						);
                    }
                }

	 }


	 }
④ 回调线程 通过http 请求 反馈工作 线程 执行结果
说明:没有执行完任务后直接回调,而是 放到一个队列里,批量 反馈,减少了网络开销
主要属性和方法:
 LinkedBlockingQueue callBackQueue = new LinkedBlockingQueue()

	 // 添加执行结果
	 public static void pushCallBack(HandleCallbackParam callback){
        getInstance().callBackQueue.add(callback);
        logger.debug(">>>>>>>>>>> xxl-job, push callback request, logId:{}", callback.getLogId());
    }
@Override
public void run() {
// normal callback
while(!toStop){
try {
HandleCallbackParam callback = getInstance().callBackQueue.take();
if (callback != null) {
// callback list param
List callbackParamList = new ArrayList();
int drainToNum = getInstance().callBackQueue.drainTo(callbackParamList);
callbackParamList.add(callback);
// callback, will retry if error
if (callbackParamList!=null && callbackParamList.size()>0) {
// 通过 http 进行回调
doCallback(callbackParamList);
}
}
} catch (Exception e) {
if (!toStop) {
logger.error(e.getMessage(), e);
}
}
}
// last callback
try {
List callbackParamList = new ArrayList();
int drainToNum = getInstance().callBackQueue.drainTo(callbackParamList);
if (callbackParamList!=null && callbackParamList.size()>0) {
doCallback(callbackParamList);
}
} catch (Exception e) {
if (!toStop) {
logger.error(e.getMessage(), e);
}
}
logger.info(">>>>>>>>>>> xxl-job, executor callback thread destory.");
}
});
继续进入:
@Override
public ReturnT callback(List callbackParamList) {
return XxlJobRemotingUtil.postBody(addressUrl+"api/callback", accessToken, timeout, callbackParamList, String.class);
} 1. 注册中心收到 请求后的操作:
api/callback
public ReturnT callback(List callbackParamList) {
        // 线程池
		callbackThreadPool.execute(new Runnable() {
			@Override
			public void run() {
				for (HandleCallbackParam handleCallbackParam: callbackParamList) {
					ReturnT callbackResult = callback(handleCallbackParam);
					logger.debug(">>>>>>>>> JobApiController.callback {}, handleCallbackParam={}, callbackResult={}",
							(callbackResult.getCode()== ReturnT.SUCCESS_CODE?"success":"fail"), handleCallbackParam, callbackResult);
				}
			}
		});

		return ReturnT.SUCCESS;
	}
callBack 方法如下:
private ReturnT callback(HandleCallbackParam handleCallbackParam) {
		// valid log item
		XxlJobLog log = XxlJobAdminConfig.getAdminConfig().getXxlJobLogDao().load(handleCallbackParam.getLogId());
		if (log == null) {
			return new ReturnT(ReturnT.FAIL_CODE, "log item not found.");
		}
		if (log.getHandleCode() > 0) {
			return new ReturnT(ReturnT.FAIL_CODE, "log repeate callback.");     // avoid repeat callback, trigger child job etc
		}

		// handle msg
		StringBuffer handleMsg = new StringBuffer();
		if (log.getHandleMsg()!=null) {
			handleMsg.append(log.getHandleMsg()).append("
");
		}
		if (handleCallbackParam.getHandleMsg() != null) {
			handleMsg.append(handleCallbackParam.getHandleMsg());
		}

		// success, update	log  ;(说明:insert log 是 在服务端向客户端发送请求的时候插入的)
		log.setHandleTime(new Date());
		log.setHandleCode(handleCallbackParam.getHandleCode());
		log.setHandleMsg(handleMsg.toString());
		XxlJobCompleter.updateHandleInfoAndFinish(log);

		return ReturnT.SUCCESS;
	}
调度日志的显示:
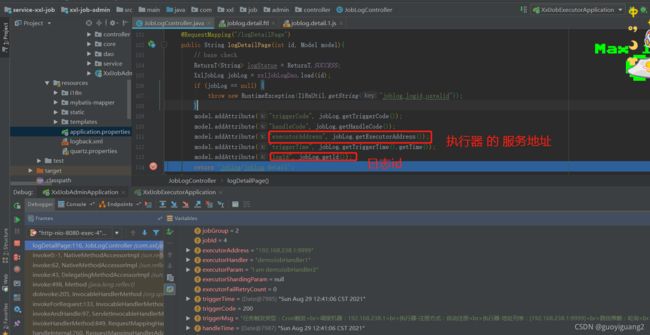
点击 页面 执行日志,执行了两部操作:
首先从 调度器获取 日志id(日志文件的文件名 日志id.log ),日志所在执行器服务器信息 ② 通过页面 ajax 请求 访问执行器 日志文件(配置文件里配置的路径)
代码如下:
① 页面 获取日志id,执行器服务器信息 如下:
说明:
文件名称 和 日志id 有关:(每次执行完一个任务,就生成一个文件,而不是 所有日志文件堆积在一起 )
log filename: logPath/yyyy-MM-dd/9999.log
② 读取日志文件(说明:如果 调度中心和 执行器不在一台服务器上,得修改源码,将本地读取日志文件改为 远程读取日志文件)
@RequestMapping("/logDetailCat")
	@ResponseBody
	public ReturnT logDetailCat(String executorAddress, long triggerTime, int logId, int fromLineNum){
		try {
			ExecutorBiz executorBiz = XxlJobDynamicScheduler.getExecutorBiz(executorAddress);
           // 读取日志文件的内容
			ReturnT logResult = executorBiz.log(triggerTime, logId, fromLineNum);

			// is end
            if (logResult.getContent()!=null && logResult.getContent().getFromLineNum() > logResult.getContent().getToLineNum()) {
                XxlJobLog jobLog = xxlJobLogDao.load(logId);
                if (jobLog.getHandleCode() > 0) {
                    logResult.getContent().setEnd(true);
                }
            }

			return logResult;
		} catch (Exception e) {
			logger.error(e.getMessage(), e);
			return new ReturnT(ReturnT.FAIL_CODE, e.getMessage());
		}
	}
读取方法:
    @Override
    public ReturnT log(long logDateTim, int logId, int fromLineNum) {
        //获取日志名称,说明  9999 是 日志id
        // log filename: logPath/yy yy-MM-dd/9999.log
        String logFileName = XxlJobFileAppender.makeLogFileName(new Date(logDateTim), logId);

       // 读取日志
        LogResult logResult = XxlJobFileAppender.readLog(logFileName, fromLineNum);
        return new ReturnT(logResult);
    }
如何获取日志文件名称?
	public static String makeLogFileName(Date triggerDate, int logId) {

		// filePath/yyyy-MM-dd
		SimpleDateFormat sdf = new SimpleDateFormat("yyyy-MM-dd");	// avoid concurrent problem, can not be static
		File logFilePath = new File(getLogPath(), sdf.format(triggerDate));
		if (!logFilePath.exists()) {
			logFilePath.mkdir();
		}

		// filePath/yyyy-MM-dd/9999.log
		String logFileName = logFilePath.getPath()
				.concat(File.separator)
                // 拼接  logId 为日志名称
				.concat(String.valueOf(logId))
                //  日志后缀
				.concat(".log");
		return logFileName;
	}
读取日志的方法:
	public static LogResult readLog(String logFileName, int fromLineNum){

		// valid log file
		if (logFileName==null || logFileName.trim().length()==0) {
            return new LogResult(fromLineNum, 0, "readLog fail, logFile not found", true);
		}
        // 创建文件对象
		File logFile = new File(logFileName);

		if (!logFile.exists()) {
            return new LogResult(fromLineNum, 0, "readLog fail, logFile not exists", true);
		}

		// read file
		StringBuffer logContentBuffer = new StringBuffer();
		int toLineNum = 0;
		LineNumberReader reader = null;
		try {
			//reader = new LineNumberReader(new FileReader(logFile));
			reader = new LineNumberReader(new InputStreamReader(new FileInputStream(logFile), "utf-8"));
			String line = null;

			while ((line = reader.readLine())!=null) {
				toLineNum = reader.getLineNumber();		// [from, to], start as 1
				if (toLineNum >= fromLineNum) {
                    // 读完一行就换行
					logContentBuffer.append(line).append("\n");
				}
			}
		} catch (IOException e) {
			logger.error(e.getMessage(), e);
		} finally {
			if (reader != null) {
				try {
					reader.close();
				} catch (IOException e) {
					logger.error(e.getMessage(), e);
				}
			}
		}

		// 返回结果集
		LogResult logResult = new LogResult(fromLineNum, toLineNum, logContentBuffer.toString(), false);
		return logResult;

	}


