现有管理系统方案
我认为,Angular还在维护的中台前端框架,大多属于冷门型。热门的管理系统方案,我一直都是推荐Ant Design Pro的,毕竟一直在持续地维护更新。
我在做管理系统的时候,由于好奇Angular,索性就学习了Angular,因为之前都是用React写的,想换换框架体验体验,同时也想用Material设计风格,就来到了本文主题。
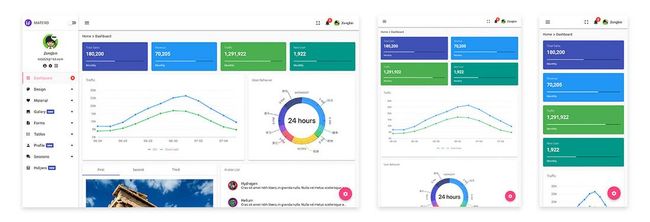
ngx-admin,GitHub达到了24.7k star,但是最近已经不怎么更新了,最高支持Angular 14。ng-admin,Github有4k star,可以说不在本讨论的范围内,这个angular1的老牌管理系统ng-zerro,为ant-design for angular,由社区进行维护,Github的star数量为8.6k,大公司也在使用,支持最新Angular 16。为UI组件库,但antd提供了布局组件,方便快速搭建面板,也仅是如此。blur-admin,也是angular 1的老牌管理系统方案,属于ngx-admin的前身。primeng,支持最新的Angular 16,GitHub上的star数量为8.4k,但是这个为UI组件库,现成的模板在Template中寻找。coreui-free-angular-admin-template,GitHub上的star数量为1.6k,支持最新的angular 16。特点
基于Angular Material 搭建的中后台管理框架。,同时还有作者编写的@ng-matero/extensions组件库,也是采用Material设计风格,可以解决更多业务场景需要的组件。
这里列举一些业务场景
- 登录认证
- 权限管理 (
ngx-permissions) - 国际化
- 主题系统
- HTTP拦截器
- RTL支持。
- 深色模式
做一个简单文章管理效果
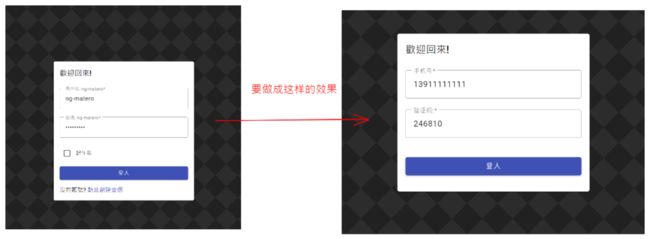
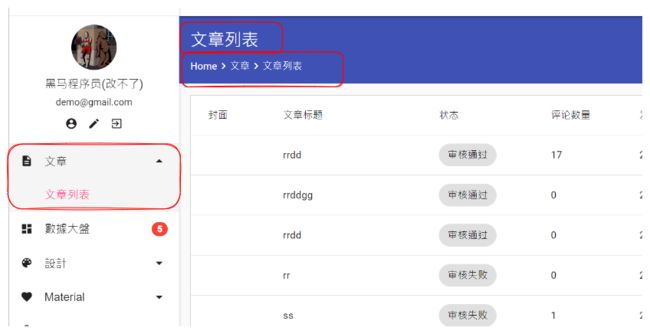
现在,我们要做一个demo,由于是快速上手,篇幅不会太大,效果如下。
就把个人信息、文章列表、删除文章、登录、处理jwt给做了,然后说明一下Angular官方的项目组织,及ng-matero简单国际化,更详细的教学后面大家一起学习哈。
前置要求
- 拥有
Node.js运行时环境,并安装Angular脚手架工具 - 学习过前端框架,并知道声明式开发范式
接下来的教学,我会尽量写的是,门槛到没有接触Angular框架的同学进行学习。
开始
先放上官方的文档地址,简介 - NG-MATERO (gitbook.io)。
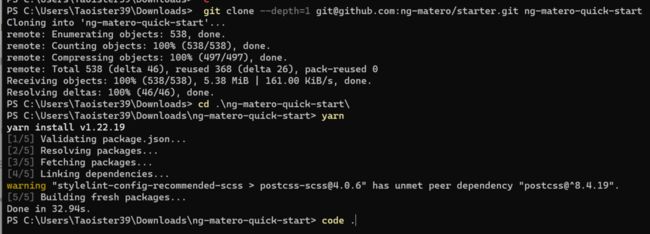
官方给出了2种方式进行使用,一种是创建一个Angular项目,然后使用ng add形式快速配置Angular安装。但这种方式得要Angular安装版本与作者提供的版本支持!这里我就直接用另一种方式,克隆 Starter 仓库。
官方的教程写的很详细了,这里安装不做演示,就用图片掩盖过去了
项目结构作者是采用的Angular官方推荐的方式进行组织,Angular - 工作区和项目文件结构。简要的说明一下重要的地方。
app根模块,启动由Angular开发的Web应用程序。app/core核心模块,一般是只用一次,只有根模块导入的服务集app/routes路由模块,对应页面的组件,及子路由的模块。app/share共享模块,一般存放重复使用的业务组件集environments,存放环境变量的值,具体类似于env文件,比如开发环境与生产环境的取值。
本教学大概会花费20-30分钟的时间学习
选用API
这里就选用黑马程序员 - 极客园接口,接口文档。
首先看到环境变量的地方,就索性把api接口写进去。后面接下来就是将环境变量的值,进行依赖注入。(生产环境中,会把这里导出的对象,替换成environment.prod.ts文件中的对象)
// src\environments\environment.ts
export const environment = {
  production: false,
  baseUrl: '',
  useHash: false,
  geekPcApi: 'http://toutiao.itheima.net/v1_0',
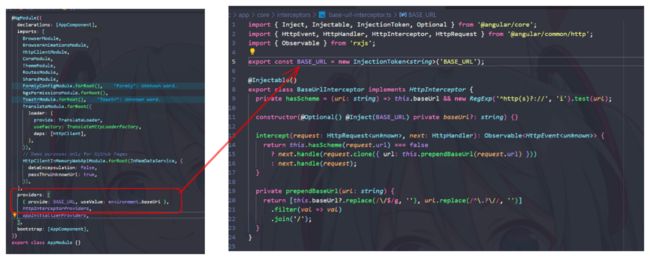
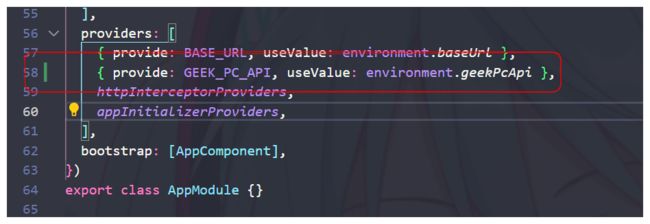
};打开根模块(src\app\app.module.ts)可以看到,baseUrl就是在这里进行Provider的,进行可以发现InjectionToken是写在核心模块的拦截器里面。
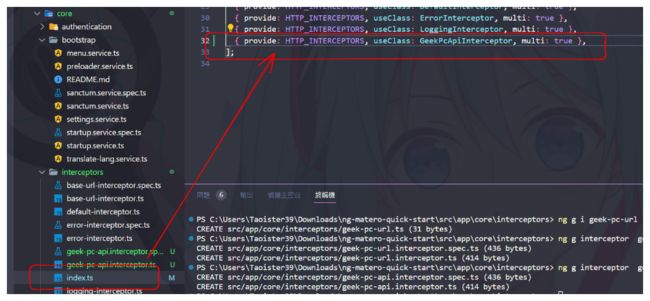
那就对应创建一个拦截器,也创建一个InjectionToken,把geek博客园api进行依赖注入。终端进入src\app\core\interceptors,然后使用Angular脚手架。
ng g interceptor geek-pc-api然后改写一下
// src\app\core\interceptors\geek-pc-api.interceptor.ts
import { Injectable, InjectionToken } from '@angular/core';
import { HttpRequest, HttpHandler, HttpEvent, HttpInterceptor } from '@angular/common/http';
import { Observable } from 'rxjs';

export const GEEK_PC_API = new InjectionToken('geek-pc-api'); // 后面作为提供商(Provider)

@Injectable()
export class GeekPcApiInterceptor implements HttpInterceptor {
  constructor() {}

  intercept(request: HttpRequest, next: HttpHandler): Observable> {
    return next.handle(request);
  }
} 统一一下拦截器的导出,记得在src\app\core\interceptors\index.ts中,做类似的配置。
接下来就是根模块中创建依赖
现在可以进行依赖注入了,通过在构造函数中,变量前面写上@Inject(GEEK_PC_API)即可
登录服务
从src\app\routes\sessions\login\login.component.ts组件文件中可以看出,登录的接口请求部分在AuthService和LoginService,顺其自然修改一下LoginService。
登录接口文档写的很详细了,这里不再描述接口数据部分
// src\app\core\authentication\login.service.ts
import { Inject, Injectable } from '@angular/core';
import { HttpClient, HttpHeaders } from '@angular/common/http';
import { GeekUser, Token, User } from './interface';
import { Menu } from '@core';
import { map } from 'rxjs/operators';
import { GEEK_PC_API } from '@core/interceptors/geek-pc-api.interceptor';
import { of } from 'rxjs';
import { IResponse } from 'app/geek/interface/response';

@Injectable({
  providedIn: 'root',
})
export class LoginService {
  constructor(protected http: HttpClient, @Inject(GEEK_PC_API) private geekPcApi: string) {}
  // 不转换数据的话,重命名interface.ts的access_token为token也行,但是TokenService记得也要改,这里索性直接转换了。
  login(mobile: string, code: string) {
    return this.http
      .post & { token: string }>>(
        `${this.geekPcApi}/authorizations`,
        {
          mobile,
          code,
        }
      )
      .pipe(
        map(res => res.data),
        map((token): Token => ({ access_token: token.token, refresh_token: token.refresh_token }))
      );
  }
  // 实际开发中,这个需要更改
  refresh(params: Record) {
    return this.http.post('/auth/refresh', params);
  }
  // 这里退出操作不需要调用后端api,索性直接返回观察者对象就好了
  logout() {
    return of(true);
  }
  // 实际开发应该统一User,这里是为了方便展示,所以索性新定义GeekUser,然后二次转换为User
  me() {
    return this.http.get>(`${this.geekPcApi}/user`).pipe(
      map(res => res.data),
      map(
        (geek): User => ({
          id: geek.id,
          avatar: geek.photo,
          email: '[email protected]',
          name: geek.name,
        })
      )
    );
  }
  // 实际开发中,不同权限应当对应不同目录,本api其实就一个角色,所以不用改
  menu() {
    return this.http.get<{ menu: Menu[] }>('/me/menu').pipe(map(res => res.menu));
  }
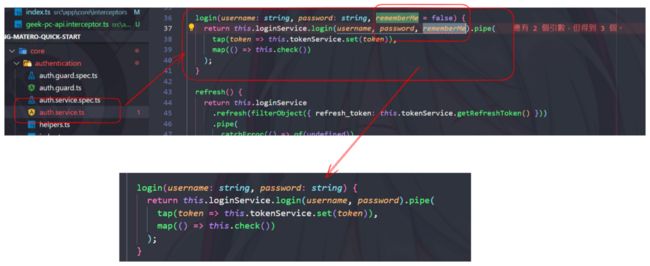
} 原来的rememberMe相关字段就都可以删掉,这里不需要了。
在src\app\core\authentication\auth.service.ts和src\app\routes\sessions\login\login.component.ts注意函数参数,否则构建不通过。(TypeScript语言特性)
然后要在接口的地方,创建一个geek博客园的用户类型
// src\app\core\authentication\interface.ts
export interface GeekUser {
  id: string; //    必须        用户id
  name: string; //    必须        用户名
  photo: string; //    必须        用户头像
  is_media: string; //必须        是否是自媒体,0-否,1-是
  intro: string; //必须        简介
  certi: string; //必须        自媒体认证说明
  art_count: string; //必须        发布文章数
  follow_count: string; //必须        关注的数目
  fans_count: string; //必须        fans_count
  like_count: string; //必须        被点赞数
}
...最后还缺少IResponse类型,这里需要创建一个特性模块,用来处理与geek博客园相关的业务操作,终端进入src/app目录下。
ng g m geek这样就创建了一个geek目录,然后还有一个Angular模块。创建一个interface目录,然后再创建一个api接口格式类型,命名为response.ts文件。
// src\app\geek\interface\response.ts
export interface IResponse {
  data: T;
  message: string;
}
登录界面
修改了登录服务之后,接着就是来看登录组件部分了
先来修改一下模板,要去掉原来的记住我字段,然后将用户名、密码改成手机、验证码。
// src\app\routes\sessions\login\login.component.html
{{ 'login_title' | translate }}!
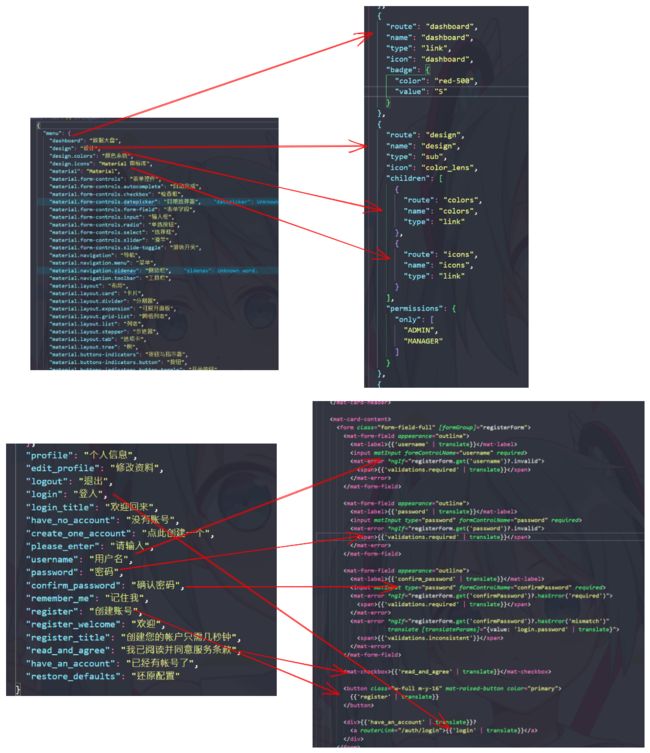
{{ 'login' | translate }}这种是使用了管道,也就是对应国际化业务。那么这里就先,全部写成中文了,原来的地方不动。
然后回到组件文件,对应的数据进行设置。
// src\app\routes\sessions\login\login.component.ts
import { Component } from '@angular/core';
import { FormBuilder, Validators } from '@angular/forms';
import { Router } from '@angular/router';
import { HttpErrorResponse } from '@angular/common/http';
import { filter } from 'rxjs/operators';
import { AuthService } from '@core/authentication';

@Component({
  selector: 'app-login',
  templateUrl: './login.component.html',
  styleUrls: ['./login.component.scss'],
})
export class LoginComponent {
  isSubmitting = false;

  loginForm = this.fb.nonNullable.group({
    mobile: ['13911111111', [Validators.required, Validators.pattern(/^[\d]{11}$/)]],
    code: ['246810', [Validators.required, Validators.pattern(/^[\d]{6}$/)]],
  });

  constructor(private fb: FormBuilder, private router: Router, private auth: AuthService) {}

  get mobile() {
    return this.loginForm.get('mobile')!;
  }

  get code() {
    return this.loginForm.get('code')!;
  }

  login() {
    this.isSubmitting = true;

    this.auth
      .login(this.mobile.value, this.code.value)
      .pipe(filter(authenticated => authenticated))
      // 这里必须要有箭头函数,否则this代表的对象不同
      .subscribe({
        complete: () => {
          this.router.navigateByUrl('/');
        },
        error: (errorRes: HttpErrorResponse) => {
          this.isSubmitting = false;
        },
      });
  }
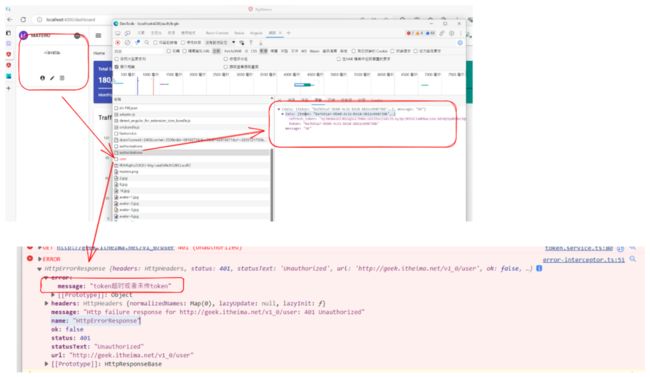
}点击登录,前端拿到了token,进入面板后又退回了登录页,提示没有未传token(请求时请求头携带)。
打开网络工具,其实是可以看到请求头没有Authorization字段,来看看请求携带token是在哪里处理的?
在app/core核心模块中,有我们最开始#选用API做的拦截器,这里顾名思义就是针对前端的网络请求,做类似Axios的请求、响应、错误前后处理函数的功能。
找到TokenService,这里就是请求时要不要携带token的地方,进行改写。
// src\app\core\interceptors\token-interceptor.ts
import { Inject, Injectable, Optional, inject } from '@angular/core';
import {
  HttpErrorResponse,
  HttpEvent,
  HttpHandler,
  HttpInterceptor,
  HttpRequest,
} from '@angular/common/http';
import { Router } from '@angular/router';
import { Observable, throwError } from 'rxjs';
import { catchError, tap } from 'rxjs/operators';
import { TokenService } from '@core/authentication';
import { BASE_URL } from './base-url-interceptor';
import { GEEK_PC_API } from '@core/interceptors/geek-pc-api.interceptor';

@Injectable()
export class TokenInterceptor implements HttpInterceptor {
  ...
  constructor(
    private tokenService: TokenService,
    private router: Router,
    @Optional() @Inject(GEEK_PC_API) private geekPcApi: string,
    @Optional() @Inject(BASE_URL) private baseUrl?: string
  ) {}
  ...
  private shouldAppendToken(url: string) {
    return !this.hasHttpScheme(url) || this.includeBaseUrl(url) || this.includeGeekPcApi(url);
  }
  ...
  private includeGeekPcApi(url: string) {
    if (!this.geekPcApi) {
      return false;
    }

    const geek = this.geekPcApi.replace(/\/$/, '');

    return new RegExp(`^${geek}`, 'i').test(url);
  }
}然后再点击登录,这一回页面上,显示了一个Unkown Error,打开浏览器开发工具,发现多了一个跨域问题。
这里的大白话意思是,请求允许Cookie时,响应头必须有Access-Control-Allow-Credentials为true字段信息,否则触发了跨域(CORS)。
因为请求携带Token是在拦截器里,那么回来再看看TokenInterceptor。
原来请求携带Token的时候,同时也允许Cookie了
这里不用覆盖了,万一后续后端接口又多了一个呢?也许老接口必须要用Cookie,为了不必要麻烦,就把最开始写的GeekPcApiInterceptor完善吧。
// src\app\core\interceptors\geek-pc-api.interceptor.ts
import { Inject, Injectable, InjectionToken, Optional } from '@angular/core';
import { HttpRequest, HttpHandler, HttpEvent, HttpInterceptor } from '@angular/common/http';
import { Observable, tap } from 'rxjs';
import { IResponse } from 'app/geek/interface/response';

export const GEEK_PC_API = new InjectionToken('geek-pc-api'); // 后面作为提供商(Provider)

@Injectable()
export class GeekPcApiInterceptor implements HttpInterceptor {
  // provider从app模块
  constructor(@Optional() @Inject(GEEK_PC_API) private geekPcApi?: string) {}
  // http请求是否是当前的api
  hasScheme = (url: string) => this.geekPcApi && new RegExp(this.geekPcApi, 'i').test(url);

  intercept(request: HttpRequest, next: HttpHandler): Observable> {
    if (this.hasScheme(request.url)) {
      this.beforeRequestEach(request);

      return next // 复制请求并设置 withCredentials 为 false
        .handle(request.clone({ withCredentials: false }))
        .pipe(tap({ next: this.afterRequestEach }));
    }

    return next.handle(request);
  }
  // 请求前的钩子函数
  beforeRequestEach = (request: HttpRequest) => {
    console.log('request is : ', request);
  };
  // 请求后的钩子函数,简化版,详细可以做成Axios那样
  afterRequestEach = (response: HttpEvent>) => {
    console.log('response is : ', response);

    return response;
  };
}
现在可以正常的进去,并能看到个人信息了。
文章服务
在app/geek目录下创建services目录,然后终端进入创建文章服务。
ng g s article就做获取列表和删除文章,其他的业务场景,各位同学可以根据接口文档完成哈。
// src\app\geek\service\article.service.ts
import { HttpClient } from '@angular/common/http';
import { Inject, Injectable } from '@angular/core';
import { GEEK_PC_API } from '@core/interceptors/geek-pc-api.interceptor';
import { IResponse } from 'app/geek/interface/response';
import { ArticleList } from 'app/geek/interface/article';

@Injectable({
  providedIn: 'root',
})
export class ArticleService {
  constructor(@Inject(GEEK_PC_API) private geekPcAPi: string, private httpClient: HttpClient) {}
  /**
   * 获取文章列表
   */
  findMany(page: number, perPage: number) {
    return this.httpClient.get>(`${this.geekPcAPi}/mp/articles`, {
      params: {
        per_page: perPage,
        page,
      },
    });
  }
  /**
   * 删除文章
   */
  delete(id: string) {
    return this.httpClient.delete(`${this.geekPcAPi}/mp/articles/${id}`);
  }
}
// src\app\geek\interface\article.ts
export interface ArticleList {
page: number;
per_page: number;
results: Article[];
total_count: number;
}
export interface Article {
id: string;
title: string;
status: string;
comment_count: string;
pubdate: string;
cover: {
type: string;
images: string;
};
like_count: number;
read_count: string;
}
这里是直接在根模块提供的,也可以让geek特性模块来提供,不过这样就必须,导入模块、导出服务。
文章列表
要创建一个新的路由,这里使用作者提供的新增路由工具。
ng g ng-matero:module article 然后是创建页面组件了
ng g ng-matero:page list -m=article这要修改src\assets\data\menu.json文件,因为现在的接口请求,是通过这个文件,来表示菜单功能的。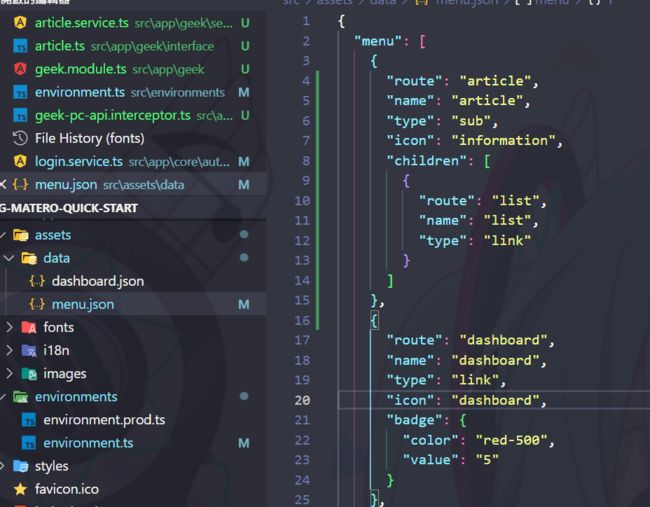
{
  "menu": [
    {
      "route": "article",
      "name": "article",
      "type": "sub",
      "icon": "description",
      "children": [
        {
          "route": "list",
          "name": "list",
          "type": "link"
        }
      ]
    },
    ...
  ]
}
这里菜单需要配置语言,最后一小节我们再来做。
可以看到页面出来了
然后改动组件吧,这里我要用到Angular Material 组件库和作者提供的Angular Material Extensions library。
// src\app\routes\article\list\list.component.html


  审核失败
  待审核
  审核通过
let-属于模板微语法,用来获取循环时的变量。具体可以看一下这篇文章,【Angular学习】关于模板输入变量(let-变量)的理解 - 掘金 (juejin.cn)。为什么数据表格要
[pageOnFront]="false"呢?作者源码的大白话意思是,为true代表data指定的数据大小,决定表格的数据总数量。false就可以使用length来同步后端的数据总数量。
// src\app\routes\article\list\list.component.ts
import { Component, OnInit } from '@angular/core';
import { PageEvent } from '@angular/material/paginator';
import { MatSnackBar } from '@angular/material/snack-bar';
import { MtxGridColumn } from '@ng-matero/extensions/grid';
import { Article, ArticleList } from 'app/geek/interface/article';
import { ArticleService } from 'app/geek/service/article.service';

@Component({
  selector: 'app-article-list',
  templateUrl: './list.component.html',
  styleUrls: ['./list.component.scss'],
})
export class ArticleListComponent implements OnInit {
  constructor(private articleService: ArticleService, private snack: MatSnackBar) {}

  ngOnInit() {
    this.getPage();
  }
  /**
   * 删除文章
   * @param id
   */
  deleteArticle(id: string) {
    this.articleService.delete(id).subscribe(() => {
      this.snack.open('删除成功', '确认', {
        duration: 2000,
      });
      this.getPage();
    });
  }
  /**
   * 调用页面请求数据
   */
  getPage() {
    this.articleService.findMany(this.page + 1, this.perPage).subscribe(list => {
      this.listData = list.data.results;
      this.listTotal = list.data.total_count;
    });
  }
  /**
   * 页面切换,当下一页,或者是改变每页数量
   * @param p
   */
  changePage(p: PageEvent) {
    this.page = p.pageIndex;
    this.perPage = p.pageSize;
    this.getPage();
  }

  page = 0;
  perPage = 10;
  listData: Article[] = [];
  listTotal = 0;
  listColumns: MtxGridColumn[] = [
    { header: '封面', field: 'cover', width: '120px' },
    { header: '文章标题', field: 'title', width: '220px' },
    { header: '状态', field: 'status' },
    { header: '评论数量', field: 'comment_count' },
    { header: '发布时间', field: 'pubdate' },
    { header: '阅读数量', field: 'read_count' },
    { header: '点赞数量', field: 'like_count' },
    {
      header: '操作',
      field: 'tool',
      type: 'button',
      buttons: [
        {
          type: 'icon',
          text: 'edit',
          icon: 'edit',
          tooltip: '编辑',
          click: () => alert('没有实现哦'),
        },
        {
          type: 'icon',
          text: 'delete',
          icon: 'delete',
          tooltip: '删除',
          color: 'warn',
          pop: {
            title: '确认要删除吗?',
          },
          click: (rowData: Article) => this.deleteArticle(rowData.id),
        },
      ],
    },
  ];
}
到此,我们最初目的就差不多了,就差最后的语言设定了。
配置语言
所有的语言配置都在src\assets\i18n下面,打开中文的zh-CN.json文件,看看有什么关联。
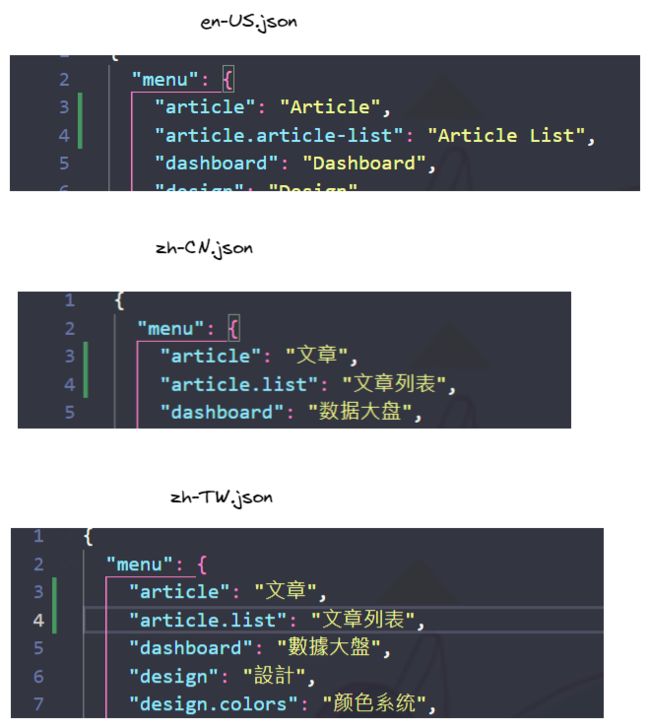
可以看到,菜单文字的话,是在menu.xx形式下。然后如果组件模板文件中使用国际化的话,就是使用translate管道运算符,对应语言json文件的键值对。
那就改一下对应语言的文件
这样就成功了
这里就把菜单部分给弄了哈,由于本教学属于快速上手,篇幅尽量还是得小一些,其他的部分可以大家额外花时间去弄。
现在就和#做一个简单文章管理效果的效果图片一致啦。
最后
Angular还是挺有趣的,提供的官方方案特别的齐全,像路由、服务器渲染、网络请求、表单校验、PWA等等,特别是依赖注入写起来就像 后端人员写前端 这样一种感觉。
但是这几年Angular的兴趣度前几年在下滑,State of JavaScript 2022: Front-end Frameworks (stateofjs.com)的调查问卷当中,去年开始有所提升了。我个人对这个框架挺感兴趣的,特别是设计风格,比如模块、服务、组件、守卫、拦截、管道概念等等,可以说是我React、Vue用久了,一个有个性的前端框架吧。
需要代码的同学,我上传了gitee上了,有需要可以克隆学习哦。
ng-matero-quick-start · 乾坤道長/share-blog-code - 码云 - 开源中国 (gitee.com)
