SpringBoot学习笔记一
一、SpringBoot简介
1. SpringBoot是什么
-
SpringBoot是由Pivotal团队提供的全新框架,其设计目的是用来简化Spring应用的初始搭建以及开发过程。
-
SpringBoot是和Spring框架紧密结合用于提升Spring开发者体验的工具。
2. 为什么使用SpringBoot
-
Spring Boot makes it easy to create stand-alone, production-grade Spring based Applications that you can “just run”.
Spring Boot可以轻松创建出独立的, 生产级别的基于能够“直接运行”的Spring应用程序。
-
We take an opinionated view of the Spring platform and third-party libraries so you can get started with minimum fuss. Most Spring Boot applications need minimal Spring configuration.
我们对Spring平台和第三方库有自己的观点,因此你可以轻松入门。大多数Spring Boot应用程序只需要最少的Spring配置。
3. SpringBoot能做什么
- 基于Spring:SpringBoot继承了原有Spring框架的优秀基因,使Spring在使用中更加方便快捷。帮助开发者快速搭建Spring框架。
- 简化编码:创建一个web项目,在SpringBoot中只需在pom文件中添加一个starter-web依赖即可。这个starter-web已经包含了多个依赖,大大简化了编码,无需一个个导入依赖。
- 简化配置:SpringBoot更多采用 Java Config的方式对Spring进行配置。同时部署配置方面,只需要一个application.yml即可。
- 简化部署:SpringBoot内嵌tomcat、netty等服务器,只需要将项目打成jar包,使用
java -jar xxx.jar一键式启动项目,不需要在服务器上再去部署tomcat。 - 简化监控:可引入
spring-boot-start-actuator依赖,直接使用REST方式来获取进程的运行期性能参数,从而达到监控的目的。比较方便。
4. SpringBoot的优点
-
Create stand-alone Spring applications
创建独立的Spring应用。
-
Embed Tomcat, Jetty or Undertow directly (no need to deploy WAR files)
直接内嵌Tomcat, Jetty或Undertow (无需部署WAR文件) 。
-
Provide opinionated ‘starter’ dependencies to simplify your build configuration
提供自动starter依赖以简化构建配置。
-
Automatically configure Spring and 3rd party libraries whenever possible
尽可能的自动配置Spring以及第三方库功能。
-
Provide production-ready features such as metrics, health checks, and externalized configuration
提供生产级别功能,如监控、健康检查及外部化配置。
-
Absolutely no code generation and no requirement for XML configuration
绝对无代码生成,同时无需编写xml配置文件。
总结:
SpringBoot是整合Spring技术栈的一站式框架。
SpringBoot是简化Spring技术栈的快速开发脚手架。
5. SpringBoot与Spring的关系
1> Spring Framework
- Spring通常指的是Spring Framework。通常 Java开发就是面向对象开发、面向抽象接口开发。而软件项目大多都是“堆积木”,随着版本迭代会越来越大,这造成了个很大的问题就是对象的管理。刚好Spring的控制反转,依赖注入,切面编程的特性对这些类生命周期的管理,组件模块化,基础层和业务分离解耦提供了很大的便利。就像粘合剂一样把各种功能的库“粘”到一起,让它们协同工作。

2> Spring Boot
- Spring Framework 经过数年的迭代已经丧失了轻量级的标签。在享受 Spring Framework 带来的便利的同时,我们又进入了另一个噩梦:大量的 XML 配置。Spring 使用者不单单要写业务代码,还要通过编写对应的 XML 配置,引入其它组件或者功能类库也要进行繁琐的适配,这偏离了 Spring Framework 最初设计的初衷。所以 Spring Boot 被设计出来。
- Spring Boot 将 Spring Framework 的功能进行了扩展,将繁琐的配置功能进行了内部整合,通过一些自动化的配置和类似 SPI 的发现机制来自动感知功能组件,大大降低了使用成本,而且保证了和Spring Framework 的一致性。
3> Spring与SpringBoot之间的关系
Spring Framework 和 Spring Boot 的根本是一致的。Spring Boot 是 Spring Framework 的引导程序以简化其配置和使用。而Spring Framework 是 Spring Boot 的基础,Spring Boot 无法脱离 Spring Framework 。用户通过上层 Spring Boot 的引导来使用 Spring Framework。

二、SpringBoot的基本使用
1. SpringBoot的创建
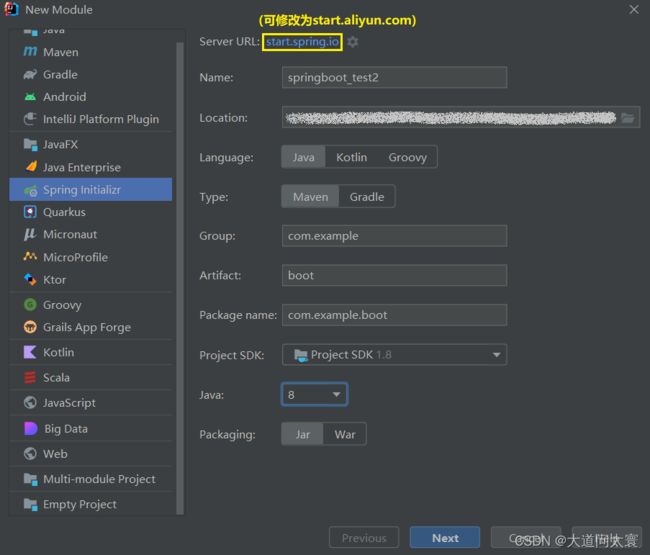
1> Spring Initializr快速创建 (需要联网)
- 打开IntelliJ IDEA,创建一个项目或模块,选择Spring Initializr,选择maven方式并设置jdk版本
- 选择要SpringBoot的版本,并勾选要添加的依赖,然后直接点击finish创建项目
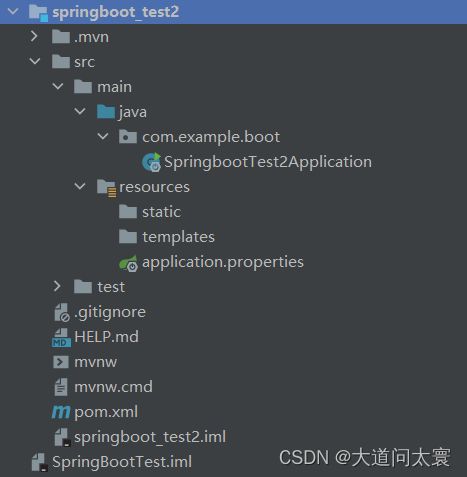
- 创建好SpringBoot项目后,项目结构如下:
- 其中,pom.xml内容如下:
<project xmlns="http://maven.apache.org/POM/4.0.0"
         xmlns:xsi="http://www.w3.org/2001/XMLSchema-instance"
         xsi:schemaLocation="http://maven.apache.org/POM/4.0.0
                             https://maven.apache.org/xsd/maven-4.0.0.xsd">
    <modelVersion>4.0.0modelVersion>


    <parent>
        <groupId>org.springframework.bootgroupId>
        <artifactId>spring-boot-starter-parentartifactId>
        <version>2.3.7.RELEASEversion>
    parent>


    <groupId>com.examplegroupId>
    <artifactId>bootartifactId>
    <version>0.0.1-SNAPSHOTversion>
    <name>springboot_test2name>
    <description>springboot_test2description>

    <properties>
        <java.version>1.8java.version>
    properties>

    <dependencies>

        <dependency>
            <groupId>org.springframework.bootgroupId>
            <artifactId>spring-boot-starter-webartifactId>
        dependency>


        <dependency>
            <groupId>org.springframework.bootgroupId>
            <artifactId>spring-boot-starter-testartifactId>
            <scope>testscope>
        dependency>
    dependencies>

    <build>
        <plugins>

            <plugin>
                <groupId>org.springframework.bootgroupId>
                <artifactId>spring-boot-maven-pluginartifactId>
            plugin>
        plugins>
    build>

project>
- 引导类“SpringbootTest2Application”内容如下:
import org.springframework.boot.SpringApplication;
import org.springframework.boot.autoconfigure.SpringBootApplication;

@SpringBootApplication
public class SpringbootTest2Application {
    public static void main(String[] args) {
        SpringApplication.run(SpringbootTest2Application.class, args);
    }
}
2> 手动创建 (无需联网)
- 创建一个maven工程
- 在新建的maven工程中的pom.xml文件中添加SpringBoot的父项目,以及相关场景的启动器
<project xmlns="http://maven.apache.org/POM/4.0.0"
         xmlns:xsi="http://www.w3.org/2001/XMLSchema-instance"
         xsi:schemaLocation="http://maven.apache.org/POM/4.0.0 http://maven.apache.org/xsd/maven-4.0.0.xsd">
    <modelVersion>4.0.0modelVersion>

    <groupId>com.examplegroupId>
    <artifactId>springboot_test3artifactId>
    <version>1.0-SNAPSHOTversion>

    <properties>
        <maven.compiler.source>8maven.compiler.source>
        <maven.compiler.target>8maven.compiler.target>
    properties>

    <parent>
        <groupId>org.springframework.bootgroupId>
        <artifactId>spring-boot-starter-parentartifactId>
        <version>2.3.7.RELEASEversion>
    parent>

    <dependencies>
        <dependency>
            <groupId>org.springframework.bootgroupId>
            <artifactId>spring-boot-starter-webartifactId>
        dependency>
    dependencies>

    <build>
        <plugins>
            <plugin>
                <groupId>org.springframework.bootgroupId>
                <artifactId>spring-boot-maven-pluginartifactId>
            plugin>
        plugins>
    build>

project>
- 在java目录创建“com.example.boot”包,同时在包中创建主程序MainApplication类,内容如下:
import org.springframework.boot.SpringApplication;
import org.springframework.boot.autoconfigure.SpringBootApplication;

//2. 然后再当前类中添加@SpringBootApplication注解
@SpringBootApplication
public class MainApplication {
    //1. 首先创建一个main方法
    public static void main(String[] args) {
        //调用SpringApplication的静态方法run,将当前类作为参数传入(可不加args)
        SpringApplication.run(MainApplication.class);
    }
}
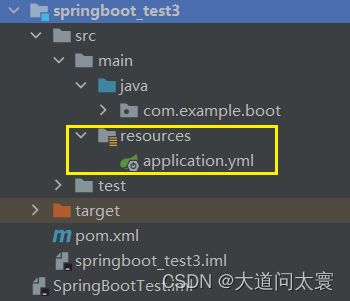
- 在resources目录下创建一个application配置文件,**“application.yml”或“application.properties”**皆可
2. SpringBoot的依赖管理
1> parent
- 具有所有SpringBoot项目要继承的项目,定义了若干个坐标版本号 (依赖管理,而非依赖),以达到减少依赖冲突的目的。
- spring-boot-starter-parent各版本间存在着诸多坐标版本不同。
- 最下层的依赖:
<parent>
    <groupId>org.springframework.bootgroupId>
    <artifactId>spring-boot-starter-parentartifactId>
    <version>2.3.7.RELEASEversion>
parent>
- 以下为上面依赖的父依赖:
<parent>
    <groupId>org.springframework.bootgroupId>
    <artifactId>spring-boot-dependenciesartifactId>
    <version>2.3.7.RELEASEversion>
parent>
- 所有场景启动器最底层的, 最基本的依赖:
<dependency>
    <groupId>org.springframework.bootgroupId>
    <artifactId>spring-boot-starterartifactId>
    <version>2.3.7.RELEASEversion>
    <scope>compilescope>
dependency>
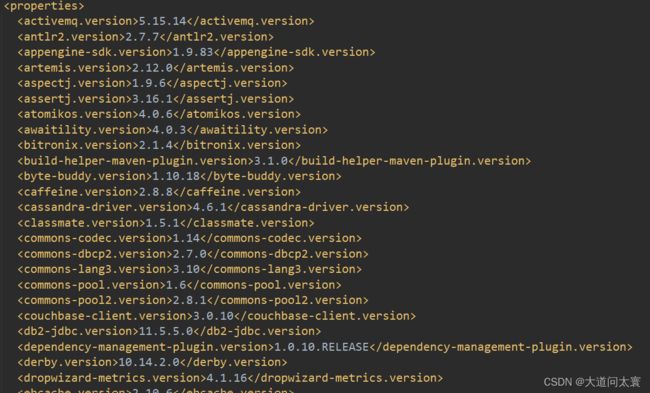
- 底层定义的一系列坐标版本:
无需关注版本号,自动版本仲裁:
- 以后引入依赖默认都可以不写版本。
- 但引入非版本仲裁 (没有声明) 的jar,需要写版本号。
可以修改默认版本号,步骤如下:
- (1) 查看spring-boot-dependencies里面规定当前依赖的版本用的key。
- (2) 在当前项目里面重写配置 (maven就近优先原则)。
2> starter
- starter是SpringBoot中常见项目名称,定义了当前项目使用的所有依赖坐标,以达到减少依赖配置的目的。
开发导入starter场景启动器:
- 官方starter命名方式:spring-boot-starter-* :其中的 * 代表某种场景。
- 只要引入了starter,然后这个场景相关的的所有常规需要的依赖都会自动引入。
- 见到的 *-spring-boot-starter 代表第三方 (自定义) 提供的简化开发的场景启动器。
3. 搭建简单的HelloWorld程序
- 创建一个controller包,并在包中创建HelloController类,代码如下:
import org.springframework.web.bind.annotation.RequestMapping;
import org.springframework.web.bind.annotation.RequestParam;
import org.springframework.web.bind.annotation.RestController;

@RestController
public class HelloController {
    @RequestMapping("/hello")
    public String hello(@RequestParam(value = "name", defaultValue = "World") String name) {
        return "Hello " + name;
    }
}
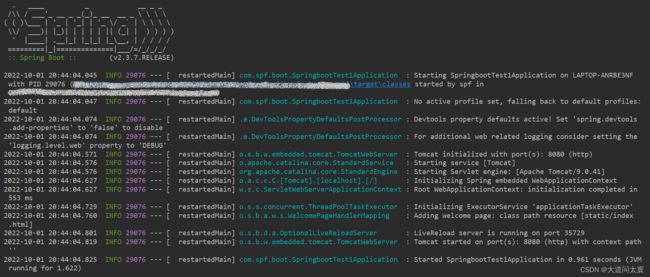
- 直接启动Application程序中的main方法
- 打开浏览器,在地址栏中输入如下地址:
(1)http://localhost:8080/hello
(2)http://localhost:8080/hello?name=springboot
4. SpringBoot开发的一些小工具
1> Lombok
- 安装lombok插件:
- 在SpringBoot项目的pom文件中引入Lombok插件:
<dependency>
    <groupId>org.projectlombokgroupId>
    <artifactId>lombokartifactId>
dependency>
- 可简化 JavaBean的开发:编写Javabean时不需要自己添加get和set方法和toString方法等结构,只需在类上标识对应的注解即可。
@Data //自动生成当前类中所有属性的get和set方法
@ToString //在编译时生成当前类的toString方法
@NoArgsConstructor //在当前类中生成无参构造器
@AllArgsConstructor //在当前类中全参构造器
@EqualsAndHashCode //重写equals和hashCode方法
public class User {
    private String name;
    private Integer age;
}
- 以上代码相当于:
public class User {
    private String name;
    private Integer age;

    public User(){
    }

    public User(String name, Integer age) {
        this.name = name;
        this.age = age;
    }

    public String getName() {
        return name;
    }

    public void setName(String name) {
        this.name = name;
    }

    public Integer getAge() {
        return age;
    }

    public void setAge(Integer age) {
        this.age = age;
    }

    @Override
    public String toString() {
        return "User{" +
                "name='" + name + '\'' +
                ", age=" + age +
                '}';
    }

    @Override
    public boolean equals(Object o) {
        if (this == o) return true;
        if (o == null || getClass() != o.getClass()) return false;
        User user = (User) o;
        return Objects.equals(name, user.name) && Objects.equals(age, user.age);
    }

    @Override
    public int hashCode() {
        return Objects.hash(name, age);
    }
}
- 简化日志开发:
@Slf4j //日志记录器:自动给当前类中注入log属性
@RestController
public class HelloController {
    @RequestMapping("/hello") //例:http://localhost:8888/hello?name=SpringBoot
    public String hello(@RequestParam(value = "name", defaultValue = "World") String name) {
        log.info("请求进来了 ~~ ");
        return String.format("Hello %s!", name);
    }
}
2> dev-tools
- 在SpringBoot项目的pom文件中引入dev-tools依赖:
<dependency>
    <groupId>org.springframework.bootgroupId>
    <artifactId>spring-boot-devtoolsartifactId>
    <optional>trueoptional>
dependency>
dev-tools的作用:自动重启项目,类似于热更新 (更新静态页)。项目或者页面修改以后只需要 Ctrl + F9 (重新编译项目),然后dev-tools就能重新加载项目,项目就可以快速地实施生效,不需要在重新部署运行。
5. SpringBoot的启动引导类
1> 引导类
- SpringBoot的引导类是Boot工程的执行入口,运行main方法就可以启动项目。
- SpringBoot工程运行后初始化Spring容器,扫描引导类所在包加载bean。
@SpringBootApplication
public class MainApplication {
    public static void main(String[] args) {
        //启动一个Spring的容器
        ConfigurableApplicationContext context = SpringApplication.run(MainApplication.class, args);
        //从容器中获取bean
        HelloController bean = context.getBean(HelloController.class);
        System.out.println("bean: " + bean); //bean: com.spf.boot.controller.HelloController@fe0a2fe
    }
}
2> @SpringBootApplication
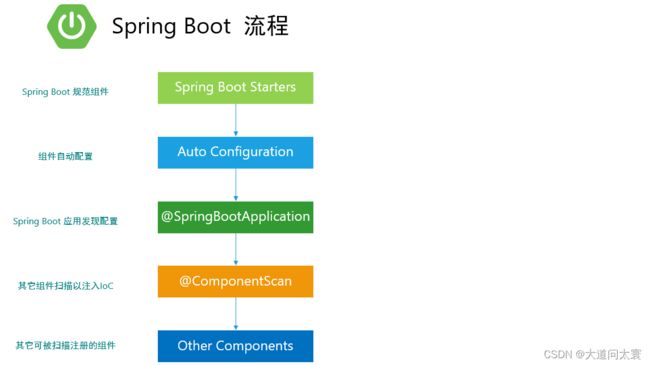
@SpringBootApplication = @EnableAutoConfiguration + @ComponentScan + @SpringBootConfiguration
- @SpringBootConfiguration:相当于**@Configuration**,告诉springboot当前类是一个配置类,等同于配置文件。配置类本身也是一个组件。
- @ComponentScan:指定组件扫描路径,引导类所在包及其下面的所有子包里面的组件都会被默认扫描进来。
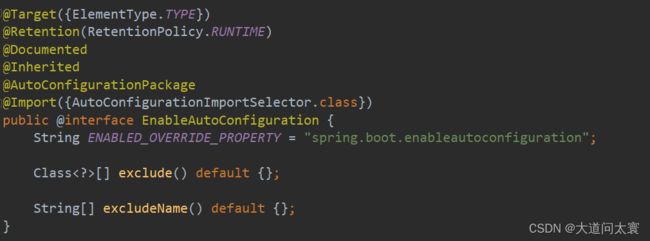
- @EnableAutoConfiguration:借助**@Import注解,把spring应用所需的bean注入容器中,即将所有符合自动配置条件的bean定义加载到容器。它通过@Import注入了一个ImportSelector的实现类AutoConfigurationImportSelector,这个ImportSelector最终实现根据我们的配置,动态加载所需的bean**。
- @Import:可以为IOC容器导入指定类型的组件,用来导入配置类或者一些需要前置加载的类。
三、SpringBoot中的配置文件
1. application配置文件
-
SpringBoot中使用一个全局的配置文件,配置文件名是固定的: application.properties / application.yml。这个文件就是用来修改默认配置信息的配置文件,即可以修改SpringBoot自动配置的默认值。项目中所有技术的配置信息都可以在这一个配置文件中进行配置。它可以是 properties文件 或 yaml文件。
-
示例1 (properties格式):
server.port=8001
- 示例2 (yml格式):
server:
  port: 8002
2. 配置处理器
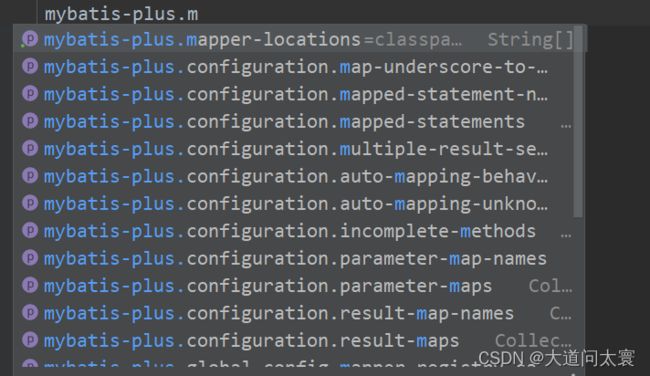
- 自定义的类和配置文件绑定一般没有提示,通过添加SpringBoot的配置处理器的依赖,可在yaml配置文件中有下拉的提示信息。
<dependency>
    <groupId>org.springframework.bootgroupId>
    <artifactId>spring-boot-configuration-processorartifactId>
    <optional>trueoptional>
dependency>

<build>
    <plugins>
        <plugin>
            <groupId>org.springframework.bootgroupId>
            <artifactId>spring-boot-maven-pluginartifactId>
            <configuration>
                <excludes>

                    <exclude>
                        <groupId>org.springframework.bootgroupId>
                        <artifactId>spring-boot-configuration-processorartifactId>
                    exclude>
                excludes>
            configuration>
        plugin>
    plugins>
build>
3. 读取yaml配置文件中的数据
1> 读取单个属性数据
-
使用**@Value**注解可读取yaml配置文件中的单个数据。
-
yaml示例:
country: china
province: beijing
city: beijing
area: haidian
port: 8080
party: true
birthday: 1949-10-01

user:
  name: Tom
  age: 16

a:
  b:
    c:
      d:
        e: 123

likes:
  - game
  - music
  - sleep

users:
  - name: zhangsan
    age: 18
  - name: lisi
    age: 17
- 在controller中读取以上yaml示例中的数据并打印:
@RestController
public class HelloController {
    //读取单个数据
    @Value(value = "${country}")
    private String country;

    //读取对象中的数据
    @Value("${user.name}")
    private String user_name;

    //可多层嵌套读取对象数据
    @Value("${a.b.c.d.e}")
    private String _e;

    //读取数组中的数据
    @Value("${likes[2]}")
    private String likes_sleep;

    //读取数组中对象的数据
    @Value("${users[0].name}")
    private String users_name1;

    @RequestMapping("/hello")
    public String hello(@RequestParam(value = "name", defaultValue = "World") String name) {
        System.out.println("SpringBoot is running ...");
        System.out.println(country);
        System.out.println(user_name);
        System.out.println(_e);
        System.out.println(likes_sleep);
        System.out.println(users_name1);
        return "Hello " + name;
    }
}
2> yaml文件中的变量引用
- 在yaml中可通过**${}**表达式引用数据,以减少不必要的重复项。
- 同时使用双引号包裹字符串,可使得字符串中的转义字符生效,否则不生效。
baseDir: c:\win10

# 使用${属性名}引用数据
tempDir: ${baseDir}\temp

# 使用引号包裹的字符串,其中的转义字符可以生效
tempDir2: "${baseDir}\temp \t1 \t2 \t3"
- 读取带有引用的数据:
@RestController
public class HelloController {
    @Value("${tempDir}")
    private String tmpDir;

    @Value("${tempDir2}")
    private String tmpDir2;

    @RequestMapping("/hello")
    public String hello(@RequestParam(value = "name", defaultValue = "World") String name) {
        System.out.println("SpringBoot is running ...");

        System.out.println(tmpDir);
        System.out.println(tmpDir2);

        return "Hello " + name;
    }
}
3> 读取yaml全部属性数据
注:yaml示例同上读取单个属性数据
@RestController
public class HelloController {
    @Autowired
    private Environment env;

    @RequestMapping("/hello")
    public String hello(@RequestParam(value = "name", defaultValue = "World") String name) {
        System.out.println("SpringBoot is running ...");
        System.out.println(env.getProperty("country"));
        System.out.println(env.getProperty("user.name"));
        System.out.println(env.getProperty("a.b.c.d.e"));
        System.out.println(env.getProperty("likes[2]"));
        System.out.println(env.getProperty("users[0].name"));
        return "Hello " + name;
    }
}
4> 读取yaml引用类型属性数据
- yaml示例:
# 创建类,用于封装下面的数据
# 由spring帮我们去加载数据到对象中,一定要告诉spring加载这组信息
# 使用时候从spring中直接获取信息使用

datasource:
  driver: com.mysql.jdbc.Driver
  url: jdbc:mysql://localhost/springboot_db
  username: root
  password: 123456
- 自定义对象封装指定数据:
//定义为spring管控的组件
@Component
//指定加载的数据
@ConfigurationProperties(prefix = "datasource")
@Data
@ToString
public class MyDataSource {
    //定义数据模型封装yaml文件中对应的数据
    private String driver;
    private String url;
    private String username;
    private String password;
}
- 在controller中读取yaml引用类型属性数据并打印:
@RestController
public class HelloController {
    //通过自动装配,读取yaml中的引用类型属性数据
    @Autowired
    private MyDataSource myDataSource;

    @RequestMapping("/hello")
    public String hello(@RequestParam(value = "name", defaultValue = "World") String name) {
        System.out.println("SpringBoot is running ...");
        //打印读取的数据
        System.out.println(myDataSource);
        return "Hello " + name;
    }
}
![]()
4. 配置文件分类
-
SpringBoot中4级配置文件 (按优先级别从高到低):
1级: 工程路径配置文件:file:config/application.yml
2级:工程路径config目录中配置文件: file:application.yml
3级:项目类路径(resources)配置文件:classpath:config/application.yml
4级:项目类路径config目录中配置文件:classpath:application.yml
-
作用:
1级与2级留做系统打包后设置通用属性,1级常用于运维经理进行线上整体项目部署方案调控
3级与4级用于系统开发阶段设置通用属性,3级常用于项目经理进行整体项目属性调控
5. yaml多环境开发
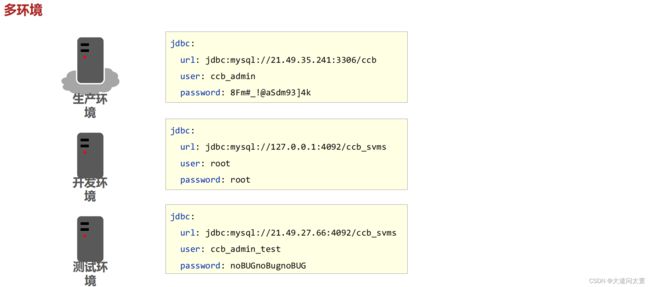
1> yaml配置文件多环境开发
1)写在一个配置文件中:
# 启动指定的环境
spring:
  profiles:
    active: pro

# 使用分隔线 “---” 来区分三种环境
---
# 设置生产环境
spring:
  profiles: pro
server:
  port: 8001

---
# 设置开发环境
spring:
  profiles: dev
server:
  port: 8002

---
# 设置测试环境
spring:
  profiles: test
server:
  port: 8003
2)写在多个配置文件中:
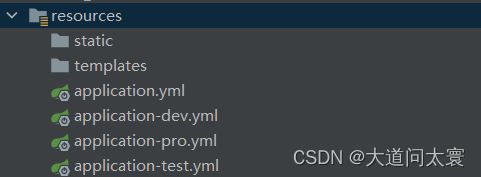
- 根据不同环境,创建多个配置文件 (文件名格式固定):
- application.yml:
# 启动指定的环境
spring:
  profiles:
    active: pro
- application-dev.yml:
server:
  port: 8002
- application-pro.yml:
server:
  port: 8001
- application-test.yml:
server:
  port: 8003
2> Maven与SpringBoot多环境兼容
1)Maven中设置多环境属性
<profiles>
    <profile>
        <id>dev_envid>
        <properties>
            <profile.active>devprofile.active>
        properties>
        <activation>

            <activeByDefault>trueactiveByDefault>
        activation>
    profile>
    <profile>
        <id>pro_envid>
        <properties>
            <profile.active>proprofile.active>
        properties>
    profile>
    <profile>
        <id>test_envid>
        <properties>
            <profile.active>testprofile.active>
        properties>
    profile>
profiles>
2)SpringBoot中引用Maven属性
spring:
  profiles:
    active: @profile.active@
3)执行Maven打包指令,并在生成的boot打包文件.jar文件中查看对应信息
6. 配置绑定
1> 第三方bean属性绑定
1)可以使用@ConfigurationProperties为第三方bean绑定属性
- 配置类:
//使用@ConfigurationProperties注解为第三方bean绑定属性
@ConfigurationProperties(prefix = "datasource")
@Bean
public DruidDataSource dataSource() {
    DruidDataSource dataSource = new DruidDataSource();
    return dataSource;
}
- application.yml:
datasource:
  driverClassName: com.mysql.cj.jdbc.Driver123
- 引导类:
@SpringBootApplication
public class SpringbootTestApplication {
    public static void main(String[] args) {
        ConfigurableApplicationContext ctx = SpringApplication.run(SpringbootTestApplication.class, args);

        //获取容器中加载的第三方bean(Druid)
        DruidDataSource ds = ctx.getBean(DruidDataSource.class);
        System.out.println(ds.getDriverClassName()); //com.mysql.cj.jdbc.Driver123

    }
}
2)@EnableConfigurationProperties注解可以将使用@ConfigurationProperties注解对应的类加入Spring容器
- 自定义组件:
//@Component //如果使用@EnableConfigurationProperties指定当前类,那么当前类一定不要加@Component,否则报错
@Data
@ConfigurationProperties(prefix = "servers")
public class ServerConfig {
    private String ipAddress;
    private int port;
    private long timeout;
}
- application.yml:
servers:
  ipAddress: 192.168.10.129
  port: 2345
  timeout: -1
- 引导类:
@SpringBootApplication
@EnableConfigurationProperties(ServerConfig.class) //此注解会自动将指定的类注入容器中,同时将配置的属性值传入bean对象
public class SpringbootTest5Application {
    public static void main(String[] args) {
        ConfigurableApplicationContext ctx = SpringApplication.run(SpringbootTest5Application.class, args);
        //获取容器中自定义的bean的对象
        ServerConfig bean = ctx.getBean(ServerConfig.class);
        System.out.println(bean); //ServerConfig(ipAddress=192.168.10.129, port=2345, timeout=-1)

    }
}
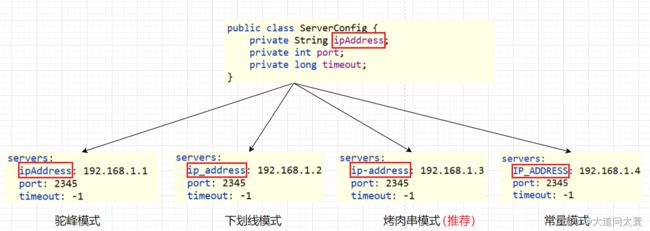
2> 宽松绑定
- @ConfigurationProperties绑定属性支持属性名宽松绑定。
- 但宽松绑定不支持注解**@Value**引用单个属性的方式。
- 绑定前缀名命名规范:仅能使用纯小写字母、数字、下划线作为合法的字符。
四、SpringBoot的数据访问
1. JDBC默认数据源HikariDataSource
- 导入JDBC场景和数据库驱动:
<dependency>
    <groupId>org.springframework.bootgroupId>
    <artifactId>spring-boot-starter-data-jdbcartifactId>
dependency>


<dependency>
    <groupId>mysqlgroupId>
    <artifactId>mysql-connector-javaartifactId>
dependency>
- 在SpringBoot中导入 JDBC场景后,会自动引入一个数据源,底层默认配置HikariDataSource数据源。
- 编写数据库相关配置:
spring:
  datasource:
    url: jdbc:mysql://localhost:3306/user_db
    username: root
    password: 123456
    driver-class-name: com.mysql.jdbc.Driver
    # 不需要指定type,默认就是hikari数据源
#    type: com.zaxxer.hikari.HikariDataSource
2. SpringBoot整合外部数据源Druid
- 导入Druid对应的starter:
<dependency>
    <groupId>com.alibabagroupId>
    <artifactId>druid-spring-boot-starterartifactId>
    <version>1.1.17version>
dependency>
- 指定数据源类型为Druid:
spring:
  datasource:
    url: jdbc:mysql://localhost:3306/boot_db?serverTimezone=UTC
    username: root
    password: 123456
    driver-class-name: com.mysql.cj.jdbc.Driver
    type: com.alibaba.druid.pool.DruidDataSource
3. SpringBoot整合MyBatis-Plus
- 导入MyBatis-Plus以及数据库驱动的相关依赖:
<dependency>
    <groupId>com.baomidougroupId>
    <artifactId>mybatis-plus-boot-starterartifactId>
    <version>3.4.2version>
dependency>


<dependency>
    <groupId>mysqlgroupId>
    <artifactId>mysql-connector-javaartifactId>
    <scope>runtimescope>
dependency>
- 在application配置文件中设置数据源和mybatis-plus的相关参数:
# 设置数据源相关的配置
spring:
  datasource:
    url: jdbc:mysql://localhost:3306/boot_db?serverTimezone=UTC
    username: root
    password: 123456
    driver-class-name: com.mysql.cj.jdbc.Driver

# 设置MP相关的配置
mybatis-plus:
  global-config:
    db-config:
      table-prefix: tbl_
- 准备数据库数据:
create table if exists tbl_book (
	`id` int primary key,
	`name` varchar(50),
	`type` varchar(50),
	`description` varchar(50)
);

INSERT INTO `tbl_book`(`id`, `name`, `type`, `description`) VALUES (1, 'Spring实战', '计算机技术', 'Spring经典案例,深入理解Spring原理技术内幕');
INSERT INTO `tbl_book`(`id`, `name`, `type`, `description`) VALUES (2, 'java从入门到放弃', '计算机技术', '关于java从入门到放弃');
INSERT INTO `tbl_book`(`id`, `name`, `type`, `description`) VALUES (3, '数据结构与算法', '计算机技术', '关于数据结构与算法');
INSERT INTO `tbl_book`(`id`, `name`, `type`, `description`) VALUES (4, '怎样拐跑别人的媳妇', '生活', '关于怎样拐跑别人的媳妇');
INSERT INTO `tbl_book`(`id`, `name`, `type`, `description`) VALUES (5, '木虚肉盖饭', '生活', '关于木虚肉盖饭');
INSERT INTO `tbl_book`(`id`, `name`, `type`, `description`) VALUES (6, 'C++编程思想', '计算机技术', '关于C++编程思想');
INSERT INTO `tbl_book`(`id`, `name`, `type`, `description`) VALUES (7, '蛋炒饭', '生活', '关于蛋炒饭');
INSERT INTO `tbl_book`(`id`, `name`, `type`, `description`) VALUES (8, '赌神', '剧情', '关于赌神');
INSERT INTO `tbl_book`(`id`, `name`, `type`, `description`) VALUES (9, 'Java编程思想', '计算机技术', '关于Java编程思想');
INSERT INTO `tbl_book`(`id`, `name`, `type`, `description`) VALUES (10, 'JavaScript从入门到精通', '计算机技术', '关于JavaScript从入门到精通');
INSERT INTO `tbl_book`(`id`, `name`, `type`, `description`) VALUES (11, 'cocos2d-x游戏编程入门', '计算机技术', '关于cocos2d-x游戏编程入门');
INSERT INTO `tbl_book`(`id`, `name`, `type`, `description`) VALUES (12, 'C语言程序设计', '计算机技术', '关于C语言程序设计');
INSERT INTO `tbl_book`(`id`, `name`, `type`, `description`) VALUES (13, 'Lua语言程序设计', '计算机技术', '关于Lua语言程序设计');
INSERT INTO `tbl_book`(`id`, `name`, `type`, `description`) VALUES (14, '西游记', '文学', '关于西游记');
INSERT INTO `tbl_book`(`id`, `name`, `type`, `description`) VALUES (15, '水浒传', '文学', '关于水浒传');
INSERT INTO `tbl_book`(`id`, `name`, `type`, `description`) VALUES (16, '操作系统原理', '计算机技术', '关于操作系统原理');
- 定义Book实体类:
@Data
public class Book {
    private int id;//书号
    private String name;//书名
    private String type;//书的类型
    private String description;//书的描述
}
- 定义数据层接口与映射配置,继承BaseMapper:
@Mapper
public interface BookMapper extends BaseMapper<Book> {
}
- 在测试类中测试查询功能:
@SpringBootTest
class MyBatisPlusTest {
    @Autowired
    private BookMapper bookMapper;

    @Test
    void testMP() {
        Book book = bookMapper.selectById(1);
        System.out.println(book);
    }
}
![]()
4. SSMP整合案例
1> 项目分析
-
需求:基于SpringBoot整合Spring、SpringMVC、MyBatis-Plus实现具有增删改查以及分页功能的页面。
-
涉及的技术:
- Druid数据源
- Lombok:快速制作实体类
- MyBatisPlus:数据访问,业务层开发
- SpringMVC:基于Restful的Controller开发:
- VUE + ElementUI:前端页面开发
-
后端代码包结构:
2> 导入依赖
<dependencies>

    <dependency>
        <groupId>org.springframework.bootgroupId>
        <artifactId>spring-boot-starter-webartifactId>
    dependency>


    <dependency>
        <groupId>com.baomidougroupId>
        <artifactId>mybatis-plus-boot-starterartifactId>
        <version>3.4.2version>
    dependency>


    <dependency>
        <groupId>com.alibabagroupId>
        <artifactId>druid-spring-boot-starterartifactId>
        <version>1.1.17version>
    dependency>


    <dependency>
        <groupId>org.springframework.bootgroupId>
        <artifactId>spring-boot-devtoolsartifactId>
        <scope>runtimescope>
        <optional>trueoptional>
    dependency>


    <dependency>
        <groupId>mysqlgroupId>
        <artifactId>mysql-connector-javaartifactId>
        <scope>runtimescope>
    dependency>


    <dependency>
        <groupId>org.springframework.bootgroupId>
        <artifactId>spring-boot-configuration-processorartifactId>
        <optional>trueoptional>
    dependency>


    <dependency>
        <groupId>org.projectlombokgroupId>
        <artifactId>lombokartifactId>
        <optional>trueoptional>
    dependency>


    <dependency>
        <groupId>org.springframework.bootgroupId>
        <artifactId>spring-boot-starter-testartifactId>
        <scope>testscope>
        <exclusions>
            <exclusion>
                <groupId>org.junit.vintagegroupId>
                <artifactId>junit-vintage-engineartifactId>
            exclusion>
        exclusions>
    dependency>
dependencies>
2> 编写数据源以及MyBatis-Plus的相关配置
# 设置数据源相关的配置
spring:
  datasource:
    druid:
      driver-class-name: com.mysql.cj.jdbc.Driver
      url: jdbc:mysql://localhost:3306/boot_db?serverTimezone=UTC
      username: root
      password: 123456

# 设置MP相关的配置
mybatis-plus:
  global-config:
    db-config:
      # 设置表名前缀
      table-prefix: tbl_
      # 开启自增主键策略
      id-type: auto
  configuration:
    # 开启MyBatisPlus的日志
    log-impl: org.apache.ibatis.logging.stdout.StdOutImpl
3> 创建实体类以及BookMapper
- 创建Book实体类:
@Data
public class Book {
    private int id;//书号
    private String name;//书名
    private String type;//书的类型
    private String description;//书的描述
}
- 实现BaseMapper,创建BookMapper类:
@Mapper
public interface BookMapper extends BaseMapper<Book> {
}
4> 分页拦截器编写
- 想要使用MyBatis-Plus提供的分页功能,必须要添加分页拦截器。
- 编写一个配置类,定义MybatisPlusInterceptor组件,添加分页拦截器。
@Configuration
public class MPConfig {
    //定义MP拦截器
    @Bean
    public MybatisPlusInterceptor mybatisPlusInterceptor() {
        MybatisPlusInterceptor interceptor = new MybatisPlusInterceptor();
        //添加分页拦截器
        interceptor.addInnerInterceptor(new PaginationInnerInterceptor());
        return interceptor;
    }
}
5> 业务层开发
- 定义IBookService接口,继承用MyBatisPlus提供的IService接口,同时在接口中添加自定义的分页抽象方法:
public interface IBookService extends IService<Book> {
    //实现分页功能的方法
    IPage<Book> getPage(int currentPage, int pageSize);

    IPage<Book> getPage(int currentPage, int pageSize, Book book);
}
- 编写IBookService的实现类,继承用MyBatisPlus提供的ServiceImpl类,指定Mapper类和实体类,并实现抽象方法:
@Service
public class BookServiceImpl extends ServiceImpl<BookMapper, Book> implements IBookService {
    @Autowired
    private BookMapper bookMapper;

    @Override
    public IPage<Book> getPage(int currentPage, int pageSize) {
        return bookMapper.selectPage(new Page<Book>(currentPage, pageSize), null);
    }

    @Override
    public IPage<Book> getPage(int currentPage, int pageSize, Book book) {
        LambdaQueryWrapper<Book> lqw = new LambdaQueryWrapper<>();
        lqw.like(Strings.isNotEmpty(book.getType()), Book::getType, book.getType())
           .like(Strings.isNotEmpty(book.getName()), Book::getName, book.getName())
           .like(Strings.isNotEmpty(book.getDescription()), Book::getDescription, book.getDescription());
        return bookMapper.selectPage(new Page<Book>(currentPage, pageSize), lqw);
    }

}
6> 表现层开发
- 基于Restful进行表现层接口开发:编写Controller类,在其中定义增删改查,以及分页的相关控制器方法。
@RestController
@RequestMapping("/books")
public class BookController {
    @Autowired
    private IBookService bookService;

    @GetMapping
    public List<Book> getAll() {
        return bookService.list();
    }

    @GetMapping("{id}")
    public Book getById(@PathVariable("id") Integer id) {
        return bookService.getById(id);
    }

    @PostMapping
    public Boolean save(@RequestBody Book book) {
        return bookService.save(book);
    }

    @PutMapping
    public Result update(@RequestBody Book book) {
        LambdaUpdateWrapper<Book> luw = new LambdaUpdateWrapper<>();
        luw.eq(Book::getId, book.getId());
        return bookService.update(book, luw);
    }

    @DeleteMapping("{id}")
    public Boolean delete(@PathVariable("id") Integer id) {
        return bookService.removeById(id);
    }

    @GetMapping("{currentPage}/{pageSize}")
    public IPage<Book> getPage(@PathVariable("currentPage") int currentPage,
                               @PathVariable("pageSize") int pageSize) {
        return bookService.getPage(currentPage, pageSize);
    }

}
- 表现层消息一致性处理:设计表现层返回结果的模型类Result,用于后端与前端进行数据格式统一。
//前后端数据协议: 满足前后端数据格式统一
@Data
@AllArgsConstructor
@NoArgsConstructor
public class Result {
    //当前查询状态,true代表查询成功,false代表查询失败
    private Boolean status;
    //具体CRUD返回的数据
    private Object data;
}
- 修改Controller类,将其中控制器方法的返回值类型都改为Result:
@RestController
@RequestMapping("/books")
public class BookController {
    @Autowired
    private IBookService bookService;

    @GetMapping
    public Result getAll() {
        return new Result(true, bookService.list());
    }

    @GetMapping("{id}")
    public Result getById(@PathVariable("id") Integer id) {
        return new Result(true, bookService.getById(id));
    }

    @PostMapping
    public Result save(@RequestBody Book book) {
        return new Result(bookService.save(book), null);
    }

    @PutMapping
    public Result update(@RequestBody Book book) {
        LambdaUpdateWrapper<Book> luw = new LambdaUpdateWrapper<>();
        luw.eq(Book::getId, book.getId());
        return new Result(bookService.update(book, luw), null);
    }

    @DeleteMapping("{id}")
    public Result delete(@PathVariable("id") Integer id) {
        return new Result(bookService.removeById(id), null);
    }

    @GetMapping("{currentPage}/{pageSize}")
    public Result getPage(@PathVariable("currentPage") int currentPage,
                          @PathVariable("pageSize") int pageSize,
                          Book book) {
        IPage<Book> page = bookService.getPage(currentPage, pageSize, book);
        //若当前页码值 > 总页码值,则重新执行查询,使用总页码值作为当前页码值
        if (currentPage > page.getPages()) {
            page = bookService.getPage((int) page.getPages(), pageSize, book);
        }
        return new Result(true, page);
    }

}
7> 异常消息处理
- 修改Result类,在其中添加msg属性,用于显示当前操作的提示信息
//前后端数据协议: 满足前后端数据格式统一
@Data
@NoArgsConstructor
public class Result {
    //当前查询状态,true代表查询成功,false代表查询失败
    private Boolean status;
    //具体CRUD返回的数据
    private Object data;
    //发生异常时,发送的消息
    private String msg;

    public Result(Boolean status, Object data) {
        this.status = status;
        this.data = data;
    }

    public Result(Boolean status, String msg) {
        this.status = status;
        this.msg = msg;
    }

    public Result(String msg) {
        this.status = false;
        this.msg = msg;
    }
}
- 编写异常处理器,解决异常导致的数据格式不一致。
//作为SpringMVC的异常处理器
@RestControllerAdvice
public class ProjectExceptionAdvice {
    //拦截所有的异常信息
    @ExceptionHandler(Exception.class)
    public Result doException(Exception e) {
        //记录日志,通知运维,通知开发 ...
        //打印异常信息
        e.printStackTrace();
        return new Result("系统错误,请稍后再试!");
    }
}
- 修改控制器方法:
@PostMapping
public Result save(@RequestBody Book book) throws Exception {
    boolean status = bookService.save(book);
    return new Result(status, status ? "添加成功^-^": "添加失败-_-!");
}
8> 前后端调用
- 前端的相关代码需要放置在resources目录下的static目录中(资源可从黑马程序员官网获取):
- 前端页面“books.html”代码:
DOCTYPE html>
<html>
<head>
<meta charset="utf-8">
<meta http-equiv="X-UA-Compatible" content="IE=edge">
<title>基于SpringBoot整合SSMP案例title>
<meta content="width=device-width,initial-scale=1,maximum-scale=1,user-scalable=no" name="viewport">
<link rel="stylesheet" href="../plugins/elementui/index.css">
<link rel="stylesheet" href="../plugins/font-awesome/css/font-awesome.min.css">
<link rel="stylesheet" href="../css/style.css">
head>
<body class="hold-transition">
<div id="app">
<div class="content-header">
<h1>图书管理h1>
div>
<div class="app-container">
<div class="box">
<div class="filter-container">
<el-input placeholder="图书类别"
v-model="pagination.type"
style="width: 200px;"
class="filter-item">
el-input>
<el-input placeholder="图书名称"
v-model="pagination.name"
style="width: 200px;"
class="filter-item">
el-input>
<el-input placeholder="图书描述"
v-model="pagination.description"
style="width: 200px;"
class="filter-item">
el-input>
<el-button @click="getAll()" class="dalfBut">查询el-button>
<el-button type="primary" class="butT" @click="handleCreate()">新建el-button>
div>
<el-table size="small" current-row-key="id" :data="dataList" stripe highlight-current-row>
<el-table-column type="index" align="center" label="序号">el-table-column>
<el-table-column prop="type" label="图书类别" align="center">el-table-column>
<el-table-column prop="name" label="图书名称" align="center">el-table-column>
<el-table-column prop="description" label="描述" align="center">el-table-column>
<el-table-column label="操作" align="center">
<template slot-scope="scope">
<el-button type="primary" size="mini" @click="handleUpdate(scope.row)">
编辑
el-button>
<el-button type="danger" size="mini" @click="handleDelete(scope.row)">
删除
el-button>
template>
el-table-column>
el-table>
<div class="pagination-container">
<el-pagination
class="pagiantion"
@current-change="handleCurrentChange"
:current-page="pagination.currentPage"
:page-size="pagination.pageSize"
layout="total, prev, pager, next, jumper"
:total="pagination.total">
el-pagination>
div>
<div class="add-form">
<el-dialog title="新增图书" :visible.sync="dialogFormVisible">
<el-form ref="dataAddForm"
:model="formData"
:rules="rules"
label-position="right"
label-width="100px">
<el-row>
<el-col :span="12">
<el-form-item label="图书类别" prop="type">
<el-input v-model="formData.type"/>
el-form-item>
el-col>
<el-col :span="12">
<el-form-item label="图书名称" prop="name">
<el-input v-model="formData.name"/>
el-form-item>
el-col>
el-row>
<el-row>
<el-col :span="24">
<el-form-item label="描述">
<el-input v-model="formData.description" type="textarea">el-input>
el-form-item>
el-col>
el-row>
el-form>
<div slot="footer" class="dialog-footer">
<el-button @click="cancel()">取消el-button>
<el-button type="primary" @click="handleAdd()">确定el-button>
div>
el-dialog>
div>
<div class="add-form">
<el-dialog title="编辑检查项" :visible.sync="dialogFormVisible4Edit">
<el-form ref="dataEditForm"
:model="formData"
:rules="rules"
label-position="right"
label-width="100px">
<el-row>
<el-col :span="12">
<el-form-item label="图书类别" prop="type">
<el-input v-model="formData.type"/>
el-form-item>
el-col>
<el-col :span="12">
<el-form-item label="图书名称" prop="name">
<el-input v-model="formData.name"/>
el-form-item>
el-col>
el-row>
<el-row>
<el-col :span="24">
<el-form-item label="描述">
<el-input v-model="formData.description" type="textarea">el-input>
el-form-item>
el-col>
el-row>
el-form>
<div slot="footer" class="dialog-footer">
<el-button @click="cancel()">取消el-button>
<el-button type="primary" @click="handleEdit()">确定el-button>
div>
el-dialog>
div>
div>
div>
div>
body>
<script src="../js/vue.js">script>
<script src="../plugins/elementui/index.js">script>
<script type="text/javascript" src="../js/jquery.min.js">script>
<script src="../js/axios-0.18.0.js">script>
<script>
var vue = new Vue({
el: '#app',
data:{
dataList: [], //当前页要展示的列表数据
dialogFormVisible: false, //添加表单是否可见
dialogFormVisible4Edit: false, //编辑表单是否可见
formData: {}, //表单数据
rules: { //校验规则
type: [{ required: true, message: '图书类别为必填项', trigger: 'blur' }],
name: [{ required: true, message: '图书名称为必填项', trigger: 'blur' }]
},
//分页相关模型数据
pagination: {
currentPage: 1, //当前页码
pageSize: 10, //每页显示的记录数
total: 0, //总记录数(未知)
//添加条件查询的相关属性
type: "",
name: "",
description: ""
}
},
//钩子函数,VUE对象初始化完成后自动执行
created() {
//1.调用查询全部数据的操作
this.getAll();
},
methods: {
//列表, 不分页的查询
// getAll() {
// //发送异步请求
// axios.get("/books").then((res) => {
// //console.log(res.data);
// this.dataList = res.data.data;
// });
// },
//分页查询
getAll() {
//组织调条件查询的参数,拼接url请求地址
param = "?type=" + this.pagination.type;
param += "&name=" + this.pagination.name;
param += "&description=" + this.pagination.description;
//通过axios发送异步请求
axios.get("/books/"
+ this.pagination.currentPage
+ "/"
+ this.pagination.pageSize + param).then((res) => {
this.pagination.pageSize = res.data.data.size;//每页的记录数
this.pagination.currentPage = res.data.data.current;//当前页号
this.pagination.total = res.data.data.total;//总记录数
//加载分页的数据
this.dataList = res.data.data.records;
});
},
//切换页码
handleCurrentChange(currentPage) {
//修改页码值为当前选中的页码值
this.pagination.currentPage = currentPage;
//执行查询
this.getAll();
},
//弹出添加窗口
handleCreate() {
this.dialogFormVisible = true;
//每次弹出添加窗口时,清除弹出的对话框中的数据
this.resetForm();
},
//重置表单内容,防止再次弹出对话框时,留下上次的数据
resetForm() {
//将表单数据置为空
this.formData = {};
},
//添加
handleAdd () {
//发送post异步请求
axios.post("/books", this.formData).then((res) => {
//判断当前操作是否成功
if(res.data.status) {
//1.关闭弹层
this.dialogFormVisible = false;
//显示操作成功的提示
this.$message.success(res.data.msg);
} else {
//显示添加失败的提示
this.$message.error(res.data.msg);
}
}).finally(() => {
//2.重新加载数据(无论是操作成功或失败,都要重新刷新数据)
this.getAll();
});
},
//弹层中的取消按钮
cancel() {
//关闭弹层
this.dialogFormVisible = false;
this.dialogFormVisible4Edit = false;
this.$message.info("当前操作取消");
},
//删除功能
handleDelete(row) {
//删除之前,先做出一个提醒,确认是否删除
this.$confirm("此操作永久删除当前信息,是否继续?", "提示", {type:"info"}).then(() => {
//发送delete异步请求
axios.delete("/books/" + row.id).then((res) => {
if (res.data.status) {
this.$message.success("删除成功");
} else {
this.$message.error("数据同步失败,自动刷新");
}
}).finally(() => {
//2.重新加载数据
this.getAll();
});
}).catch(() => {
this.$message.info("取消操作");
});
},
//弹出编辑窗口
handleUpdate(row) {
axios.get("/books/" + row.id).then((res) => {
if (res.data.status && res.data.data != null ) {
//弹出对话框
this.dialogFormVisible4Edit = true;
//加载数据
this.formData = res.data.data;
} else {
//数据查询失败
this.$message.error("数据同步失败,自动刷新");
}
}).finally(() => {
//2.重新加载数据
this.getAll();
});
},
//修改功能
handleEdit() {
axios.put("/books", this.formData).then((res) => {
//判断当前操作是否成功
if (res.data.status) {
//1.关闭弹层
this.dialogFormVisible4Edit = false;
this.$message.success("修改成功");
} else {
this.$message.error("修改失败");
}
}).finally(() => {
//2.重新加载数据
this.getAll();
});
},
}
})
script>
html>
访问页面:http://localhost:8080/pages/books.html
五、SpringBoot中的测试功能
1. SpringBoot整合JUnit
-
通过Spring Initializr创建SpringBoot项目时,默认会导入测试场景的starter。
-
在测试类中测试对象的步骤可分为两步:
(1) 注入要测试的对象。
(2) 执行要测试对象对应的方法。
@SpringBootTest(classes = SpringbootTest4ApplicationTests.class) //classes属性指定配置类
class SpringbootTest4ApplicationTests {
    //1.注入要测试的对象
    @Autowired
    private BookMapper bookMapper;

    @Test
    void contextLoads() {
        //2.执行要测试对象对应的方法
        bookMapper.save();
    }
}
-
@SpringBootTest注解用于设置JUnit加载的SpringBoot启动类
classes属性:设置SpringBoot启动类。
注:如果测试类在SpringBoot启动类的包或子包中,可以省略启动类的设置,也就是省略classes的设定。
2. 加载测试专用属性
1> properties属性
- 在**@SpringBootTest注解中,可通过properties属性为测试环境添加临时属性**, 仅在当前测试用例中有效。properties是字符串数组,可添加多个临时参数。
- 通过**@Value注解接收在测试环境中添加的临时属性值,如果没有添加临时参数**,则会从application配置文件中读取参数。
//可通过properties属性为测试环境添加临时属性, 仅在测试用例中有效
@SpringBootTest(properties = {"test.prop=testValue1"})
class SpringbootTest4ApplicationTests {
    @Value("${test.prop}") //接收临时属性值
    private String msg;

    @Test
    void testProperties() {
        System.out.println(msg);//testValue1
    }
}
2> args属性
- 在**@SpringBootTest注解中,args属性可以为当前测试用例添加临时的命令行参数**。args也是字符串数组类型,可添加多个参数。
//args属性可以为当前测试用例添加临时的命令行参数
@SpringBootTest(args = {"--test.prop=testValue2"})
class SpringbootTest4ApplicationTests {
    @Value("${test.prop}") //接收临时属性值
    private String msg;

    @Test
    void testProperties() {
        System.out.println(msg);//testValue2
    }
}
注:args属性的优先级高于properties属性,若args属性和properties属性添加相同名称的属性,则会优先读取args中添加的值。
3. @Import加载测试实体类
-
@Import注解可以导入要注入的bean的字节码,并将其作为一个容器中的组件存在。因此可以为当前测试类导入专用的配置。
-
MsgConfig配置类:
@Configuration
public class MsgConfig {
    @Bean
    public String msg() {
        return "bean msg";
    }
}
- 测试类:
@SpringBootTest(classes = ConfigurationTest.class)
@Import(MsgConfig.class) //@Import用于导入bean
public class ConfigurationTest {
    @Autowired //将配置类中的对象注入属性
    private String msg;

    @Test
    void testConfiguration() {
        System.out.println(msg);//bean msg
    }
}
4. Web环境模拟测试
1> 模拟web环境
- 使用webEnvironment属性,模拟端口启动web服务器环境
@SpringBootTest(webEnvironment = SpringBootTest.WebEnvironment.RANDOM_PORT) //模拟端口启动web服务器环境
public class WebTest {
    @Test
    void testRandomPort() {
    }
}
- 控制器方法:
@RestController
public class HelloController {
    @GetMapping("/hello")
    public String hello(@RequestParam(value = "name", required = false, defaultValue = "World") String name)
    {
        System.out.println("SpringBoot is running ...");
        return String.format("Hello %s!", name);
    }
}
2> 发送模拟请求
- 使用**@AutoConfigureMockMvc**注解开启虚拟MVC调用。
@SpringBootTest(webEnvironment = SpringBootTest.WebEnvironment.RANDOM_PORT) //模拟端口启动web服务器环境
@AutoConfigureMockMvc //开启虚拟MVC调用
public class WebTest {
    @Test
    //注入虚拟MVC调用对象
    void testWeb(@Autowired MockMvc mvc) throws Exception {
        //创建虚拟请求,当前访问"/hello"
        MockHttpServletRequestBuilder builder = MockMvcRequestBuilders.get("/hello");
        //执行请求
        ResultActions action = mvc.perform(builder);//打印"SpringBoot is running ..."
    }
}
3> 虚拟请求状态匹配
@SpringBootTest(webEnvironment = SpringBootTest.WebEnvironment.RANDOM_PORT) //模拟端口启动web服务器环境
@AutoConfigureMockMvc //开启虚拟MVC调用
public class WebTest {
    //注入虚拟MVC调用对象
    @Test
    void testWeb(@Autowired MockMvc mvc) throws Exception {
        //创建虚拟的get请求,当前访问"/hello"
        MockHttpServletRequestBuilder builder = MockMvcRequestBuilders.get("/hello");
        //执行请求
        ResultActions action = mvc.perform(builder);

        //匹配执行结果(是否预期值)
        //定义执行状态匹配器
        StatusResultMatchers status = MockMvcResultMatchers.status();
        //预期本次调用成功的执行状态:状态200
        ResultMatcher ok = status.isOk();

        //使用本次真实执行结果与预期结果进行比对
        action.andExpect(ok);
    }
}
4> 虚拟请求响应体匹配
@SpringBootTest(webEnvironment = SpringBootTest.WebEnvironment.RANDOM_PORT) //模拟端口启动web服务器环境
@AutoConfigureMockMvc //开启虚拟MVC调用
public class WebTest {
    //注入虚拟MVC调用对象
    @Test
    void testWeb(@Autowired MockMvc mvc) throws Exception {
        //创建虚拟请求,当前访问"/hello"
        MockHttpServletRequestBuilder builder = MockMvcRequestBuilders.get("/hello");
        //执行请求
        ResultActions action = mvc.perform(builder);

        //匹配执行结果(是否预期值)
        //定义执行结果匹配器
        ContentResultMatchers content = MockMvcResultMatchers.content();
        //定义预期执行结果
        ResultMatcher result = content.string("Hello World!");

        //使用本次真实执行结果与预期结果进行比对
        action.andExpect(result);
    }
}
5> 虚拟请求json匹配
- 自定义Book实体类:
@Data
public class Book {
    private int id;
    private String name;
}
- 控制器方法:
@GetMapping("/book")
public Book getById() {
    System.out.println("getById is running ...");
    Book book = new Book();
    book.setId(1);
    book.setName("springboot");
    return book;
}
- 测试类:
@SpringBootTest(webEnvironment = SpringBootTest.WebEnvironment.RANDOM_PORT) //模拟端口启动web服务器环境
@AutoConfigureMockMvc //开启虚拟MVC调用
public class WebTest {
    //注入虚拟MVC调用对象
    @Test
    void testWeb(@Autowired MockMvc mvc) throws Exception {
        //创建虚拟请求,当前访问"/hello"
        MockHttpServletRequestBuilder builder = MockMvcRequestBuilders.get("/book");
        //执行请求
        ResultActions action = mvc.perform(builder);

        //匹配执行结果(是否预期值)
        //定义执行结果匹配器
        ContentResultMatchers content = MockMvcResultMatchers.content();
        //定义预期执行结果
        ResultMatcher jsonResult = content.json("{\"id\":1, \"name\":\"springboot\"}");

        //使用本次真实执行结果与预期结果进行比对
        action.andExpect(jsonResult);//打印"getById is running ..."
    }
}
6> 虚拟请求响应头匹配
@SpringBootTest(webEnvironment = SpringBootTest.WebEnvironment.RANDOM_PORT) //模拟端口启动web服务器环境
@AutoConfigureMockMvc //开启虚拟MVC调用
public class WebTest {
    //注入虚拟MVC调用对象
    @Test
    void testWeb(@Autowired MockMvc mvc) throws Exception {
        //创建虚拟请求,当前访问"/hello"
        MockHttpServletRequestBuilder builder = MockMvcRequestBuilders.get("/hello");
        //执行请求
        ResultActions action = mvc.perform(builder);

        //匹配执行结果(是否预期值)
        //定义响应头结果匹配器
        HeaderResultMatchers header = MockMvcResultMatchers.header();
        //定义预期执行结果
        ResultMatcher resultHeader = header.string("Content-Type", "application/json");

        //使用本次真实执行结果与预期结果进行比对
        action.andExpect(resultHeader);//打印"getById is running ..."
    }
}
5. 数据层测试回滚
- 为测试用例添加事务,SpringBoot会对测试用例对应的事务提交操作进行回滚
@SpringBootTest
@Transactional //添加事务
public class MapperTest {
    @Autowired
    private BookService bookService;
    @Test
    void testSave() {
        Book book = new Book();
        book.setName("springboot");
        bookService.save(book);//事务提交后会自动回归
    }
}
- 如果想在测试用例中提交事务,可以通过**@Rollback**注解设置
@SpringBootTest
@Transactional //添加事务
@Rollback(false) //关闭回滚,正常提交
public class MapperTest {
    @Autowired
    private BookService bookService;

    @Test
    void testSave() {
        Book book = new Book();
        book.setName("springboot");
        bookService.save(book);
    }
}
6. 测试用例数据设定
- 测试用例数据通常采用随机值进行测试,使用SpringBoot提供的随机数为其赋值
testcase:
  book:
    id: ${random.int(10,20)} # 生成10到20的随机数
    name: ${random.value} # 随机字符串, MD5字符串, 32位
    uuid: ${random.uuid} # 随机uuid
    publishTime: ${random.long} # 随机整数 (long范围)
- BookCase实体类:
@Component
@Data
@ConfigurationProperties(prefix = "testcase.book")
public class BookCase {
    public int id;
    private String name;
    private String uuid;
    private long publishTime;
}
- 测试类:
@SpringBootTest
class RandomTest {
    @Autowired
    private BookCase bookCase;

    @Test
    void testProperties() {
        System.out.println(msg);//testValue2
        System.out.println(bookCase);
    }
}
六、SpringBoot的指标监控
监控的意义:
- 监控服务状态是否宕机
- 监控服务运行指标(内存、虚拟机、线程、请求等)
- 监控日志
- 管理服务(服务下线)
监控的实施方式:
- 显示监控信息的服务器:用于获取服务信息,并显示对应的信息。
- 运行的服务:启动时主动上报,告知监控服务器自己需要受到监控。
1. SpringBootAdmin
- Spring Boot Admin是一个开源社区项目,用于管理和监控SpringBoot应用程序。 客户端注册到服务端后,通过HTTP请求方式,服务端定期从客户端获取对应的信息,并通过UI界面展示对应信息。
1)创建SpringBoot admin server模块:
- 添加的依赖:
<dependencies>
    <dependency>
        <groupId>de.codecentricgroupId>
        <artifactId>spring-boot-admin-starter-serverartifactId>
    dependency>


    <dependency>
        <groupId>org.springframework.bootgroupId>
        <artifactId>spring-boot-starter-webartifactId>
    dependency>

    <dependency>
        <groupId>org.springframework.bootgroupId>
        <artifactId>spring-boot-starter-testartifactId>
        <scope>testscope>
    dependency>
dependencies>
- 配置SpringBoot Admin服务端的端口号:
server:
  port: 8080
- 服务端的引导类需要添加**@EnableAdminServer**注解来开启Spring-Admin
@SpringBootApplication
@EnableAdminServer //开启SpringBoot Admin Server
public class SpringbootAdminServerApplication {
    public static void main(String[] args) {
        SpringApplication.run(SpringbootAdminServerApplication.class, args);
    }
}
2)创建SpringBoot admin client模块:
- 添加的依赖:
<dependencies>
    <dependency>
        <groupId>de.codecentricgroupId>
        <artifactId>spring-boot-admin-starter-clientartifactId>
    dependency>


    <dependency>
        <groupId>org.springframework.bootgroupId>
        <artifactId>spring-boot-starter-webartifactId>
    dependency>

    <dependency>
        <groupId>org.springframework.bootgroupId>
        <artifactId>spring-boot-starter-testartifactId>
        <scope>testscope>
    dependency>
dependencies>
- 编写SpringBoot Admin客户端的配置:
server:
  port: 8081

spring:
  boot:
    admin:
      client:
        # 设置监控服务器的地址
        url: http://localhost:8080

management:
  endpoint:
    # 开启健康状况
    health:
      show-details: always
  endpoints:
    web:
      exposure:
        # 暴露所有的信息
        include: "*"
**3)**将服务端和客户端的SpringBoot启动,在浏览器中查看服务端的地址,可监控到所有客户端的情况
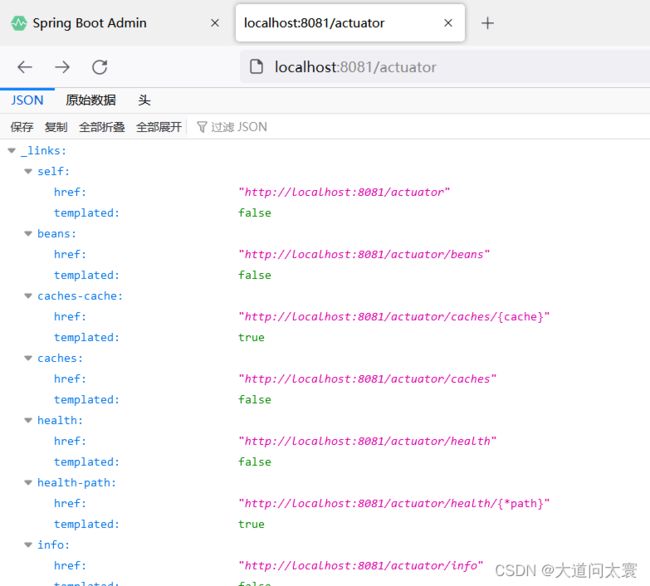
2. actuator
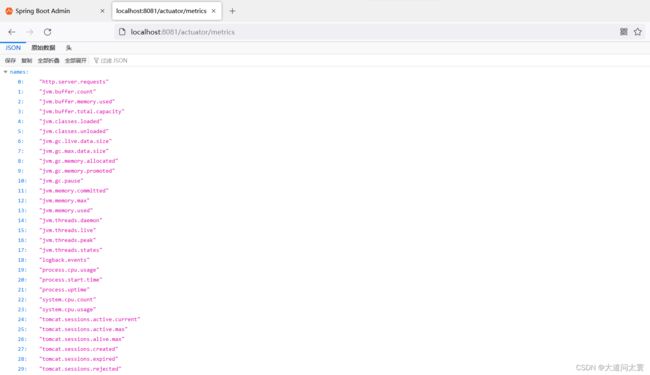
- Actuator提供了SpringBoot生产就绪功能,通过端点的配置与访问,获取端点信息
- 端点描述了一组监控信息,SpringBoot提供了多个内置端点,也可以根据需要自定义端点信息
- 访问当前应用所有端点信息:/actuator
- 访问端点详细信息:/actuator/端点名称
3. info、health、metrics端点指标控制
| ID | 描述 | 默认启用 |
|---|---|---|
| health | 显示应用程序健康信息 | 是 |
| info | 显示应用程序信息 | 是 |
| loggers | 显示和修改应用程序中日志记录器的配置 | 是 |
| metrics | 显示当前应用程序的指标度量信息 | 是 |
1> info
- 在配置文件中添加简单的info数据:
info:
  author: spf
  appName: sprintboot_admin_client
  version: 0.0.1-SNAPSHOT
- 编写代码,添加复杂的info数据:
@Component //注册组件
public class InfoConfig implements InfoContributor { //需要实现InfoContributor接口
    @Override
    public void contribute(Info.Builder builder) {
        //可通过withDetail方法链式添加info信息
        builder.withDetail("runTime", System.currentTimeMillis());
        //也可以通过withDetails方法,传入含有info信息的Map
        Map infoMap = new HashMap();
        infoMap.put("buildTime", "2022");
        builder.withDetails(infoMap);
    }
}
2> health
-
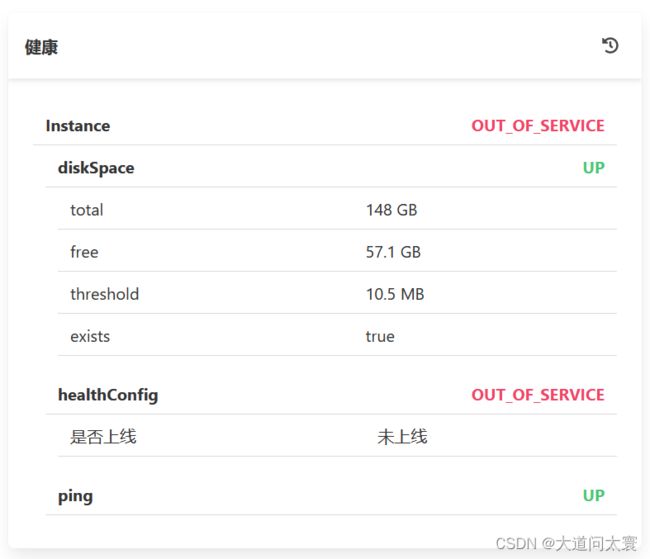
health中标注了项目中各个正在工作中的组件的运行状态 (UP / DOWN)。
-
编写代码,为Health端点添加自定义指标:
//添加Health端点的指标
@Component //注册组件
public class HealthConfig extends AbstractHealthIndicator {
    @Override
    protected void doHealthCheck(Health.Builder builder) throws Exception {
        boolean conditon = false;
        if (conditon) {
            //同info,也可通过withDetail方法链式添加info信息
            builder.withDetail("runTime", System.currentTimeMillis());
            //或也可以通过withDetails方法,传入含有info信息的Map
            Map healthMap = new HashMap();
            healthMap.put("buildTime", "2022");
            builder.withDetails(healthMap);
            //设置状态
            //builder.up();
            builder.status(Status.UP);
        } else {
            builder.withDetail("是否上线", "未上线");
            builder.status(Status.OUT_OF_SERVICE);
        }

    }
}
3> metrics
- 编写代码,为Metrics端点添加自定义指标:
@Service
public class BookServiceImpl extends ServiceImpl<BookDao, Book> implements IBookService {
    private Counter counter;

    public BookServiceImpl(MeterRegistry meterRegistry){ //添加MeterRegistry对象
        //设置指标名称
        counter = meterRegistry.counter("用户付费操作次数:");
    }

    @Override
    public boolean delete(Integer id) {
        //counter计数器,自增
        counter.increment();
        return bookDao.deleteById(id) > 0;
    }
}
![]()
4. 自定义端点
//自定义端点
@Component
@Endpoint(id="pay", enableByDefault = true) //声明端点,设置端点名, 默认开启
public class PayEndPoint {
    @ReadOperation
    public Object getPay() {
        //调用业务操作,获取支付相关信息结果,最终返回
        Map payMap = new HashMap();
        payMap.put("level 1", 102);
        payMap.put("level 2", 315);
        payMap.put("level 3", 666);
        return payMap;
    }
}
七、SpringBoot的原理
1. 自动配置原理
1> bean的加载方式
-
xml +
-
xml:context + 注解(@Component+4个@Bean)
-
配置类 + 扫描 + 注解(@Component+4个@Bean)
- @Bean定义FactoryBean接口
- @ImportResource加载配置类并加载配置文件 (系统迁移)
- @Configuration注解的proxyBeanMethods属性,设为true可保障调用此方法得到的对象是从容器中获取的而不是重新创建的
-
@Import导入bean的类
-
@Import导入配置类
-
AnnotationConfigApplicationContext调用register方法
-
@Import导入ImportSelector接口
-
@Import导入ImportBeanDefinitionRegistrar接口
-
@Import导入BeanDefinitionRegistryPostProcessor接口
2> bean的加载控制
- bean的加载控制指根据特定情况对bean进行选择性加载以达到适用于项目的目标
**1)**使用编程的方式控制bean的加载
public class MyImportSelector implements ImportSelector {
    @Override
    public String[] selectImports(AnnotationMetadata annotationMetadata) {
        try {
            //根据需求确认是否加载bean
            Class<?> clazz = Class.forName("com.spf.Mouse");
            if (clazz != null) {
                return new String[] {"com.spf.bean.Cat"};
            }
        } catch (ClassNotFoundException e) {
//            e.printStackTrace();
            return new String[0];
        }
        return null;
    }
}
@Import(MyImportSelector.class)
public class SpringConfig {
}
public class MainApplication {
    public static void main(String[] args) {
        ApplicationContext context = new AnnotationConfigApplicationContext(SpringConfig.class);
        String[] beans = context.getBeanDefinitionNames();
        //打印容器中所有定义的bean的名称
        for (String bean : beans) {
            System.out.println(bean);
        }
    }
}
2)使用@Conditional注解的派生注解设置各种组合条件控制bean的加载
@Component("jerry")
public class Mouse {
}
@Import(Mouse.class)
public class SpringConfig {
    @Bean
    @ConditionalOnBean(name = "jerry")
    @ConditionalOnMissingClass("com.spf.bean.Dog")
    public Cat tom() {
        return new Cat();
    }
}
运行结果:
注释以上SpringConfig中的**“@ConditionalOnMissingClass(“com.spf.bean.Dog”)”**的结果:
3)使用@Conditional的派生注解进行控bean的加载控制来匹配指定环境
@Bean
@ConditionalOnClass(name = "com.mysql.cj.jdbc.Driver")
public DruidDataSource dataSource() {
    return new DruidDataSource();
}
3> bean依赖的属性配置
- 将业务功能bean运行需要的资源抽取成独立的属性类 (Properties),设置读取配置文件信息
@ConfigurationProperties(prefix = "cartoon") //从配置文件中读取对应的属性
@Data
public class CartoonProperties {
    private Cat cat;
    private Mouse mouse;
}
- 配置文件中使用固定格式为属性类注入数据
cartoon:
  cat:
    name: "图多盖洛"
    age: 5
  mouse:
    name: "泰菲"
    age: 1
- 定义业务功能bean,通常使用@Import导入,解耦强制加载bean
@Data
//使用@EnableConfigurationProperties注解设定使用属性类时加载bean
@EnableConfigurationProperties(CartoonProperties.class)
public class CartoonCatAndMouse {
    private Cat cat;
    private Mouse mouse;

    //属性类
    private CartoonProperties cartoonProperties;

    public CartoonCatAndMouse(CartoonProperties cartoonProperties) { //构造器
        this.cartoonProperties = cartoonProperties;
        cat = new Cat();
        //使用三元运算符进行判断
        cat.setAge(cartoonProperties.getCat() != null &&
                   cartoonProperties.getCat().getAge() != null
                   ? cartoonProperties.getCat().getAge(): 3);
        cat.setName(cartoonProperties.getCat() != null &&
                    StringUtils.hasText(cartoonProperties.getCat().getName()) ?
                    cartoonProperties.getCat().getName(): "tom");

        mouse = new Mouse();
        mouse.setAge(cartoonProperties.getMouse() != null &&
                     cartoonProperties.getMouse().getAge() != null ?
                     cartoonProperties.getMouse().getAge(): 4);
        mouse.setName(cartoonProperties.getMouse() != null &&
                      StringUtils.hasText(cartoonProperties.getMouse().getName()) ?
                      cartoonProperties.getMouse().getName(): "jerry");
    }

    public void play() {
        System.out.println(String.format("%d岁的%s和%d岁的%s打起来了!", cat.getAge(),
                                                                     cat.getName(),
                                                                     mouse.getAge(),
                                                                     mouse.getName()));
    }
}
@SpringBootApplication
@Import(CartoonCatAndMouse.class)
public class MainApplication {
    public static void main(String[] args) {
        ConfigurableApplicationContext context = SpringApplication.run(MainApplication.class);
        CartoonCatAndMouse cartoon = context.getBean(CartoonCatAndMouse.class);
        cartoon.play();
    }
}
当前运行结果:
将application配置文件中内容全部注释后的运行结果:
4> 自动配置思想
-
收集Spring开发者的编程习惯,整理开发过程使用的常用技术列表 ----> (技术集A)
-
收集常用技术(技术集A)的使用参数,整理开发过程中每个技术的常用设置列表 ----> (设置集B)
-
初始化SpringBoot基础环境,加载用户自定义的bean和导入的其他坐标,形成初始化环境。
-
将技术集A包含的所有技术都定义出来,在Spring/SpringBoot启动时默认全部加载。
-
将技术集A中具有使用条件的技术约定出来,设置成按条件加载,由开发者决定是否使用该技术(与初始化环境比对)
-
将设置集B作为默认配置加载(约定大于配置),减少开发者配置工作量。
-
开放设置集B的配置覆盖接口,由开发者根据自身需要决定是否覆盖默认配置。
5> 变更自动配置
- 自定义自动配置 (META-INF/spring.factories):
# Auto Configure
org.springframework.boot.autoconfigure.EnableAutoConfiguration=\
com.spf.bean.CartoonCatAndMouse
- 控制SpringBoot内置自动配置类加载:
spring:
  autoconfigure:
    exclude:
      - org.springframework.boot.autoconfigure.task.TaskExecutionAutoConfiguration
      - org.springframework.boot.autoconfigure.context.LifecycleAutoConfiguration
- 通过注解@EnableAutoConfiguration属性排除自动配置项:
@EnableAutoConfiguration(excludeName = "",exclude = {})
- 在“pom.xml”中变更自动配置:去除tomcat自动配置 (条件激活),添加jetty自动配置 (条件激活):
<dependencies>
    <dependency>
        <groupId>org.springframework.bootgroupId>
        <artifactId>spring-boot-starter-webartifactId>

        <exclusions>
            <exclusion>
                <groupId>org.springframework.bootgroupId>
                <artifactId>spring-boot-starter-tomcatartifactId>
            exclusion>
        exclusions>
    dependency>

    <dependency>
        <groupId>org.springframework.bootgroupId>
        <artifactId>spring-boot-starter-jettyartifactId>
    dependency>
dependencies>
2. 自定义starter案例
1> 需求分析
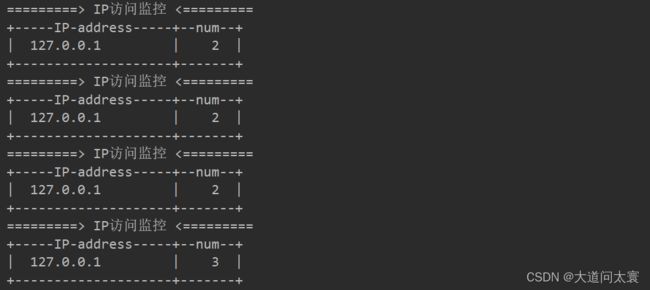
- 需求:记录系统访客独立IP访问次数
- 每次访问网站行为均进行统计。
- 后台每10秒输出一次监控信息 (格式: IP + 访问次数)。
- 分析:
-
数据记录位置:Map
-
功能触发位置:每次web请求 (拦截器)
-
业务参数 (配置项):
① 输出频度,默认5秒
② 数据特征:累计数据 / 阶段数据,默认累计数据
③ 输出格式:详细模式 / 极简模式
-
校验环境,设置加载条件
2> starter定义
1)通过Spring Initializr创建SpringBoot项目:
<project xmlns="http://maven.apache.org/POM/4.0.0"
         xmlns:xsi="http://www.w3.org/2001/XMLSchema-instance"
         xsi:schemaLocation="http://maven.apache.org/POM/4.0.0
                             https://maven.apache.org/xsd/maven-4.0.0.xsd">

    <modelVersion>4.0.0modelVersion>

    <parent>
        <groupId>org.springframework.bootgroupId>
        <artifactId>spring-boot-starter-parentartifactId>
        <version>2.3.7.RELEASEversion>
    parent>

    <groupId>com.spfgroupId>
    <artifactId>ip_spring_boot_starterartifactId>
    <version>0.0.1-SNAPSHOTversion>

    <properties>
        <java.version>1.8java.version>
    properties>

    <dependencies>

        <dependency>
            <groupId>org.springframework.bootgroupId>
            <artifactId>spring-boot-starter-webartifactId>
        dependency>
    dependencies>
project>
2)清除项目中不必要的内容
3)开发业务功能
public class IpCountServiceImpl implements IpCountService {

    //定义Map用来存储IP地址和访问次数
    private Map<String, Integer> ipCountMap = new HashMap<>();

    @Autowired //当前的HttpServletRequest对象的注入工作有使用当前starter的工程提供自动装配
    private HttpServletRequest request;

    //功能类:统计访问次数
    @Override
    public void count() {
        //每次调用当前操作,就记录当前访问的IP,然后累加访问次数
        //1.通过请求获取当前操作的ip地址
        String ip = request.getRemoteAddr();
        //2.根据IP地址从map取值,并递增
        Integer count = ipCountMap.get(ip);
        if (count == null) {
            //第一次访问一次
            ipCountMap.put(ip, 1);
        } else {
            //不是第一次访问,则访问次数加1
            ipCountMap.put(ip, count + 1);
        }
    }

    @Autowired
    private IpProperties ipProperties;

    //在有定时任务的功能上标注cron表达式
    @Scheduled(cron = "0/#{ipProperties.cycle} * * * * ?") //通过#{} EL表达式设置循环周期
    @Override
    public void display() { //显示Map中的ip的相关数据
        if (ipProperties.getMode().equals(IpProperties.LogModel.DETAIL.getValue())) { //详细模式
            System.out.println("=========> IP访问监控 <=========");
            System.out.println("+-----IP-address-----+--num--+");
            for (Map.Entry<String, Integer> entry : ipCountMap.entrySet()) {
                System.out.printf("|  %-18s|%5d  |\n", entry.getKey(), entry.getValue());
            }
            System.out.println("+--------------------+-------+");
        } else if (ipProperties.getMode().equals(IpProperties.LogModel.SIMPLE.getValue())) { //极简模式
            System.out.println("=========> IP访问监控(极简) <=========");
            System.out.println("+-----IP-address-----+");
            for (String key : ipCountMap.keySet()) {
                System.out.printf("|  %-18s|\n", key);
            }
            System.out.println("+--------------------+");
        }

        //一定要显示数据后再进行判断是否重置数据
        if (ipProperties.getCycleReset()) {
            //清空map中的数据
            ipCountMap.clear();
        }
    }
}
4)定义配置属性类
@Component("ipProperties") //设置组件的名称
@ConfigurationProperties("tools.ip")
public class IpProperties {
    /**
     * 日志的显示周期
     */
    private Long cycle = 5L;

    /**
     * 是否周期内重置数据
     */
    private Boolean cycleReset = false;

    /**
     * 日志输出模式:
     * - detail: 详细模式
     * - simple: 极简模式
     */
    private String mode = LogModel.DETAIL.value;

    //定义日志输出模式的枚举类
    public enum LogModel {
        DETAIL("detail"),
        SIMPLE("simple");

        private String value;

        LogModel(String mode) {
            this.value = mode;
        }

        public String getValue() {
            return value;
        }
    }

    public Long getCycle() {
        return cycle;
    }

    public void setCycle(Long cycle) {
        this.cycle = cycle;
    }

    public Boolean getCycleReset() {
        return cycleReset;
    }

    public void setCycleReset(Boolean cycleReset) {
        this.cycleReset = cycleReset;
    }

    public String getMode() {
        return mode;
    }

    public void setMode(String mode) {
        this.mode = mode;
    }
}
5)定义自动配置类
@EnableScheduling //开启定时任务功能
//@EnableConfigurationProperties(IpProperties.class)
@Import(IpProperties.class) //放弃配置属性创建bean的方式,改为手工控制
public class IpAutoConfiguration {
    @Bean
    public IpCountService ipCountService() {
        return new IpCountServiceImpl();
    }
}
6)在类路径中创建META-INF目录,并在其中定义spring.factories
# Auto Configure
org.springframework.boot.autoconfigure.EnableAutoConfiguration=\
  com.spf.autoconfig.IpAutoConfiguration
7)开启yml提示功能
- 首先导入配置处理器:
<dependency>
    <groupId>org.springframework.bootgroupId>
    <artifactId>spring-boot-configuration-processorartifactId>
dependency>
- 然后通过maven工具对项目进行安装:
- 将target中生成的“spring-configuration-metadata.json”文件复制到META-INF目录下
- 在JSON功能中进行自定义提示功能开发:
"hints": [
    {
        "name": "tools.ip.mode",
        "values": [
            {
                "value": "detail",
                "description": "详细模式."
            },
            {
                "value": "simple",
                "description": "极简模式."
            }
        ]

    }
]
8)对自定义的starter项目进行install
3> 自定义starter测试
1)自定义拦截器
//自定义拦截器
public class IpCountInterceptor implements HandlerInterceptor {
    @Autowired
    private IpCountService ipCountService;

    @Override
    public boolean preHandle(HttpServletRequest request,
                             HttpServletResponse response,
                             Object handler) throws Exception {
        ipCountService.count();
        return true;
    }
}
2)注册拦截器
@Configuration
public class WebConfig implements WebMvcConfigurer {
    @Override
    public void addInterceptors(InterceptorRegistry registry) {
        //注册自定义拦截器
        registry.addInterceptor(ipCountInterceptor()).addPathPatterns("/pages/**");
    }

    @Bean
    public IpCountInterceptor ipCountInterceptor() {
        return new IpCountInterceptor();
    }
}
3)在SSMP项目中导入自定义的starter
<dependency>
    <groupId>com.spfgroupId>
    <artifactId>ip_spring_boot_starterartifactId>
    <version>0.0.1-SNAPSHOTversion>
dependency>
4)配置yml参数
# 自定义starter的配置
tools:
  ip:
    cycle: 3
    cycle-reset: false
    mode: "detail"
4)运行程序,刷新页面,查看效果
3. SpringBoot启动流程
➢ SpringBoot启动流程主要分为两部分:
- 初始化数据
- 创建容器
➢ SpringBoot启动过程的思想:
**1)**初始化各种属性,加载成对象
- 读取环境属性(Environment)
- 系统配置(spring.factories)
- 参数(Arguments、application.properties)
**2)**创建Spring容器对象ApplicationContext,加载各种配置
**3)**在容器创建前,通过监听器机制,应对不同阶段加载数据、更新数据的需求
**4)**容器初始化过程中追加各种功能,例如统计时间、输出日志等
(参考资料)
[1] SpringBoot官网:https://spring.io/projects/spring-boot/
[2] Springboot入门到精通 (超详细文档): https://blog.csdn.net/cuiqwei/article/details/118188540
[3] Spring和Spring Boot到底什么关系:https://blog.csdn.net/qq_35067322/article/details/105304648
[4] 简单讲讲@SpringBootApplication:https://www.jianshu.com/p/39ee4f98575c
[5] springboot中@SpringBootApplication详解:https://blog.csdn.net/qq_39817135/article/details/110186214
[6]【尚硅谷】SpringBoot2零基础入门教程:https://www.bilibili.com/video/BV19K4y1L7MT/?spm_id_from=333.337.search-card.all.click&vd_source=c174b2269aa743e7be0447a55ddf3d18
[7] 黑马程序员SpringBoot2全套视频教程, springboot零基础到项目实战:https://www.bilibili.com/video/BV15b4y1a7yG/?p=8&spm_id_from=333.999.header_right.history_list.click&vd_source=c174b2269aa743e7be0447a55ddf3d18

