数据结构——二叉树层序遍历
链式二叉树的建立
- 前言
- 一、层序遍历的概念和实现
- 二、判断二叉树是否是完全二叉树
- 总结
前言
来喽来喽~ 二叉树的层序遍历来喽~
层序遍历那是相当有趣滴!
我的朋友,请不要迷惘,你要记住,你终有鲲鹏一日!
加油吧!从现在开始~
一、层序遍历的概念和实现
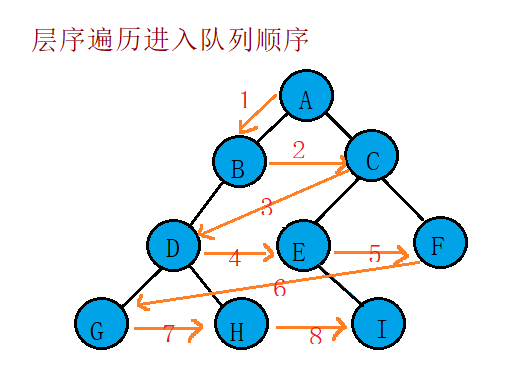
层序遍历:除了先序遍历、中序遍历、后序遍历外,还可以对二叉树进行层序遍历。设二叉树的根节点所在层数为1,层序遍历就是从所在二叉树的根节点出发,首先访问第一层的树根节点,然后从左到右访问第2层上的节点,接着是第三层的节点,以此类推,自上而下,自左至右逐层访问树的结点的过程就是层序遍历。
既然了解了层序遍的概念,那么要层序遍历二叉树那么首先就应该想到利用队列来进行!

大家对于层序遍历已经有了一些基础的认知了吧,那么现在开始代码实现吧!
1.头文件的声明
#include2.二叉树接口的定义
typedef char BTDataType;//类型重命名

typedef struct BinaryTreeNode
{
	BTDataType data;
	struct BinaryTreeNode* left;//左子树
	struct BinaryTreeNode* right;//右子树
}BTNode;
3.队列接口的定义
这里有涉及到之前队列的知识,如果对于队列不是太了解的话可以看看之前的文章!
栈和队列
//链表接口定义
typedef struct BinaryTreeNode* QDataType;
typedef struct QueueNode
{
	struct QueueNode* next;
	QDataType data;
}QNode;

//队列接口定义
typedef struct Queue
{
	QNode* head;
	QNode* tail;
	int size;
}Que;

void QueueInit(Que* pq)
{
	assert(pq);

	pq->head = pq->tail = NULL;
	pq->size = 0;
}

//否为空
bool QueueEmpty(Que* pq)
{
	assert(pq);

	return pq->head == NULL;
}

void QueueDestroy(Que* pq)
{
	assert(pq);

	QNode* cur = pq->head;
	while (cur)
	{
		QNode* next = cur->next;
		free(cur);
		cur = next;
	}

	pq->head = pq->tail = NULL;
	pq->size = 0;
}

//查找队头元素
QDataType QueueFront(Que* pq)
{
	assert(pq);
	assert(!QueueEmpty(pq));

	return pq->head->data;
}

void QueuePush(Que* pq, QDataType x)
{
	assert(pq);
	QNode* newnode = (QNode*)malloc(sizeof(QNode));
	if (newnode == NULL)
	{
		perror("malloc fail");
		exit(-1);
	}

	newnode->data = x;
	newnode->next = NULL;

	if (pq->tail == NULL)
	{
		pq->head = pq->tail = newnode;
	}
	else
	{
		pq->tail->next = newnode;
		pq->tail = newnode;
	}

	pq->size++;
}

void QueuePop(Que* pq)
{
	assert(pq);//判断队列指针指向是否为空
	assert(!QueueEmpty(pq));//判断队列里面的数据是否为空

	if (pq->head->next == NULL)
	{
		free(pq->head);
		pq->head = pq->tail = NULL;
	}
	else
	{
		QNode* next = pq->head->next;
		free(pq->head);
		pq->head = next;
	}

	pq->size--;
}
4.前序遍历构建二叉树
BTNode* BinaryTreeCreate(BTDataType* a, int* pi) {

	if (a[*pi] == '#') {//如果字符为#,则说明此处为空
		(*pi)++;//读取字符串中的下一个字符
		return NULL;
	}
	BTNode* root = (BTNode*)malloc(sizeof(BTNode));
	root->data = a[*pi];
	(*pi)++;
	root->left = BinaryTreeCreate(a, pi);//构建左子树
	root->right = BinaryTreeCreate(a, pi);//构建右子树
	return root;
}
5.层序遍历代码实现
// 层序遍历
void BinaryTreeLevelOrder(BTNode* root) {
	Que q;//定义一个队列
	QueueInit(&q);//初始化队列

	if (root)
		QueuePush(&q, root);//如果根节点不为空则入队列

	while (!QueueEmpty(&q)) {
		BTNode* front = QueueFront(&q);//指针指向队头
		printf("%c ", front->data);//输出队头字符
		if(front->left!=NULL)//如果左子树存在则将其入队列
			QueuePush(&q, front->left);
		if(front->right!=NULL)//如果右子树存在则将其入队列
			QueuePush(&q, front->right);
		QueuePop(&q);//将头结点删除,并将下一个结点变为队头
	}

	printf("\n");
	QueueDestroy(&q);//销毁队列
}
6.二叉树的销毁
利用后序遍历思想,从左子树,右子树,根依次销毁结点
// 二叉树销毁
void BinaryTreeDestory(BTNode** root) {
	if (root == NULL) {
		return;
	}
	BinaryTreePrevOrder((*root)->left);
	BinaryTreePrevOrder((*root)->right);
	free(*root);
}
7.主函数的定义
int main() {
	char arr[] = "ABD##E#H##CF##G##";
	BinaryTreeLevelOrder(arr);
	return 0;
}
8.运行结果
二、判断二叉树是否是完全二叉树
例子:数组"ABD##E#H##CF##G##"
思路解析:
这道题理所当担要用到层序遍历思想!
代码实现:
int BinaryTreeComplete(BTNode* root) {
	Que q;
	QueueInit(&q);
	if (root)
		QueuePush(&q, root);
	while (!QueueEmpty(&q)) {
		BTNode* front = QueueFront(&q);//front指向队头
		if (front == NULL)//当队头为NULL时退出入队
			break;
		QueuePush(&q, front->left);//左子树入队
		QueuePush(&q, front->right);//右子树入队
		QueuePop(&q);//删除队头
	}

	while (!QueueEmpty(&q)) {
		BTNode* front = QueueFront(&q);//front指向队头,即NULL结点
		QueuePop(&q);//

		if (front != NULL) {//当队头不为BULL,则说明这不是完全二叉树
			QueueDestroy(&q);//销毁队列
			return false;
		}
	}

	QueueDestroy(&q);
	return true;//如果从队列中的第一个NULL开始后面也全为NULL,则说明是完全二叉树
}
总结
不知道有没有难住你呢!
相信你不会被这些小困难绊倒!
说给你,更说给我,现在的努力至少不会辜负这一点青春时光!


