解析一下vue项目、scoped、ref属性、props其它、mixin、插件、elementui
解析一下vue项目、scoped、ref属性、props其它、mixin、插件、elementui
0 解析一下vue项目
案例演绎代码
1 登录小案例
案例演绎代码
2 scoped
3 ref属性
4 props其它
5 mixin
6 插件
7 elementui
0 解析一下vue项目
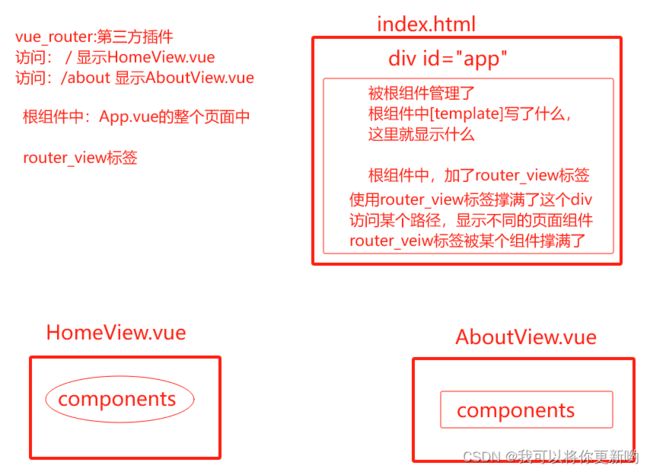
# 1 为什么浏览器中访问某个地址,会显示某个页面组件
	-根组件:App.vue  必须是
        <template>
          <div id="app">
            <router-view></router-view>
          </div>
    	</template>
	-1 配置路由
    	router----》index.js---》const routes = [
                {
                path: '/lin',
                name: 'lin',
                component: Lin  # 组件,需要导入
            },
        ]
     -2 放心大胆的写页面组件  -src---->views文件夹


# 2 在页面组件中使用小组件
	-1 写一个小组件,我们写了个Child.vue
    -2 在父组件中,导入组件
    	# @ 代指src路径
		import Child from "@/components/Child";
    -3 父组件中,注册组件
    	  components: {
            Child
          }
    -4 父组件中使用组件
	    <Child :msg="msg" @myevent="handleEvent"></Child>
    -5 自定义属性,自定义事件,插槽,跟之前一模一样
案例演绎代码
1.1在views(页面组件)中建个Lin.vue的父组件
<template>
  <div class="lin">
    <button @click="handleClick">点我看美女</button> 子组件传过来的:{{name}}
    <hr>
    <Child :msg="msg" @myevent="handleEvent">
      <div>
        我是div,准备不具名插槽拉
      </div>
    </Child>
    <hr>
  </div>
</template>

<script>
// @ 代指src路径
import Child from "@/components/Child";
export default {
  name: "Lin",
  data(){
    return {
      msg: '我是lin组件的变量,msg',
      name: ''
    }
  },
  methods: {
    handleClick() {
      alert('lin')
    },
    handleEvent(name){
      // alert(name)
      this.name = name
    }
  },
  components:{
    Child
  }
}
</script>

<style scoped>
</style>
1.2在components(小组件)中建个Child.vue的子组件
<template>
  <div>
    <button @click="back">后退</button>
      {{ title }}
    <button>前进</button>
    <br>
    <h2>父传子</h2>
    父组件传给我的:{{msg}}

    <br>
    <h2>子传父</h2>
    <input type="text" v-model="name"> -----》{{name}}
    <button @click="handleSend">点我传给父亲</button>

    <br>
    <h2>插槽的使用</h2>
    <slot></slot>
    <h2>插槽结束</h2>
  </div>
</template>

<script>
export default {
  name: "Child",
  data() {
    return {
      title: '首页',
      name: ''
    }
  },
  methods: {
    back() {
      alert('后退')
    },
    handleSend(){
      this.$emit('myevent', this.name)
    }
  },
  props: ['msg']
}
</script>

<style scoped>
</style>
1.3在index.js中导入和加入路由
import Lin from "@/views/Lin";

const routes = [
    {
        path: '/lin',
        name: 'lin',
        component: Lin
    }
]
1 登录小案例
1 登录页面:LoginView.vue

2 访问/login 显示这个页面组件
3 在LoginView.vue写html,和js,axios
	-安装 axios
    -cnpm install -S axios  # 把安装的axios放到package.json中
4 写ajax,向后端发送请求,给按钮绑定两个一个事件
	# 安装axios,导入axios
	    handleSubmit() {
          console.log(this.name, this.password)
          axios.post('http://127.0.0.1:8000/login/', {
            name: this.name,
            password: this.password
          }).then(res => {
            // console.log(res.data)
            if (res.data.code == 100) {
              //跳转到百度
              location.href = 'http://www.baidu.com'
            } else {
              alert(res.data.msg)
            }
          })
        }
5 写个后端的登录接口,处理好跨域问题,处理跨域如下


--注意:解决后端跨域问题
	1 安装
    	pip3.8 install django-cors-headers
    2 注册app
        INSTALLED_APPS = (
            'corsheaders',
        )
    3 配置中间件
        MIDDLEWARE = [
            'corsheaders.middleware.CorsMiddleware',
        ]

    4 配置文件中加入:setting下面添加下面的配置
        CORS_ORIGIN_ALLOW_ALL = True
        CORS_ALLOW_METHODS = (
            'DELETE',
            'GET',
            'OPTIONS',
            'PATCH',
            'POST',
            'PUT',
            'VIEW',
        )

        CORS_ALLOW_HEADERS = (
            'XMLHttpRequest',
            'X_FILENAME',
            'accept-encoding',
            'authorization',
            'content-type',
            'dnt',
            'origin',
            'user-agent',
            'x-csrftoken',
            'x-requested-with',
            'Pragma',
            'token'
        )
案例代码演示
后端
# POST请求会出跨域
def login(request):
    data = json.loads(request.body)
    username = data.get('username')
    password = data.get('password')

    user = User.objects.filter(username=username, password=password).first()
    if username == user.username and password == user.password:
        return JsonResponse({'code': 100, 'msg': '登录成功'})

    return JsonResponse({'code': 101, 'msg': '用户名或密码错误'})


--------------------------------------------------------------------------------
路由:
urlpatterns = [
    path('login/', views.login),
]
前端
/*
	在views文件夹下新建一个LoginView.vue,
	然后在index.js中添加路由
	import LoginView from "@/views/LoginView";
	const routes = [
		{
	        path: '/login',
	        name: 'login',
	        component: LoginView
	    }
    ]
*/

<template>
<div>
  <p>用户名:<input type="text" v-model="username"></p>
  <p>密码:<input type="password" v-model="password"></p>
  <button @click="handleSubmit">登录</button>
</div>
</template>

<script>
//安装的依赖,直接导入即可
import axios from 'axios'

export default {
  name: "LoginView",
  data(){
    return{
      username: '',
      password: ''
    }
  },
  methods:{
    handleSubmit(){
      console.log(this.username, this.password)
      axios.post('http://127.0.0.1:8000/login/', {
        username: this.username,
        password: this.password
      }).then(
          res => {
            console.log(res.data)
            if (res.data.code === 100) {
              // 跳转到百度
              location.href = 'http://www.baidu.com'
            } else {
              alert(res.data.msg)
            }
          }
      );
    }
  }
}
</script>

<style scoped>
</style>
2 scoped
--新建的组件 加了scoped,表示样式只在当前组件生效,如果不加,子组件都会使用这个样式
'''
scoped 是 Vue.js 中