【flutter】架构之商城main入口
架构之商城main入口
- 前言
- 一、项目模块的划分
- 二、入口main的配置
- 三、配置文件怎么做
- 总结
前言
本栏目我们将完成一个商城项目的架构搭建,并完善中间的所有功能,总页面大概200个,如果你能看完整个栏目,你肯定能独立完成flutter 项目的整体研发工作。
首先新建一个叫blog_mall 的项目,能看到这里的,我想都知道该怎么创建项目了,这里就不再赘述。
一、项目模块的划分
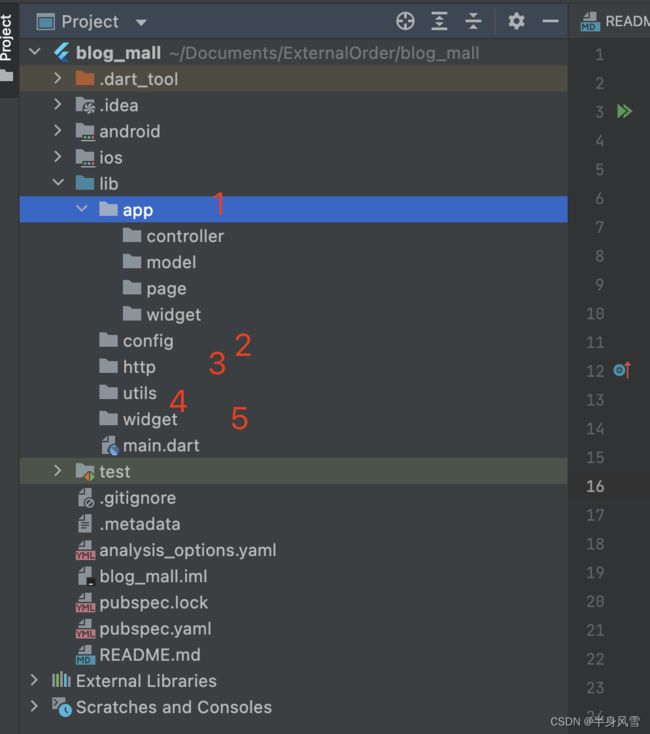
由上图我们可以看到,我把整个项目的文件夹分为了5个模块:
- app: 整个项目的主题文件夹
- config: 项目的基础配置文件
- http:网络模块
- utils:工具模块
- widget:通用的child 模块
二、入口main的配置
在配置main 入口文件之前,我们先导入本项目主要的框架插件:
#  设备适配
flutter_screenutil: ^5.8.4
#  状态管理
get: ^4.6.5
#  收起键盘
keyboard_dismisser: ^3.0.0
#  加载器
flutter_easyloading: ^3.0.5
- flutter_screenutil:做前端的,最重要的是,没错,就是适配,这个组件会完美的解决你的问题。
- get:大家可以看到,我将使用getx 作为整个项目的状态管理器,如果有对getx 这个组件不太了解的,可以翻看我之前写的相关文章。
- keyboard_dismisser:当你使用文本输入框的,键盘怎么回收?单个设置?麻烦不你,这里教你一键解决。
- flutter_easyloading:网络请求?吐司?菊花?这个全都有。
上面我们介绍导入的四个组件,下面我们来看看主要针对main 文件做了什么改造:
class MyApp extends StatelessWidget {
const MyApp({super.key});
Widget build(BuildContext context) {
return ScreenUtilInit(
// 一般情况下,你的设计师的UI比例初始值都是它
designSize: const Size(375, 812),
minTextAdapt: true,
splitScreenMode: true,
builder: (context, child) {
return KeyboardDismisser(
gestures: const [GestureType.onTap],
child: GetMaterialApp(
// 项目的主题走起来
theme: FhTheme.getTheme(),
debugShowCheckedModeBanner: false,
title: '即时零售',
// 配置的路由文件,什么?routes??? 不需要,完全不需要
getPages: GetPages.getPages,
initialBinding: BaseBindings(),
builder: (context, child) {
// 初始化你的loading
EasyLoading.init();
// 看不懂这个是什么???你想你的APP 字体会跟随系统字体大小去改变的话,你尽管干掉它
return MediaQuery(
data: MediaQuery.of(context).copyWith(textScaleFactor: 1.0),
child: FlutterEasyLoading(child: child ?? Container(),),
);
},
),
);
},
);
}
}
看完上面的代码,如果你还有什么疑问的话,那么我只想说,你没救了,还是尽快换个行业比较好。
三、配置文件怎么做
上面的代码中,你看到了"GetPages.getPages" 路由的配置,“FhTheme.getTheme()” 主题色的配置,“BaseBindings()” bindings 的配置,那么这些文件夹里面都是什么呢?带着疑问我们继续看。
import 'package:get/get.dart';

/// 1 * FileName: get_pages
/// 2 * Author: tiger -- 范虎
/// 3 * Date: 2023/9/20 11:52
/// 4 * Description:
/// 5 * 作者博客:半身风雪

class GetPages{
  // static String home = '/home';
  static List<GetPage> getPages = [
   //  GetPage(name: home, page: () => const HomePage()),
  ];

}
GetPages 啥也不是,他就只是一个GetPage 的数组,后期我们所有的路由都将在这里进行配置,具体可参考示例。
import 'package:get/get.dart';
/// 1 * FileName: base_bindings
/// 2 * Author: tiger -- 范虎
/// 3 * Date: 2023/9/20 11:54
/// 4 * Description:
/// 5 * 作者博客:半身风雪
class BaseBindings extends Bindings{
void dependencies() {
// TODO: implement dependencies
// Get.lazyPut(() => HomeController, fenix: true);
}
}
Bindings 的配置文件也一样,这里我们初始化的整个项目的所有controller,怎么用?看示例啊,加载方式有几种,我就不一一介绍,普遍使用lazyPut 就可以了,fenix 的初始值是false ,这里我为什么要用true?因为他可以让你的controller 复活,想想你跳了N个界面之后,突然想调第一个controller 的数据,但是这个controller 已经被销毁了,会发生什么呢?
import 'package:flutter/material.dart';
import 'package:flutter/services.dart';

import 'fh_colors.dart';

/// 1 * FileName: fh_theme
/// 2 * Author: tiger -- 范虎
/// 3 * Date: 2023/9/20 11:39
/// 4 * Description:  项目主题
/// 5 * 作者博客:半身风雪


class FhTheme{
 static ThemeData getTheme(){
   return ThemeData(
     // 取消按钮的溅射效果
     splashColor: Colors.transparent,
     highlightColor: Colors.transparent,
     hoverColor: Colors.transparent,

     // 页面背景色
     scaffoldBackgroundColor: FhColors.themeColor,
     // 分割线颜色
     dividerColor: FhColors.dividerColor,
     // 全局appbar样式控制
     appBarTheme: const AppBarTheme(
       //分割线
       elevation: 0.0,
       //背景色
       color: Colors.white,
       // 状态栏
       systemOverlayStyle: SystemUiOverlayStyle(
         statusBarColor: Colors.transparent,
         statusBarIconBrightness: Brightness.dark,
         statusBarBrightness: Brightness.dark,
       ),
     ),

     // 底部 bottom 主题
     bottomNavigationBarTheme: const BottomNavigationBarThemeData(
       backgroundColor: Colors.white,
     ),


     // floatingActionButtonTheme: const FloatingActionButtonThemeData(
     //   //浮动按钮样式 after v1.13.2. 后不建议使用
     //   backgroundColor: Colors.white,
     // ),
   );

 }
}
theme 主题色,这个就没有什么好说的了,你只有明白一点,整个项目中,你所有widget 的初始色值、属性等,都可以在这里进行赋值,不懂的请移步看我之前的文章。
在上面的class 中,你还疑惑FhColors 是什么?别急,这个是我们自己封装的色值文件。
class FhColors{
  static Color themeColor = FhColorUtils.hexStringColor('#F4F5F9');
  static Color dividerColor = FhColorUtils.hexStringColor('#E6E6E6');
  static Color textBlack = FhColorUtils.hexStringColor('#000000');


}
作用就一个,后期项目中所有的设置我们都将放在这里,进行统一的管理。
纳尼?FhColorUtils 又是啥???
拜托,FhColorUtils 就是一个色值转换的封装操作,里面就放你flutter 目前不支持的色值格式转换就行,你就理解成色值转换器呗。
贴代码?i no 你去看一下我前面的文章行不行啊,都有的。
总结
本篇文章很短,内容也很少,但是有一点,当你去新建项目的时候,main 文件就这么写,觉得没错,说不定你的管理还给你加个鸡腿呢。
