使用Hackintool修复通用帧缓存区(帧缓冲区) 指南
General Framebuffer Patching Guide using Hackintool
Please do not quote this guide in its entirety. Post a link instead.
原始链接:[GUIDE] General Framebuffer Patching Guide (HDMI Black Screen Problem) | tonymacx86.com
以下内容为翻译,方便查询使用。
15 Jan 2019: Intel FB-Patcher has been renamed to Hackintool.
19 Jan 2019: Guide overhauled. Please be aware of possible HDMI hot-plug issues. After boot you may have to unplug and replug HDMI cable.
02 Feb 2019: Screenshots updated for new Hackintool GUI design and added Step 16 to "disablegfxfirmware".
12 Mar 2019: Hackintool v2.0.9 and newer incorporates the various connector patches from the Compilation of Patches for Various Motherboards below. See that section for details!
18 Jun 2020: Quick note about use of video adapters such as DisplayPort to DVI. They may be okay to use, but may require setting Type to DigitalDVI. Reference.
NOTICE 24 JUL 2020:The next versions of Lilu and WhateverGreen are expected to fix the HDMI output problem with macOS Catalina. Early build may be downloaded from here.
NOTICE 03 AUG 2020:
WhateverGreen 1.4.1 was released today, and it fixes the on-board HDMI output problem with macOS Catalina.
About this Guide
If you have a relatively recent motherboard with an Intel iGPU, and on-board HDMI is not working, here's a general guide that may help. This guide is meant to supplement -- not replace -- existing framebuffer patching guides.
Do you have a 360, 370, or 390 series motherboard with desktop Coffee Lake processor, either HDMI or DP monitor, and a Gigabyte, ASUS, ASRock, or MSI motherboard and want to try your luck with a pre-built framebuffer patch? Then check out Compilation of Patches for Various Motherboards at the end of this Guide.
This guide is best suited to relatively new, modern components. This includes (a) modern CPU, (b) modern motherboard, and most importantly, (c) modern monitor. A large number of problems are due to the use of televisions, old monitors, or monitors without DisplayPort 1.2+ or HDMI 1.4+ support.
The primary purpose of this Guide is to activate the on-board HDMI port on your motherboard with the intention of using that port to drive a single monitor. This guide does not recommend using a multi-monitor setup with the iGPU. Multi-monitor setups are best handled by discrete AMD graphics cards.
Contents
This guide is organized into the following sections. You may jump to any section by clicking on the link.
- Theory
- Preflight Checklist
- Preparation
- Procedure
- Finishing Up
- References
- Compilation of Patches for Various Motherboards
- Help Others
Theory
There are many motherboards available from ASRock, ASUS, EVGA, Gigabyte, MSI and others. The on-board video ports on these boards come in many different combinations. Some boards offer one HDMI and two DPs. Some boards offer two HDMIs. Others may provide DVI and VGA as well. (But note that there is no support for VGA even if the motherboard has a VGA connector.) Update: We now have two confirmed cases of working VGA ports with macOS 10.14 (Mojave) and Coffee Lake CPUs. Therefore, VGA is now considered to be supported.
When MacOS initializes the iGPU display driver (called AppleIntelFramebuffer) it does not know the specific video ports on the motherboard. It doesn't know which port is HDMI, which is DVI, etc. So depending on the Platform ID you select, it makes default assumptions. For Platform ID 0x3E9B0007, for example, all ports are treated by default as DisplayPorts (VGA is also treated as DisplayPort). So if you were to connect a DisplayPort (or VGA) monitor to the motherboard, it would work right away. But if you were to connect an HDMI or DVI monitor to the motherboard, you would get no display at all -- because by default MacOS thinks those are DisplayPort connections.
Fortunately there is a relatively straightforward way to change the default port map. Every physical video port on the motherboard is associated with a port number. These port numbers are 5, 6, and 7, but they are wired to different physical ports on different boards. MacOS allows a maximum of 3 external video connections through the iGPU.
On some motherboards Port 5 may be wired to HDMI, while on others it may be wired to DP or DVI or VGA. Likewise, Ports 6 and 7 are wired to different physical ports on different boards. To solve the HDMI and DVI black screen problem, we first need to determine which ports on the motherboard are wired to HDMI (if any), which are wired to DVI (if any), and which (if any) are wired to DP or VGA.
Once we have determined the physical port mappings for the motherboard, we provide this information to MacOS by filling out a simple Framebuffer Table. Because a maximum of 3 external video ports are supported by MacOS, we can define up to 3 software connectors or "cons". Any software connector can be mapped to any physical video port.
- The 3 software connectors are called con0, con1, and con2.
- The 3 physical ports 5, 6, and 7 are available to us as software Indexes 1, 2, and 3.
- Software Index 1 always refers to physical Port 5.
- Software Index 2 always refers to physical Port 6.
- Software Index 3 always refers to physical Port 7.
- HDMI and DVI are considered to be the same. Set Type to HDMI for both HDMI and DVI physical ports.
- DP and VGA are considered to be the same. Set Type to DP for both DP and VGA physical ports.
So for example:
- If we want to inform MacOS that physical Port 6 is type HDMI, we set Index 2 to Type HDMI.
- If we want to inform MacOS that physical Port 5 is type DVI, we set Index 1 to Type HDMI (because DVI and HDMI are equivalent in MacOS).
- If we want to inform MacOS that physical Port 7 is type DP, we set Index 3 to Type DP.
- If we want to inform MacOS that physical Port 7 is type VGA, we set Index 3 to Type DP (because VGA and DP are equivalent in MacOS).
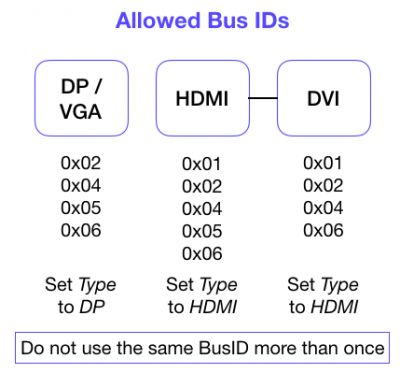
But in addition to Type we also need to specify something called the BusID. Every software connector must be assigned a unique BusID, but only certain BusID values are permitted:
- DisplayPort is the most flexible. BusIDs 0x02, 0x04, 0x05, 0x06 are permitted. Any of these values should work on any motherboard. These values apply to VGA as well.
- HDMI is very restrictive. Only BusIDs 0x01, 0x02, 0x04, 0x06 are permitted but some motherboards will only accept one or two of these possibilities. The Gigabyte Designare Z390, for instance, only accepts 0x04.
- DVI is the same as HDMI. The same BusIDs and even the same Type are used.
With this crash course in Ports, Connectors, Indexes, Types, and BusIDs we're ready to start...
We begin by determining the Type of each physical Port. Once we have completed this task, the rest is relatively easy. So in the beginning we have 3 answers to discover:
- Port 5 (Index 1) is which Type?
- Port 6 (Index 2) is which Type?
- Port 7 (Index 3) is which Type?https://www.tonymacx86.com/threads/...hdmi-black-screen-problem.269149/post-2169249
The high level procedure is illustrated below.

Preflight Checklist
NOTE: If you're using a DisplayPort to DVI adapter (DP to DVI) or an HDMI to DisplayPort (HDMI to DP) adapter, please see this post and this post now.
- Download Hackintool from here.
- Lilu and WhateverGreen must be installed.
- Your computer must be booted up with proper graphics Device ID and Platform ID values. These can be specified easily in Clover. Choose either Option 1 or Option 2 below.
Spoiler: Option 1: Enter the values in Clover Configurator (recommended for most people)
Spoiler: Option 2: Add custom Properties in the Devices page of Clover Configurator (for advanced users)
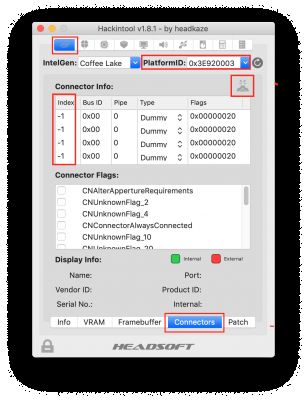
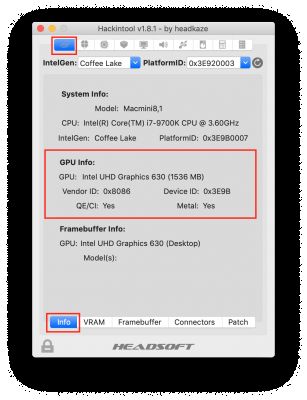
- For most Coffee Lake desktop processors, Device ID 0x3E9B and Platform ID 0x3E9B0007 can be used. Please refer to this framebuffer patching guide to determine the appropriate values for your system. These values allow the proper display driver to be attached to the iGPU. If the default (non-accelerated) display driver gets attached instead, then this Guide will not work. Any Platform ID with all connectors set to Index = -1 is known as a headless platform, and must be avoided, such as Platform ID 0x3E920003 as shown:
- But herein lies the problem: When the proper (accelerated) display driver is connected, your motherboard's HDMI and DVI ports will stop working. So you must either (1) connect your display monitor to a different but working video port on the motherboard (try DisplayPort), or (2) use a discrete (external) GPU and connect your display monitor to the discrete GPU.
- To determine whether the proper display driver is attached to the iGPU, run Hackintool. If GPU Info is shown properly as in the image below, then you're good to proceed. If you see GPU: ??? then start again at Preflight Check or post a request for help.
- Make a list of the video ports on your motherboard (e.g. HDMI, DP, DVI-D, VGA).
- During the procedure we will need to test each of the video ports. So you must have monitor(s) and cables for each type of video connector. The procedure can, however, be followed even if one of the cable types is not available or supported by your monitor, but that will add a bit of guesswork.
- At this point your computer is booted up and running with the accelerated display driver for your iGPU. It does not matter whether you specified ig-platform-id and graphics Device ID using fields/checkboxes in Clover Configurator or by inserting Devices-->Properties. It just matters that the accelerated driver is active. But now you must clear the following settings (if they exist) from config.plist (use Clover Configurator) but DO NOT REBOOT:
- Devices --> Fake ID --> IntelGFX --> remove any entry you might have made in this field.
- Graphics --> Inject Intel --> uncheck the checkbox.
- Graphics --> ig-platform-id --> remove any entry you might have made in this field.
- Save the config.plist and quit Clover Configurator.
Preparation
- Run Hackintool. From the top menu bar, select Framebuffer and choose macOS 10.14.

- From the Patch menu, select Apply Current Patches and make sure the check-mark is present!

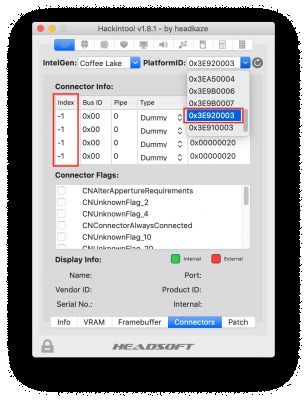
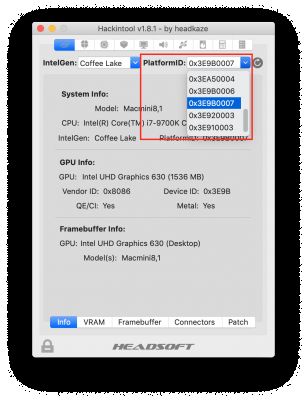
Note: This option displays the currently active framebuffer settings in the Connectors tab. It does not actually apply any changes to your system. But when changes are made as described later in this Guide and the system is rebooted, this option displays those settings instead of the default framebuffer settings. So if you made and applied some changes, rebooted, and did not see those changes in Hackintool, it is because Apply Current Patches was not selected. Also note that whenever you select a new Platform ID from the pop-up menu, the default settings for that platform will appear in Connectors (as it should). To see your previously applied settings, however, just select Apply Current Patches once again. - Select the most appropriate Platform ID for your motherboard. See Which ig-platform-id should I use for my system. Different Platform IDs will have a different set of connectors. If you choose a headless platform ID, all connectors will have Index = -1 (all off).
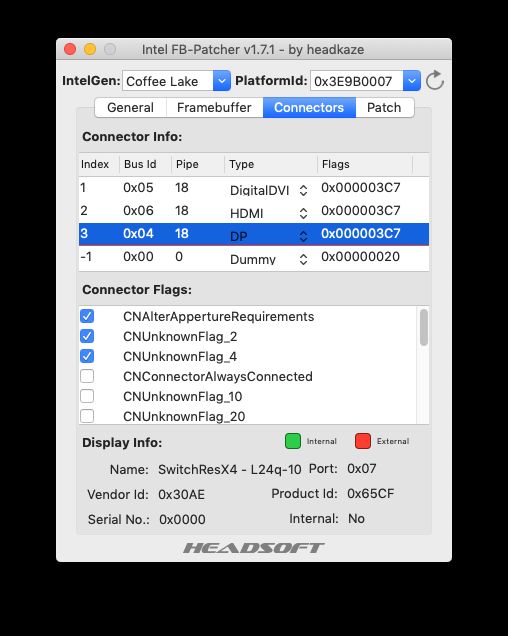
- In this case we select Platform ID 0x3E9B0007 and then we click the Connectors tab. This will be our main focus -- this is the connector mapping table -- where we can assign Index, BusID, Pipe, Type, and Flags. Each row in the table corresponds to a software connector. Connectors are numbered sequentially from 0. So we are looking at the mapping table for con0, con1, and con2. At this time, don't trust any of the values in this table!
- If your monitor is connected to one of the on-board video ports, one of the rows will be highlighted in red. Because I used a DisplayPort cable and nothing else, only one row is highlighted. This tells me definitively that the red line belongs to a DisplayPort connection. So now I need to determine its Port number. This is done by clicking on the red row and reading Port number from the bottom right of the window.
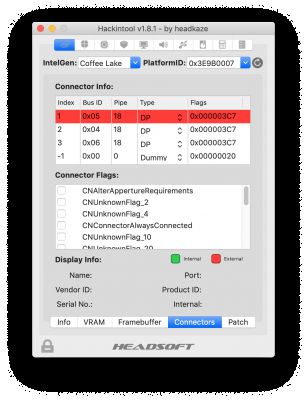
Great! One down, two to go. We now know that Port 5 -- which is Index 1 -- is DisplayPort. So our discovery result looks like this:- Port 5 (Index 1) is DisplayPort
Procedure
- Keep your primary monitor connected at all times.
- Now connect one of the other on-board video ports to a monitor that supports that type of input. For example, if your motherboard has a DVI port, connect it now to a monitor with DVI input. Chances are that all of your DisplayPort connections will light up, but your DVI and HDMI connections may or may not light up. Do not use video adapters (e.g. DP-to-HDMI, DVI-to-HDMI, etc.) during this procedure. Instead, use straight connections (HDMI-to-HDMI, DP-to-DP, DVI-to-DVI, etc.).
- One of the rows in Hackintool will light up in red. Because my motherboard has 2 DisplayPort connectors, I now unplugged the cable from the first one and inserted it into the second. As soon as I did this, a different row lit up in red. And once again we need to determine Port number by clicking the red bar. In this case the port number of the second DisplayPort connector is 6.

Our discovery result has now expanded to this:- Port 5 (Index 1) is DisplayPort
- Port 6 (Index 2) is DisplayPort
- Because there are only 3 video connectors on this motherboard and I know that my HDMI output isn't working, there's no point connecting an HDMI cable. But feel free to connect one and verify the black screen. Through the process of elimination we can safely conclude that Port 7 (Index 3) must be HDMI. So our discovery result now looks like this:
- Port 5 (Index 1) is DisplayPort
- Port 6 (Index 2) is DisplayPort
- Port 7 (Index 3) must be HDMI
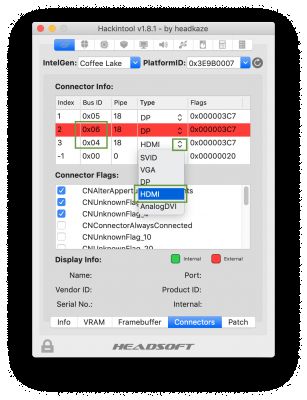
- Now look at the Type and Index columns. We see that all three rows are set to Type DP (DisplayPort) and the Index values are 1, 2, and 3. The first two look correct, but we have just determined that Index 3 must be HDMI.
- So we change the Type of Index 3 to HDMI from the pop-up menu. And we set its BusID to 0x04. Why 0x04? There are other possible values for BusID, but we need to start somewhere and test the possibilities one at a time. Because BusID 0x04 is currently assigned to Index 2, we swap the values between them. Index 2 get BusID 0x06 (which is a valid BusID for DisplayPort) and Index 3 gets 0x04. So the result looks like this:
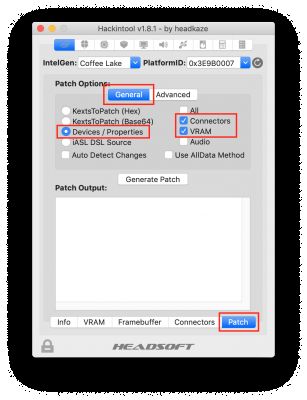
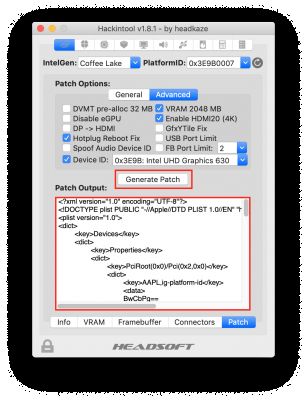
- Now we're ready to test our changes. Click the Patch tab and make the selections shown in the General and Advanced sub-tabs: (Because I'm using a Coffee Lake processor, the Device ID in the Advanced sub-tab is set to 0x3E9B: Intel UHD Graphics 630. You should select the most appropriate Device ID for your CPU.)
- Hackintool sometimes resets the Connectors page when certain checkboxes are clicked. So at this time go back to Connectors page, double-check your settings (redo them if needed), and return to the Patch page. And now click Generate Patch.
- Now we need to insert the patch into our existing config.plist. Mount the EFI partition of the Mojave SSD using Clover Configurator or EFI Mounter v3.
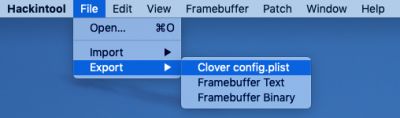
- Then select File --> Export --> Clover config.plist from the Hackintool menu bar as follows:
- And from the file browser that appears, navigate to the CLOVER folder on the EFI partition of the Mojave SSD and select the existing config.plist. Hackintool will backup the existing file and insert the patch directly into the config.plist in a non-destructive manner.
- Now the patch has been installed so let's test our changes. Reboot the computer at this time.
- When Mojave starts up, login and connect your motherboard's HDMI port to an HDMI input on your monitor. Does HDMI turn on? At this stage it might not. But if it does, we're done!
- If HDMI (or DVI) does not turn on, try a different permitted BusID. Run Hackintool once again, select Framebuffer --> macOS 10.14 and verify that Patch --> Apply Current Patches is still checked on. Then repeat Steps 5 through 13, but apply a different BusID using the following cheat sheet:
- If you have fewer than 3 video ports there are two options for disabling unused Indexes. Option 1 is to set the Index value to -1. Option 2 is to leave the Index value as-is, but set the BusID to 0x00. Based on some user feedback, Option 2 may be the one to try first. For example, if you have a single HDMI at Port 0x07 (Index 3) you could try any of the configurations in the spoiler below.
Spoiler: Possible Configurations for Single HDMI at Port 0x07
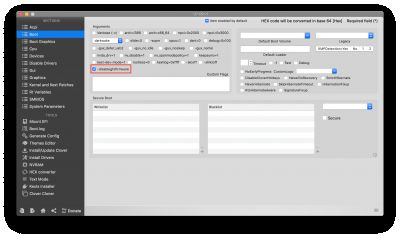
- In order to reduce graphics glitches and prevent some (rare) boot failures, it's recommended to enable the "disablegfxfirmware" checkbox as shown.
Finishing Up
This turned out to be a relatively simple case because two of the three ports were configured properly by default and there was virtually no guesswork. But what if no other row lights up when you connect another video port? In this case you have to resort to trial and error. Hopefully one of the ports will be known, so you only have to figure out one more or two more.
Let's say you've already discovered that Port 5 (Index 1) is DisplayPort, and that's all the information you can get because no other row turns red. So if the next port to configure is HDMI, you would try to assign HDMI to Port 6 (Index 2) and set its Type and BusIDs appropriately and reboot. If HDMI still does not activate, you would assign it to Port 7 (Index 3) and set its Type and BusID appropriately. If this still fails, you would try a different BusID on Port 6 and then again on Port 7 until you find the magic combination.
Once HDMI (or DVI) has been successfully enabled we can run Hackintool once again to check the Port number. First, we see that the row marked HDMI is now lit up in red (the first row is our DisplayPort connection) and if we click on the HDMI row itself, we can confirm that the Port number is indeed 0x07.

And we're done!
References
- The techniques described in this guide depend on Lilu and its plug-in, WhateverGreen. A thorough guide to Lilu and its various plug-ins is located here. Written by @jaymonkey, it goes into considerably more depth and uses a large number of examples.
- Written by @headkaze, author of Hackintool, this guide covers a broad range of Intel processor generations.
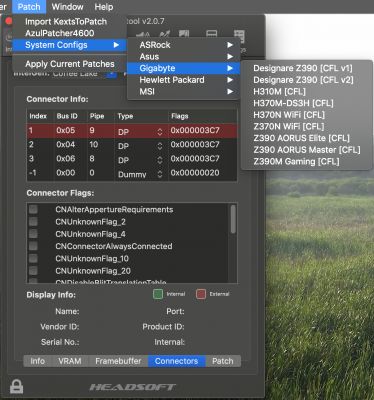
Compilation of Patches for Various Motherboards
Framebuffer patches submitted by forum members are provided here. If your motherboard is listed, you may be able to simply copy-and-paste the patch into your config.plist as described in the spoiler below.
Update: 12 Mar 2019: Hackintool v2.0.9 and newer incorporates these predefined connector patches so you can simply select the appropriate one from the Patch --> System Configs menu bar item. See Procedure to Insert Framebuffer Patch into config.plist below for details.
Spoiler: Procedure to Insert Framebuffer Patch into config.plist
Spoiler: V2: Gigabyte Designare Z390 and Coffee Lake CPU
Spoiler: V1: Gigabyte Designare Z390 and Coffee Lake CPU
Spoiler: Gigabyte Z390 AORUS Elite and Coffee Lake CPU
Spoiler: Gigabyte Z390 AORUS Master and Coffee Lake CPU
Spoiler: Gigabyte Z390M Gaming and Coffee Lake CPU
Spoiler: Gigabyte H370M-DS3H and Coffee Lake CPU
Spoiler: Gigabyte H370M-D3H and H370M-D3H GSM, and Coffee Lake CPU
Spoiler: Gigabyte H370N WiFi and Coffee Lake CPU
Spoiler: Gigabyte Z370N WiFi and Coffee Lake CPU
Spoiler: Gigabyte H370 HD3 and Coffee Lake CPU
Spoiler: Gigabyte H370 AORUS Gaming 3 and Coffee Lake CPU
Spoiler: Gigabyte H310M and Coffee Lake CPU
Spoiler: Gigabyte B360N WiFi and Coffee Lake CPU
Spoiler: Asus Maximus XI Extreme and Coffee Lake CPU
Spoiler: Asus Prime H370M-Plus, ASUS Prime Z390-A, Asus ROG Strix B360-I, Asus TUF Z390M-Pro Gaming, Asus Prime H370-Plus and Coffee Lake CPU
Spoiler: ASRock Z390M-itx/ac and Coffee Lake CPU
Spoiler: ASRock Z370 Taichi and Coffee Lake CPU
Spoiler: ASRock B360M-itx/ac and Coffee Lake CPU
Spoiler: ASRock H370M-ITX/AC and Coffee Lake CPU
Spoiler: ASRock Fatal1ty Z370 Gaming-ITXac and Coffee Lake CPU
Spoiler: MSI Z390M Gaming Edge AC and Coffee Lake CPU
Spoiler: MSI Z390M Gaming Plus and Coffee Lake CPU
Spoiler: MSI Z370I Gaming Pro Carbon AC and Coffee Lake CPU
Spoiler: Pre-Built Hewlett Packard HP Pavilion 590-p0066 and Coffee Lake CPUThis system has VGA and HDMI. The settings below are only for enabling HDMI on Index 2. There is no support for VGA. Indexes 1 and 3 could be set to BusID=0x00 and Type=DUMMY -- feel free to try it and see.
Index 1, BusID 0x05, Type HDMI
Row 2: Index 2, BusID 0x02, Type HDMI
Index 3, BudID 0x04, Type HDMI
XML:
        Properties

            PciRoot(0x0)/Pci(0x2,0x0)

                AAPL,ig-platform-id

                BwCbPg==

                device-id

                mz4AAA==

                framebuffer-con0-busid

                BQAAAA==

                framebuffer-con0-enable

                AQAAAA==

                framebuffer-con0-flags

                xwMAAA==

                framebuffer-con0-index

                AQAAAA==

                framebuffer-con0-pipe

                EgAAAA==

                framebuffer-con0-type

                AAgAAA==

                framebuffer-con1-busid

                AgAAAA==

                framebuffer-con1-enable

                AQAAAA==

                framebuffer-con1-flags

                xwMAAA==

                framebuffer-con1-index

                AgAAAA==

                framebuffer-con1-pipe

                EgAAAA==

                framebuffer-con1-type

                AAgAAA==

                framebuffer-con2-busid

                BAAAAA==

                framebuffer-con2-enable

                AQAAAA==

                framebuffer-con2-flags

                xwMAAA==

                framebuffer-con2-index

                AwAAAA==

                framebuffer-con2-pipe

                EgAAAA==

                framebuffer-con2-type

                AAgAAA==

                framebuffer-con3-busid

                AAAAAA==

                framebuffer-con3-enable

                AQAAAA==

                framebuffer-con3-flags

                IAAAAA==

                framebuffer-con3-index

                /w==

                framebuffer-con3-pipe

                AAAAAA==

                framebuffer-con3-type

                AQAAAA==

                framebuffer-patch-enable

                AQAAAA==
Spoiler: Pre-Built Dell Optiplex 9030 All in One and Haswell CPU
Spoiler: Asus Prime Z490M-PLUS with 10th Gen Intel CPU
Please Help Others
If you find a successful set of parameters for your motherboard, please help the community by posting a screenshot of the Hackintool Connectors page with all the necessary settings applied. You may have to enter the changes again in the Connectors page. You may post the screenshot in this thread and I'll compile a list from everyone's contributions.
Last edited: Feb 25, 2021


Reactions:peppe1945, MagTux, taiheng and 60 others

poles
Joined
Dec 25, 2015
Messages
316
Motherboard
Gigabyte Z690 UD AX
CPU
i5-12400F
Graphics
Readon RX 6600
Mobile Phone
-

- Jan 10, 2019
- #2
Now thats called a proper connector patching tutorial. Very detailed explanation. It clears a lot of confusion.
Hackintosh Haswell
GA-Z97X-UD3H | i5 4690 | GeForce GTX 1050 Ti OC
Hackintosh Skylake
GA-H170-D3H | i3 6100 | HD 530
Hackintosh Kabylake
GA-H270M-D3H | i5 7500 | HD 530
Hackintosh Coffelake 1
Z370 PC PRO | i3 8100 | HD 630
Hackintosh Coffelake 2
PRIME Z390-P | i5 8600K | HD 630

Reactions:aruchiru2

jaymonkey
Moderator
Joined
Aug 27, 2011
Messages
4,009
Motherboard
GB Z490 Vision G
CPU
i9 10850K OC @ 5.2 GHz
Graphics
Vega 64 LC + HD 630
Mac
-

-

-

Mobile Phone
-

- Jan 11, 2019
- #3
@CaseySJ,
Nice Job !!
Very well written guide on advanced patching of framebuffer ports and connectors using Hackingtool.
Have added a link to your guide in the Lilu + Plug-in's guide.
Cheers
Jay
Last edited: Mar 10, 2019

CaseySJ
Moderator
Joined
Nov 11, 2018
Messages
20,756
Motherboard
Asus ProArt Z690-Creator
CPU
i7-12700K
Graphics
RX 6800 XT
Mac
-
-
-
Classic Mac
-

Mobile Phone
-
- Jan 11, 2019
- #4
@jaymonkey Thank you!! Building my first Hackintosh has been an immensely satisfying experience so I hope others can benefit from the experience gained along the way...

Reactions:aruchiru2, poles, jaymonkey and 1 other person

aureus
Joined
Nov 10, 2018
Messages
15
Motherboard
ASRock B360M-ITX/ac
CPU
i5-8400
Graphics
HD 630
Mac
-
- Jan 12, 2019
- #5
Thank you very much so far.
However, I still can't get any combination to work. Will probably post a more detailed thread soon to get help, but one question first - if only one connector is working (DP), can I somehow follow your guide as well? I have tried to exchange all the bus IDs and types (with the exception of leaving the type of the DP of course), but I still get black screen on both DVI and HDMI, unfortunately.
CaseySJ
Moderator
Joined
Nov 11, 2018
Messages
20,756
Motherboard
Asus ProArt Z690-Creator
CPU
i7-12700K
Graphics
RX 6800 XT
Mac
-
-
-
Classic Mac
-
Mobile Phone
-
- Jan 12, 2019
- #6
aureus said:
Thank you very much so far.
However, I still can't get any combination to work. Will probably post a more detailed thread soon to get help, but one question first - if only one connector is working (DP), can I somehow follow your guide as well? I have tried to exchange all the bus IDs and types (with the exception of leaving the type of the DP of course), but I still get black screen on both DVI and HDMI, unfortunately.
Yes, if DisplayPort is working you should be able to identify the other connectors one by one.
- Which row lights up with DisplayPort?
- Please post a screenshot of the Connectors page.
- What BusID and Type combinations have you attempted?
#7七楼
Ok, so this is my current configuration:
As it is (slightly) visible, the last row lights up in red when my DP monitor is connected.
I also tried changing the first two lines, with the first one being HDMI and the second DVI (with the bus IDs changed as well). Then I tried this configuration with the bus IDs of DP and HDMI changed. I also tried the first two lines changed and DP and HDMI bus IDs exchanged. So I basically tried every single configuration possible, I guess.
My platform ID is set as shown with device ID set to 0x3E9B, however I also tried 0x3E92 which didn't change anything either.
The thing is that the only row ever lighting up in red is the DP one, with neither of the two other monitors - connecting them via HDMI or DVI - ever showing a picture. I have also attached my config.plist, maybe there's anything else wrong? I also tried a config.plist you posted in another thread recently where someone had issues with the i5 8400, that didn't change anything either.
I have to add that some other stuff is not working yet either, like audio. However this is a fresh build and I wanted to get my screens working first (two of them matter, the DVI one is just for testing purposes).
Thank you for your help already, very appreciated.
Edit: It works. After having tried pretty much everything I decided to do something which makes no sense at all according to what I read so far and changed the bus IDs of the HDMI and DVI to 01 and 02. Now I get a pink screen on my HDMI, but I've read somewhere else about this and should be able to fix it with exchanging the types I guess.
I'm incredibly happy right now to get a picture on more than one screen, however I have absolutely no explanation for this. Do you? I thought you had to set the bus ID to 04, 05 or 06 for the digital outputs?
Attachments
- config.plist
21.3 KB · Views: 1,274
Last edited: Jan 12, 2019
CaseySJ
Moderator
Joined
Nov 11, 2018
Messages
20,756
Motherboard
Asus ProArt Z690-Creator
CPU
i7-12700K
Graphics
RX 6800 XT
Mac
-
-
-
Classic Mac
-
Mobile Phone
-
- Jan 12, 2019
- #8
@aureus Good work, especially by thinking outside the box and trying BusIDs 0x01 and 0x02!! As we learn more, especially from motherboards with DVI and VGA connectors, we'll update the guide.
On the Asus Prime H370M-Plus with VGA, DVI, and HDMI the configuration that seems to work is this:
Code:
Row 1: Index 2, BusID 0x02, Type HDMI (0x0008)
Row 2: Index 3, BusID 0x04, Type HDMI (0x0008)
Row 3: Index 1, BusID 0x01, Type DP (0x0004)
Notice that BusIDs 0x01 and 0x02 are used, but in this case I think the owner forgot to update the Type column, which suggests that the Type field may not be important. It's also not clear whether Index is important.
The settings in your config.plist are as follows:
Code:
Row 1: BusID ????,  Type DVI-D (0x04)
Row 2: BusID 0x06, Type HDMI (0x0008)
Row 3: BusID 0x04, Type ????
This seems like an early test version of config.plist. Can you please fill out the table above with the configuration that is now working for you?
Some questions based on your observation:
- HDMI = BusID 0x01. Does HDMI port work if you change BusID to 0x02 or does it only work with BusID 0x01?
- DVI = BusID 0x02. Does DVI port work if you change BusID to 0x01 or does it only work with BusID 0x02?
- DP = BusID 0x04?
- Did you notice whether the Type field matters? Or only the BusID field matters?
Last edited: Jan 12, 2019
aureus
Joined
Nov 10, 2018
Messages
15
Motherboard
ASRock B360M-ITX/ac
CPU
i5-8400
Graphics
HD 630
Mac
-
- Jan 12, 2019
- #9
Here is my current properties section:
Code:
Properties

            PciRoot(0x0)/Pci(0x2, 0x0)

                AAPL,ig-platform-id

                BwCbPg==

                device-id

                mz4AAA==

                enable-hdmi20

                AQAAAA==

                framebuffer-con0-busid

                AQAAAA==

                framebuffer-con0-enable

                AQAAAA==

                framebuffer-con0-pipe

                EgAAAA==

                framebuffer-con0-type

                AAgAAA==

                framebuffer-con1-busid

                AgAAAA==

                framebuffer-con1-enable

                AQAAAA==

                framebuffer-con1-index

                /w==

                framebuffer-con1-pipe

                EgAAAA==

                framebuffer-con1-type

                BAAAAA==

                framebuffer-con2-enable

                AQAAAA==

                framebuffer-con2-pipe

                EgAAAA==

                framebuffer-patch-enable

                AQAAAA==

                framebuffer-pipecount

                AgAAAA==
I assume that not setting the bus ID for port 3 in this example (con2) means it uses the standard value of the selected framebuffer? I generated this part via FB patcher, so currently this is set to 0x06 (or 0x04, not sure right now, I think both worked). Same goes for the type, I think if it's not set it's set to DP by default (in regards to the code you posted, however as my config.plist changed this example is a bit different).
Notice that I tried to deactivate port 2 and changing pipecount to 2, however leaving port 3 as index 3. I tried to get sleep working this way, without success so far though, but this is the only configuration I could get both screens working (so index 1 HDMI, index 3 DP, port 2 set to index -1, bus IDs set as described and types accordingly). When I set portcount to 2 as well, my DP screen stays black (I don't really have a clue about the difference between pipe- and portcount at this point). I need some further investigation into this (hints appreciated), but I've been working on getting my screens to work for at least 10 hours, so I need a break. I will also try changing the bus IDs for HDMI and DVI later.
Type field does matter for the HDMI port at least, because I had, as described, a pink tint before I set the type to HDMI. It does not however matter for the DVI port for some reason, because the screen worked just fine with the type being set to HDMI.
I hope I answered your questions as I could thus far, if not just ask again. I will gladly help, as I received so much help from this forum (and your original post) already. However, as I said, I'm a bit exhausted at this point due to working on this two days straight. But I will continue to solve my other problems later and in this context also hopefully cover your questions as well.
CaseySJ
Moderator
Joined
Nov 11, 2018
Messages
20,756
Motherboard
Asus ProArt Z690-Creator
CPU
i7-12700K
Graphics
RX 6800 XT
Mac
-
-
-
Classic Mac
-
Mobile Phone
-
- Jan 12, 2019
- #10
Your configuration is as follows, where items in black are explicitly set by your patch and items in red were left to their default values, which I entered in red.
Row 1: Index 1, BusID 0x01, Type HDMI
Row 2: Index -1, BusID 0x02, Type DVI-D
Row 3: Index 3, BusID 0x06 or 0x04, Type DP
Pipecount = 2
- With this setup you are getting HDMI and DP output.
- You were trying to disable DVI-D by reducing port count to 2, but that disabled your DisplayPort, so you set pipe count to 2.
- If you leave out pipecount, do you still get HDMI and DP output?
- I agree that by not explicitly specifying any Row 3 values, default values get assigned, which are shown in red. BusID is most likely 0x06 for Row 3.
- Because of the pink tint that occurred when Type was set incorrectly, it seems that Type does in fact matter.
Thank you! I think you answered all of my questions. This has been very helpful, and I need to get some additional information from people in similar situation in order to update the Guide.
Follow-up Question:
- Now that HDMI is working, which Row lights up in red when you plug in an HDMI cable?