CSS进阶用法
文章目录
- 1、CSS三角的做法
-
- 1.2、制作想要的三角
- 2、CSS圆形的做法
- 3、解决图片底部默认空白缝隙问题
- 4、溢出的文字省略号显示
-
- 4.1、单行文本溢出显示省略号
- 4.2、多行文本溢出显示省略号
- 5、常见布局技巧
-
- 5.1、margin负值的运用
- 5.2、鼠标经过盒子边框被相邻盒子遮挡的处理
- 5.3、文字围绕浮动元素
- 5.4、行内块的巧妙运用
- 5.4、CSS三角强化
- 6、CSS初始化
1、CSS三角的做法
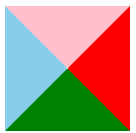
## 1.1、原理 **原理:** 1.将盒子的宽、高均设为0。 2. 为四条边框指定不同的颜色。 3. 代码和展示效果如下。<style>
.box {
width: 0;
height: 0;
border-top: 50px solid pink;
border-right: 50px solid red;
border-left: 50px solid skyblue;
border-bottom: 50px solid green;
}
style>
<div class="box">div>
1.2、制作想要的三角
<style>
    .box {
        width: 0;
        height: 0;
        /*边框设为透明*/
        border: 50px solid transparent;
        /*上边框给个颜色*/
        border-top-color: red;

    }
style>


<div class="box">div>
2、CSS圆形的做法
3、解决图片底部默认空白缝隙问题
- 图片底侧会有一个空白缝隙,原因是行内块元素默认和文字基线对齐所致。
解决方案:
- 方法一:
vertical-align: middle|top|bottom等。<style> div { border: 2px solid red; } img { vertical-align: middle; } style> <div> <img src="images/chuhe.png" alt=""> div> - 方法二:把图片转换为块级元素
display:block
4、溢出的文字省略号显示
4.1、单行文本溢出显示省略号
单行文本溢出显示省略号,须满足三个条件:
- 先强制一行内显示文本
white-space:nowrap; - 超出的部分隐藏
overflow:hidden; - 文字用省略号代替超出部分
text-overflow:ellipsis;
<style>
    div {
        width: 50px;
        height: 80px;
        background-color: red;
        /* 1、显示不开也必须在一行,不允许换行 */
        white-space: nowrap;
        /* 2、溢出的部分隐藏 */
        overflow: hidden;
        /* 3、文字溢出时,用省略号来显示 */
        text-overflow: ellipsis;
    }
style>
<div>
    锄禾日当午
div>
white-space说明:
| 值 | 描述 |
|---|---|
| normal | 显示不开就换行 |
| nowrap | 显示不开也必须在一行,不允许换行 |
4.2、多行文本溢出显示省略号
- 多行文本溢出显示省略号,存大较大兼容性问题,适合webkit浏览器或移动端(移动端大部分是webkit内核)。
<style>
    div {
        width: 50px;
        height: 40px;
        background-color: red;
        /* 溢出的部分隐藏 */
        overflow: hidden;
        /* 文字溢出时,用省略号来显示 */
        text-overflow: ellipsis;
        /* 弹性伸缩盒子模型显示 */
        display: -webkit-box;
        /* 限制一个块元素显示的文本的行数,第几行显示省略号就设置几 */
        -webkit-line-clamp: 2;
        /* 设置或检索伸缩盒子对象的子元素的排列方式 */
        -webkit-box-orient: vertical;
    }
style>
<div>
    锄禾日当午,汗滴河下土,谁知盘中餐,粒粒皆辛苦。
div>
后台人员来做这个效果,操作更简单。
5、常见布局技巧
5.1、margin负值的运用
如果给盒子加边框,相当于盒子宽度增加了边宽的宽度。
两个盒子靠在一起,边框也会叠加。
可以使用margin-left:-1px巧妙解决这个问题。
<style>
    .box {
        width: 302px;
        height: 100px;
        background-color: skyblue;
    }

    .box div {
        width: 100px;
        height: 100px;
        border: 1px solid red;
        float: left;
        margin-left: -1px;
    }
style>
<div class="box">
    <div>div>
    <div>div>
    <div>div>
div>
5.2、鼠标经过盒子边框被相邻盒子遮挡的处理
- margin负值的可以有效解决边框叠加的问题,但当鼠标经过盒子,想让盒子显现边框时,也会因margin负值,导致边框被遮挡。
- 解决上述问题可以给鼠标经过的盒子提高层级
- 如果没有定位,则加相对定位(保留位置)
- 如果有定位,则加
z-index
如果没有定位,加相对定位,代码如下
<style>
    .box {
        width: 303px;
        height: 100px;
        background-color: skyblue;
    }

    .box div {
        width: 100px;
        height: 100px;
        float: left;
        border: 1px solid red;
        margin-left: -1px;
    }

    .box div:hover {
        /* 如果盒子没有定位,则加相对定位 */
        position: relative;
        border: 1px solid blue;

    }
style>
<div class="box">
    <div>div>
    <div>div>
    <div>div>
div>
5.3、文字围绕浮动元素
<style>
    * {
        margin: 0;
        padding: 0;
    }

    .box {
        width: 300px;
        height: 70px;
        background-color: skyblue;
        padding: 5px;


    }

    .pic {
        float: left;
        width: 130px;
        height: 70px;
        margin-right: 5px;
    }

    img {
        width: 100%;
        height: 100%;
    }
style>
<div class="box">
    <div class="pic">
        <img src="images/img.png" alt="">
    div>
    <p>三年之约,佛怒火莲灭云岚 p>
div>
5.4、行内块的巧妙运用
text-align: center;可使盒子内的文本、行内元素、行内块元素居中显示。
<style>
    * {
        padding: 0;
        margin: 0;
    }

    .box {
        text-align: center;
    }

    .box a {
        display: inline-block;
        width: 36px;
        height: 36px;
        border: 1px solid #7f7f7f;
        text-align: center;
        line-height: 36px;
        text-decoration: none;
    }

    .box .prev,
    .box .next {
        width: 85px;
    }

    .box input {
        width: 36px;
        height: 36px;
        overflow: none;
    }
style>
<div class="box">
    <a href="#" class="prev">上一页<<a>
    <a href="#">1a>
    <a href="#">2a>
    <a href="#">3a>
    <a href="#">4a>
    <a href="#">5a>
    <a href="#">6a>
    <a href="#" class="next">>>下一页a>
    跳转到,第
    <input type="text" name="" id="">
    页
div>#
5.4、CSS三角强化
原理请参照CSS三角的原理
<style>
    .box {
        width: 0;
        height: 0;
        border-color: transparent red transparent transparent;
        border-style: solid;
        border-width: 100px 50px 0 0;
    }
style>
<div class="box">div>
案例示例
<style>
    .price {
        width: 180px;
        height: 24px;
        border: 1px solid red;
        margin: 0 auto;
    }

    .miaosha {
        position: relative;
        float: left;
        width: 90px;
        height: 100%;
        background-color: red;
        color: #fff;
        margin-right: 5px;

    }

    .miaosha i {
        position: absolute;
        top: 0;
        right: 0;
        width: 0;
        height: 0;
        border-color: transparent #fff transparent transparent;
        border-style: solid;
        border-width: 24px 10px 0 0;

    }

    .price .origin {
        color: gray;
        text-decoration: line-through;
    }
style>
<div class="box">div>
<div class="price">
    <span class="miaosha">
        ¥1999.99
        <i>i>
    span>
    <span class="origin">¥9999.99span>


div>
6、CSS初始化
- 不同浏览器标签默认值是不同的,为了消除不同浏览器对HTML文本呈现的差异,照顾浏览器的兼容,需要对CSS初始化。
- CSS初始化是指重设浏览器的样式。也称为CSS reset。
/* 把我们所有标签的内外边距清零 */
* {
    margin: 0;
    padding: 0
}
/* em 和 i 斜体的文字不倾斜 */
em,
i {
    font-style: normal
}
/* 去掉li 的小圆点 */
li {
    list-style: none
}

img {
    /* border 0 照顾低版本浏览器 如果 图片外面包含了链接会有边框的问题 */
    border: 0;
    /* 取消图片底侧有空白缝隙的问题 */
    vertical-align: middle
}

button {
    /* 当我们鼠标经过button 按钮的时候,鼠标变成小手 */
    cursor: pointer
}

a {
    color: #666;
    text-decoration: none
}

a:hover {
    color: #c81623
}

button,
input {
    /* "\5B8B\4F53" 就是宋体的意思 这样浏览器兼容性比较好 */
    font-family: Microsoft YaHei, Heiti SC, tahoma, arial, Hiragino Sans GB, "\5B8B\4F53", sans-serif
}

body {
    /* CSS3 抗锯齿形 让文字显示的更加清晰 */
    -webkit-font-smoothing: antialiased;
    background-color: #fff;
    font: 12px/1.5 Microsoft YaHei, Heiti SC, tahoma, arial, Hiragino Sans GB, "\5B8B\4F53", sans-serif;
    color: #666
}

.hide,
.none {
    display: none
}
/* 清除浮动 */
.clearfix:after {
    visibility: hidden;
    clear: both;
    display: block;
    content: ".";
    height: 0
}

.clearfix {
    *zoom: 1
}


