微信小程序快速入门01(含案例)
文章目录
- 前言
- 一、组件
-
- 1.常用视图容器类组件
-
- view
- scroll-view
- swiper、swiper-item
- 2.text、rich-text
- 3.其他常用组件
-
- button
- image
- navigator
- 二、小程序API
- 三、数据绑定
-
- 1.定义页面数据
- 2.绑定数据
- 四、事件绑定
-
- 1.什么是事件
- 2.小程序中常用的事件
- 3.事件对象 的属性列表
-
- target和currentTarget区别
- 4.bindtap的语法格式
- 5.在事件处理函数中为data中数据赋值
- 6.事件传参
- 7.bindinput的语法格式
- 8.实例:
- 五、条件渲染和列表渲染
-
- 1.wx:if
-
- 结合
使用wx:if - hidden
- wx:if与hidden的对比
- 实例
- 结合
- 2.wx:for
-
- 手动指定索引和当前项的变量名*
- wx:key的使用
- 实例
- 六、WXSS模板样式
-
- WXSS和CSS的关系
-
- rpx尺寸单位
- rpx与px之间的单位换算*
- 七、样式
-
- 1.样式导入
- 2.全局样式
- 3.局部样式
- 八、全局配置
-
- 1.常用全局配置
- 2.小程序窗口组成部分
- 3.app.json内的window节点
-
- 常用配置项
- 下拉刷新
- 上拉触底处理
- 4.tabBar
-
- tabBar的六个组成
- tabBar节点的配置项
- 每个tab项的配置选项
- 实例
- 九、页面配置
-
- 1.页面配置文件的作用
- 2.页面配置和全局配置的关系
- 3.页面配置中的常用配置项
- 九、网络请求
-
- 1.小程序中网络数据请求的限制
- 2.配置request合法域名
- 3.发起GET请求
- 4.发起POST请求
- 5.在页面刚加载时请求数据
- 6.跳过request合法域名校验
- 7.关于跨域和Ajax的说明
- 十、案例
- 总结
前言
一篇学习常用组件、数据绑定、事件绑定、条件渲染、列表渲染、样式、全局配置(window、tabBar)、数据请求(GET、POST)、API。(包含黑马程序员本地生活首页实现案例)
一、组件
1.常用视图容器类组件
view
- 普通视图区域
- 类似于HTML中的div,是一个块级元素
- 常用来实现页面的布局效果
<view class="container1">
  <view>Aview>
  <view>Bview>
  <view>Cview>
view>
.container1 view{
  width: 100px;
  height: 100px ;
  text-align: center;
  line-height: 100px;
}

.container1 view:nth-child(1){
  background-color: lightgreen;
}

.container1 view:nth-child(2){
  background-color: lightskyblue;
}

.container1 view:nth-child(3){
  background-color: lightpink;
}

.container1{
  display: flex;
  justify-content: space-around;
}
scroll-view
- 可滚动的视图区域
- 常用来实现滚动列表效果
实现y轴滚动:(scroll-x:实现x轴滚动)
<scroll-view class="container1" scroll-y>
  <view>Aview>
  <view>Bview>
  <view>Cview>
scroll-view>
在上诉wxss样式加入:
.container1{
  border: 1px solid red;
  width: 100px;
  height: 120px;
}

.swiper-container{
  height: 150px;
}
swiper、swiper-item
<swiper class="swiper-container" indicator-dots indicator-color="white" indicator-active-color="gray" autoplay interval="3000" circular>
  <swiper-item>

    <view class="item">Aview>
  swiper-item>
  <swiper-item>

    <view class="item">Bview>
  swiper-item>
  <swiper-item>

    <view class="item">Cview>
  swiper-item>
swiper>
加入如下样式:
.swiper-container{
  height: 150px;
}

.item{
  height: 100%;
  line-height: 150px;
  text-align: center;
}

swiper-item:nth-child(1) .item{
  background-color: lightgreen;
}

swiper-item:nth-child(2) .item{
  background-color: lightskyblue;
}

swiper-item:nth-child(3) .item{
  background-color: lightpink;
}
2.text、rich-text
- text是文本标签,其属性selectable可以长按复制该标签内的内容。
- rich-text能够通过nodes属性节点,把HTML字符串渲染为对应的UI结构。
<view>
手机号支持长按选中效果
<text selectable>18837944929text>
view>
<rich-text nodes=" style='color:red;'>标题</h1>"> rich-text>
3.其他常用组件
button
- 按钮组件
- 功能比HTML中的button按钮丰富
- 通过open-type属性可以调用微信提供各种功能(客服、转发、获取用户授权、获取用户信息等)
<button>普通按钮button>
<button type="primary">主色调按钮button>
<button type="warn">警告按钮button>

<button size="mini">普通按钮button>
<button type="primary" size="mini">主色调按钮button>
<button type="warn" size="mini">警告按钮button>

<button size="mini" plain>普通按钮button>
<button type="primary" size="mini" plain>主色调按钮button>
<button type="warn" size="mini" plain>警告按钮button>
image
<image>image>
<image src="/images/1.png" mode="aspectFill"/>
加入以下样式:
image{
  border: 1px solid red;
}
navigator
- 页面导航组件
- 类似于HTML中的链接
二、小程序API
三、数据绑定
1.定义页面数据
在页面对应的.js文件中,把数据定义到data对象中即可:
Page({
	data: {
		info: 'hello worrd',
		msgList: [{msg: 'hello'}, {msg: 'world'}]
	}
})
2.绑定数据
Mustache语法格式:把data中的数据绑定在页面中渲染,使用双大括号将变量包起来即可:
<view>{{要绑定的数据名称}}</view>
可以绑定内容、属性、三元运算、算数运算等等,与Vue数据绑定相似:
<view>{{info}}</view>
<image src="{{imgSrc}}" mode="widthFix"></image>
<view>{{randomNum1 >=5 ? '随机数字大于或等于5' : '随机数小于5'}}</view>
<view>生成100以内的随机数:{{randomNum2*100}}</view>
Page({
	data: {
    	info:'hello world',
    	imgSrc:'http://www.itheima.com/images/logo.png',
    	randomNum1: Math.random()*10,
    	randomNum2: Math.random().toFixed(2),
  	}
})
四、事件绑定
1.什么是事件
事件是渲染层到逻辑层的通讯方式。通过事件可以将用户在渲染层产生的行为,反馈到逻辑层进行业务的处理。

2.小程序中常用的事件
3.事件对象 的属性列表
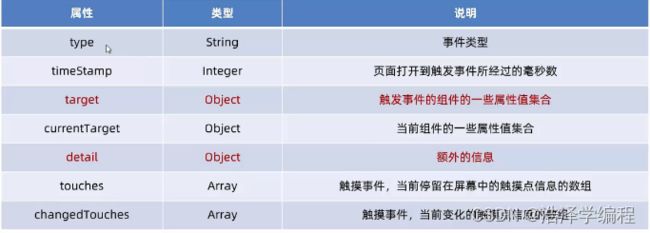
当事件回调触发的时候,会收到一个事件对象event,它的详细如下表:

target和currentTarget区别
target是触发该事件的源头组件,而currentTarget则是当前事件所绑定的组件。

点击内部的按钮时,点击事件以冒泡的方式向外扩散,也会触发外层view的tap事件处理函数。此时,对于外层的view来说:
- e.target指的是触发事件的源头组件,因此e.target是内部的按钮组件
- e.currentTarget指向的是当前正在触发事件的那个组件,因此e.currentTarget是当前的view组件。
4.bindtap的语法格式
在小程序中,不存在 HTML中的onclick鼠标点击事件,而是通过tap事件来响应用户的触摸行为。
- 通过bindtap,可以组件绑定tap触摸事件:
<button type="primary" bindtap="btnTapHandler">按钮button>
- 在页面的.js文件中定义对应的事件处理函数,事件参数通过形参event(一般简写成e)来接受:
Page({
	btnTapHandler(e){
		console.log(e)
	}
})
5.在事件处理函数中为data中数据赋值
通过调用this.setData(dataObject)方法,可以给页面data中的数据赋值:
Page({
	data: {
		count: 0
	},
	changeCount(){
		this.setData({
			count: this.data.count + 1
		})
	}
})
6.事件传参
可以为组件提供data-*自定义属性传参,其中 *代表的是参数的名字:
<button type="primary" bindtap="btnTap2" data-info="{{2}}">事件传参button>
- info会被解析为参数的名字
- 数值2会被解析为参数的值
- 在事件处理函数中,通过event.target.dataset.参数名即可获取具体参数的值
7.bindinput的语法格式
在小程序中,通过input事件来响应文本框的输入事件:
<input value="{{msg}}" bindinput="inputHandler">input>
 inputHandler(e){
    console.log(e.detail.value)//变化过后文本框最新值
}
8.实例:
<button type="primary" bindtap="btnTapHandler">按钮button>
<button type="primary" bindtap="CountChange">+1button>
<button type="primary" bindtap="btnTap2" data-info="{{2}}">+2button>
<input value="{{msg}}" bindinput="inputHandler">input>
Page({
	data: {
		count: 0,
		msg: '你好,'
	},
//定义按钮事件处理函数
  btnTapHandler(e){
    console.log(e)
  },
//+1按钮点击事件
  CountChange(){
    this.setData({
      count: this.data.count + 1
    })
    // console.log('ok')
  },
  btnTap2(e){
    this.setData({
      count: this.data.count + e.target.dataset.info
    })
    // console.log(e)
  },
//input 输入框的事件处理函数
  inputHandler(e){
    console.log(e.detail.value)//变化过后文本框最新值
    this.setData({
      msg: e.detail.value
    })
  }
})
五、条件渲染和列表渲染
1.wx:if
在小程序中,使用wx:if="{{condition}}"来判断是否需要渲染该代码块:
<view wx:if="{{condition}}"> True view>
也可以用wx:elif和wx:else来添加else判断:
<view wx:if="{{type === 1}}"> 男 view>
<view wx:elif="{{type === 2}}"> 女 view>
<view wx:else> 保密 view>
结合使用wx:if
如果要一次性控制多个组件的展示与隐藏,可以使用一个标签将多个组件包装起来,并在标签上使用wx:if控制属性:
<block wx:if="{{true}}">
  <view>view1view>
  <view>view2view>
block>
注意:
hidden
在小程序中,直接使用hidden="{{condition}}"也能控制元素的显示与隐藏:
<view hidden="{{condition}}">条件为true的时候隐藏元素,否则显示view>
wx:if与hidden的对比
实例
<view wx:if="{{type === 1}}"> 男 view>
<view wx:elif="{{type === 2}}"> 女 view>
<view wx:else> 保密 view>
<block wx:if="{{true}}">
  <view>view1view>
  <view>view2view>
block>
<view hidden="{{!flag}}">条件为true的时候隐藏元素,否则显示view>
<view wx:if="{{flag}}">这是使用 wx:if 控制的元素view>
Page({
  data: {
    type: 1,
    flag: true
  }
2.wx:for
通过wx:for可以根据指定的数组,循环渲染重复的组件结构:
<view wx:for="{{array}}">
  索引是:{{index}},当前项是:{{item}}
view>
默认情况下,当前循环项的索引用index表示;当前循环项用item表示。
手动指定索引和当前项的变量名*
- 使用wx:for-index可以指定当前循环项的索引的变量名
- 使用wx:for-item可以指定当前项的变量名
<view wx:for="{{array}}" wx:for-index="idx" wx:for-item="itemName">
  索引是:{{idx}},item 项是:{{itemName}}
view>
wx:key的使用
类似于Vue列表渲染的:key,小程序在实现列表渲染时,也建议为渲染出来的列表项指定唯一的key值,从而提高渲染的效率。
Page({
  data: {
    userList: [
      {id: 1,name: '小红'},
      {id: 2,name: '小黄'},
      {id: 3,name: '小白'}
    ]
  }
<view wx:for="{{userList}}" wx:key="id">{{item.name}}view>
实例
<view wx:for="{{arr1}}" wx:key="index">
  索引是:{{index}},item 项是:{{item}}
view>
<view wx:for="{{arr1}}" wx:for-index="idx" wx:for-item="itemName" wx:key="idx">
  索引是:{{idx}},item 项是:{{itemName}}
view>
<view wx:for="{{userList}}" wx:key="id">{{item.name}}view>

<view wx:for="{{userList}}" wx:key="id" class="username">{{item.name}}view>
六、WXSS模板样式
WXSS(WeiXin Style Sheets)是一套样式语言,用于美化WXML的组件样式,类似于网页开发中的CSS。
WXSS和CSS的关系
WXSS具有CSS的大部分特性,同时,WXSS还对CSS进行了扩充以及修改,以适应微信小程序的开发。
于CSS相比,WXSS扩展的特性有:
rpx尺寸单位
rpx是微信小程序独有的,用来解决屏适配的尺寸单位。鉴于不同设备屏幕大小,为实现屏幕的自动适配,rpx把所有设备的屏幕在宽度上等分为750份(即当前屏幕的总宽度为750rpx)。
rpx的原理:
- 在较小的设备上,1rpx所代表的宽度较小
- 在较大的设备上,1rpx所代表的宽度较大
小程序在不同设备上运行时,会把rpx的样式单位换算成对应的像素单位来渲染,从而实现屏幕适配。
rpx与px之间的单位换算*
七、样式
1.样式导入
在.wxss中导入,@import “路径”
@import "/common/common.wxss";
comm.wxss:
.username{
  color: red;
}
2.全局样式
定义在app.wxss中的样式为全局样式,作用在每一个页面。

3.局部样式
在页面的.wxss文件中定义的样式为局部样式,只作用于当前页面
八、全局配置
1.常用全局配置
2.小程序窗口组成部分
3.app.json内的window节点
常用配置项
下拉刷新
(1)在全局配置app.json中的window节点添加"enablePullDownRefresh"=true。当全局开启下拉刷新功能之后,默认的窗口背景为白色。如果自定义下拉刷新窗口背景颜色,设置步骤是:在全部配置app.json中的window节点中将backgroundColor设置指定颜色的16进制颜色值,如efefef。
(2)当全局开启下拉刷新后,默认窗口的loading样式是白色,更改效果在全局配置app.json中的window节点中将backgroundTextStyle指定dark值。(仅支持dark和light)

上拉触底处理
4.tabBar
tabBar是移动端应用常见的页面效果,用于实现多页面的快速切换。通常分为:底部tabBar和顶部tabBar。
- tabBar中只能配置至少两个,最多五个tab页签
- 当渲染顶部tabBar时,不显示icon,只显示文本
tabBar的六个组成
tabBar节点的配置项
每个tab项的配置选项
实例
在全局配置app.json中配置页面:

在全局配置app.json中,与Pages同级设置tabBar节点:
tabBar里的页面配置顺序决定底部tab的顺序
{
  "pages":[
    "pages/home/home",
    "pages/message/message",
    "pages/contact/contact",
    "pages/index/index",
    "pages/logs/logs"
  ],
  "window":{
    "backgroundTextStyle":"light",
    "navigationBarBackgroundColor": "#2b4b6b",
    "navigationBarTitleText": "浩泽学编程",
    "navigationBarTextStyle":"white",
    "backgroundColor": "#efefef",
    "enablePullDownRefresh": true
  },
  "tabBar": {
    "list": [
    {
      "pagePath": "pages/home/home",
      "text": "首页",
      "iconPath": "/images/tabs/home.png",
      "selectedIconPath": "/images/tabs/home-active.png"
    },
    {
      "pagePath": "pages/message/message",
      "text": "消息",
      "iconPath": "/images/tabs/message.png",
      "selectedIconPath": "/images/tabs/message-active.png"
    },
    {
      "pagePath": "pages/contact/contact",
      "text": "联系我们",
      "iconPath": "/images/tabs/contact.png",
      "selectedIconPath": "/images/tabs/contact-active.png"
    }
  ]
  },
  "style": "v2",
  "sitemapLocation": "sitemap.json"
}
九、页面配置
1.页面配置文件的作用
小程序中,每个页面都有自己的.json配置文件,用来对当前页面的窗口外观、页面效果等进行配置。
2.页面配置和全局配置的关系
小程序中,app.json中的window节点,可以在全局配置小程序中每个页码的窗口表现。如果某些小程序页面想拥有特殊的窗口表现,此时,“页面级别的.json配置文件”就可以实现这种需求。
注意:当配置与全局配置冲突时,根据就近原则,最终的效果以页面配置为准。
3.页面配置中的常用配置项
九、网络请求
1.小程序中网络数据请求的限制
出于安全性考虑,小程序官方对数据接口的请求做出了如下两个限制:
- 只能请求HTTPS类型的接口
- 必须将接口的域名添加到信任列表中
2.配置request合法域名
需求描述:假设在自己的微信小程序中,希望请求https://www.escook.cn/域名下大的接口,配置:登录微信公众平台–>开发管理–>开发设置–>服务器域名–>修改
3.发起GET请求
调用微信小程序提供的wx.request()方法,可以发起GET数据请求:
    wx.request({
      url: 'https://www.escook.cn/api/get',
      method: 'GET',
      data: {
        name: 'zs',
        age: 20
      },
      success: (res) => {
        console.log(res)
      }
    })
4.发起POST请求
调用微信小程序提供的wx.request()方法,可以发起POST数据请求:
    wx.request({
      url: 'https//www.escook.cn/api/post',
      method: 'POST',
      data: {
        name: 'ls',
        gender: '男'
      },
      success: (res) => {
        console.log(res)
      }
    })
5.在页面刚加载时请求数据
很多情况下,我们需要在页面刚加载的时候,自动请求一些初始化的数据。此时需要在页面的onLoad(在.页面.js文件内的onLoad节点)事件中调用获取数据的函数:
  /**
   * 生命周期函数--监听页面加载
   */
  onLoad(options) {
    this.getInfo()
    this.postInfo()
  }
6.跳过request合法域名校验
如果后端程序员仅仅提供了http协议的接口、暂时没有提供https协议的接口。此时为了不耽误我开发进度,我们可以直接在微信小程序开发工具中,临时开启【开发环境不校验请求域名、TLS版本及HTTPS证书】选项,跳过request合法域名的校验。
注意:跳过request合法域名的校验的选项,仅限在开发与调试阶段使用!

7.关于跨域和Ajax的说明
跨域问题只存在于基于浏览器的Web开发中。由于小程序的宿主环境不是浏览器而是微信客户端,所以小程序中不存在跨域问题。
Ajax技术的核心是依赖于浏览器中的XMLHttpRequest这个对象,由于小程序的宿主环境是微信客户端,所以小程序中不能叫做“发起Ajax请求”,而是叫做“发起网络数据请求”。
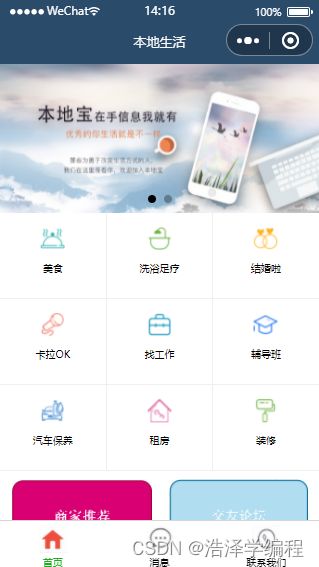
十、案例
黑马程序员的本地生活首页实现。
新建一个小程序项目,修改以下文件:
全局配置的app.json:
{
  "pages":[
    "pages/home/home",
    "pages/message/message",
    "pages/contact/contact"
  ],
  "window":{
    "backgroundTextStyle":"light",
    "navigationBarBackgroundColor": "#2b4b6b",
    "navigationBarTitleText": "本地生活",
    "navigationBarTextStyle":"white"
  },
  "tabBar": {
    "list": [
      {
        "pagePath": "pages/home/home",
        "text": "首页",
        "iconPath": "/images/tabs/home.png",
        "selectedIconPath": "/images/tabs/home-active.png"
      },
      {
        "pagePath": "pages/message/message",
        "text": "消息",
        "iconPath": "/images/tabs/message.png",
        "selectedIconPath": "/images/tabs/message-active.png"
      },
      {
        "pagePath": "pages/contact/contact",
        "text": "联系我们",
        "iconPath": "/images/tabs/contact.png",
        "selectedIconPath": "/images/tabs/home-active.png"
      }
    ]
  },
  "style": "v2",
  "sitemapLocation": "sitemap.json"
}
保存后生成了home、message、contact文件夹。
修改home.js:
// pages/home/home.js
Page({

  /**
   * 页面的初始数据
   */
  data: {
    swiperList: [],
    gridList: []
  },

  /**
   * 生命周期函数--监听页面加载
   */
  onLoad(options) {
    this.getSwiperList()
    this.getGridList()
  },
// 获取轮播图
  getSwiperList(){
    wx.request({
      url: 'https://applet-base-api-t.itheima.net/slides',
      method: 'GET',
      success: (res) => {
        console.log(res)
        this.setData({
          swiperList: res.data
        })
      }
    })
  },

// 获取九宫格数据
getGridList(){
  wx.request({
    url: 'https://applet-base-api-t.itheima.net/categories',
    method: 'GET',
    success: (res)=> {
      this.setData({
        gridList: res.data
      })
    }
  })
}
,

  /**
   * 生命周期函数--监听页面初次渲染完成
   */
  onReady() {

  },

  /**
   * 生命周期函数--监听页面显示
   */
  onShow() {

  },

  /**
   * 生命周期函数--监听页面隐藏
   */
  onHide() {

  },

  /**
   * 生命周期函数--监听页面卸载
   */
  onUnload() {

  },

  /**
   * 页面相关事件处理函数--监听用户下拉动作
   */
  onPullDownRefresh() {

  },

  /**
   * 页面上拉触底事件的处理函数
   */
  onReachBottom() {

  },

  /**
   * 用户点击右上角分享
   */
  onShareAppMessage() {

  }
})
修改home.wxml:
<swiper indicator-dots circular interval="2000" autoplay>
  <swiper-item wx:for="{{swiperList}}" wx:key="id">
    <image src="{{item.image}}">image>
  swiper-item>
swiper>


<view class="grid-list">

<navigator class="grid-item" wx:for="{{gridList}}" url="/pages/shoplist/shoplist?id={{item.id}}&title={{item.name}}" wx:key="id">

<image src="{{item.icon}}" mode=""/>

<text>{{item.name}}text>
navigator>
view>


<view class="img-box">
  <image src="/images/link-01.png" mode="widthFix"/>
  <image src="/images/link-02.png" mode="widthFix"/>
view>
修改home.wxss:
/* pages/home/home.wxss */
swiper {
  height: 350rpx;
}

swiper image {
  width: 100%;
  height: 100%;
}

.grid-list {
  display: flex;
    /* 允许换行 */
  flex-wrap: wrap;
}

.grid-list .grid-item {
  width: 33%;
  height: 200rpx;
  display: flex;
  /* 纵向布局 */
  flex-direction: column;
  /* 横向居中 */
  align-items: center;
  /* 纵向居中 */
  justify-content: center;
  /* 四周白线 */
  border-right: 1px solid #efefef;
  border-bottom: 1px solid #efefef;
  /* box-sizing: border-box; */
}

.grid-item image {
  width: 60rpx;
  height: 60rpx;
}

.grid-item text {
  font-size: 24rpx;
  margin: 10px 0;
}

.img-box{
  display: flex;
  padding: 20rpx 10rpx;
  justify-content: space-around;
}

.img-box image{
  width: 45%;
}
总结
以上就是微信小程序快速入门01讲解。


