Qt开发 - Qt基础类型
1.基础类型
因为Qt是一个C++ 框架, 因此C++中所有的语法和数据类型在Qt中都是被支持的, 但是Qt中也定义了一些属于自己的数据类型, 下边给大家介绍一下这些基础的数类型。
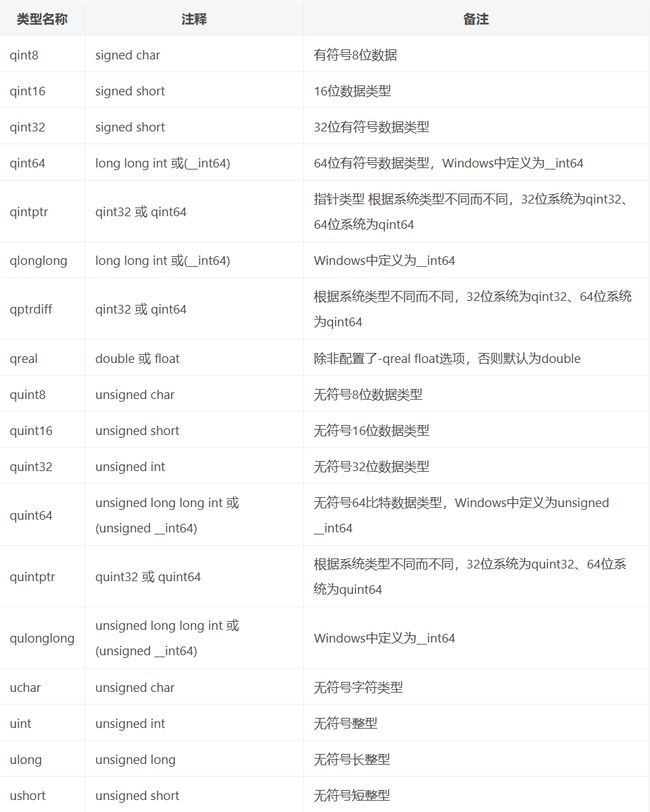
QT基本数据类型定义在#include 中,QT基本数据类型有:
虽然在Qt中有属于自己的整型或者浮点型, 但是在编程过程中这些一般不用, 常用的类型关键字还是 C/C++中的 int, float, double等。
2.log输出
在调试窗口中输入日志
在Qt中进行log输出, 一般不使用c中的printf, 也不是使用C++中的cout, Qt框架提供了专门用于日志输出的类, 头文件名为QDebug, 使用方法如下:
包含了QDebug头文件, 直接通过全局函数 qDebug() 就可以进行日志输出了
#include "mainwindow.h"
#include "ui_mainwindow.h"
#include 在终端窗口中输出日志
使用上面的方法只能在项目调试过程中进行日志输出,如果不是通过IDE进行程序调试,而是直接执行可执行程序在这种情况下是没有日志输出窗口的, 因此也就看不到任何的日志输出。
默认情况下日志信息是不会打印到终端窗口的,,如果想要实现这样的效果,必须在项目文件中添加相关的属性信息
打开项目文件(*.pro)找到配置项config, 添加console 控制台属性:
和全局函数 qDebug() 类似的日志函数还有: qWarning(), qInfo(), qCritical()
示例:
MainWindow::MainWindow(QWidget *parent)
    : QMainWindow(parent)
    , ui(new Ui::MainWindow)
{
    ui->setupUi(this);
    int a  =10;
    qDebug() << "我很帅" << a;

    int number = 666;
    float i = 11.11;
    qWarning() << "Number:" << number << "Other value:" << i;
    qInfo() << "Number:" << number << "Other value:" << i;
    qCritical() << "Number:" << number << "Other value:" << i;
}
3.字符串类型
在Qt中不仅支持C, C++中的字符串类型, 而且还在框架中定义了专属的字符串类型, 我们必须要掌握在Qt中关于这些类型的使用和相互之间的转换。
| 语言类型 | 字符串类型 |
|---|---|
| C | char* |
| C++ | std::string, char* |
| Qt | QByteArray, QString 等 |
QByteArray
在Qt中QByteArray可以看做是c语言中char*的升级版本。我们在使用这种类型的时候可通过这个类的构造函数申请一块动态内存,用于存储我们需要处理的字符串数据。
下面给大家介绍一下这个类中常用的一些API函数。
- 构造函数
// 构造空对象, 里边没有数据
QByteArray::QByteArray();
// 将data中的size个字符进行构造, 得到一个字节数组对象
// 如果 size==-1 函数内部自动计算字符串长度, 计算方式为: strlen(data)
QByteArray::QByteArray(const char *data, int size = -1);
// 构造一个长度为size个字节, 并且每个字节值都为ch的字节数组
QByteArray::QByteArray(int size, char ch);
- 数据操作
// 在尾部追加数据
// 其他重载的同名函数可参考Qt帮助文档, 此处略
QByteArray &QByteArray::append(const QByteArray &ba);
void QByteArray::push_back(const QByteArray &other);

// 头部添加数据
// 其他重载的同名函数可参考Qt帮助文档, 此处略
QByteArray &QByteArray::prepend(const QByteArray &ba);
void QByteArray::push_front(const QByteArray &other);

// 插入数据, 将ba插入到数组第i个字节的位置(从0开始)
// 其他重载的同名函数可参考Qt帮助文档, 此处略
QByteArray &QByteArray::insert(int i, const QByteArray &ba);

// 删除数据
// 从大字符串中删除len个字符, 从第pos个字符的位置开始删除
QByteArray &QByteArray::remove(int pos, int len);
// 从字符数组的尾部删除 n 个字节
void QByteArray::chop(int n);
// 从字节数组的pos位置将数组截断 (前边部分留下, 后边部分被删除)
void QByteArray::truncate(int pos);
// 将对象中的数据清空, 使其为null
void QByteArray::clear();

// 字符串替换
// 将字节数组中的子字符串before替换为 after
// 其他重载的同名函数可参考Qt帮助文档, 此处略
QByteArray &QByteArray::replace(const QByteArray &before, const QByteArray &after);
- 子字符串查找和判断
// 判断字节数组中是否包含子字符串 ba, 包含返回true, 否则返回false
bool QByteArray::contains(const QByteArray &ba) const;
bool QByteArray::contains(const char *ba) const;
// 判断字节数组中是否包含子字符 ch, 包含返回true, 否则返回false
bool QByteArray::contains(char ch) const;

// 判断字节数组是否以字符串 ba 开始, 是返回true, 不是返回false
bool QByteArray::startsWith(const QByteArray &ba) const;
bool QByteArray::startsWith(const char *ba) const;
// 判断字节数组是否以字符 ch 开始, 是返回true, 不是返回false
bool QByteArray::startsWith(char ch) const;

// 判断字节数组是否以字符串 ba 结尾, 是返回true, 不是返回false
bool QByteArray::endsWith(const QByteArray &ba) const;
bool QByteArray::endsWith(const char *ba) const;
// 判断字节数组是否以字符 ch 结尾, 是返回true, 不是返回false
bool QByteArray::endsWith(char ch) const;
- 遍历
// 使用迭代器
iterator QByteArray::begin();
iterator QByteArray::end();

// 使用数组的方式进行遍历
// i的取值范围 0 <= i < size()
char QByteArray::at(int i) const;
char QByteArray::operator[](int i) const;
- 查看字节数
// 返回字节数组对象中字符的个数
int QByteArray::length() const;
int QByteArray::size() const;
int QByteArray::count() const;

// 返回字节数组对象中 子字符串ba 出现的次数
int QByteArray::count(const QByteArray &ba) const;
int QByteArray::count(const char *ba) const;
// 返回字节数组对象中 字符串ch 出现的次数
int QByteArray::count(char ch) const;
- 类型转换
// 将QByteArray类型的字符串 转换为 char* 类型
char *QByteArray::data();
const char *QByteArray::data() const;

// int, short, long, float, double -> QByteArray
// 用于将一个类型数转换为字符串并存储在QByteArray对象中。
// n:要转换的整数值。
// base:可选参数,表示转换为字符串时使用的进制,默认为十进制
QByteArray &QByteArray::setNum(int n, int base = 10);
QByteArray &QByteArray::setNum(short n, int base = 10);
QByteArray &QByteArray::setNum(qlonglong n, int base = 10);
//f:可选参数,表示转换为字符串时使用的格式。默认值为 'g',表示一般格式(根据具体值选择 %e 或 %f 格式)。
//prec:可选参数,表示转换为字符串时使用的小数精度。默认值为 6,表示保留六位小数。
QByteArray &QByteArray::setNum(float n, char f = 'g', int prec = 6);
QByteArray &QByteArray::setNum(double n, char f = 'g', int prec = 6);
[static] QByteArray QByteArray::number(int n, int base = 10);
[static] QByteArray QByteArray::number(qlonglong n, int base = 10);
[static] QByteArray QByteArray::number(double n, char f = 'g', int prec = 6);

// QByteArray -> int, short, long, float, double
// 用于将 QByteArray 对象转换为类型值。
// ok:可选参数,是一个指向 bool 类型的指针。如果提供了这个参数,函数会将转换的结果存储在 ok 指针指向的变量中,以便判断转换是否成功。如果转换成功,ok 的值会被设置为 true,否则为 false。如果不需要判断转换结果,可以将 ok 设置为 Q_NULLPTR。
int QByteArray::toInt(bool *ok = Q_NULLPTR, int base = 10) const;
short QByteArray::toShort(bool *ok = Q_NULLPTR, int base = 10) const;
long QByteArray::toLong(bool *ok = Q_NULLPTR, int base = 10) const;
float QByteArray::toFloat(bool *ok = Q_NULLPTR) const;
double QByteArray::toDouble(bool *ok = Q_NULLPTR) const;

// std::string -> QByteArray
[static] QByteArray QByteArray::fromStdString(const std::string &str);
// QByteArray -> std::string
std::string QByteArray::toStdString() const;

// 所有字符转换为大写
QByteArray QByteArray::toUpper() const;
// 所有字符转换为小写
QByteArray QByteArray::toLower() const;
QString
QString也是封装了字符串, 但是内部的编码为utf8, UTF-8属于Unicode字符集, 它固定使用多个字节(window为2字节, linux为3字节)来表示一个字符,这样可以将世界上几乎所有语言的常用字符收录其中。
下面给大家介绍一下这个类中常用的一些API函数。
- 构造函数
// 构造一个空字符串对象
QString::QString();
// 将 char* 字符串 转换为 QString 类型
QString::QString(const char *str);
// 将 QByteArray 转换为 QString 类型
QString::QString(const QByteArray &ba);
// 其他重载的同名构造函数可参考Qt帮助文档, 此处略
- 数据操作
// 尾部追加数据
// 其他重载的同名函数可参考Qt帮助文档, 此处略
QString &QString::append(const QString &str);
QString &QString::append(const char *str);
QString &QString::append(const QByteArray &ba);
void QString::push_back(const QString &other);

// 头部添加数据
// 其他重载的同名函数可参考Qt帮助文档, 此处略
QString &QString::prepend(const QString &str);
QString &QString::prepend(const char *str);
QString &QString::prepend(const QByteArray &ba);
void QString::push_front(const QString &other);

// 插入数据, 将 str 插入到字符串第 position 个字符的位置(从0开始)
// 其他重载的同名函数可参考Qt帮助文档, 此处略
QString &QString::insert(int position, const QString &str);
QString &QString::insert(int position, const char *str);
QString &QString::insert(int position, const QByteArray &str);

// 删除数据
// 从大字符串中删除len个字符, 从第pos个字符的位置开始删除
QString &QString::remove(int position, int n);

// 从字符串的尾部删除 n 个字符
void QString::chop(int n);
// 从字节串的 position 位置将字符串截断 (前边部分留下, 后边部分被删除)
void QString::truncate(int position);
// 将对象中的数据清空, 使其为null
void QString::clear();

// 字符串替换
// 将字节数组中的 子字符串 before 替换为 after
// 参数cs为是否区分大小写, 默认区分大小写
// 其他重载的同名函数可参考Qt帮助文档, 此处略
QString &QString::replace(const QString &before, const QString &after, Qt::CaseSensitivity cs = Qt::CaseSensitive);
- 子字符串查找和判断
// 判断字符串中是否包含子字符串 str, 包含返回true, 否则返回false
bool QString::contains(const QString &str, Qt::CaseSensitivity cs = Qt::CaseSensitive) const;

// 判断字符串是否以字符串 ba 开始, 是返回true, 不是返回false
bool QString::startsWith(const QString &s, Qt::CaseSensitivity cs = Qt::CaseSensitive) const;

// 判断字符串是否以字符串 ba 结尾, 是返回true, 不是返回false
bool QString::endsWith(const QString &s, Qt::CaseSensitivity cs = Qt::CaseSensitive) const;
- 遍历
// 使用迭代器
iterator QString::begin();
iterator QString::end();

// 使用数组的方式进行遍历
// i的取值范围 0 <= position < size()
const QChar QString::at(int position) const
const QChar QString::operator[](int position) const;
- 查看字节数
// 返回字节数组对象中字符的个数 (字符个数和字节个数是不同的概念)
int QString::length() const;
int QString::size() const;
int QString::count() const;

// 返回字节串对象中 子字符串 str 出现的次数
// 参数 cs 为是否区分大小写, 默认区分大小写
int QString::count(const QStringRef &str, Qt::CaseSensitivity cs = Qt::CaseSensitive) const;
- 类型转换
// 将int, short, long, float, double 转换为 QString 类型
// 其他重载的同名函数可参考Qt帮助文档, 此处略
QString &QString::setNum(int n, int base = 10);
QString &QString::setNum(short n, int base = 10);
QString &QString::setNum(long n, int base = 10);
QString &QString::setNum(float n, char format = 'g', int precision = 6);
QString &QString::setNum(double n, char format = 'g', int precision = 6);
[static] QString QString::number(long n, int base = 10);
[static] QString QString::number(int n, int base = 10);
[static] QString QString::number(double n, char format = 'g', int precision = 6);

// 将 QString 转换为 int, short, long, float, double 类型
int QString::toInt(bool *ok = Q_NULLPTR, int base = 10) const;
short QString::toShort(bool *ok = Q_NULLPTR, int base = 10) const;
long QString::toLong(bool *ok = Q_NULLPTR, int base = 10) const
float QString::toFloat(bool *ok = Q_NULLPTR) const;
double QString::toDouble(bool *ok = Q_NULLPTR) const;

// 将标准C++中的 std::string 类型 转换为 QString 类型
[static] QString QString::fromStdString(const std::string &str);
// 将 QString 转换为 标准C++中的 std::string 类型
std::string QString::toStdString() const;

// QString -> QByteArray
// 转换为本地编码, 跟随操作系统
QByteArray QString::toLocal8Bit() const;
// 转换为 Latin-1 编码的字符串 不支持中文
QByteArray QString::toLatin1() const;
// 转换为 utf8 编码格式的字符串 (常用)
QByteArray QString::toUtf8() const;

// 所有字符转换为大写
QString QString::toUpper() const;
// 所有字符转换为小写
QString QString::toLower() const;
- 字符串格式
QString QString::arg(const QString &a, int fieldWidth = 0, QChar fillChar = QLatin1Char( ' ' )) const;
QString QString::arg(int a, int fieldWidth = 0, int base = 10, QChar fillChar = QLatin1Char( ' ' )) const;

// 示例程序
int i = 1;                // 假设该变量表示当前文件的编号
int total = 2;            // 假设该变量表示文件的总个数
QString fileName = "hello world";     // 假设该变量表示当前文件的名字
// 使用以上三个变量拼接一个动态字符串
QString status = QString("Processing file %1 of %2: %3").arg(i).arg(total).arg(fileName);
qDebug() << status;  //"Processing file 1 of 2: hello world"
4.QVariant
QVariant 是Qt框架中的一个类,用于在不同数据类型之间进行类型安全的转换和存储。
QVariant 这个类型充当着最常见的数据类型的联合。QVariant 可以保存很多Qt的数据类型,包括QBrush、QColor、QCursor、QDateTime、QFont、QKeySequence、 QPalette、QPen、QPixmap、QPoint、QRect、QRegion、QSize和QString,并且还有C++基本类型,如 int、float等。
示例:
#include 基本数据类型
- 将标准类型转换为QVariant类型
QVariant::QVariant(int val);
QVariant::QVariant(bool val);
QVariant::QVariant(double val);
QVariant::QVariant(const char *val);
QVariant::QVariant(const QByteArray &val);
QVariant::QVariant(const QString &val);
......

// 使用设置函数也可以将支持的类型的数据设置到QVariant对象中
// 这里的 T 类型, 就是QVariant支持的类型
void QVariant::setValue(const T &value);
// 该函数行为和 setValue() 函数完全相同
[static] QVariant QVariant::fromValue(const T &value);
// 例子:
#if 1
QVariant v;
v.setValue(5);
#else
QVariant v = QVariant::fromValue(5);
#endif

int i = v.toInt();          // i is now 5
QString s = v.toString();   // s is now "5"
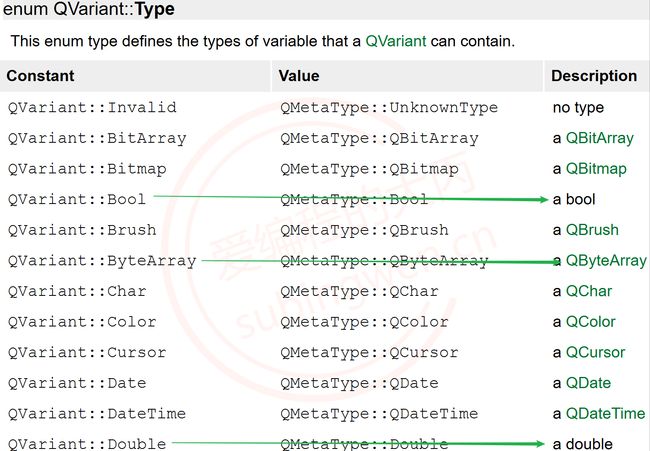
判断QVariant中封装的实际数据类型
// 该函数的返回值是一个枚举类型, 可通过这个枚举判断出实际是什么类型的数据
Type QVariant::type() const;
返回值Type的部分枚举定义, 全部信息可以自行查阅Qt帮助文档
将QVariant对象转换为实际的数据类型
// 如果要实现该操作, 可以使用QVariant类提供的 toxxx() 方法, 全部转换可以参考Qt帮助文档
// 在此举列举几个常用函数:
bool QVariant::toBool() const;
QByteArray QVariant::toByteArray() const;
double QVariant::toDouble(bool *ok = Q_NULLPTR) const;
float QVariant::toFloat(bool *ok = Q_NULLPTR) const;
int QVariant::toInt(bool *ok = Q_NULLPTR) const;
QString QVariant::toString() const;
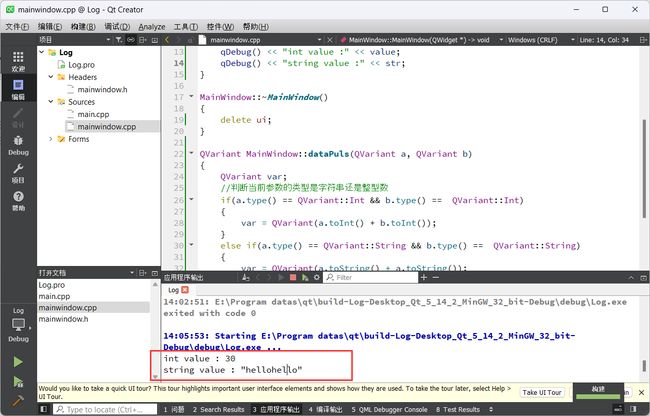
示例:
#include "mainwindow.h"
#include "ui_mainwindow.h"
#include 自定义类型
除了标准类型, 我们自定义的类型也可以使用QVariant类进行封装, 被QVariant存储的数据类型需要有一个默认的构造函数和一个拷贝构造函数。为了实现这个功能,首先必须使用Q_DECLARE_METATYPE()宏。通常会将这个宏放在类的声明所在头文件的下面, 原型为:
Q_DECLARE_METATYPE(Type)
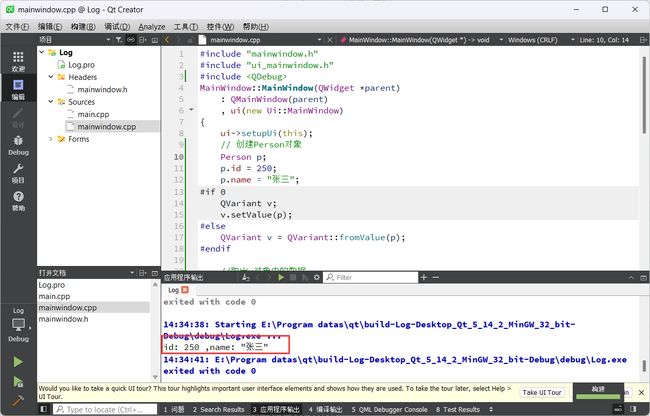
示例:
struct Person
{
    int id;
    QString name;
};
Q_DECLARE_METATYPE(Person)

MainWindow::MainWindow(QWidget *parent)
    : QMainWindow(parent)
    , ui(new Ui::MainWindow)
{
    ui->setupUi(this);
    //整型
    int value = dataPuls(10,20).toInt();
    //字符串
    QString str = dataPuls("hello","world").toString();
    qDebug() << "int value :" << value;
    qDebug() << "string value :" << str;

    // 创建Person对象
    Person p;
    p.id = 250;
    p.name = "张三";
//两种方式设置值
#if 0
    QVariant v;
    v.setValue(p);
#else
    QVariant v = QVariant::fromValue(p);
#endif

    //取出v对象中的数据
    if(v.canConvert<Person>())
    {
        Person tmp = v.value<Person>();
        qDebug() << "id:" << tmp.id << ",name:" << tmp.name;
    }
}
以上操作用到的QVariant类的API如下:
// 如果当前QVariant对象可用转换为对应的模板类型T, 返回true, 否则返回false
bool QVariant::canConvert<T>() const;
// 将当前QVariant对象转换为实际的 T 类型
T QVariant::value()<T> const;
5. 位置和尺寸
在Qt中我们常见的 点, 线, 尺寸, 矩形 都被进行了封装, 下边依次为大家介绍相关的类。
QPoint
QPoint类封装了我们常用用到的坐标点 (x, y), 常用的 API如下:
// 构造函数
// 构造一个坐标原点, 即(0, 0)
QPoint::QPoint();
// 参数为 x轴坐标, y轴坐标
QPoint::QPoint(int xpos, int ypos);

// 设置x轴坐标
void QPoint::setX(int x);
// 设置y轴坐标
void QPoint::setY(int y);

// 得到x轴坐标
int QPoint::x() const;
// 得到x轴坐标的引用
int &QPoint::rx();
// 得到y轴坐标
int QPoint::y() const;
// 得到y轴坐标的引用
int &QPoint::ry();

// 直接通过坐标对象进行算术运算: 加减乘除
QPoint &QPoint::operator*=(float factor);
QPoint &QPoint::operator*=(double factor);
QPoint &QPoint::operator*=(int factor);
QPoint &QPoint::operator+=(const QPoint &point);
QPoint &QPoint::operator-=(const QPoint &point);
QPoint &QPoint::operator/=(qreal divisor);
QLine
QLine是一个直线类, 封装了两个坐标点 (两点确定一条直线)
常用API如下:
// 构造函数
// 构造一个空对象
QLine::QLine();
// 构造一条直线, 通过两个坐标点
QLine::QLine(const QPoint &p1, const QPoint &p2);
// 从点 (x1, y1) 到 (x2, y2)
QLine::QLine(int x1, int y1, int x2, int y2);

// 给直线对象设置坐标点
void QLine::setPoints(const QPoint &p1, const QPoint &p2);
// 起始点(x1, y1), 终点(x2, y2)
void QLine::setLine(int x1, int y1, int x2, int y2);
// 设置直线的起点坐标
void QLine::setP1(const QPoint &p1);
// 设置直线的终点坐标
void QLine::setP2(const QPoint &p2);

// 返回直线的起始点坐标
QPoint QLine::p1() const;
// 返回直线的终点坐标
QPoint QLine::p2() const;
// 返回值直线的中心点坐标, (p1() + p2()) / 2
QPoint QLine::center() const;

// 返回值直线起点的 x 坐标
int QLine::x1() const;
// 返回值直线终点的 x 坐标
int QLine::x2() const;
// 返回值直线起点的 y 坐标
int QLine::y1() const;
// 返回值直线终点的 y 坐标
int QLine::y2() const;

// 用给定的坐标点平移这条直线
void QLine::translate(const QPoint &offset);
void QLine::translate(int dx, int dy);
// 用给定的坐标点平移这条直线, 返回平移之后的坐标点
QLine QLine::translated(const QPoint &offset) const;
QLine QLine::translated(int dx, int dy) const;

// 直线对象进行比较
bool QLine::operator!=(const QLine &line) const;
bool QLine::operator==(const QLine &line) const;
示例:
MainWindow::MainWindow(QWidget *parent)
    : QMainWindow(parent)
    , ui(new Ui::MainWindow)
{
    ui->setupUi(this);
    QLine line(QPoint(100,200),QPoint(150,210));
    QLine newLine = line.translated(20,20);
    qDebug() << "平移之前的坐标点:" << line;
    qDebug() << "平移之后的坐标点:" << newLine;
}
输出:
平移之前的坐标点: QLine(QPoint(100,200),QPoint(150,210))
平移之后的坐标点: QLine(QPoint(120,220),QPoint(170,230))
QSize
在Qt中QSize类用来形容长度和宽度, 常用的API如下:
// 构造函数
// 构造空对象, 对象中的宽和高都是无效的
QSize::QSize();
// 使用宽和高构造一个有效对象
QSize::QSize(int width, int height);

// 设置宽度
void QSize::setWidth(int width)
// 设置高度
void QSize::setHeight(int height);

// 得到宽度
int QSize::width() const;
// 得到宽度的引用
int &QSize::rwidth();
// 得到高度
int QSize::height() const;
// 得到高度的引用
int &QSize::rheight();

// 交换高度和宽度的值
void QSize::transpose();
// 交换高度和宽度的值, 返回交换之后的尺寸信息
QSize QSize::transposed() const;

// 进行算法运算: 加减乘除
QSize &QSize::operator*=(qreal factor);
QSize &QSize::operator+=(const QSize &size);
QSize &QSize::operator-=(const QSize &size);
QSize &QSize::operator/=(qreal divisor);
QRect
在Qt中使用QRect类来描述一个矩形, 常用的API如下:
// 构造函数
// 构造一个空对象
QRect::QRect();
// 基于左上角坐标, 和右下角坐标构造一个矩形对象
QRect::QRect(const QPoint &topLeft, const QPoint &bottomRight);
// 基于左上角坐标, 和 宽度, 高度构造一个矩形对象
QRect::QRect(const QPoint &topLeft, const QSize &size);
// 通过 左上角坐标(x, y), 和 矩形尺寸(width, height) 构造一个矩形对象
QRect::QRect(int x, int y, int width, int height);

// 设置矩形的尺寸信息, 左上角坐标不变
void QRect::setSize(const QSize &size);
// 设置矩形左上角坐标为(x,y), 大小为(width, height)
void QRect::setRect(int x, int y, int width, int height);
// 设置矩形宽度
void QRect::setWidth(int width);
// 设置矩形高度
void QRect::setHeight(int height);

// 返回值矩形左上角坐标
QPoint QRect::topLeft() const;
// 返回矩形右上角坐标
// 该坐标点值为: QPoint(left() + width() -1, top())
QPoint QRect::topRight() const;
// 返回矩形左下角坐标
// 该坐标点值为: QPoint(left(), top() + height() - 1)
QPoint QRect::bottomLeft() const;
// 返回矩形右下角坐标
// 该坐标点值为: QPoint(left() + width() -1, top() + height() - 1)
QPoint QRect::bottomRight() const;
// 返回矩形中心点坐标
QPoint QRect::center() const;

// 返回矩形上边缘y轴坐标
int QRect::top() const;
int QRect::y() const;
// 返回值矩形下边缘y轴坐标
int QRect::bottom() const;
// 返回矩形左边缘 x轴坐标
int QRect::x() const;
int QRect::left() const;
// 返回矩形右边缘x轴坐标
int QRect::right() const;

// 返回矩形的高度
int QRect::width() const;
// 返回矩形的宽度
int QRect::height() const;
// 返回矩形的尺寸信息
QSize QRect::size() const;
6.日期和时间
QDate
QDate类可以封装日期信息也可以通过这个类得到日期相关的信息, 包括:年, 月, 日。
// 构造函数
QDate::QDate();
QDate::QDate(int y, int m, int d);

// 公共成员函数
// 重新设置日期对象中的日期
bool QDate::setDate(int year, int month, int day);
// 给日期对象添加 ndays 天
QDate QDate::addDays(qint64 ndays) const;
// 给日期对象添加 nmonths 月
QDate QDate::addMonths(int nmonths) const;
// 给日期对象添加 nyears 月
QDate QDate::addYears(int nyears) const;

// 得到日期对象中的年/月/日
int QDate::year() const;
int QDate::month() const;
int QDate::day() const;
void QDate::getDate(int *year, int *month, int *day) const;

// 日期对象格式化
/*
    d    - The day as a number without a leading zero (1 to 31)
    dd   - The day as a number with a leading zero (01 to 31)
    ddd	 - The abbreviated localized day name (e.g. 'Mon' to 'Sun'). Uses the system locale to localize the name, i.e. QLocale::system().
    dddd - The long localized day name (e.g. 'Monday' to 'Sunday'). Uses the system locale to localize the name, i.e. QLocale::system().
    M    - The month as a number without a leading zero (1 to 12)
    MM   - The month as a number with a leading zero (01 to 12)
    MMM	 - The abbreviated localized month name (e.g. 'Jan' to 'Dec'). Uses the system locale to localize the name, i.e. QLocale::system().
    MMMM - The long localized month name (e.g. 'January' to 'December'). Uses the system locale to localize the name, i.e. QLocale::system().
    yy   - The year as a two digit number (00 to 99)
    yyyy - The year as a four digit number. If the year is negative, a minus sign is prepended, making five characters.
*/
QString QDate::toString(const QString &format) const;

// 操作符重载 ==> 日期比较
bool QDate::operator!=(const QDate &d) const;
bool QDate::operator<(const QDate &d) const;
bool QDate::operator<=(const QDate &d) const;
bool QDate::operator==(const QDate &d) const;
bool QDate::operator>(const QDate &d) const;
bool QDate::operator>=(const QDate &d) const;

// 静态函数 -> 得到本地的当前日期
[static] QDate QDate::currentDate();
示例:
MainWindow::MainWindow(QWidget *parent)
    : QMainWindow(parent)
    , ui(new Ui::MainWindow)
{
    ui->setupUi(this);
    //获取当前的日期
    QDate d = QDate::currentDate();
    // 第一种方式:
    qDebug() << "year:" <<d.year() << ", month:" <<d.month() << ",day:" << d.day();

    // 第二种方式 - 2000-01-01
    QString str = d.toString("yyyy-MM-dd");
    qDebug() << "date str:" << str;
}
输出:
year: 2023 , month: 9 ,day: 20
date str: "2023-09-20"
QTime
QTime类可以封装时间信息也可以通过这个类得到时间相关的信息, 包括:时, 分, 秒, 毫秒。
// 构造函数
QTime::QTime();
/*
    h 		==> 取值范围: 0 ~ 23
    m and s 	==> 取值范围: 0 ~ 59
    ms 		==> 取值范围: 0 ~ 999
*/
QTime::QTime(int h, int m, int s = 0, int ms = 0);

// 公共成员函数
// Returns true if the set time is valid; otherwise returns false.
bool QTime::setHMS(int h, int m, int s, int ms = 0);
QTime QTime::addSecs(int s) const;
QTime QTime::addMSecs(int ms) const;

// 示例代码
  QTime n(14, 0, 0);                // n == 14:00:00
  QTime t;
  t = n.addSecs(70);                // t == 14:01:10
  t = n.addSecs(-70);               // t == 13:58:50
  t = n.addSecs(10 * 60 * 60 + 5);  // t == 00:00:05
  t = n.addSecs(-15 * 60 * 60);     // t == 23:00:00

// 从时间对象中取出 时/分/秒/毫秒
// Returns the hour part (0 to 23) of the time. Returns -1 if the time is invalid.
int QTime::hour() const;
// Returns the minute part (0 to 59) of the time. Returns -1 if the time is invalid.
int QTime::minute() const;
// Returns the second part (0 to 59) of the time. Returns -1 if the time is invalid.
int QTime::second() const;
// Returns the millisecond part (0 to 999) of the time. Returns -1 if the time is invalid.
int QTime::msec() const;


// 时间格式化
/*
    -- 时 --
    h	==>	The hour without a leading zero (0 to 23 or 1 to 12 if AM/PM display)
    hh	==>	The hour with a leading zero (00 to 23 or 01 to 12 if AM/PM display)
    H	==>	The hour without a leading zero (0 to 23, even with AM/PM display)
    HH	==>	The hour with a leading zero (00 to 23, even with AM/PM display)
    -- 分 --
    m	==>	The minute without a leading zero (0 to 59)
    mm	==>	The minute with a leading zero (00 to 59)
    -- 秒 --
    s	==>	The whole second, without any leading zero (0 to 59)
    ss	==>	The whole second, with a leading zero where applicable (00 to 59)
    -- 毫秒 --
    zzz	==>	The fractional part of the second, to millisecond precision,
			including trailing zeroes where applicable (000 to 999).
    -- 上午或者下午
    AP or A	==>	使用AM/PM(大写) 描述上下午, 中文系统显示汉字
    ap or a	==>	使用am/pm(小写) 描述上下午, 中文系统显示汉字
*/
QString QTime::toString(const QString &format) const;

// 阶段性计时
// 过时的API函数
// 开始计时
void QTime::start();
// 计时结束
int QTime::elapsed() const;
// 重新计时
int QTime::restart();

// 推荐使用的API函数
// QElapsedTimer 类
void QElapsedTimer::start();
qint64 QElapsedTimer::restart();
qint64 QElapsedTimer::elapsed() const;


// 操作符重载 ==> 时间比较
bool QTime::operator!=(const QTime &t) const;
bool QTime::operator<(const QTime &t) const;
bool QTime::operator<=(const QTime &t) const;
bool QTime::operator==(const QTime &t) const;
bool QTime::operator>(const QTime &t) const;
bool QTime::operator>=(const QTime &t) const;

// 静态函数 -> 得到当前时间
[static] QTime QTime::currentTime();
示例1:
MainWindow::MainWindow(QWidget *parent)
    : QMainWindow(parent)
    , ui(new Ui::MainWindow)
{
    ui->setupUi(this);

    QTime curtime = QTime::currentTime();
    qDebug() << "hour:" << curtime.hour() << ",minute:" << curtime.minute() << ",second:" << curtime.second() << ",millisecond" << curtime.msec();

    QString strtm = curtime.toString("hh:mm::ss.zzz");
    qDebug() << "格式化的日期:" << strtm;
}
输出:
hour: 11 ,minute: 29 ,second: 6 ,millisecond 195
格式化的日期: "11:29::06.195"
示例2:
MainWindow::MainWindow(QWidget *parent)
    : QMainWindow(parent)
    , ui(new Ui::MainWindow)
{
    ui->setupUi(this);

    //统计函数运行的时间
    QElapsedTimer tt;
    tt.start();
    randNumbers(100);
    int ms = tt.elapsed();
    qDebug() << "函数执行所用的时间长度为:" << ms << "毫秒";
}

void MainWindow::randNumbers(int count){
    srand(time(NULL));
    for(int i = 0; i< count;i++){
        int num = rand()%10000;
    }
}
输出:
函数执行所用的时间长度为: 4
QDateTime
QDateTime类可以封装日期和时间信息也可以通过这个类得到日期和时间相关的信息, 包括:年, 月, 日, 时, 分, 秒, 毫秒。其实这个类就是QDate和QTime 这两个类的结合体。
// 构造函数
QDateTime::QDateTime();
QDateTime::QDateTime(const QDate &date, const QTime &time, Qt::TimeSpec spec = Qt::LocalTime);

// 公共成员函数
// 设置日期
void QDateTime::setDate(const QDate &date);
// 设置时间
void QDateTime::setTime(const QTime &time);
// 给当前日期对象追加 年/月/日/秒/毫秒, 参数可以是负数
QDateTime QDateTime::addYears(int nyears) const;
QDateTime QDateTime::addMonths(int nmonths) const;
QDateTime QDateTime::addDays(qint64 ndays) const;
QDateTime QDateTime::addSecs(qint64 s) const;
QDateTime QDateTime::addMSecs(qint64 msecs) const;

// 得到对象中的日期
QDate QDateTime::date() const;
// 得到对象中的时间
QTime QDateTime::time() const;

// 日期和时间格式, 格式字符参考QDate 和 QTime 类的 toString() 函数
QString QDateTime::toString(const QString &format) const;


// 操作符重载 ==> 日期时间对象的比较
bool QDateTime::operator!=(const QDateTime &other) const;
bool QDateTime::operator<(const QDateTime &other) const;
bool QDateTime::operator<=(const QDateTime &other) const;
bool QDateTime::operator==(const QDateTime &other) const;
bool QDateTime::operator>(const QDateTime &other) const;
bool QDateTime::operator>=(const QDateTime &other) const;

// 静态函数
// 得到当前时区的日期和时间(本地设置的时区对应的日期和时间)
[static] QDateTime QDateTime::currentDateTime();
示例:
MainWindow::MainWindow(QWidget *parent)
    : QMainWindow(parent)
    , ui(new Ui::MainWindow)
{
    ui->setupUi(this);

    //获取当前的日期和时间
    QDateTime dt = QDateTime::currentDateTime();
    // 格式化 2020/01/10 12:12:12 上午/下午
    //       yyyy/MM/dd hh:mm:ss ap
    QString strdt = dt.toString("yyyy/MM/dd hh:mm:ss ap");
    qDebug() << "当前的日期和时间:" << strdt;

    //先取出日期
    QDate d = QDate();
    d = dt.date();
    qDebug() << "year:" << d.year() << ",month" << d.month() << ",day:" << d.day();

    // 取出时间
    QTime t = dt.time();
    qDebug() << "hour:" <<t.hour() << ",minute:" <<t.minute() << ",second:" <<t.second() << ",millsecond:" << t.msec();
}
输出:
当前的日期和时间: "2023/09/20 11:51:24 am"
year: 2023 ,month 9 ,day: 20
hour: 11 ,minute: 51 ,second: 24 ,millsecond: 168


