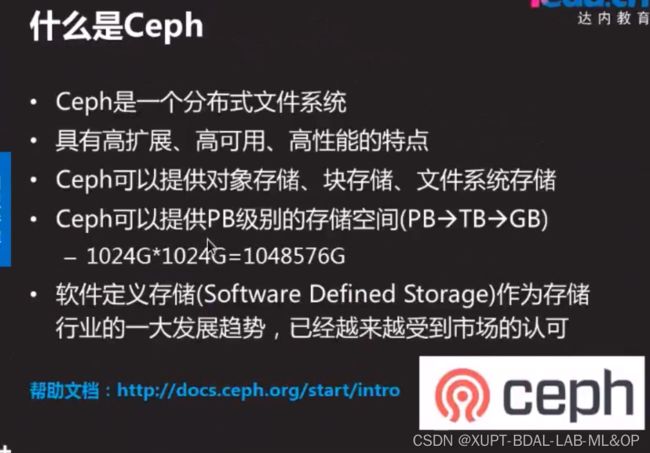
Ceph概述 、 部署Ceph集群 、 Ceph块存储
这里写目录标题
- 概述
- 环境准备
-
- 配yum源
-
- 1
- 2
- ssh免密
- 分发小脚本
- 时间同步
- 添加虚拟磁盘
- 安装部署软件ceph-deploy
-
- node1安装ceph-deploy(部署ceph的一个python脚本)
- 创建目录(目录名称可以任意,推荐与案例一致)
- 部署Ceph集群
-
- 创建Ceph集群配置
- 给所有节点安装ceph相关软件包。
- 初始化monitor节点,
- 将认证密钥拷贝到其他节点,
- 制作OSD
-
- 分缓存盘
-
- 权限
- 分存储盘
- 创建OSD存储空间(仅node1操作即可)
- 问题
-
- 1
- 2
- 3
- 4
- 5
- 6
- 完成搭建
- 客户端配置
-
- 块
概述
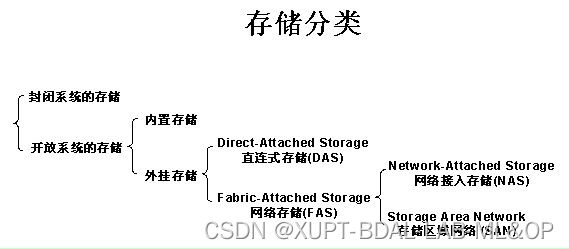
存储的类型
https://www.cnblogs.com/orange-CC/p/12657920.html
DAS(支链存储,用线直接连)IDE,SATA(家用电脑),SAS(服务器)

NAS 网络附加存储 ,就是网盘 共享的是文件系统
samba nfs ftp
SAN(存储区域网络)iscsi 共享的是块
没格式化前就是块
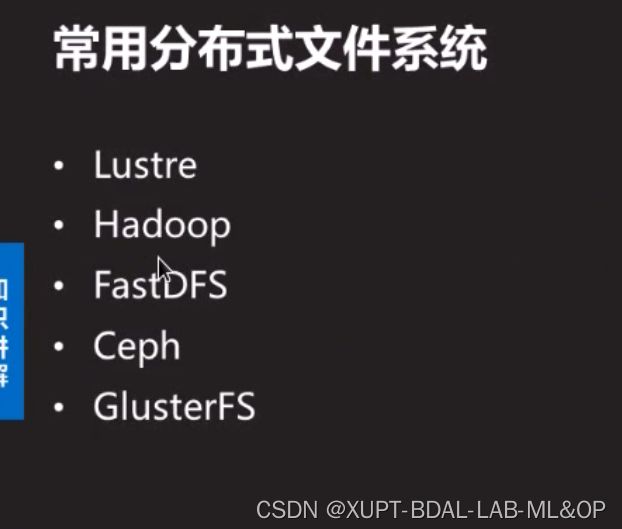
(SDS)(软件定义存储) 分布式存储ceph,glusterfs
EB>PB>TB>GB
b站(老了)https://blog.csdn.net/weixin_46575696/article/details/109638542
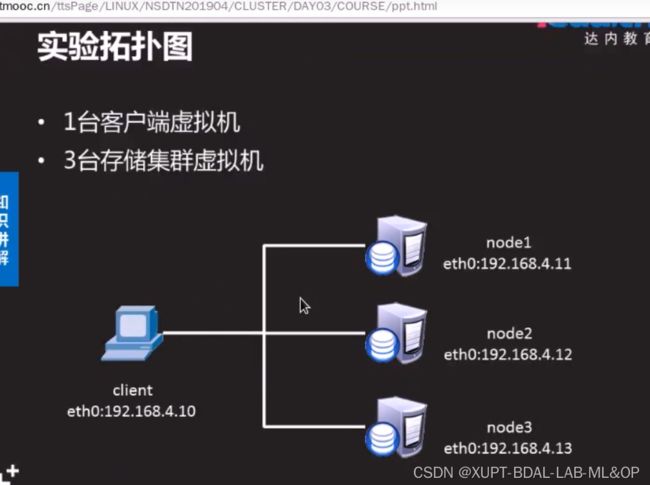
环境准备

腾讯的教材 https://www.yisu.com/zixun/22179.html
配yum源
1
官网
阿里(推荐)
vim ceph-package.repo
[ceph packages]
name = ceph packages for $basearch
baseurl=https://mirrors.aliyun.com/ceph/rpm-15.1.0/el8/$basearch
enabled=1
priority=2
gpgcheck=1
gpgkey=https://mirrors.aliyun.com/ceph/keys/release.asc

[ceph-noarch]
name=Ceph noarch packages
baseurl=https://mirrors.aliyun.com/ceph/rpm-15.1.0/el8/noarch
enabled=1
priority=2
gpgcheck=1
gpgkey=https://mirrors.aliyun.com/ceph/keys/release.asc

[ceph-source]
name=Ceph source packages
baseurl=https://mirrors.aliyun.com/ceph/rpm-15.1.0/el8/SRPMS
enabled=0
priority=2
gpgcheck=1
gpgkey=https://mirrors.aliyun.com/ceph/keys/release.asc
2
设置Ceph安装yum源
vim ceph.repo
[ceph-noarch]
name=Ceph noarch packages
baseurl=https://download.ceph.com/rpm-mimic/el7/noarch
enabled=1
gpgcheck=1
type=rpm-md
gpgkey=https://download.ceph.com/keys/release.asc


### 安装EPEL 仓库
[root@node-1 ~]# sudo yum install -y https://dl.fedoraproject.org/pub/epel/epel-release-latest-7.noarch.rpm
ssh免密
 ssh-keygen -N ''

for i in 129 130 131
> do
> ssh-copy-id 192.168.222.$i
> done
分发小脚本
分发/etc/hosts等
cd /usr/local/bin

xsync <要同步的文件路径>

#!/bin/bash
#1获取输入参数个数,如果没有参数,直接退出
pcount=$#
if((pcount==0));then
    echo no args;
    exit;
fi

#2获取文件路径
p1=$1
fname=`basename $p1`
echo fname=$fname

#3获取上级目录到绝对路径
pdir=`cd -P $(dirname $p1);pwd`
echo pdir=$pdir

#4获取当前用户名称
user=`whoami`

#5循环
for((num=1;num<4;num++));do
    host=$(printf "%d" "$num")
    echo -------------------node$host--------------
    rsync -rvl $pdir/$fname $user@node$host:$pdir
done
时间同步
1、服务端配置
1)、配置文件修改
  vi  /etc/chrony.conf
	server ntp.aliyun.com iburst

 a、修改第22行,Allow NTP client access from local network,配置允许访问的客户端列表,支持CIDR,例如:

  allow 192.168/16

 b、修改第29行设置同步,Serve time even if not synchronized to any NTP server.,打开注释即可,即:

  local stratum 10
2)、重启下服务端chrony服务,使用systemctl restart chronyd.service重启即可。

2、客户端配置
1)、配置文件修改
  vim  /etc/chrony.conf
 a、修改server即可,删掉其他的,添加要同步时间的源服务器ip,格式如下:

  server x.x.x.x iburst
2)、重启下客户端chrony服务,使用systemctl restart chronyd.service重启即可。

  客户端使用chronyc sources -v命令完成同步即可

3)、查看同步状态
添加虚拟磁盘
略
lsblk -l# 查看
安装部署软件ceph-deploy
node1安装ceph-deploy(部署ceph的一个python脚本)
前提是ssh免密
[root@node1 ~]#  yum -y install ceph-deploy
[root@node1 ~]#  ceph-deploy  --help
[root@node1 ~]#  ceph-deploy mon --help
创建目录(目录名称可以任意,推荐与案例一致)
[root@localhost ~]# mkdir ceph-cluster
[root@localhost ~]# cd ceph-cluster/
部署Ceph集群
创建Ceph集群配置
在ceph-cluster目录下生成Ceph配置文件(ceph.conf)。
在ceph.conf配置文件中定义monitor主机是谁。
[root@node1 ceph-cluster]# ceph-deploy new node1 node2 node3

[root@node-1 ceph-admin ]# ls -l
总用量 12
-rw-r--r-- 1 root root  265 3月   1 13:04 ceph.conf    #配置文件
-rw-r--r-- 1 root root 3068 3月   1 13:04 ceph-deploy-ceph.log #部署日志文件
-rw------- 1 root root   73 3月   1 13:04 ceph.mon.keyring #monitor认证key
给所有节点安装ceph相关软件包。
[root@node1 ceph-cluster]# for i in node1 node2 node3
do
    ssh  $i "yum -y install ceph-mon ceph-osd ceph-mds ceph-radosgw"
done
或(不行)
ceph-deploy install node1 node2 node3

rpm -qa | grep ceph
初始化monitor节点,
执行ceph-deploy mon create-initial做初始化
systemctl status [email protected]
systemctl status [email protected]
systemctl status [email protected]

ceph -s
初始化完毕后会生成对应的keyring文件,用于ceph认证:
ceph.client.admin.keyring
ceph.bootstrap-mgr.keyring
ceph.bootstrap-osd.keyring
ceph.bootstrap-mds.keyring
ceph.bootstrap-rgw.keyring
ceph.bootstrap-rbd.keyring
ceph.bootstrap-rbd-mirror.keyring
将认证密钥拷贝到其他节点,
便于ceph命令行可以通过keyring和ceph集群进行交互,
ceph-deploy admin node-1 node-2 node-3
制作OSD
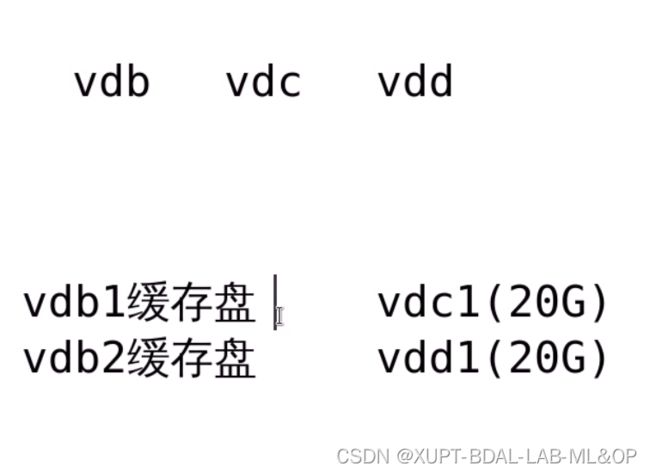
分缓存盘
for i in node1 node2 node3
do
	ssh $i "parted /dev/sdb mklabel gpt"

	ssh $i "parted /dev/sdb mkpart primary 1 50%"
	ssh $i "parted /dev/sdb mkpart primary 50% 100%"
done
权限
ll /dev/sdb*
brw-rw----. 1 root disk 8, 16 5月   1 23:20 /dev/sdb
brw-rw----. 1 root disk 8, 17 5月   1 23:20 /dev/sdb1
brw-rw----. 1 root disk 8, 18 5月   1 23:20 /dev/sdb2

id ceph
uid=167(ceph) gid=167(ceph) 组=167(ceph)

# 重启后会重置
[root@node1 ~]# chown ceph.ceph /dev/sdb1
[root@node1 ~]# chown ceph.ceph /dev/sdb2
# 永久
vim /etc/udev/rules.d/71-sdb.rules

ENV{DEVNAME}=="/dev/sdb1",OWNER="ceph",GROUP="ceph"
ENV{DEVNAME}=="/dev/sdb2",OWNER="ceph",GROUP="ceph"
分存储盘
# 在node1下

for i in node1 node2 node3; do ssh $i "parted /dev/sdd mklabel gpt"; ssh $i "parted /dev/sdc mkpart primary 1 100%"; done

 #ceph-deploy disk  zap  node1 /dev/sdc
 #ceph-deploy disk  zap  node1 /dev/sdd
 ......
创建OSD存储空间(仅node1操作即可)
[root@node1 ceph-cluster]# ceph-deploy osd create node1:sdb  node1:sdc
#每个磁盘都会被自动分成两个分区;一个固定5G大小;一个为剩余所有容量
#5G分区为Journal日志缓存;剩余所有空间为数据盘。
[root@node1 ceph-cluster]# ceph-deploy osd create node2:sdb  node2:sdc
[root@node1 ceph-cluster]# ceph-deploy osd create node3:sdb  node3:sdc
问题
1
ceph_deploy][ERROR ] Traceback (most recent call last):
[ceph_deploy][ERROR ]   File "/usr/lib/python2.7/site-packages/ceph_deploy/util/decorators.py", line 69, in newfunc
[ceph_deploy][ERROR ]     return f(*a, **kw)
[ceph_deploy][ERROR ]   File "/usr/lib/python2.7/site-packages/ceph_deploy/cli.py", line 162, in _main
[ceph_deploy][ERROR ]     return args.func(args)
[ceph_deploy][ERROR ]   File "/usr/lib/python2.7/site-packages/ceph_deploy/new.py", line 141, in new
[ceph_deploy][ERROR ]     ssh_copy_keys(host, args.username)
[ceph_deploy][ERROR ]   File "/usr/lib/python2.7/site-packages/ceph_deploy/new.py", line 35, in ssh_copy_keys
[ceph_deploy][ERROR ]     if ssh.can_connect_passwordless(hostname):
[ceph_deploy][ERROR ]   File "/usr/lib/python2.7/site-packages/ceph_deploy/util/ssh.py", line 15, in can_connect_passwordless
[ceph_deploy][ERROR ]     if not remoto.connection.needs_ssh(hostname):
[ceph_deploy][ERROR ] AttributeError: 'module' object has no attribute 'needs_ssh'


解决  换成centos7
2
ceph安装时报错RuntimeError: NoSectionError
标签: ceph安装时报错runtim  分类: ceph
安装ceph时出错[ceph_deploy][ERROR ] RuntimeError: NoSectionError: No section: 'ceph'
解决办法:
# yum remove ceph-release
把这个东西卸了,应该是这个的版本不兼容 亲测有效。
3
ceph-deploy install node1 node2 node3

No Presto metadata available for os

解决 yum源加上1方案 ,采用yum安装
4
ceph -s

2022-05-01 22:04:37.180 7f12aa0e3700 -1 auth: unable to find a keyring on /etc/ceph/ceph.client.admin.keyring,/etc/ceph/ceph.keyring,/etc/ceph/keyring,/etc/ceph/keyring.bin,: (2) No such file or directory
2022-05-01 22:04:37.180 7f12aa0e3700 -1 monclient: ERROR: missing keyring, cannot use cephx for authentication
[errno 2] error connecting to the cluster


没有ceph-deploy admin node-1 node-2 node-3
5
[ceph_deploy.mgr][ERROR ] OSError: [Errno 2] No such file or directory: '/var/lib/ceph/mgr/ceph-enickel7'
    [ceph_deploy][ERROR ] GenericError: Failed to create 1 MGRs
6
 all OSDs are running luminous or later but require_osd_release < luminous


https://www.suse.com/support/kb/doc/?id=000019069
完成搭建
1.ssh免密

2.防火墙

3.更新yum源,下载ceph-deploy
# BASE wget -O /etc/yum.repos.d/CentOS-Base.repo https://mirrors.aliyun.com/repo/Centos-7.repo
# epel wget -O /etc/yum.repos.d/epel.repo http://mirrors.aliyun.com/repo/epel-7.repo
[ceph-noarch]
name=Ceph noarch packages
baseurl=https://mirrors.aliyun.com/ceph/rpm-mimic/el7/noarch/
enabled=1
gpgcheck=0
type=rpm-md
gpgkey=https://download.ceph.com/keys/release.asc
# vim ceph.repo
yum install ceph-deploy  -y
# 必须2.0.1

4.# 下载distribute-0.7.3插件
cd ~
wget https://files.pythonhosted.org/packages/5f/ad/1fde06877a8d7d5c9b60eff7de2d452f639916ae1d48f0b8f97bf97e570a/distribute-0.7.3.zip
unzip distribute-0.7.3.zip
cd distribute-0.7.3/
python setup.py install

5.# 创建集群
ceph-deploy new node1
[root@localhost my-cluster]# ls
ceph.conf  ceph-deploy-ceph.log  ceph.mon.keyring
# 安装luminous-12.2.13
# 1)三台分别采用手动部署
wget -O /etc/yum.repos.d/epel.repo http://mirrors.aliyun.com/repo/epel-7.repo
# vim /ceph.repo
[ceph packages]
name = ceph packages for $basearch
baseurl=https://mirrors.aliyun.com/ceph/rpm-luminous/el7/$basearch
enabled=1
priority=2
gpgcheck=0
gpgkey=https://mirrors.aliyun.com/ceph/keys/release.asc

[ceph-noarch]
name=Ceph noarch packages
baseurl=https://mirrors.aliyun.com/ceph/rpm-luminous/el7/noarch
enabled=1
priority=2
gpgcheck=0
gpgkey=https://mirrors.aliyun.com/ceph/keys/release.asc

[ceph-source]
name=Ceph source packages
baseurl=https://mirrors.aliyun.com/ceph/rpm-luminous/el7/SRPMS
enabled=0
priority=2
gpgcheck=0
gpgkey=https://mirrors.aliyun.com/ceph/keys/release.asc
# 安装ceph-radosgw
yum install -y ceph  ceph-radosgw
# 2)自动
 ceph-deploy install --release luminous node1 node2 node3


# 改ceph.repo % s/download.ceph.com/mirrors.aliyun.com/g
# yum install -y https://dl.fedoraproject.org/pub/epel/epel-release-latest-7.noarch.rpm
[ceph]
name=ceph
baseurl=http://mirrors.aliyun.com/ceph/rpm-luminous/el7/x86_64/
gpgcheck=0
priority =1
[ceph-noarch]
name=cephnoarch
baseurl=http://mirrors.aliyun.com/ceph/rpm-luminous/el7/noarch/
gpgcheck=0
priority =1
[ceph-source]
name=Ceph source packages
baseurl=http://mirrors.aliyun.com/ceph/rpm-luminous/el7/SRPMS
gpgcheck=0
priority=1

#初始化 mon
[root@localhost my-cluster]# ceph-deploy mon create-initial

# 赋予各个用户免用户名权限
ceph-deploy admin node1 node2 node3

# 安装ceph-mgr
ansible all -m shell -a "chmod 644 /etc/ceph/ceph.client.admin.keyring"

ceph-deploy mgr create node1

# 添加osd
ceph-deploy osd create --data /dev/sdb node1
ceph-deploy osd create --data /dev/sdb node2
ceph-deploy osd create --data /dev/sdb node3


# Dashboard
## 1.mgr(node1)创建管理域密钥
ceph auth get-or-create mgr.noed1 mon 'allow profile mgr' osd 'allow *' mds 'allow *'

[mgr.noed1]
	key = AQDakW9iVUH8BRAAKY/x0hvSZeABb6TTbqKwvg==

## 开启管理域
ceph-mgr -i node1

## 查看状态
ceph status

ervices:
    mon: 1 daemons, quorum node1
    mgr: node1(active, starting)
    osd: 3 osds: 3 up, 3 in

## 打开dashboard模块
ceph mgr module enable dashboard

## 绑定开启模块的mgr节点ip
ceph config-key set mgr/dashboard/node1/server_addr 192.168.222.143
输出set mgr/dashboard/node1/server_addr
客户端配置
块
# 在node1 创建存储池bd
ceph osd pool create rbd 128 128
# 初始化
rbd pool init rbd

# 客户端
## 升级内核
rpm --import https://www.elrepo.org/RPM-GPG-KEY-elrepo.org
## 安装elrepo的yum源
rpm -Uvh http://www.elrepo.org/elrepo-release-7.0-2.el7.elrepo.noarch.rpm
## 查看可用内核包
yum --disablerepo="*" --enablerepo="elrepo-kernel" list available

## 安装内核
yum --enablerepo=elrepo-kernel install kernel-ml-devel kernel-ml -y
## 查看内核启动顺序
awk -F\' '$1=="menuentry " {print $2}' /etc/grub2.cfg
## 改变默认顺序
grub2-set-default 0
## 删除旧内核
yum remove kernel


# 安装
yum install ceph ceph-radosgw -y
## 免用户名
ceph-deploy admin client
修改client的文件权限
chmod +r /etc/ceph/ceph.client.admin.keyring
## 解决映射镜像时出错
vim /etc/ceph/ceph.conf
rbd_default_features = 1

## client创建块设备镜像 4个G
rbd create foo --size 4096
## client映射到主机
rbd map foo --name ckient.admin
输出/dev/rbd0
## 格式化
mkfs.ext4 -m 0 /dev/rbd/rbd/foo

## 挂载
mdir /mnt/ceph-block-device
mount /dev/rbd/ebd/foo /mnt/ceph-block-device
客户端重启后,设备要重新映射