HybridCLR+Addressables资源代码全热更框架 二

第二章 使用huotuo 与 addressables

文章目录

    • 第二章 使用huotuo 与 addressables
      • 一.修改HybridCLR打包方式
      • 二.设置热更场景
      • 三.打包测试
  • 总结

一.修改HybridCLR打包方式

因为HybridCLR实例代码中使用的是传统AssetBundle打包方式,将预制体,程序集,场景打包到ab包中,在这里我们将替换为Addressables打包
1.创建热更程序集Hotfix

  • 新建文件夹HotFix

  • 新建文件HotFix.asmdef并检视界面修改属性如下
    HybridCLR+Addressables资源代码全热更框架 二_第1张图片

  • 新建文件App.cs
    App.cs代码如下

using System;
using System.Collections.Generic;
using UnityEngine;
using UnityEngine.AddressableAssets;

namespace HotFix
{
    struct MyValue
    {
        public int x;
        public float y;
        public string s;
    }
    public class App
    {
        public static int Main()
        {
#if !UNITY_EDITOR
            LoadMetadataForAOTAssembly();
            Debug.Log("ydd-- AOT程序集加载完毕!");
#endif
            TestAOTGeneric();

            LoadScene();
            return 0;
        }
        /// 
        /// 测试 aot泛型
        /// 
        public static void TestAOTGeneric()
        {
            var arr = new List<MyValue>();
            arr.Add(new MyValue() { x = 1, y = 10, s = "abc" });
            Debug.Log("AOT泛型补充元数据机制测试正常");
        }
        /// 
        /// 切换场景
        /// 
        static async void LoadScene()
        {
            var handler = await Addressables.LoadSceneAsync("MainScene").Task;
            handler.ActivateAsync();
        }

        /// 
        /// 为aot assembly加载原始metadata, 这个代码放aot或者热更新都行。
        /// 一旦加载后,如果AOT泛型函数对应native实现不存在,则自动替换为解释模式执行
        /// 
        public static unsafe void LoadMetadataForAOTAssembly()
        {
            // 可以加载任意aot assembly的对应的dll。但要求dll必须与unity build过程中生成的裁剪后的dll一致,而不能直接使用原始dll。
            // 我们在Huatuo_BuildProcessor_xxx里添加了处理代码,这些裁剪后的dll在打包时自动被复制到 {项目目录}/HuatuoData/AssembliesPostIl2CppStrip/{Target} 目录。

            /// 注意,补充元数据是给AOT dll补充元数据,而不是给热更新dll补充元数据。
            /// 热更新dll不缺元数据,不需要补充,如果调用LoadMetadataForAOTAssembly会返回错误


            foreach (var dllBytes in LoadDll.aotDllBytes)
            {
                fixed (byte* ptr = dllBytes.bytes)
                {
                    // 加载assembly对应的dll,会自动为它hook。一旦aot泛型函数的native函数不存在,用解释器版本代码
                    int err = HybridCLR.RuntimeApi.LoadMetadataForAOTAssembly((IntPtr)ptr, dllBytes.bytes.Length);
                    Debug.Log($"LoadMetadataForAOTAssembly:{dllBytes.name}. ret:{err}");
                }
            }
        }
    }
}

  • 在检视界面修改Main/Main.asmdef文件,加入对Addressables的引用

HybridCLR+Addressables资源代码全热更框架 二_第2张图片
2.打开LoadDll.cs,修改代码如下

using System;
using System.Collections;
using System.Collections.Generic;
using System.Linq;
using System.Reflection;
using UnityEngine;
#if !UNITY_EDITOR
using UnityEngine.AddressableAssets;
#endif

/// 
/// 加载热更新Dll
/// 
public class LoadDll : MonoBehaviour
{
    Assembly gameAss;
    public static TextAsset[] aotDllBytes;
    public static readonly List<string> aotDlls = new List<string>()
            {
                "mscorlib.dll",
                "System.dll",
                "System.Core.dll",// 如果使用了Linq,需要这个
                // "Newtonsoft.Json.dll",
                // "protobuf-net.dll",
                // "Google.Protobuf.dll",
                // "MongoDB.Bson.dll",
                // "DOTween.Modules.dll",
                // "UniTask.dll",
            };
    // Start is called before the first frame update
    void Start()
    {
        LoadGameDll();
        RunMain();
    }

    void LoadGameDll()
    {
#if !UNITY_EDITOR
            aotDllBytes = new TextAsset[aotDlls.Count];
            for (int i = 0; i < aotDlls.Count; i++)
            {
                aotDllBytes[i] = Addressables.LoadAssetAsync<TextAsset>(aotDlls[i]).WaitForCompletion();
            }
            TextAsset hotfixDll = Addressables.LoadAssetAsync<TextAsset>("HotFix.dll").WaitForCompletion();
            gameAss = Assembly.Load(hotfixDll.bytes);
#else
        gameAss = AppDomain.CurrentDomain.GetAssemblies().First(assembly => assembly.GetName().Name == "HotFix");
#endif
    }

    public void RunMain()
    {
        if (gameAss == null)
        {
            UnityEngine.Debug.LogError("dll未加载");
            return;
        }
        var appType = gameAss.GetType("HotFix.App");
        var mainMethod = appType.GetMethod("Main");
        mainMethod.Invoke(null, null);

        // 如果是Update之类的函数,推荐先转成Delegate再调用,如
        //var updateMethod = appType.GetMethod("Update");
        //var updateDel = System.Delegate.CreateDelegate(typeof(Action), null, updateMethod);
        //updateDel(deltaTime);
    }
}

二.设置热更场景

使用上一章工程

1.修改默认场景名为Entry并加入BuildSetting作为热更新的入口,新建场景MainScene作为热更场景,然后打开Addressable Groups选择Create
HybridCLR+Addressables资源代码全热更框架 二_第3张图片

HybridCLR+Addressables资源代码全热更框架 二_第4张图片
HybridCLR+Addressables资源代码全热更框架 二_第5张图片
2.在检视界面将MainScene标记为可寻址,名称为MainScene
HybridCLR+Addressables资源代码全热更框架 二_第6张图片
3.打开Entry场景,修改界面UI如下,添加空对象挂载脚本LoadDll.cs
HybridCLR+Addressables资源代码全热更框架 二_第7张图片

4.编译dll
HybridCLR+Addressables资源代码全热更框架 二_第8张图片

5.首次打包获取aot dll(此次为无效打包,仅为获取aot dll),然后HybridCLRData/AssembliesPostIl2CppStrip/StandaloneWindows64目录会如下
HybridCLR+Addressables资源代码全热更框架 二_第9张图片

6.复制4.5步中的HotFix.dll,mscorlib.dll,System.dll,System.Core.dll到Assets目录下
因为Addressables只能加载Assets目录下的资源,所以我们需要将HybridCLR生成的dll复制过去
Assets/Editor目录下编写编辑器脚本CopeDll2Assets.cs如下

using System.Collections;
using System.Collections.Generic;
using UnityEngine;
using UnityEditor;
using HybridCLR;
using System.IO;

public class CopeDll2Assets : Editor
{
    [MenuItem("Tools/复制Dll到Assets/ActiveBuildTarget")]
    static void CopeByActive()
    {
        Copy(EditorUserBuildSettings.activeBuildTarget);
    }
    [MenuItem("Tools/复制Dll到Assets/Win32")]
    static void CopeByStandaloneWindows32()
    {
        Copy(BuildTarget.StandaloneWindows);
    }
    [MenuItem("Tools/复制Dll到Assets/Win64")]
    static void CopeByStandaloneWindows64()
    {
        Copy(BuildTarget.StandaloneWindows64);
    }

    [MenuItem("Tools/复制Dll到Assets/Android")]
    static void CopeByAndroid()
    {
        Copy(BuildTarget.Android);
    }
    [MenuItem("Tools/复制Dll到Assets/IOS")]
    static void CopeByIOS()
    {
        Copy(BuildTarget.iOS);
    }

    static void Copy(BuildTarget target)
    {
        List<string> copyDlls = new List<string>()
        {
            "HotFix.dll",
        }; 
        string outDir = BuildConfig.GetHotFixDllsOutputDirByTarget(target);
        string exportDir = Application.dataPath + "/Res/Dlls";
        if (!Directory.Exists(exportDir))
        {
            Directory.CreateDirectory(exportDir);
        }
        foreach (var copyDll in copyDlls)
        {
            File.Copy($"{outDir}/{copyDll}", $"{exportDir}/{copyDll}.bytes", true);
        }

        string aotDllDir = $"{BuildConfig.AssembliesPostIl2CppStripDir}/{target}";
        foreach (var dll in LoadDll.aotDlls)
        {
            string dllPath = $"{aotDllDir}/{dll}";
            if (!File.Exists(dllPath))
            {
                Debug.LogError($"ab中添加AOT补充元数据dll:{dllPath} 时发生错误,文件不存在。需要构建一次主包后才能生成裁剪后的AOT dll");
                continue;
            }
            string dllBytesPath = $"{exportDir}/{dll}.bytes";
            File.Copy(dllPath, dllBytesPath, true);
        }
        AssetDatabase.Refresh();
        Debug.Log("热更Dll复制成功!");
    }
}

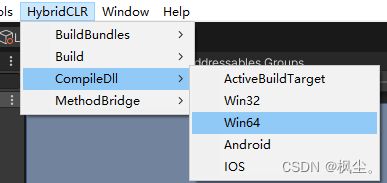
执行Tools/复制Dll到Assets/Win64,结构如下:
HybridCLR+Addressables资源代码全热更框架 二_第10张图片

7.将4个文件均加入Addressables并修改名称
HybridCLR+Addressables资源代码全热更框架 二_第11张图片

三.打包测试

1.打包Addressables Group Befault build Script
HybridCLR+Addressables资源代码全热更框架 二_第12张图片
2.打PC包测试

HybridCLR+Addressables资源代码全热更框架 二_第13张图片

直接进入热更场景,说明在热更工程App.Main中的Addressables加载场景与async/await语法糖也能正确使用

        /// 
        /// 切换场景
        /// 
        static async void LoadScene()
        {
            var handler = await Addressables.LoadSceneAsync("MainScene").Task;
            handler.ActivateAsync();
        }

总结

hybridclr与 addressables的使用已经完毕,下一章会演示同时更新资源与代码

你可能感兴趣的:(Unity热更新,unity,c#,游戏引擎)