SpringBoot2.3.4整合MyBatis-Plus3.4.0和Swagger3.0
简介
MyBatis是常用的持久层框架,深得广大程序员的喜爱,MyBatis-Plus是在MyBatis的基础之上实现的增强版持久层框架,开发更加简洁,效率更高。详见MyBatis-Plus官网
本文主要介绍基于SpringBoot2.3.0集成MyBatis-Plus3.4.0,并使用Swagger3.0测试
数据库表
新建数据库springboot并在其下建立测试表sys_user
DROP TABLE IF EXISTS `sys_user`;
CREATE TABLE `sys_user`  (
  `id` bigint(20) UNSIGNED NOT NULL AUTO_INCREMENT COMMENT '主键ID',
  `login_name` varchar(30) NOT NULL COMMENT '登录名',
  `user_name` varchar(30) NULL DEFAULT NULL COMMENT '用户名',
  `password` varchar(64) NOT NULL COMMENT '密码',
  `sex` tinyint(2) UNSIGNED NOT NULL DEFAULT 10 COMMENT '性别10:男;11:女;12:其他',
  `avatar` varchar(100) NULL DEFAULT NULL COMMENT '头像地址',
  `status` tinyint(2) UNSIGNED NOT NULL DEFAULT 10 COMMENT '账号状态10:正常;20:锁定;30:注销',
  `del_flag` tinyint(1) UNSIGNED NOT NULL DEFAULT 0 COMMENT '删除标识0(true):未删除;1(false):已删除',
  `create_by` varchar(30) NULL DEFAULT NULL COMMENT '创建者',
  `create_time` timestamp(0) NULL DEFAULT NULL COMMENT '创建时间',
  `update_by` varchar(30) NULL DEFAULT NULL COMMENT '更新者',
  `update_time` timestamp(0) NULL DEFAULT NULL COMMENT '更新时间',
  `remark` varchar(100) NULL DEFAULT NULL COMMENT '备注',
  PRIMARY KEY (`id`) USING BTREE
) ENGINE = InnoDB AUTO_INCREMENT = 1 CHARACTER SET = utf8 COLLATE = utf8_general_ci;
新建maven项目,引入相关依赖
核心依赖引入如下:
<dependencies>
    <dependency>
        <groupId>org.springframework.bootgroupId>
        <artifactId>spring-boot-starter-webartifactId>
    dependency>
    <dependency>
        <groupId>org.projectlombokgroupId>
        <artifactId>lombokartifactId>
    dependency>
    <dependency>
        <groupId>mysqlgroupId>
        <artifactId>mysql-connector-javaartifactId>
    dependency>
    <dependency>
        <groupId>com.baomidougroupId>
        <artifactId>mybatis-plus-boot-starterartifactId>
        <version>3.4.0version>
    dependency>
    <dependency>
        <groupId>com.baomidougroupId>
        <artifactId>mybatis-plus-generatorartifactId>
        <version>3.4.0version>
    dependency>
    <dependency>
        <groupId>org.apache.velocitygroupId>
        <artifactId>velocity-engine-coreartifactId>
        <version>2.0version>
    dependency>
    <dependency>
        <groupId>io.springfoxgroupId>
        <artifactId>springfox-boot-starterartifactId>
        <version>3.0.0version>
    dependency>
dependencies>
引入MyBatis-Plus依赖包后,不需要再引入MyBatis依赖包,否则会引起jar包冲突
添加配置信息
在resources目录下新建application.yml文件,配置如下:
server:
  port: 8080
spring:
  application:
    name: springboot-mybatis-plus
  datasource:
    driver-class-name: com.mysql.cj.jdbc.Driver
    url: jdbc:mysql://192.168.108.11:3306/springboot?useUnicode=true&characterEncoding=utf8&zeroDateTimeBehavior=convertToNull&useSSL=true&serverTimezone=GMT%2B8
    username: root
    password: root
  jackson:
    date-format: yyyy-MM-dd HH:mm:ss
    time-zone: GMT+8
mybatis-plus:
  mapper-locations: classpath:mapper/**/*Mapper.xml
  configuration:
    log-impl: org.apache.ibatis.logging.stdout.StdOutImpl
  type-aliases-package: com.xlhj.plus.entity
新建配置文件
MyBatis-Plus是通过插件来实现分页功能的,需要配置相关的插件,代码如下:
@Configuration
@MapperScan(basePackages = "com.xlhj.*.mapper")
public class MybatisPlusConfig {
    /**
     * 分页插件
     * @return
     */
    @Bean
    public MybatisPlusInterceptor interceptor() {
        MybatisPlusInterceptor interceptor = new MybatisPlusInterceptor();
        interceptor.addInnerInterceptor(new PaginationInnerInterceptor(DbType.MYSQL));
        return interceptor;
    }
}
Swagger配置文件如下:
@Configuration
@EnableOpenApi
public class SwaggerConfig {
    @Bean
    public Docket createRestApi() {
        return new Docket(DocumentationType.OAS_30)
                .apiInfo(apiInfo())
                .select()
                .apis(RequestHandlerSelectors.withMethodAnnotation(ApiOperation.class))
                .paths(PathSelectors.any())
                .build();
    }
    private ApiInfo apiInfo() {
        return new ApiInfoBuilder()
                .title("springboot整合mybatis-plus")
                .description("springboot2.3.0整合mybatis-plus")
                .contact(new Contact("lcj", null, "[email protected]"))
                .version("1.0")
                .build();
    }
}
Swagger3.0的写法跟之前有较大的区别,这点请注意
主要代码
使用MyBatis-Plus自带的代码生成工具可以生成entity、dao、service、controller文件结构,MyBatis-Plus提供常用的增删改查方法,只需要自己写一些复杂的SQL即可,实体类代码如下:
@Data
@EqualsAndHashCode(callSuper = false)
@ApiModel(value="SysUser对象", description="用户表")
public class SysUser implements Serializable {

    private static final long serialVersionUID = -4892850743805515016L;

    @ApiModelProperty(value = "主键ID")
    @TableId(value = "id", type = IdType.AUTO)//主键生成策略:自动生成
    private Long id;

    @ApiModelProperty(value = "登录名")
    private String loginName;

    @ApiModelProperty(value = "用户名")
    private String userName;

    @ApiModelProperty(value = "密码")
    private String password;

    @ApiModelProperty(value = "性别10:男;11:女;12:其他")
    private Integer sex;

    @ApiModelProperty(value = "头像地址")
    private String avatar;

    @ApiModelProperty(value = "账号状态10:正常;20:锁定;30:注销")
    private Integer status;

    @TableLogic(value = "0", delval = "1")//开启逻辑删除功能
    @ApiModelProperty(value = "删除标识0(true):未删除;1(false):已删除")
    private Boolean delFlag;

    @ApiModelProperty(value = "创建者")
    private String createBy;

    @ApiModelProperty(value = "创建时间")
    @TableField(value = "create_time", fill = FieldFill.INSERT)//设置时间自动填充
    private LocalDateTime createTime;

    @ApiModelProperty(value = "更新者")
    private String updateBy;

    @ApiModelProperty(value = "更新时间")
    @TableField(value = "update_time", fill = FieldFill.INSERT_UPDATE)
    private LocalDateTime updateTime;

    @ApiModelProperty(value = "备注")
    private String remark;
}
Controller代码如下:
@RestController
@RequestMapping("/plus/user")
public class SysUserController {

    @Autowired
    private SysUserService userService;

    /**
     * 查询所有用户列表
     * @return
     */
    @GetMapping("/findAll")
    @ApiOperation(value = "查询所有用户列表")
    public AjaxResult findAllUser() {
        List<SysUser> userList = userService.list(null);
        return AjaxResult.ok().data("items", userList);
    }

    /**
     * 分页查询用户信息
     * @param current
     * @param limit
     * @return
     */
    @GetMapping("/pageListUser/{current}/{limit}")
    @ApiOperation(value = "分页查询用户信息")
    public AjaxResult pageListUser(@PathVariable long current, @PathVariable long limit) {
        Page<SysUser> userPage = new Page<SysUser>(current, limit);
        userService.page(userPage, null);
        long total = userPage.getTotal();
        List<SysUser> records = userPage.getRecords();
        return AjaxResult.ok().data("total", total).data("rows", records);
    }

    /**
     * 新增用户信息
     * @param user
     * @return
     */
    @PostMapping("/add")
    @ApiOperation(value = "新增用户")
    public AjaxResult add(@RequestBody SysUser user) {
        user.setPassword(Md5Utils.toHex(Md5Utils.md5(user.getPassword())));
        boolean flag = userService.save(user);
        if (flag) {
            return AjaxResult.ok();
        } else {
            return AjaxResult.error();
        }
    }

    /**
     * 根据ID查询用户信息
     * @param id
     * @return
     */
    @GetMapping("getUserById/{id}")
    @ApiOperation(value = "根据ID查询用户信息")
    public AjaxResult getUserById(@PathVariable Long id) {
        SysUser user = userService.getById(id);
        return AjaxResult.ok().data("user", user);
    }

    /**
     * 修改用户信息
     * @param user
     * @return
     */
    @PostMapping("/update")
    @ApiOperation(value = "修改用户")
    public AjaxResult update(@RequestBody SysUser user) {
        userService.updateById(user);
        return AjaxResult.ok();
    }

    /**
     * 逻辑删除用户信息
     * @param id
     * @return
     */
    @DeleteMapping("/remove/{id}")
    @ApiOperation(value = "逻辑删除用户信息")
    public AjaxResult remove(@ApiParam(name = "id", value = "主键ID", required = true) @PathVariable Long id) {
        boolean flag = userService.removeById(id);
        if (flag) {
            return AjaxResult.ok();
        } else {
            return AjaxResult.error();
        }
    }
}
主启动类代码如下:
@SpringBootApplication
@MapperScan(basePackages = "com.xlhj.*.mapper")
public class MybatisPlusApplication {

    public static void main(String[] args) {
        SpringApplication.run(MybatisPlusApplication.class, args);
    }
}
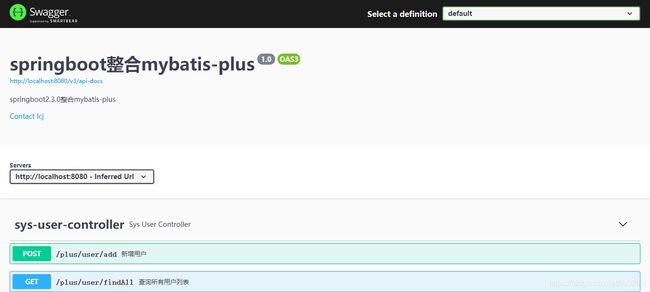
启动项目,访问Swagger-UI页面http://localhost:8080/swagger-ui/index.html如下所示:
完整代码请参考码云地址