JDBC与Spring事务及事务传播性原理解析-上篇
这篇我们主要介绍下JDBC的各种简单操作,例如增删改查、事务、事务保存点,以及介绍下Spring的传播机制,同时试着简单说明下Spring事务传播机制是怎样操作JDBC事务的组装来实现的。
1、基本操作
首先我们来看下jdbc的基本使用demo
public class JdbcMain {

    public static void main(String[] args) throws ClassNotFoundException, SQLException {
        //加载驱动
        Class.forName("com.mysql.cj.jdbc.Driver");
        String url = "jdbc:mysql://127.0.0.1:3306/test";
        String username = "root";
        String password = "xxx";
        //获取连接
        Connection conn = DriverManager.getConnection(url, username, password);
        String insertSql = "insert into student (`name`,age) values (?,?);";
        //获取会话
        PreparedStatement insertPreparedStatement = conn.prepareStatement(insertSql);
        insertPreparedStatement.setString(1,System.currentTimeMillis() + "lix");
        insertPreparedStatement.setInt(2,13);
        int count = insertPreparedStatement.executeUpdate();
        System.out.println("--------insert ------ " + count);
        insertPreparedStatement.close();
        String deleteSql = "delete from student";
        PreparedStatement deletePreparedStatement = conn.prepareStatement(deleteSql);
        int i = deletePreparedStatement.executeUpdate();
        deletePreparedStatement.close();
        System.out.println("--------delete ------" + i );
    }

}
这个demo中,我们首先是加载驱动,然后获取到连接,然后通过Connection我们创建两个Statement来分别执行insert、delete。

2、事务操作(包含Spring事务传播机制的介绍)
下面我们来看下事务操作的demo。
public class JdbcMain {

    public static void main(String[] args) throws ClassNotFoundException, SQLException {
        //加载驱动
        Class.forName("com.mysql.cj.jdbc.Driver");
        String url = "jdbc:mysql://127.0.0.1:3306/test";
        String username = "root";
        String password = "xxx";
        //获取连接
        Connection conn = DriverManager.getConnection(url, username, password);
        conn.setAutoCommit(false);
        int i = 0;
        try {
            insert(conn);
//            int errorCode = 1/0;		异常
            insert(conn);
        } catch (Exception throwables) {
            throwables.printStackTrace();
            select(conn);
            System.out.println("--------rollback ------");
            conn.rollback();
        }
        conn.commit();
        conn.setAutoCommit(true);
        select(conn);
        delete(conn);
    }

    private static void insert(Connection connection) throws SQLException {
        String insertSql = "insert into student (`name`,age) values (?,?);";
        //获取会话
        PreparedStatement insertPreparedStatement = connection.prepareStatement(insertSql);
        insertPreparedStatement.setString(1,System.currentTimeMillis() + "lix");
        insertPreparedStatement.setInt(2,13);
        int count = insertPreparedStatement.executeUpdate();
        System.out.println("--------insert ------ " + count);
        insertPreparedStatement.close();
    }

    private static void delete(Connection connection) throws SQLException {
        String deleteSql = "delete from student";
        PreparedStatement deletePreparedStatement = connection.prepareStatement(deleteSql);
        int i = deletePreparedStatement.executeUpdate();
        deletePreparedStatement.close();
        System.out.println("--------delete ------" + i );
    }

    private static void select(Connection connection) throws SQLException {
        String selectSql = "select * from student";
        PreparedStatement preparedStatement = connection.prepareStatement(selectSql);
        ResultSet resultSet = preparedStatement.executeQuery();
        System.out.println("-------------- select ---------------");
        while (resultSet.next()){
            int id = resultSet.getInt(1);
            String name = resultSet.getString(2);
            int age = resultSet.getInt(3);
            System.out.println("----id " + id + " name " + name + " age " + age);
        }
        preparedStatement.close();
    }

}

在这个demo中我们插入了两条记录。我们先将自动提交设置为false,然后再手动提交(conn.commit();),注意中间int errorCode = 1/0; 这个异常、我们并没有打开让其起作用。
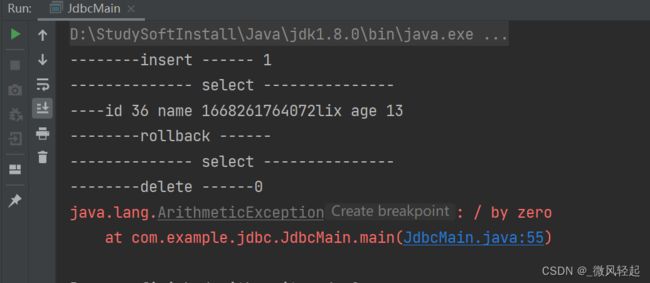
下面我们打开我们中间的异常int errorCode = 1/0;,再看下:

可以看到我们这次启动了回滚,两条记录没有插入记录。
我们可以将上面的demo中insert()、delete()这些方法当做Spring中的事务方法,例如:
@Transactional(propagation = Propagation.REQUIRES_NEW)
public int add(InsOrder insOrder)
{
    return insOrderMapper.insert(insOrder);
}
在上面的这两个demo中,我们可以看到jdbc的操作主要是与两个对象相关:
一个是Connection,我们关于事务的操作都是对connection对象进行操作(也就是一个Connection操作一个事务,然后对于Spring事务的传播,也就是操作操作多个事务(也可以将事务的传播性理解为对多个Connection操作进行编排),例如PROPAGATION_REQUIRES_NEW,也就是我们在操作这个事务的时候,我们就需要将上一个Connection挂起,也就是不使用上一个Connection,我们需要重新创建一个Connection,通过这个新的Connection来操作事务的提交、回滚)。
另一个是Statement,Statement是通过Connection创建的,然后一个Connection可以创建多个Statement操作多条sql语句。例如PROPAGATION_SUPPORTS,这种的话我们就可以用用一个Connection,来创建多个Statment操作,然后对事务的操作也是对同一个Connection。
PROPAGATION_REQUIRED	默认的Spring事物传播级别,若当前存在事务,则加入该事务,若不存在事务,则新建一个事务
PROPAGATION_REQUIRE_NEW	若当前没有事务,则新建一个事务。若当前存在事务,则新建 一个事务,新老事务相互独立。外部事务抛出异常回滚不会影响内部事务的正常提交
PROPAGATION_SUPPORTS	支持当前事务,若当前不存在事务,以非事务的方式执行
PROPAGATION_NOT_SUPPORTED	以非事务的方式执行,若当前存在事务,则把当前事务挂起
PROPAGATION_MANDATORY	强制事务执行,若当前不存在事务,则抛出异常
PROPAGATION_NEVER	以非事务的方式执行,如果当前存在事务,则抛出异常
上面这几种事务的传播操作都是基于我们上面提到的概念来操作的。可以看到我们上面的还有一种传播机制没有提到,就是:
PROPAGATION_NESTED 如果当前存在事务,则嵌套在当前事务中执行。如果当前没有事务, 则新建一个事务,类似于REQUIRE_NEW
这种是有用到另一个概念,就是事务的保存点。接下来我们看下面第3个demo
3、事务保存点操作
这个demo我们在前面的基础上面该一下:
public static void main(String[] args) throws ClassNotFoundException, SQLException {
    //加载驱动
    Class.forName("com.mysql.cj.jdbc.Driver");
    String url = "jdbc:mysql://127.0.0.1:3306/test";
    String username = "root";
    String password = "xxx";
    //获取连接
    Connection conn = DriverManager.getConnection(url, username, password);
    conn.setAutoCommit(false);
    int i = 0;
    Savepoint savepoint = null;
    try {
        insert(conn);
        savepoint = conn.setSavepoint();
        int errorCode = 1/0;
        insert(conn);
    } catch (Exception throwables) {
        throwables.printStackTrace();
        select(conn);
        System.out.println("--------rollback ------");
        conn.rollback(savepoint);
    }
    conn.commit();
    conn.setAutoCommit(true);
    select(conn);
    delete(conn);
}

可以看到我们这个demo与上一个不同的是,通过--------delete ------1我们知道其最终有插入一条记录。这种保存点的概念就是,如果在一个事务中有异常,但我们在发生异常之前如果设置了保存点,我们就可以选择将这个事务之前的内容进行提交,而不回滚整个事务。
Spring事务传播机制,其实就是对上面这几个demo中的操作进行更高维度的抽象以及具体的组装实现。我们如果理解了这个关系,其实就差不多理解了Spring事务传播机制的原理了。
下面我们就再通过对Spring事务的源码来了解其具体是怎么实现的。下篇已更新