SpringCloud+OAuth2+Redis实现的微服务统一认证授权
点击上方“Java基基”,选择“设为星标”
做积极的人,而不是积极废人!
源码精品专栏
原创 | Java 2020 超神之路,很肝~
中文详细注释的开源项目
RPC 框架 Dubbo 源码解析
网络应用框架 Netty 源码解析
消息中间件 RocketMQ 源码解析
数据库中间件 Sharding-JDBC 和 MyCAT 源码解析
作业调度中间件 Elastic-Job 源码解析
分布式事务中间件 TCC-Transaction 源码解析
Eureka 和 Hystrix 源码解析
Java 并发源码
来源:blog.csdn.net/WYA1993/
article/details/85050120
授权服务
会员服务配置
配置网关
因为目前做了一个基于Spring Cloud的微服务项目,所以了解到了OAuth2,打算整合一下OAuth2来实现统一授权。关于OAuth是一个关于授权的开放网络标准,目前的版本是2.0,这里我就不多做介绍了。下面我推荐一些学习资料:
《芋道 Spring Security OAuth2 入门》
《芋道 Spring Security OAuth2 存储器》
《芋道 Spring Security OAuth2 单点登陆》
开发环境 :Windows10, Intellij Idea2018.2, jdk1.8, redis3.2.9, Spring Boot 2.0.2 Release, Spring Cloud Finchley.RC2 Spring 5.0.6
项目目录
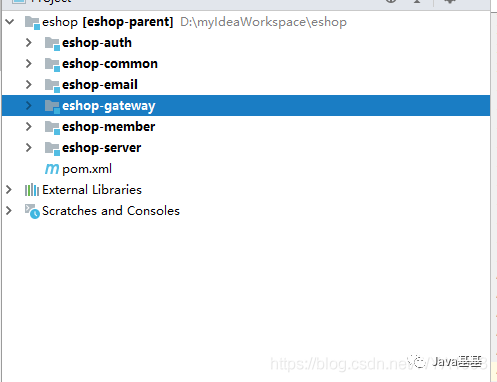
eshop —— 父级工程,管理jar包版本
eshop-server —— Eureka服务注册中心
eshop-gateway —— Zuul网关
eshop-auth —— 授权服务
eshop-member —— 会员服务
eshop-email —— 邮件服务(暂未使用)
eshop-common —— 通用类
关于如何构建一个基本的Spring Cloud 微服务这里就不赘述了,不会的可以看一下我的关于Spring Cloud系列的博客。
https://github.com/YunaiV/SpringBoot-Labs
授权服务
首先构建eshop-auth服务,引入相关依赖
        eshop-parent
        com.curise.eshop
        1.0-SNAPSHOT

    4.0.0
    eshop-auth
    war
    授权模块


            com.curise.eshop
            eshop-common
            1.0-SNAPSHOT


            org.springframework.boot
            spring-boot-starter-web


            org.springframework.cloud
            spring-cloud-starter-netflix-eureka-client


            org.springframework.cloud
            spring-cloud-starter-oauth2


            org.springframework.cloud
            spring-cloud-starter-security


            org.springframework.boot
            spring-boot-starter-data-redis


            org.mybatis.spring.boot
            mybatis-spring-boot-starter


            org.springframework.boot
            spring-boot-starter-actuator


            mysql
            mysql-connector-java


            com.alibaba
            druid


            log4j
            log4j


                org.springframework.boot
                spring-boot-maven-plugin
接下来,配置Mybatis、redis、eureka,贴一下配置文件
server:
  port: 1203

spring:
  application:
    name: eshop-auth
  redis:
    database: 0
    host: 192.168.0.117
    port: 6379
    password:
    jedis:
      pool:
        max-active: 8
        max-idle: 8
        min-idle: 0
  datasource:
    driver-class-name: com.mysql.jdbc.Driver
    url: jdbc:mysql://localhost:3306/eshop_member?useUnicode=true&characterEncoding=utf-8&useSSL=false&allowMultiQueries=true
    username: root
    password: root
  druid:
    initialSize: 5 #初始化连接大小
    minIdle: 5     #最小连接池数量
    maxActive: 20  #最大连接池数量
    maxWait: 60000 #获取连接时最大等待时间,单位毫秒
    timeBetweenEvictionRunsMillis: 60000 #配置间隔多久才进行一次检测,检测需要关闭的空闲连接,单位是毫秒
    minEvictableIdleTimeMillis: 300000   #配置一个连接在池中最小生存的时间,单位是毫秒
    validationQuery: SELECT 1 from DUAL  #测试连接
    testWhileIdle: true                  #申请连接的时候检测,建议配置为true,不影响性能,并且保证安全性
    testOnBorrow: false                  #获取连接时执行检测,建议关闭,影响性能
    testOnReturn: false                  #归还连接时执行检测,建议关闭,影响性能
    poolPreparedStatements: false        #是否开启PSCache,PSCache对支持游标的数据库性能提升巨大,oracle建议开启,mysql下建议关闭
    maxPoolPreparedStatementPerConnectionSize: 20 #开启poolPreparedStatements后生效
    filters: stat,wall,log4j #配置扩展插件,常用的插件有=>stat:监控统计  log4j:日志  wall:防御sql注入
    connectionProperties: 'druid.stat.mergeSql=true;druid.stat.slowSqlMillis=5000' #通过connectProperties属性来打开mergeSql功能;慢SQL记录


eureka:
  instance:
    prefer-ip-address: true
    instance-id: ${spring.cloud.client.ip-address}:${server.port}
  client:
    service-url:
      defaultZone: http://localhost:1111/eureka/

mybatis:
  type-aliases-package: com.curise.eshop.common.entity
  configuration:
    map-underscore-to-camel-case: true  #开启驼峰命名,l_name -> lName
    jdbc-type-for-null: NULL
    lazy-loading-enabled: true
    aggressive-lazy-loading: true
    cache-enabled: true #开启二级缓存
    call-setters-on-nulls: true #map空列不显示问题
  mapper-locations:
    - classpath:mybatis/*.xml
AuthApplication添加@EnableDiscoveryClient和@MapperScan注解。
接下来配置认证服务器AuthorizationServerConfig ,并添加@Configuration和@EnableAuthorizationServer注解,其中ClientDetailsServiceConfigurer配置在内存中,当然也可以从数据库读取,以后慢慢完善。
@Configuration
@EnableAuthorizationServer
public class AuthorizationServerConfig extends AuthorizationServerConfigurerAdapter {

    @Autowired
    private AuthenticationManager authenticationManager;

    @Autowired
    private DataSource dataSource;

    @Autowired
    private RedisConnectionFactory redisConnectionFactory;

    @Autowired
    private MyUserDetailService userDetailService;

    @Bean
    public TokenStore tokenStore() {
        return new RedisTokenStore(redisConnectionFactory);
    }

    @Override
    public void configure(AuthorizationServerSecurityConfigurer security) throws Exception {
        security
                .allowFormAuthenticationForClients()
                .tokenKeyAccess("permitAll()")
                .checkTokenAccess("isAuthenticated()");
    }

    @Override
    public void configure(ClientDetailsServiceConfigurer clients) throws Exception {
       // clients.withClientDetails(clientDetails());
        clients.inMemory()
                .withClient("android")
                .scopes("read")
                .secret("android")
                .authorizedGrantTypes("password", "authorization_code", "refresh_token")
                .and()
                .withClient("webapp")
                .scopes("read")
                .authorizedGrantTypes("implicit")
                .and()
                .withClient("browser")
                .authorizedGrantTypes("refresh_token", "password")
                .scopes("read");
    }
    @Bean
    public ClientDetailsService clientDetails() {
        return new JdbcClientDetailsService(dataSource);
    }

    @Bean
    public WebResponseExceptionTranslator webResponseExceptionTranslator(){
        return new MssWebResponseExceptionTranslator();
    }

    @Override
    public void configure(AuthorizationServerEndpointsConfigurer endpoints) throws Exception {
        endpoints.tokenStore(tokenStore())
                .userDetailsService(userDetailService)
                .authenticationManager(authenticationManager);
        endpoints.tokenServices(defaultTokenServices());
        //认证异常翻译
       // endpoints.exceptionTranslator(webResponseExceptionTranslator());
    }

    /**
     * 注意,自定义TokenServices的时候,需要设置@Primary,否则报错,
     * @return
     */
    @Primary
    @Bean
    public DefaultTokenServices defaultTokenServices(){
        DefaultTokenServices tokenServices = new DefaultTokenServices();
        tokenServices.setTokenStore(tokenStore());
        tokenServices.setSupportRefreshToken(true);
        //tokenServices.setClientDetailsService(clientDetails());
        // token有效期自定义设置,默认12小时
        tokenServices.setAccessTokenValiditySeconds(60*60*12);
        // refresh_token默认30天
        tokenServices.setRefreshTokenValiditySeconds(60 * 60 * 24 * 7);
        return tokenServices;
    }
}
在上述配置中,认证的token是存到redis里的,如果你这里使用了Spring5.0以上的版本的话,使用默认的RedisTokenStore认证时会报如下异常:
nested exception is java.lang.NoSuchMethodError: org.springframework.data.redis.connection.RedisConnection.set([B[B)V
原因是spring-data-redis 2.0版本中set(String,String)被弃用了,要使用RedisConnection.stringCommands().set(…),所有我自定义一个RedisTokenStore,代码和RedisTokenStore一样,只是把所有conn.set(…)都换成conn..stringCommands().set(…),测试后方法可行。
public class RedisTokenStore implements TokenStore {
private static final String ACCESS = "access:";
private static final String AUTH_TO_ACCESS = "auth_to_access:";
private static final String AUTH = "auth:";
private static final String REFRESH_AUTH = "refresh_auth:";
private static final String ACCESS_TO_REFRESH = "access_to_refresh:";
private static final String REFRESH = "refresh:";
private static final String REFRESH_TO_ACCESS = "refresh_to_access:";
private static final String CLIENT_ID_TO_ACCESS = "client_id_to_access:";
private static final String UNAME_TO_ACCESS = "uname_to_access:";
private final RedisConnectionFactory connectionFactory;
private AuthenticationKeyGenerator authenticationKeyGenerator = new DefaultAuthenticationKeyGenerator();
private RedisTokenStoreSerializationStrategy serializationStrategy = new JdkSerializationStrategy();
private String prefix = "";
public RedisTokenStore(RedisConnectionFactory connectionFactory) {
this.connectionFactory = connectionFactory;
}
public void setAuthenticationKeyGenerator(AuthenticationKeyGenerator authenticationKeyGenerator) {
this.authenticationKeyGenerator = authenticationKeyGenerator;
}
public void setSerializationStrategy(RedisTokenStoreSerializationStrategy serializationStrategy) {
this.serializationStrategy = serializationStrategy;
}
public void setPrefix(String prefix) {
this.prefix = prefix;
}
private RedisConnection getConnection() {
return this.connectionFactory.getConnection();
}
private byte[] serialize(Object object) {
return this.serializationStrategy.serialize(object);
}
private byte[] serializeKey(String object) {
return this.serialize(this.prefix + object);
}
private OAuth2AccessToken deserializeAccessToken(byte[] bytes) {
return (OAuth2AccessToken)this.serializationStrategy.deserialize(bytes, OAuth2AccessToken.class);
}
private OAuth2Authentication deserializeAuthentication(byte[] bytes) {
return (OAuth2Authentication)this.serializationStrategy.deserialize(bytes, OAuth2Authentication.class);
}
private OAuth2RefreshToken deserializeRefreshToken(byte[] bytes) {
return (OAuth2RefreshToken)this.serializationStrategy.deserialize(bytes, OAuth2RefreshToken.class);
}
private byte[] serialize(String string) {
return this.serializationStrategy.serialize(string);
}
private String deserializeString(byte[] bytes) {
return this.serializationStrategy.deserializeString(bytes);
}
@Override
public OAuth2AccessToken getAccessToken(OAuth2Authentication authentication) {
String key = this.authenticationKeyGenerator.extractKey(authentication);
byte[] serializedKey = this.serializeKey(AUTH_TO_ACCESS + key);
byte[] bytes = null;
RedisConnection conn = this.getConnection();
try {
bytes = conn.get(serializedKey);
} finally {
conn.close();
}
OAuth2AccessToken accessToken = this.deserializeAccessToken(bytes);
if (accessToken != null) {
OAuth2Authentication storedAuthentication = this.readAuthentication(accessToken.getValue());
if (storedAuthentication == null || !key.equals(this.authenticationKeyGenerator.extractKey(storedAuthentication))) {
this.storeAccessToken(accessToken, authentication);
}
}
return accessToken;
}
@Override
public OAuth2Authentication readAuthentication(OAuth2AccessToken token) {
return this.readAuthentication(token.getValue());
}
@Override
public OAuth2Authentication readAuthentication(String token) {
byte[] bytes = null;
RedisConnection conn = this.getConnection();
try {
bytes = conn.get(this.serializeKey("auth:" + token));
} finally {
conn.close();
}
OAuth2Authentication auth = this.deserializeAuthentication(bytes);
return auth;
}
@Override
public OAuth2Authentication readAuthenticationForRefreshToken(OAuth2RefreshToken token) {
return this.readAuthenticationForRefreshToken(token.getValue());
}
public OAuth2Authentication readAuthenticationForRefreshToken(String token) {
RedisConnection conn = getConnection();
try {
byte[] bytes = conn.get(serializeKey(REFRESH_AUTH + token));
OAuth2Authentication auth = deserializeAuthentication(bytes);
return auth;
} finally {
conn.close();
}
}
@Override
public void storeAccessToken(OAuth2AccessToken token, OAuth2Authentication authentication) {
byte[] serializedAccessToken = serialize(token);
byte[] serializedAuth = serialize(authentication);
byte[] accessKey = serializeKey(ACCESS + token.getValue());
byte[] authKey = serializeKey(AUTH + token.getValue());
byte[] authToAccessKey = serializeKey(AUTH_TO_ACCESS + authenticationKeyGenerator.extractKey(authentication));
byte[] approvalKey = serializeKey(UNAME_TO_ACCESS + getApprovalKey(authentication));
byte[] clientId = serializeKey(CLIENT_ID_TO_ACCESS + authentication.getOAuth2Request().getClientId());
RedisConnection conn = getConnection();
try {
conn.openPipeline();
conn.stringCommands().set(accessKey, serializedAccessToken);
conn.stringCommands().set(authKey, serializedAuth);
conn.stringCommands().set(authToAccessKey, serializedAccessToken);
if (!authentication.isClientOnly()) {
conn.rPush(approvalKey, serializedAccessToken);
}
conn.rPush(clientId, serializedAccessToken);
if (token.getExpiration() != null) {
int seconds = token.getExpiresIn();
conn.expire(accessKey, seconds);
conn.expire(authKey, seconds);
conn.expire(authToAccessKey, seconds);
conn.expire(clientId, seconds);
conn.expire(approvalKey, seconds);
}
OAuth2RefreshToken refreshToken = token.getRefreshToken();
if (refreshToken != null && refreshToken.getValue() != null) {
byte[] refresh = serialize(token.getRefreshToken().getValue());
byte[] auth = serialize(token.getValue());
byte[] refreshToAccessKey = serializeKey(REFRESH_TO_ACCESS + token.getRefreshToken().getValue());
conn.stringCommands().set(refreshToAccessKey, auth);
byte[] accessToRefreshKey = serializeKey(ACCESS_TO_REFRESH + token.getValue());
conn.stringCommands().set(accessToRefreshKey, refresh);
if (refreshToken instanceof ExpiringOAuth2RefreshToken) {
ExpiringOAuth2RefreshToken expiringRefreshToken = (ExpiringOAuth2RefreshToken) refreshToken;
Date expiration = expiringRefreshToken.getExpiration();
if (expiration != null) {
int seconds = Long.valueOf((expiration.getTime() - System.currentTimeMillis()) / 1000L)
.intValue();
conn.expire(refreshToAccessKey, seconds);
conn.expire(accessToRefreshKey, seconds);
}
}
}
conn.closePipeline();
} finally {
conn.close();
}
}
private static String getApprovalKey(OAuth2Authentication authentication) {
String userName = authentication.getUserAuthentication() == null ? "": authentication.getUserAuthentication().getName();
return getApprovalKey(authentication.getOAuth2Request().getClientId(), userName);
}
private static String getApprovalKey(String clientId, String userName) {
return clientId + (userName == null ? "" : ":" + userName);
}
@Override
public void removeAccessToken(OAuth2AccessToken accessToken) {
this.removeAccessToken(accessToken.getValue());
}
@Override
public OAuth2AccessToken readAccessToken(String tokenValue) {
byte[] key = serializeKey(ACCESS + tokenValue);
byte[] bytes = null;
RedisConnection conn = getConnection();
try {
bytes = conn.get(key);
} finally {
conn.close();
}
OAuth2AccessToken accessToken = deserializeAccessToken(bytes);
return accessToken;
}
public void removeAccessToken(String tokenValue) {
byte[] accessKey = serializeKey(ACCESS + tokenValue);
byte[] authKey = serializeKey(AUTH + tokenValue);
byte[] accessToRefreshKey = serializeKey(ACCESS_TO_REFRESH + tokenValue);
RedisConnection conn = getConnection();
try {
conn.openPipeline();
conn.get(accessKey);
conn.get(authKey);
conn.del(accessKey);
conn.del(accessToRefreshKey);
// Don't remove the refresh token - it's up to the caller to do that
conn.del(authKey);
List配置资源服务器
@Configuration
@EnableResourceServer
@Order(3)
public class ResourceServerConfig extends ResourceServerConfigurerAdapter {
    @Override
    public void configure(HttpSecurity http) throws Exception {
        http
                .csrf().disable()
                .exceptionHandling()
                .authenticationEntryPoint((request, response, authException) -> response.sendError(HttpServletResponse.SC_UNAUTHORIZED))
                .and()
                .requestMatchers().antMatchers("/api/**")
                .and()
                .authorizeRequests()
                .antMatchers("/api/**").authenticated()
                .and()
                .httpBasic();
    }
}
配置Spring Security
@Configuration
@EnableWebSecurity
@Order(2)
public class SecurityConfig extends WebSecurityConfigurerAdapter {
    @Autowired
    private MyUserDetailService userDetailService;

    @Bean
    public PasswordEncoder passwordEncoder() {
        //return new BCryptPasswordEncoder();
        return new NoEncryptPasswordEncoder();
    }

    @Override
    protected void configure(HttpSecurity http) throws Exception {
        http.requestMatchers().antMatchers("/oauth/**")
                .and()
                .authorizeRequests()
                .antMatchers("/oauth/**").authenticated()
                .and()
                .csrf().disable();
    }

    @Override
    protected void configure(AuthenticationManagerBuilder auth) throws Exception {
        auth.userDetailsService(userDetailService).passwordEncoder(passwordEncoder());
    }

    /**
     * 不定义没有password grant_type
     *
     * @return
     * @throws Exception
     */
    @Override
    @Bean
    public AuthenticationManager authenticationManagerBean() throws Exception {
        return super.authenticationManagerBean();
    }
}
可以看到ResourceServerConfig 是比SecurityConfig 的优先级低的。
二者的关系:
ResourceServerConfig 用于保护oauth相关的endpoints,同时主要作用于用户的登录(form login,Basic auth)
SecurityConfig 用于保护oauth要开放的资源,同时主要作用于client端以及token的认证(Bearer auth)
所以我们让SecurityConfig优先于ResourceServerConfig,且在SecurityConfig 不拦截oauth要开放的资源,在ResourceServerConfig 中配置需要token验证的资源,也就是我们对外提供的接口。所以这里对于所有微服务的接口定义有一个要求,就是全部以/api开头。
如果这里不这样配置的话,在你拿到access_token去请求各个接口时会报 invalid_token的提示。
另外,由于我们自定义认证逻辑,所以需要重写UserDetailService
@Service("userDetailService")
public class MyUserDetailService implements UserDetailsService {

    @Autowired
    private MemberDao memberDao;

    @Override
    public UserDetails loadUserByUsername(String memberName) throws UsernameNotFoundException {
        Member member = memberDao.findByMemberName(memberName);
        if (member == null) {
            throw new UsernameNotFoundException(memberName);
        }
        Set grantedAuthorities = new HashSet<>();
        // 可用性 :true:可用 false:不可用
        boolean enabled = true;
        // 过期性 :true:没过期 false:过期
        boolean accountNonExpired = true;
        // 有效性 :true:凭证有效 false:凭证无效
        boolean credentialsNonExpired = true;
        // 锁定性 :true:未锁定 false:已锁定
        boolean accountNonLocked = true;
        for (Role role : member.getRoles()) {
            //角色必须是ROLE_开头,可以在数据库中设置
            GrantedAuthority grantedAuthority = new SimpleGrantedAuthority(role.getRoleName());
            grantedAuthorities.add(grantedAuthority);
            //获取权限
            for (Permission permission : role.getPermissions()) {
                GrantedAuthority authority = new SimpleGrantedAuthority(permission.getUri());
                grantedAuthorities.add(authority);
            }
        }
        User user = new User(member.getMemberName(), member.getPassword(),
                enabled, accountNonExpired, credentialsNonExpired, accountNonLocked, grantedAuthorities);
        return user;
    }

}
密码验证为了方便我使用了不加密的方式,重写了PasswordEncoder,实际开发还是建议使用BCryptPasswordEncoder。
public class NoEncryptPasswordEncoder implements PasswordEncoder {

    @Override
    public String encode(CharSequence charSequence) {
        return (String) charSequence;
    }

    @Override
    public boolean matches(CharSequence charSequence, String s) {
        return s.equals((String) charSequence);
    }
}
另外,OAuth的密码模式需要AuthenticationManager支持
@Override
@Bean
public AuthenticationManager authenticationManagerBean() throws Exception {
    return super.authenticationManagerBean();
}
定义一个Controller,提供两个接口,/api/member用来获取当前用户信息,/api/exit用来注销当前用户
@RestController
@RequestMapping("/api")
public class MemberController {

    @Autowired
    private MyUserDetailService userDetailService;

    @Autowired
    private ConsumerTokenServices consumerTokenServices;

    @GetMapping("/member")
    public Principal user(Principal member) {
        return member;
    }

    @DeleteMapping(value = "/exit")
    public Result revokeToken(String access_token) {
        Result result = new Result();
        if (consumerTokenServices.revokeToken(access_token)) {
            result.setCode(ResultCode.SUCCESS.getCode());
            result.setMessage("注销成功");
        } else {
            result.setCode(ResultCode.FAILED.getCode());
            result.setMessage("注销失败");
        }
        return result;
    }
}
会员服务配置
引入依赖
        eshop-parent
        com.curise.eshop
        1.0-SNAPSHOT

    4.0.0
    eshop-member
    war
    会员模块


            org.springframework.boot
            spring-boot-starter-web


            org.springframework.boot
            spring-boot-starter-test
            test


            org.springframework.cloud
            spring-cloud-starter-netflix-eureka-client


            org.springframework.cloud
            spring-cloud-starter-oauth2


            org.springframework.cloud
            spring-cloud-starter-security


            com.alibaba
            fastjson


                org.springframework.boot
                spring-boot-maven-plugin
配置资源服务器
@Configuration
@EnableResourceServer
public class ResourceServerConfig extends ResourceServerConfigurerAdapter {

    @Override
    public void configure(HttpSecurity http) throws Exception {
        http
                .csrf().disable()
                .exceptionHandling()
                .authenticationEntryPoint((request, response, authException) -> response.sendError(HttpServletResponse.SC_UNAUTHORIZED))
                .and()
                .requestMatchers().antMatchers("/api/**")
                .and()
                .authorizeRequests()
                .antMatchers("/api/**").authenticated()
                .and()
                .httpBasic();
    }
}
配置文件配置
spring:
  application:
    name: eshop-member

server:
  port: 1201

eureka:
  instance:
    prefer-ip-address: true
    instance-id: ${spring.cloud.client.ip-address}:${server.port}
  client:
    service-url:
      defaultZone: http://localhost:1111/eureka/

security:
  oauth2:
    resource:
      id: eshop-member
      user-info-uri: http://localhost:1202/auth/api/member
      prefer-token-info: false
MemberApplication主类配置
@SpringBootApplication
@EnableDiscoveryClient
@EnableGlobalMethodSecurity(prePostEnabled = true)
public class MemberApplication {

    public static void main(String[] args) {
        SpringApplication.run(MemberApplication.class,args);
    }
}
提供对外接口
@RestController
@RequestMapping("/api")
public class MemberController {

    @GetMapping("hello")
    @PreAuthorize("hasAnyAuthority('hello')")
    public String hello(){
        return "hello";
    }

    @GetMapping("current")
    public Principal user(Principal principal) {
        return principal;
    }

    @GetMapping("query")
    @PreAuthorize("hasAnyAuthority('query')")
    public String query() {
        return "具有query权限";
    }
}
配置网关
引入依赖
        eshop-parent
        com.curise.eshop
        1.0-SNAPSHOT

    4.0.0
    jar
    eshop-gateway
    网关


            org.springframework.boot
            spring-boot-starter-web


            org.springframework.cloud
            spring-cloud-starter-netflix-eureka-client


            org.springframework.cloud
            spring-cloud-starter-netflix-zuul


            org.springframework.cloud
            spring-cloud-starter-oauth2


            org.springframework.cloud
            spring-cloud-starter-security


            org.springframework.boot
            spring-boot-starter-actuator


                org.springframework.boot
                spring-boot-maven-plugin
配置文件
server:
  port: 1202

spring:
  application:
    name: eshop-gateway

#--------------------eureka---------------------
eureka:
  instance:
    prefer-ip-address: true
    instance-id: ${spring.cloud.client.ip-address}:${server.port}
  client:
    service-url:
      defaultZone: http://localhost:1111/eureka/

#--------------------Zuul-----------------------
zuul:
  routes:
    member:
      path: /member/**
      serviceId: eshop-member
      sensitiveHeaders: "*"
    auth:
      path: /auth/**
      serviceId: eshop-auth
      sensitiveHeaders: "*"
  retryable: false
  ignored-services: "*"
  ribbon:
    eager-load:
      enabled: true
  host:
    connect-timeout-millis: 3000
    socket-timeout-millis: 3000
  add-proxy-headers: true


#---------------------OAuth2---------------------
security:
  oauth2:
    client:
      access-token-uri: http://localhost:${server.port}/auth/oauth/token
      user-authorization-uri: http://localhost:${server.port}/auth/oauth/authorize
      client-id: web
    resource:
      user-info-uri:  http://localhost:${server.port}/auth/api/member
      prefer-token-info: false

#----------------------超时配置-------------------
ribbon:
  ReadTimeout: 3000
  ConnectTimeout: 3000
  MaxAutoRetries: 1
  MaxAutoRetriesNextServer: 2
  eureka:
    enabled: true
hystrix:
  command:
    default:
      execution:
        timeout:
          enabled: true
        isolation:
          thread:
            timeoutInMilliseconds: 3500
ZuulApplication主类
@SpringBootApplication
@EnableDiscoveryClient
@EnableZuulProxy
@EnableOAuth2Sso
public class ZuulApplication {
    public static void main(String[] args) {
        SpringApplication.run(ZuulApplication.class, args);
    }
}
Spring Security配置
@Configuration
@EnableWebSecurity
@Order(99)
public class SecurityConfig extends WebSecurityConfigurerAdapter {
    @Override
    protected void configure(HttpSecurity http) throws Exception {
        http.csrf().disable();
    }
}
接下来分别启动eshop-server、eshop-member、eshop-auth、eshop-gateway。
先发送一个请求测试一下未认证的效果

获取认证

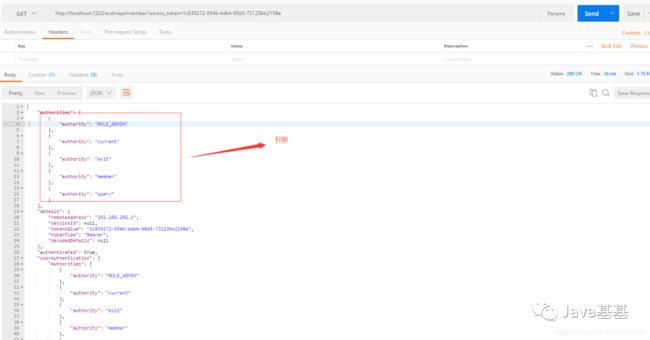
使用access_token请求auth服务下的用户信息接口
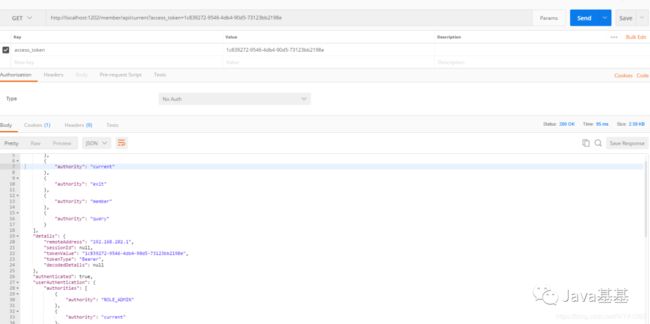
使用access_token请求member服务下的用户信息接口
请求member服务的query接口

请求member服务的hello接口,数据库里并没有给用户hello权限

刷新token

注销

后续还会慢慢完善,敬请期待!!
关于代码和数据表sql已经上传到GitHub。地址:https://github.com/WYA1993/springcloud_oauth2.0。
注意把数据库和redis替换成自己的地址
统一回复一下,有很多人反映获取认证时返回401,如下:
{
    "timestamp": "2019-08-13T03:25:27.161+0000",
    "status": 401,
    "error": "Unauthorized",
    "message": "Unauthorized",
    "path": "/oauth/token"
}
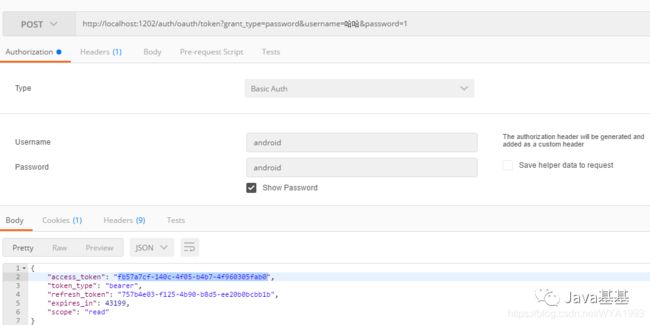
原因是在发起请求的时候没有添加Basic Auth认证,如下图:

,添加Basic Auth认证后会在headers添加一个认证消息头

添加Basic Auth认证的信息在代码中有体现:

客户端信息和token信息从MySQL数据库中获取
现在客户端信息都是存在内存中的,生产环境肯定不可以这么做,要支持客户端的动态添加或删除,所以我选择把客户端信息存到MySQL中。
首先,创建数据表,数据表的结构官方已经给出,地址在
https://github.com/spring-projects/spring-security-oauth/blob/master/spring-security-oauth2/src/test/resources/schema.sql
其次,需要修改一下sql脚本,把主键的长度改为128,LONGVARBINARY类型改为blob,调整后的sql脚本:
create table oauth_client_details (
  client_id VARCHAR(128) PRIMARY KEY,
  resource_ids VARCHAR(256),
  client_secret VARCHAR(256),
  scope VARCHAR(256),
  authorized_grant_types VARCHAR(256),
  web_server_redirect_uri VARCHAR(256),
  authorities VARCHAR(256),
  access_token_validity INTEGER,
  refresh_token_validity INTEGER,
  additional_information VARCHAR(4096),
  autoapprove VARCHAR(256)
);

create table oauth_client_token (
  token_id VARCHAR(256),
  token BLOB,
  authentication_id VARCHAR(128) PRIMARY KEY,
  user_name VARCHAR(256),
  client_id VARCHAR(256)
);

create table oauth_access_token (
  token_id VARCHAR(256),
  token BLOB,
  authentication_id VARCHAR(128) PRIMARY KEY,
  user_name VARCHAR(256),
  client_id VARCHAR(256),
  authentication BLOB,
  refresh_token VARCHAR(256)
);

create table oauth_refresh_token (
  token_id VARCHAR(256),
  token BLOB,
  authentication BLOB
);

create table oauth_code (
  code VARCHAR(256), authentication BLOB
);

create table oauth_approvals (
 userId VARCHAR(256),
 clientId VARCHAR(256),
 scope VARCHAR(256),
 status VARCHAR(10),
 expiresAt TIMESTAMP,
 lastModifiedAt TIMESTAMP
);


-- customized oauth_client_details table
create table ClientDetails (
  appId VARCHAR(128) PRIMARY KEY,
  resourceIds VARCHAR(256),
  appSecret VARCHAR(256),
  scope VARCHAR(256),
  grantTypes VARCHAR(256),
  redirectUrl VARCHAR(256),
  authorities VARCHAR(256),
  access_token_validity INTEGER,
  refresh_token_validity INTEGER,
  additionalInformation VARCHAR(4096),
  autoApproveScopes VARCHAR(256)
);
调整后的sql脚步也放到了GitHub中,需要的可以自行下载

然后在eshop_member数据库创建数据表,将客户端信息添加到oauth_client_details表中

如果你的密码不是明文,记得client_secret需要加密后存储。
然后修改代码,配置从数据库读取客户端信息

接下来启动服务测试即可。
获取授权

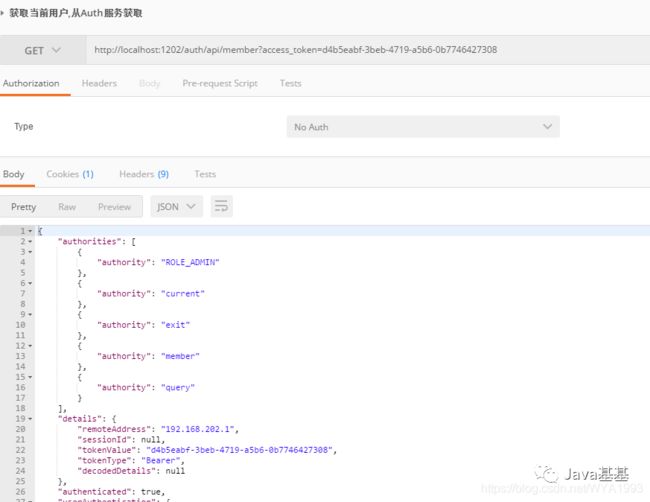
获取用户信息
刷新token

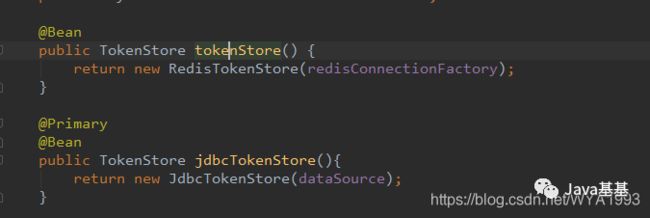
打开数据表发现token这些信息并没有存到表中,因为tokenStore使用的是redis方式,我们可以替换为从数据库读取。修改配置

重启服务再次测试

查看数据表,发现token数据已经存到表里了。
 - END -
欢迎加入我的知识星球,一起探讨架构,交流源码。加入方式,长按下方二维码噢:
已在知识星球更新源码解析如下:
最近更新《芋道 SpringBoot 2.X 入门》系列,已经 20 余篇,覆盖了 MyBatis、Redis、MongoDB、ES、分库分表、读写分离、SpringMVC、Webflux、权限、WebSocket、Dubbo、RabbitMQ、RocketMQ、Kafka、性能测试等等内容。
提供近 3W 行代码的 SpringBoot 示例,以及超 4W 行代码的电商微服务项目。
获取方式:点“在看”,关注公众号并回复 666 领取,更多内容陆续奉上。
文章有帮助的话,在看,转发吧。
谢谢支持哟 (*^__^*)
