几种解决 element-ui 的 el-upload 组件上传文件跨域问题的方法
前言
最近在开发基于 SpringBoot 和 Vue 的前后端分离项目的时候,在使用 element-ui 的 el-upload 组件的时候遇到了跨域的问题,尽管之前我也写过一篇关于解决跨域问题的文章,但是发现还是无法解决使用 action 时的跨域问题,因此本文将基于后端 SpringBoot 和 基于 nginx 反向代理的解决跨域的方法,本文的完整代码(前端和后端代码)也已上传到GitHub。
使用 action 的解决方法
在具体的讲解之前先声明,本文的后端都基于 8888 端口,前端基于 8080 端接口,nginx 代理端口为 80。下面是前端使用 el-upload的代码,为了方便专注于跨域问题,已去掉不必要的属性:
点击上传
下面是后端的配置文件(application.yaml)代码:
server:
  port: 8888

upload:
  filePath: D:\\Temp\\img\\
基于 nginx 反向代理的解决方法
后端接口代码如下:
@RestController
public class UploadByAction {

    @Value("${upload.filePath}")
    private String filePath;

    @PostMapping("/nginx/uploadByAction")
    public String uploadByNginx(@RequestPart("file") MultipartFile file) {
        return getUploadMsg(file);
    }

    private String getUploadMsg(@RequestPart("file") MultipartFile file) {
        if (file.isEmpty()) {
            return "上传失败,请选择文件";
        }
        String fileName = file.getOriginalFilename();
        File dest = new File(filePath + fileName);
        try {
            file.transferTo(dest);
            return "上传成功";
        } catch (IOException e) {
            e.printStackTrace();
            return "上传失败";
        }
    }

}
nginx 代理配置如下:
location / {
	root   html;
	add_header Access-Control-Allow-Origin *;

	if ($request_method = 'OPTIONS') {
		return 204;
	}
	proxy_pass http://localhost:8888;
	index  index.html index.htm;
}
只要以上简单的 nginx 配置便解决了使用 ation 时的跨域问题,相信看过前言里我说的解决跨域问题的那篇文章的同学会发现,这里的nginx 配置只是多了下面这句:
if ($request_method = 'OPTIONS') {
   return 204;
}
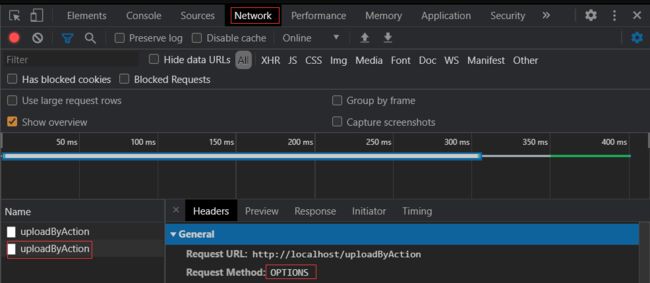
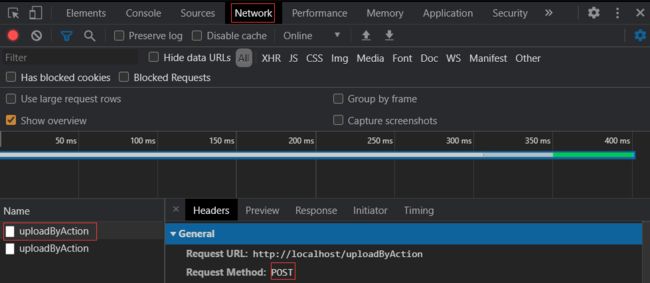
这里是因为使用 action 时,会发送一个预检请求,关于预检请求的详细介绍,可以查看这篇文章,这里的配置主要是为了让预检请求正常的返回,其实仔细查看点击了上传时的Network,就会后台其实发送了两个请求:
基于 SpringBoot 后台代码的解决方法
其实基于 SpringBoot 后台代码的解决方法也就是将上述的 nginx 反向代理配置改成了具体的代码配置而已,下面就具体介绍,首先由于现在不再使用反向代理了,el-upload 里的 action 属性也需要改为 http://localhost:8888/springboot/uploadByAction,然后就是后台代码的改变:
首先是 controller 接口的代码:
@RestController
public class UploadByAction {

    @Value("${upload.filePath}")
    private String filePath;

    @PostMapping("/springboot/uploadByAction")
    public String uploadBySpringBoot(@RequestPart("file") MultipartFile file) {
        return getUploadMsg(file);
    }

    private String getUploadMsg(@RequestPart("file") MultipartFile file) {
        if (file.isEmpty()) {
            return "上传失败,请选择文件";
        }
        String fileName = file.getOriginalFilename();
        File dest = new File(filePath + fileName);
        try {
            file.transferTo(dest);
            return "上传成功";
        } catch (IOException e) {
            e.printStackTrace();
            return "上传失败";
        }
    }

}
然后是拦截器的设置:
@Configuration
public class CorsInterceptor implements HandlerInterceptor {

    @Override
    public boolean preHandle(
        HttpServletRequest request, HttpServletResponse response, Object handler) throws Exception {
        response.addHeader("Access-Control-Allow-Origin", "*");
        if ("OPTIONS".equals(request.getMethod())) {
            return true;
        }
        return HandlerInterceptor.super.preHandle(request, response, handler);
    }

}
最后添加拦截器:
@Configuration
public class ApiConfig extends WebMvcConfigurationSupport {

	private final CorsInterceptor corsInterceptor;

	@Autowired
	public ApiConfig(CorsInterceptor corsInterceptor) {
		this.corsInterceptor = corsInterceptor;
	}

	@Override
	protected void addInterceptors(InterceptorRegistry registry) {
		registry.addInterceptor(corsInterceptor).addPathPatterns("/**");
		super.addInterceptors(registry);
	}

}
完成以上配置后便不再需要使用 nginx 反向代理的配置,也可以直接访问 8888 端口请求资源了。
不使用 action 的解决方法
下面再讲讲不使用 action 的解决方法,其实还是推荐不使用 action,自己处理 ajax 请求可以更自由一些。
首先是前端的代码:
点击上传
由于不再使用 action,因此这里的值任意,http-request 里的值对应自己处理请求的方法,upload 方法如下(使用了 axios 发送 ajax 请求):
upload(param) {
  const formData = new FormData()
  formData.append('file', param.file)
  const url = 'http://localhost:8888/uploadWithoutAction'
  axios.post(url, formData).then(data => {
    console.log('上传图片成功')
  }).catch(response => {
    console.log('图片上传失败')
  })
}
对应的后台处理的 controller 代码如下:
@RestController
public class UploadWithoutAction {

    @Value("${upload.filePath}")
    private String filePath;

    @PostMapping("/uploadWithoutAction")
    public String upload(@RequestPart("file") MultipartFile file) {
        if (file.isEmpty()) {
            return "上传失败,请选择文件";
        }
        String fileName = file.getOriginalFilename();
        File dest = new File(filePath + fileName);
        try {
            file.transferTo(dest);
            return "上传成功";
        } catch (IOException e) {
            e.printStackTrace();
            return "上传失败";
        }
    }

}
由于在使用 action 的解决方法里已经配置过拦截器设置了 response.addHeader("Access-Control-Allow-Origin", "*"); 这里就不再需要配置跨域了,如果想通过 nginx 反向代理解决跨域,以上的拦截器都不要设置,然后把上文中 nginx 反向代理配置中的关于 OPTIONS 的处理配置去掉即可,当然不去掉也没什么影响,如果不使用 action 了,参考我前言里的处理跨域的那篇文章即可。
总结
本文简单介绍了如何处理使用 el-upload 的 action 时的跨域问题,其实本质还是解决 OPTIONS 的预检请求请求问题,希望能够对你有所帮助。

