Vue2源码学习笔记 - 4.new Vue应用实例化
在上一节我们已经学习了 Vue 的类是如何定义的,这一节我们来学习一下 Vue 的实例化,就是我们经常写的创建 Vue 应用 new Vue。我们先在这里学习应用实例化创建的大致过程,对于过程中的诸多细节,我们后续慢慢研读。
从 Vue 的定义我们知道,Vue 在 new 的时候只调用了一个动态方法,那就是 _init。
function Vue (options) {
  if (process.env.NODE_ENV !== 'production' &&
    !(this instanceof Vue)
  ) {
    warn('Vue is a constructor and should be called with the `new` keyword')
  }
  this._init(options) // new Vue 时调用
}
我们来看看这个 _init,它紧跟在定义 Vue 构造函数之后通过调用 initMixin(Vue) 被定义到 Vue 的原型上,它的源码在 /src/core/instance/init.js 里
export function initMixin (Vue: Class<Component>) {
  Vue.prototype._init = function (options?: Object) {
    const vm: Component = this
    // a uid
    vm._uid = uid++
    ...
    // a flag to avoid this being observed
    vm._isVue = true
    // merge options
    if (options && options._isComponent) {
      // optimize internal component instantiation
      // since dynamic options merging is pretty slow, and none of the
      // internal component options needs special treatment.
      // 组件实例化 合并选项参数
      initInternalComponent(vm, options) //
    } else {
      // Vue实例化 合并选项参数
      vm.$options = mergeOptions(
        resolveConstructorOptions(vm.constructor),
        options || {},
        vm
      )
    }

    // 代理 vm._renderProxy 到 自身,主要用来检测 vm 上属性的读取操作
    if (process.env.NODE_ENV !== 'production') {
      initProxy(vm)
    } else {
      vm._renderProxy = vm
    }
    // expose real self
    vm._self = vm
    // 添加一些实例变量,设置初始空值
    initLifecycle(vm)
    // 初始化设置 $on $off 自定义事件
    initEvents(vm)
    // 扩展 createElement 函数赋给 vm 为动态方法 $createElement、_c 等
    initRender(vm)
    // 调用钩子函数 beforeCreate
    callHook(vm, 'beforeCreate')
    // 解析 inject 选项
    initInjections(vm) // resolve injections before data/props
    // 这个是重点,后续我们还会对它做详细研读,它对
    // props,methods,data,computed,watch 做了一些列初始化操作
    initState(vm)
    // 解析 provide 选项,配合 inject 一起使用
    initProvide(vm) // resolve provide after data/props
    // 调用钩子函数 created
    callHook(vm, 'created')
    ...
    // 挂载渲染页面
    if (vm.$options.el) {
      vm.$mount(vm.$options.el)
    }
  }
}
在这个 _init 中的注释已经比较清晰地展现了这个实例化的过程,其中有两个点,一个是 initState,它与响应式数据驱动有关,一个是 $mount,它与页面的解析渲染有关。
initState
export function initState (vm: Component) {
  vm._watchers = []
  const opts = vm.$options
  // 初始化 props 选项
  if (opts.props) initProps(vm, opts.props)
  // 处理 methods 选项
  if (opts.methods) initMethods(vm, opts.methods)
  // 初始化 data 选项
  if (opts.data) {
    initData(vm)
  } else {
    observe(vm._data = {}, true /* asRootData */)
  }
  // 初始化 computed 选项
  if (opts.computed) initComputed(vm, opts.computed)
  if (opts.watch && opts.watch !== nativeWatch) {
    // 初始化 watch 选项
    initWatch(vm, opts.watch)
  }
}
$mount:
// ******************************************
// $mount 1:挂载渲染
// public mount method
Vue.prototype.$mount = function (
  el?: string | Element,
  hydrating?: boolean
): Component {
  el = el && inBrowser ? query(el) : undefined
  return mountComponent(this, el, hydrating)
}

// ******************************************

const mount = Vue.prototype.$mount

// ******************************************
// $mount 2:编译模板再调用 $mount 1
Vue.prototype.$mount = function (
  el?: string | Element,
  hydrating?: boolean
): Component {
  el = el && query(el)

  /* istanbul ignore if */
  if (el === document.body || el === document.documentElement) {
    process.env.NODE_ENV !== 'production' && warn(
      `Do not mount Vue to  or  - mount to normal elements instead.`
    )
    return this
  }

  const options = this.$options
  // resolve template/el and convert to render function
  if (!options.render) {
    let template = options.template
    if (template) {
      if (typeof template === 'string') {
        if (template.charAt(0) === '#') {
          template = idToTemplate(template)
          /* istanbul ignore if */
          if (process.env.NODE_ENV !== 'production' && !template) {
            warn(
              `Template element not found or is empty: ${options.template}`,
              this
            )
          }
        }
      } else if (template.nodeType) {
        template = template.innerHTML
      } else {
        if (process.env.NODE_ENV !== 'production') {
          warn('invalid template option:' + template, this)
        }
        return this
      }
    } else if (el) {
      template = getOuterHTML(el)
    }
    if (template) {
      /* istanbul ignore if */
      if (process.env.NODE_ENV !== 'production' && config.performance && mark) {
        mark('compile')
      }
      // 编译模板
      const { render, staticRenderFns } = compileToFunctions(template, {
        outputSourceRange: process.env.NODE_ENV !== 'production',
        shouldDecodeNewlines,
        shouldDecodeNewlinesForHref,
        delimiters: options.delimiters,
        comments: options.comments
      }, this)
      options.render = render // 渲染函数
      options.staticRenderFns = staticRenderFns

      /* istanbul ignore if */
      if (process.env.NODE_ENV !== 'production' && config.performance && mark) {
        mark('compile end')
        measure(`vue ${this._name} compile`, 'compile', 'compile end')
      }
    }
  }
  // 调用 $mount 1 挂载渲染
  return mount.call(this, el, hydrating)
}
这里有两个 $mount,后者 $mount 2 主要是较前者多了编译模板的功能,这仅在需要编译和运行时的版本中存在。在只有运行时的版本中只有 $mount 1,因为编译操作已经在生成打包阶段就已经完成了。
总结:
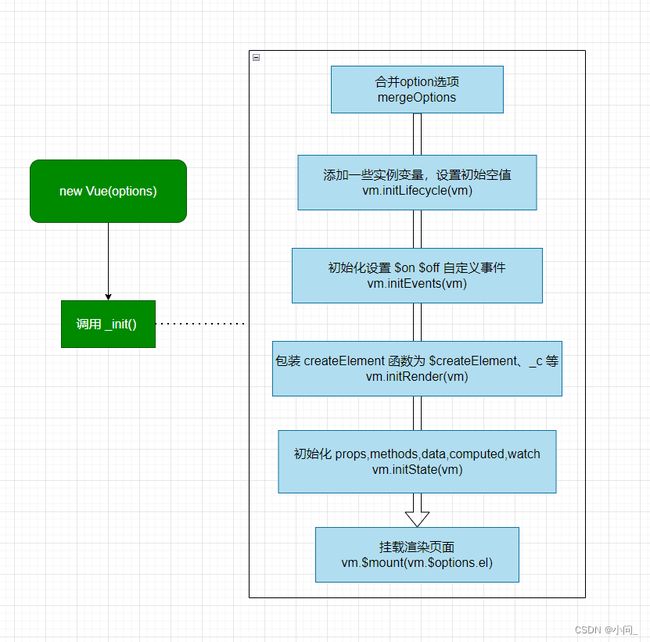
如图,Vue 实例化过程大致就是合并选项,初始化设置变量和事件,初始化各种 props,methods,data, computed, watch等,然后在挂载渲染页面。这一节我们在这里做个大概的了解,其中的细节,我们后续分章节逐步道来。
