Go:实现SMTP邮件发送订阅功能(包含163邮箱、163企业邮箱、谷歌gmail邮箱)
需求很简单,就是用户输入自己的邮箱后,使用官方邮箱给用户发送替邮件模版

目录
- 前置
-
- 邮件模版
- 邮箱开启SMTP服务
-
- 163邮箱
- 163企业邮箱
- 谷歌gmail邮箱
- 腾讯企业邮箱-失败
- 其他邮箱-未操作
- 邮件发送核心代码
-
- config.yaml配置
- 读取邮件相关配置
- 发送邮件
- 附录
前置
邮件模版
邮件模版类似如下图发来的欢迎加入的模版

这里我们使用html格式存储模版,上图源码如下
<html lang="en-US" xmlns:th="http://www.w3.org/1999/xhtml">
<head>
    <meta charset="UTF-8">
    <title>emailtitle>
    <style>
        a{
            color: #ECC94B !important;
        }
        .foot-text{
            color: rgba(0, 0, 0, 0.50) !important;
        }

        .im{
            color:rgba(0,0,0,0.86) !important;
        }

        .center {
            display: flex;
            justify-content: center;
            align-items: center;

}
    style>
head>
<body style="background-color: white;">
<div style="width: 640px;height: auto;border-radius: 5px;margin: 0 auto;position: relative; padding-bottom: 80px; padding-top: 20px">
    <div>
        <img width="640" src="file:///Users/yanzhixing/Downloads/My/文档/HatchfulExport-All/linkedin_banner_image_2.png" alt="">
    div>
    <div style="color: rgba(0,0,0,0.86);font-family: 'Roboto','Century Gothic', 'Trebuchet MS', 'Hiragino Sans GB', 微软雅黑, 'Microsoft Yahei', Tahoma, Helvetica, Arial, 'SimSun', sans-serif;font-size: 16px;margin: 10px auto 0px">
        <h2 style="font-size: 20px;font-weight: 700; color: #000">Dear KunZhi Fans,h2>
        <div>
            <p style="margin: 16px 0; ">Welcome to the family! We are glad to have you on board as a subscriber to my blog.p >
            <p style="font-weight: 600; color: #000;">Get the latest on <a style="color: #000" href="https://kunzhi.blog.csdn.net/">CSDNa> and give me a follow if you haven't already.p>
            <p style="margin: 16px 0">
                <p style="font-weight: 600; color: #000"> About Mep>
                <p style="margin-bottom: 8px">Former Alibaba programmer, now working for a blockchain company. He is a blogger in the domestic Internet circle, an expert blogger on Alibaba Cloud, and the manager of CSDN Hangzhou City Community. Welcome to communicate and win-win cooperation.p>
            p >

            <div style="margin: 16px 0">
                <p style="font-weight: 600; color: #000;"> Contact Mep>
                <p style=" margin-bottom: 8px">Should you have any questions, require assistance, or want to dive deeper into any aspect, you can reach out to me through various channels:p>

                <div>
                    <p style="margin-bottom: 0; display: flex; margin-bottom: 4px">
                        <span style="margin: 0 8px">●span>
                        <span>Wechat: Follow me <a style="color: #ECC94B;text-decoration: none " target="_blank">kunzhi96a> to communicate and learn together.span>
                        <div class="center">
                            <img width="200" src="file:///Users/yanzhixing/Downloads/My/私人/微信二维码.png" alt="">
                        div>
                    p>
                    <p style="margin: 0; display: flex; margin-bottom: 4px">
                        <span style="margin: 0 8px">●span>
                        <span>CSDN Blog: Visit my blog -<a style="color: #ECC94B; text-decoration: none" target="_blank" href="https://kunzhi.blog.csdn.net/">鲲志说a> for in-depth information about my learning content and technology sharing.span>
                    p>
                    <p style="margin: 0; display: flex; margin-bottom: 4px">
                        <span style="margin: 0 8px">●span>
                        <span> Email: Feel free to contact us via email at <span style="color: #ECC94B; opacity: 1;">[email protected]span> for any inquiries, feedback, or support needs.span>
                    p>
                div>
                <p style="margin-bottom: 0px">I'm excited to embark on this journey with you.p>
            div >
            <p>Warm regards,p>
            <p>Kun Zhip>
            <div style="background-color: #F7F7F7; padding: 40px; text-align:center;">
                <p style="font-size: 24px;font-weight: 700; color: #000;  margin-bottom: 24px; margin-top: 0">KunZhip>
                <p style="margin-bottom: 8px; margin-top: 0">This email was send to <span style="color: #ECC94B; opacity: 1;">[email protected]span>p>
                <p style="margin-bottom: 24px; margin-top: 0">You’ve received it because you’ve subscribed to our newsletter.p>
                <div>
                    <a style="color: rgba(0, 0, 0, 0.50); text-decoration: underline" href="unsubscribe_url/unsubscribe?email=unsubscribe_email" class="foot-text">Unsubscribea>
                div>
            div>
        div>
    div>
div>
body>
html>
邮箱开启SMTP服务
选择好官方邮箱来开启smtp服务,这里我测试验证了163邮箱、163企业邮箱、谷歌gmail邮箱和腾讯企业邮箱(但腾讯企业邮箱未成功,后续会说明)
163邮箱
-
登录163邮箱(一定不要登录到简易版啊)
-
登录后如下图所示,点击上面导航栏的设置

-
按照下图顺序点击 POP3/SMTP/IMAP

-
开启SMTP服务
如下图我已经是开启状态了

5. 新增授权密码
如上图,我们如果需要使用SMTP服务,就一定要使用授权码,而且这个密码只出现一次,一定要记得保存好,保存好先留着,我们后面会用到
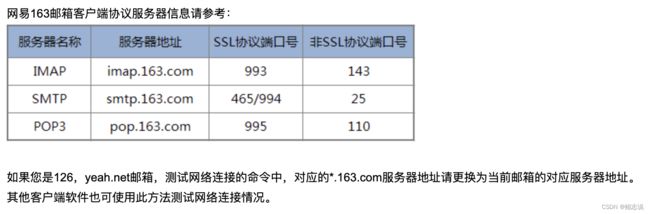
6.服务器地址及端口
我们使用的是SMTP服务,则对应的服务器地址是smtp.163.com,端口为25,后面都会用到
自此,163邮箱的smtp服务开启完毕,可直接跳到邮件发送源码处继续即可
163企业邮箱
- 登录163企业邮箱
可以看到登录的是网易灵犀办公界面

- 登录后如下图所示,点击上面导航栏的设置-账号与安全-客户端设置

- 进入客户端设置
可看到如下图
- 选择IMAP协议
- 开启并设置客户端授权密码
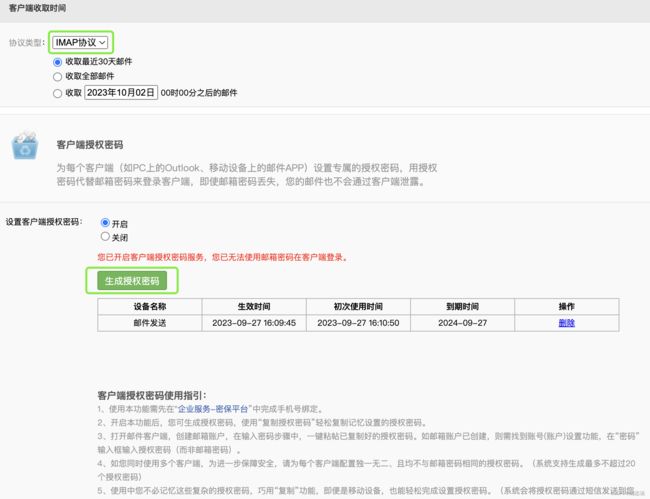
- 新增授权密码
如上图,生成授权码,而且这个密码只出现一次,一定要记得保存好,保存好先留着,我们后面会用到。
可以看到163企业邮箱不同的是,有一个到期时间,也就意味着,到期了,我们需要更换授权码,这一点需要谨记
- 服务器地址及端口
我们使用的是SMTP服务,则对应的服务器地址是smtphz.qiye.163.com,端口为25,后面都会用到

自此,163企业邮箱的smtp服务开启完毕,可直接跳到邮件发送源码处继续即可
谷歌gmail邮箱
- 登录 谷歌gmail邮箱
- 点击设置-查看所有设置

- 点击转发和 POP/IMAP 标签页,如下图进行启用设置,并保存更改

- 创建和使用应用专用密码
-
前往您的 Google 帐号-选择安全性
-
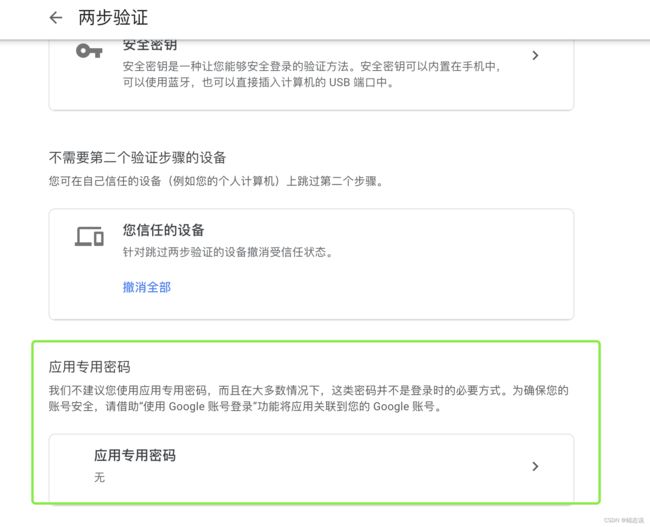
在“登录 Google”下方,选择两步验证

-
在页面底部,选择应用专用密码,进行点击
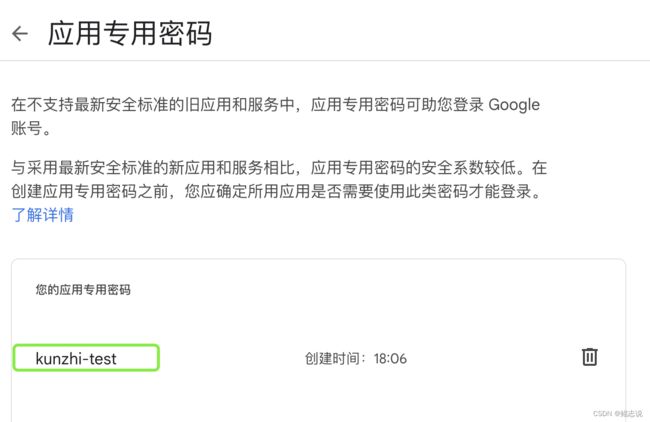
-
输入一个名称,以帮助您记住在什么情况下使用应用专用密码,如我的kunzhi-test

-
选择创建后,会出现如下弹窗。设备的应用专用密码即生成了,是指在设备上生成的 16 个字符的代码。也就是授权码,而且这个密码只出现一次,一定要记得保存好,保存好先留着,我们后面会用到。

-
选择完成,记得应用名称对应的密码即可
- 服务器地址及端口
我们使用的是SMTP服务,则对应的服务器地址是smtp.gmail.com,端口为587,后面都会用到

自此,谷歌gmail邮箱的smtp服务开启完毕,可直接跳到邮件发送源码处继续即可
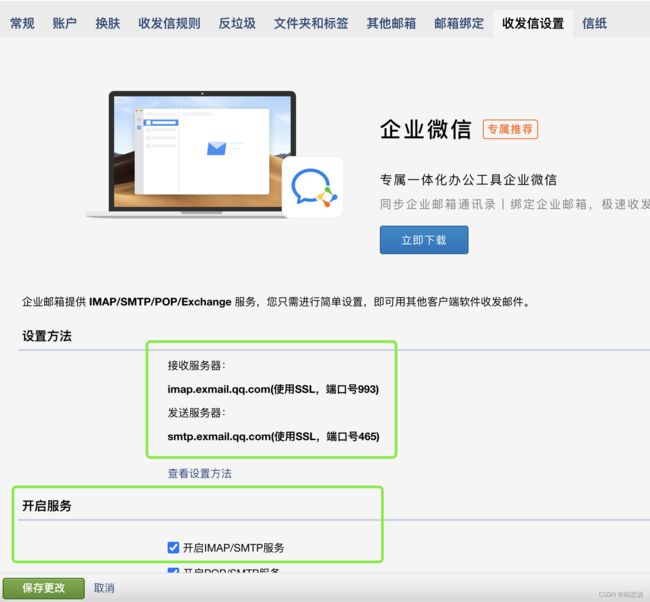
腾讯企业邮箱-失败
腾讯企业邮箱失败的原因是因为一直没有找到授权码在哪里进行设置,同时使用邮箱的密码作为授权码也无法发送邮件,所以一直没有实现,但是前面的操作步骤可以放出来供大家参考,如果有人找到了腾讯企业邮箱的操作方法请一定要评论区给出解法。
-
企业微信管理后台
-
开启腾讯企业邮箱的POP/SMTP/IMAP服务
-
企业邮箱服务器及端口号设置
其他邮箱-未操作
这个链接的操作我并未实际执行,需要的可以参考
- 发件服务设置-包含:阿里云邮箱设置、Outlook邮箱设置
邮件发送核心代码
config.yaml配置
这里是发送邮件的邮箱相关配置,这里就使用到之前只出现一次的授权码了,以及对应的服务器地址和端口
email:
# 163邮箱
  template_dir: /test.html
  smtp_server: smtp.163.com
  smtp_port: 25
  smtp_user: KunZhi
  smtp_password: 授权码
  from_email: [email protected]

# 腾讯企业邮箱
  # smtp_server: smtp.exmail.qq.com
  # smtp_port: 465
  # smtp_user: KunZhi
  # smtp_password: 授权码
  # from_email: XXXX

# 163企业邮箱
  # smtp_server: smtphz.qiye.163.com
  # smtp_port: 25
  # smtp_user: KunZhi
  # smtp_password: 授权码
  # from_email: XXXX


# gmail
#   smtp_server: smtp.gmail.com
#   smtp_port: 587
#   smtp_user: KunZhi
#   smtp_password: 授权码
#   from_email: [email protected]
这里的smtp_user如下图,就是展示的发件人名称

读取邮件相关配置
	//读取邮件相关配置
	err = sendWelcomeEmail(Cfg{
		SenderAddress:  viper.GetString("email.from_email"),
		SenderName:     viper.GetString("email.smtp_user"),
		SenderPwd:      viper.GetString("email.smtp_password"),
		MailServerHost: viper.GetString("email.smtp_server"),
		MailServerPort: viper.GetString("email.smtp_port"),
	}, viper.GetString("email.from_email"), toEmail, unsubscribeUrl)
	if err != nil {
		errors.Errorf("Failed to send email: ", toEmail, err)
		responseData := gin.H{
			"message": "Failed to send email: " + toEmail,
			"code":    -1,
		}
		c.JSON(http.StatusOK, responseData)
		return err
	}
发送邮件
func sendWelcomeEmail(cfg Cfg, template string, recipientEmail, unsubscribeUrl string) error {
	currentDir, err2 := os.Getwd()

	if err2 != nil {
		log.Fatalf("Failed to get current working directory: %v", err2)
	}
    //获取邮件模版
	htmlContent, err3 := ioutil.ReadFile(currentDir + viper.GetString("email.template_dir"))

	if err3 != nil {
		fmt.Println("Failed to read HTML file:", err3)
		return err3
	}

	// 邮件标题
	subject := "Your Journey Begins Here"
	message := string(htmlContent)
	// 需要替换邮件模版中的字符串映射
	replacements := map[string]string{
		"[email protected]":     recipientEmail,
		"header_img":        viper.GetString("img.header_img"),
	}
	// 替换字符串
	for oldStr, newStr := range replacements {
		message = strings.Replace(message, oldStr, newStr, -1) // -1 表示替换所有匹配项
	}

	// 连接到 SMTP 服务器并发送电子邮件
	auth := smtp.PlainAuth("", cfg.SenderAddress, cfg.SenderPwd, cfg.MailServerHost)
	to := []string{recipientEmail}
	msg := []byte("To: " + recipientEmail + "\r\n" +
		"Subject: " + subject + "\r\n" +
		"From: " + cfg.SenderName + " <" + cfg.SenderAddress + ">\r\n" +
		"MIME-Version: 1.0\r\n" +
		"Content-Type: text/html; charset=utf-8\r\n" + // 将内容类型设置为 HTML
		"\r\n" + message)

	//发送邮件
	err := smtp.SendMail(cfg.MailServerHost+":"+cfg.MailServerPort, auth, cfg.SenderAddress, to, msg)
	if err != nil {
		fmt.Println("failed to send email:", err)
		return err
	}

	return nil
}
如上代码,可以实现SMTP邮件发送订阅功能,如有任何问题欢迎私聊或评论区留言
附录
- 163帮助中心
- 163邮箱无法发送邮件发生退信问题 550 User has no permission以及554, DT:SPM的解决办法
- 163企业邮箱帮助中心-灵犀办公客户端的设置方法
- 谷歌邮箱-使用应用专用密码登录