玩客云-网心云Armbian23.08-Docker-homeassistant-CUPS-网页导航
榨干玩客云Armbian23.08-Docker-homeassistant-CUPS-网页导航

一、玩客云工具及固件
1、使用工具
烧录工具
- USB_Burning_Tool_v2.1.6.8
- Xshell6工具包
2、固件
固件下载地址:https://github.com/hzyitc/armbian-onecloud
armbian来自hzyitc大神编译的
Armbian_23.08.0-trunk_Onecloud_jammy_current_6.1.38.burn.img
二、烧录固件
-
使用USB_Burning_Tool_v2.1.6.8导入固件armbian固件
文件-导入烧录包-选择固件Armbian_23.08.0-trunk_Onecloud_jammy_current_6.1.38.burn.img -
双公头连接玩客云
这里使用的是已经刷过其他固件的玩客云- 将玩客云(已刷过其他系统的)靠近HDMI口的USB使用双公头线连接到电脑
- 用针按压restat空的同时,接入电源。
- 点击开始
- 等待刷入成功后,点击停止,关闭USB_Burning_Tool_v2.1.6.8拔掉USB,断电接入网络。
三、shell调试及更新系统
Welcome to ARMBIAN!
Documentation: https://docs.armbian.com | Community: https://forum.armbian.com
IP address: 192.168.3.170
Create root password: ****
Repeat root password: **** # 设置管理员密码
Warning: Weak password, it is too short! #
Support status: community support (looking for a dedicated maintainer)
Choose default system command shell: # 用第一种方式
1) bash
2) zsh
1 # 这里输入1
Shell: BASH
Creating a new user account. Press <Ctrl-C> to abort
Please provide a username (eg. your first name): ^C # 创建用户 ctrl+C 取消掉不新建用户
Disabling user account creation procedure
root@onecloud:~#
- 编辑系统更新源
root@onecloud:~# sudo cp /etc/apt/sources.list /etc/apt/sources.list.bak
root@onecloud:~# nano /etc/apt/sources.list
deb https://mirrors.tuna.tsinghua.edu.cn/ubuntu-ports/ jammy main restricted universe multiverse
# deb-src https://mirrors.tuna.tsinghua.edu.cn/ubuntu-ports/ jammy main restricted universe multiverse
deb https://mirrors.tuna.tsinghua.edu.cn/ubuntu-ports/ jammy-updates main restricted universe multiverse
# deb-src https://mirrors.tuna.tsinghua.edu.cn/ubuntu-ports/ jammy-updates main restricted universe multiverse
deb https://mirrors.tuna.tsinghua.edu.cn/ubuntu-ports/ jammy-backports main restricted universe multiverse
# deb-src https://mirrors.tuna.tsinghua.edu.cn/ubuntu-ports/ jammy-backports main restricted universe multiverse
deb https://mirrors.tuna.tsinghua.edu.cn/ubuntu-ports/ jammy-security main restricted universe multiverse
# deb-src https://mirrors.tuna.tsinghua.edu.cn/ubuntu-ports/ jammy-security main restricted universe multiverse
# 预发布软件源,不建议启用
# deb https://mirrors.tuna.tsinghua.edu.cn/ubuntu-ports/ jammy-proposed main restricted universe multiverse
# deb-src https://mirrors.tuna.tsinghua.edu.cn/ubuntu-ports/ jammy-proposed main restricted universe multiverse
- 对系统进行更新
root@onecloud:~# sudo apt update
root@onecloud:~# sudo apt upgrade -y
- 接下来设置时间
root@onecloud:~# date -R
Wed, 19 Jul 2023 08:02:33 +0000
root@onecloud:~# cp /usr/share/zoneinfo/Asia/Shanghai  /etc/localtime
root@onecloud:~# date -R
Wed, 19 Jul 2023 16:02:52 +0800
root@onecloud:~#
到这里系统的安装就结束了
安装MQTT服务器
sudo apt update
sudo apt install mosquitto mosquitto-clients
# 基本操作
# 检查Mosquitto服务是否正在运行
systemctl status mosquitto
# 手动启动服务
sudo systemctl start mosquitto
#重新启动 Mosquitto 代理
sudo systemctl restart mosquitto
# sudo mosquitto_passwd -c /etc/mosquitto/passwd listener 1883 0.0.0.0
allow_anonymous false
password_file /etc/mosquitto/passwd
安装docker
- 通过命令安装docker
root@onecloud:~# curl -fsSL https://test.docker.com -o test-docker.sh
root@onecloud:~# sudo sh test-docker.sh
- docker相关的操作命令
#启动 docker
systemctl start docker
#设定开机自动启动docker
systemctl enable docker
#查看docker运行状态
systemctl status docker
#查看 docker 版本信息
docker version
#把当前用户加入 docker 用户组
sudo usermod -a -G docker root
#重启 docker 服务
sudo systemctl restart docker
#将用户在docker用户组中移除,安全!
sudo gpasswd -d root docker
- 安装中文Docker图形化管理工具FAST OS DOCKER
root@onecloud:~# docker pull wangbinxingkong/fast
root@onecloud:~# mkdir -p /data/fast
root@onecloud:~# docker run --name fast --restart always -p 8081:8081 -d -v /var/run/docker.sock:/var/run/docker.sock -v /etc/docker/:/etc/docker/ -v /data/fast:/fast/data  wangbinxingkong/fast
安装完毕后使用IP:8081就可以访问FAST OS DOCKER初次登录先点击注册按照提示操作即可
安装HomeAssistant
- 拉取Homeassistant镜像
#拉取hass的最新版镜像
docker pull homeassistant/home-assistant:latest
#创建容器并运行
docker run -d --restart always --name="hass" -v /home/hass/config:/config -p 8123:8123 homeassistant/home-assistant:latest
- 安装hacs插件
#进入hass目录,安装hacs
docker exec -it hass bash # 通过docker名hass进入hass的bash环境
export http_proxy=http://192.168.3.137:7890 # 这里使用代理下载
export https_proxy=http://192.168.3.137:7890 # 这里使用代理下载
wget -O - https://get.hacs.xyz | bash # 下载hacs插件
# 取消代理
unset http_proxy
unset https_proxy
# 退出hass目录
exit
systemctl enable docker #设置docker开机自启动
docker update --restart=always hass # 设置homeassistant开机自启动
docker update --restart=always blissful_ellis # 设置portainer开机自启动
安装CUPS打印机服务器
原文参考:https://www.rstk.cn/news/1115055.html
表示感谢
- 安装cups命令
apt install cups
- 配置cupsd.conf
nano /etc/cups/cupsd.conf
# Only listen for connections from the local machine.
Listen localhost:631 改成 Listen 0.0.0.0:631
Listen /run/cups/cups.sock
……省略一部分
# Restrict access to the server...
<Location />
  Order allow,deny
  Allow all    #增加这一行
</Location>

# Restrict access to the admin pages...
<Location /admin>
  Order allow,deny
  Allow all   #增加这一行
</Location>

# Restrict access to configuration files...
<Location /admin/conf>
  AuthType Default
  Require user @SYSTEM
  Order allow,deny
  Allow all   #增加这一行
</Location>

# Restrict access to log files...
<Location /admin/log>
  AuthType Default
  Require user @SYSTEM
  Order allow,deny
  Allow all   #增加这一行
</Location>
然后Ctrl+X 退出Y保存
- 安装常用打印机驱动
# HP打印机驱动安装
apt install hplip
# 爱普生打印机驱动安装
apt install printer-driver-escpr
# 兄弟打印机驱动安装
apt install printer-driver-brlaser
# 三星打印机驱动安装
apt install printer-driver-splix
# 高品质打印机驱动合集
apt install printer-driver-gutenprint
……
#安装驱动后需要重启打印服务
systemctl restart cups
- 添加打印机
浏览器地址栏输入https://ip:631例如https://192.168.3.225:631回车进入CUPS主页
点击Administration 输入账号及密码 进入管理界面
在Printers栏点击add printer在列表中选择你要安装的打印机点击Continue
或者在在Printers栏点击Find New Printers 中选择你要的打印机点击 Continue
- 配置自动发现
# 安装发现协议/组织局域网服务
apt install avahi-daemon
# 如果不可用使用下面命令
apt install avahi-daemon avahi-discover libnss-mdn
# 重启CUPS
systemctl restart cups
# 重启avahi-daemon服务
systemctl restart avahi-daemon
# 设置开机自启动
systemctl enable cups
systemctl enable avahi-daemon
# 查看服务启动状态
systemctl status cups
systemctl status avahi-daemon
给玩客云设置导航页
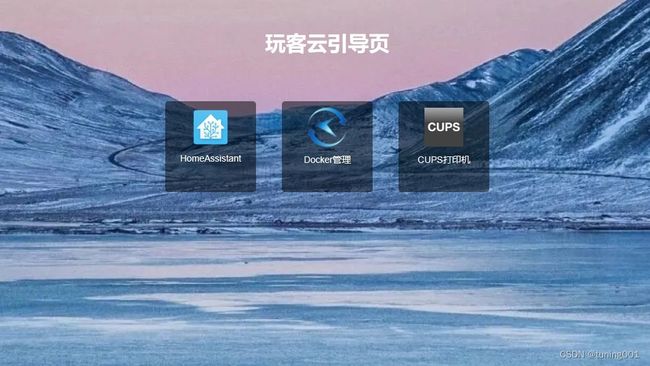
经过上面的操作,我们的玩客云已经基本被榨干了。所以我觉得最后一个工作就是让他开始工作。
那么为了有更好的体验,我需要一个导航页来完善之前所有的工作
- 安装web服务器
apt install nginx
systemctl enable nginx # 开机自动启动
- 简单设计一个页面
DOCTYPE html>
<html>
<head>
  <meta charset="UTF-8">
  <title>玩客云引导页title>
  <style>
    body {
      font-family: Arial, sans-serif;
      text-align: center;
      background-image: url("imge/beijing.jpg");
      background-size: cover;
      background-position: center;
      position: relative;
    }
    h1 {
      color: #fff;
      margin-top: 50px;
    }
    .button-container {
      display: flex;
      justify-content: center;
      align-items: center;
      margin-top: 50px;
    }
    .button {
      display: flex;
      flex-direction: column;
      align-items: center;
      margin: 20px;
      padding: 10px;
      background-color: rgba(0, 0, 0, 0.5);
      border-radius: 5px;
      cursor: pointer;
      width: 120px;
      height: 120px;
      transition: transform 0.3s ease-in-out;
    }
    .button:hover {
      transform: scale(1.1);
    }
    .button img {
      width: 60px;
      height: 60px;
      margin-bottom: 10px;
    }
    .button span {
      color: #fff;
      font-size: 14px;
    }
    .time {
      position: absolute;
      bottom: 20px;
      right: 20px;
      background-color: rgba(0, 0, 0, 0.5);
      padding: 10px;
      border-radius: 5px;
      color: #fff;
      font-size: 16px;
    }
  style>
  <script>
    window.addEventListener('DOMContentLoaded', function() {
      var homeAssistantButton = document.getElementById('homeAssistantButton');
      var dockerButton = document.getElementById('dockerButton');
      var printButton = document.getElementById('printButton');

      homeAssistantButton.addEventListener('click', function() {
        var href = window.location.protocol + '//' + window.location.hostname + ':8123';
        window.location.href = href;
      });

      dockerButton.addEventListener('click', function() {
        var href = window.location.protocol + '//' + window.location.hostname + ':8081';
        window.location.href = href;
      });

      printButton.addEventListener('click', function() {
        var href = window.location.protocol + '//' + window.location.hostname + ':631';
        window.location.href = href;
      });

      function updateTime() {
        var now = new Date();
        var hours = now.getHours();
        var minutes = now.getMinutes();
        var seconds = now.getSeconds();
        var timeString = hours.toString().padStart(2, '0') + ':' + minutes.toString().padStart(2, '0') + ':' + seconds.toString().padStart(2, '0');
        var timeElement = document.getElementById('time');
        timeElement.innerText = timeString;
      }

      setInterval(updateTime, 1000);
    });
  script>
head>
<body>
  <h1>玩客云引导页h1>
  <div class="button-container">
    <div class="button" id="homeAssistantButton">
      <img src="imge/homeassistant.png" alt="HomeAssistant">
      <span>HomeAssistantspan>
    div>
    <div class="button" id="dockerButton">
      <img src="imge/docker.png" alt="Docker">
      <span>Docker管理span>
    div>
    <div class="button" id="printButton">
      <img src="imge/print.png" alt="CUPS">
      <span>CUPS打印机span>
    div>
  div>
  <div class="time" id="time">div>
body>
html>
将上面的代码连同imge文件夹图片一同上传到/var/www/html中就可以了
玩客云基本上就没有其他空间供我折腾了。到此我觉得这是我个人觉得它用途的最佳方案。
资料下载
资料内容均来自网络,用于学习使用,如有不妥请联系。
链接:https://pan.baidu.com/s/1E9f-yF6BZoSwipydvEjsQw?pwd=77jd
提取码:77jd