pandas
一、pandas初级

安装matplotlib:pip install matplotlib
安装pandas:pip install pandas
本地C:\Users\Administrator\pip,在此目录配置清华园的远程下载

配置内容:
[global]
index-url=https://pypi.tuna.tsinghua.edu.cn/simple
[install]
trusted-host=mirrors.aliyun.com
1.1 花色调整
import numpy as np
import matplotlib.pyplot as plt
img=plt.imread('./向日葵.jpg')
img.shape  #高、宽、颜色,(1200, 1920, 3)
# 1200高度像素
# 1920宽度像素
# 3 颜色通道:红绿蓝
plt.imshow(img) #展示图像,红绿蓝,红色
plt.imshow(img[:,:,::-1]) #蓝绿红,蓝色
plt.imshow(img[:,:,[1,0,2]]) #绿红蓝,绿色
1.2 pandas
1.2.1 数据结构
一维结构
import pandas as pd
s=pd.Series(data=[0,3,5,7],index=['a','b','c','d'])#指定索引,一一对应
s=pd.Series(data=[0,3,5,7])#不指定索引,默认从0自增
s
0 0
1 3
2 5
3 7
dtype: int64
二维结构
第一种方式:
import pandas as pd
import numpy as np
#Excel类似
#创建DataFrame第一种方式
pd.DataFrame(data=np.random.randint(0,150,size=(5,3)),columns=['Python','En','Math'],
            index=list('ABCDE'),dtype=np.float32)
import pandas as pd
import numpy as np
#Excel类似
#创建DataFrame第二种方式,字典中的key作为列索引,冒号后面表示数据

pd.DataFrame(data={'Python':np.random.randint(100,150,size=5),
                   'En':np.random.randint(0,150,size=5),
                   'Math':np.random.randint(0,150,size=5)},index=list('ABCDE'))
1.2.2 数据查看
import numpy as np
import pandas as pd
df=pd.DataFrame(data=np.random.randint(0,151,size=(150,3)),
               index=None,#行索引默认
               columns=['Python','Math','En'])#列索引
# df.head(10)#查看前10行
# df.tail#默认查看后5个
# df.shape#查看形状
df['Python']=df['Python'].astype(np.int64)#修改数据类型
df.dtypes#查看数据类型
df.index#行索引
df.columns#列索引
df.values#对象值,二维数组
df.describe()#查看数值型列的汇总统计,平均值,最大值最小值等
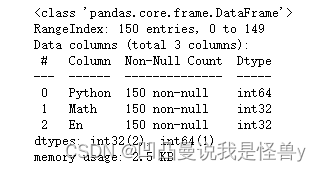
df.info()#查看列索引、数据类型、非空计数和内存信息
1.2.3 数据的输入和输出
第一节:csv
import numpy as np
import pandas as pd
df=pd.DataFrame(data=np.random.randint(0,50,size=(50,5)),#薪资情况
                columns=['IT','化工','生物','教师','士兵'])
display(df)
#保存到当前路径
df.to_csv('./salary.csv',
          sep=',',#文本分隔符,尽量用逗号
           header=True,#是否保存列索引
           index=True#是否保存行索引,若保存,文件被加载时,默认行索引会作为一列
          )
#加载文件
pd.read_csv('./salary.csv',
           sep=',',
           header=[0],#指定列索引
           index_col=0)#指定行索引
第二节:Excel
pip install xlrd
pip install xlwt
写
import numpy as np
import pandas as pd
df1=pd.DataFrame(data=np.random.randint(0,50,size=(50,5)),#薪资情况
                columns=['IT','化工','生物','教师','士兵'])
df2=pd.DataFrame(data=np.random.randint(0,50,size=(150,3)),#计算机科目的考试成绩
                columns=['Python','Tensorflow','Keras'])#列索引

df1.to_excel('./salary.xlsx',sheet_name='salary', #Excel中工作表的名字
             header=True,#是否保存列索引
             index=False)#是否保存行索引
读
pd.read_excel('./salary.xlsx',
            sheet_name=0,#读取哪一个Excel工作表,默认第一个,或者sheet_name='salary'
            header=0,#使用第一行数据作为列索引
            names=list('ABCDE'),#替换列索引
            index_col=1)#指定行索引,B作为行索引
一个Excel中保存多个工作表
with pd.ExcelWriter('./data.xlsx') as writer:
    df1.to_excel(writer,sheet_name='salary',index=False)
    df2.to_excel(writer,sheet_name='score',index=False)
Excel中保存的多个工作表中,读取一个
pd.read_excel('./data.xlsx',
             sheet_name='salary')#读取Excel中指定名字的工作表
1.2.4 数据选择
和Numpy的花式索引类似
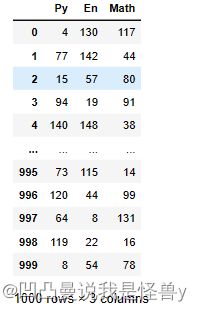
df=pd.DataFrame(np.random.randint(0,150,size=(1000,3)),
                columns=['Py','En','Math'])
df
# df['Py'] #不显示列索引
# df.Py #不显示列索引
df[['Py','Math']]#使用两个中括号时才会显示列索引
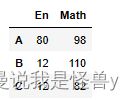
df[['En']] #显示列索引
行获取:
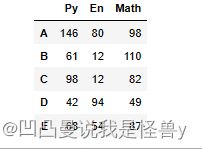
df2=pd.DataFrame(np.random.randint(0,150,size=(5,3)),
                index=list('ABCDE'),
                columns=['Py','En','Math'])
df2
df2.loc['A']#行索引
df2.loc[['A','D']]
# df2.iloc[0]#自然数索引,第一行
df2.iloc[[0,3]]#第1行,第4行
df2['Math']['B']#这个必须分开写 110
df2.loc['B']['Math'] #加了loc首先要跟行索引,注意先后顺序110
df2.loc['B','Math']#也是先行后列110
# iloc表示,先获取行,再获取列
df2.iloc[1,2]#110
df2.loc['A':'C','En':]
df2.iloc[2:4,[0,-1]]#第三行、第四行的第一列和最后一列
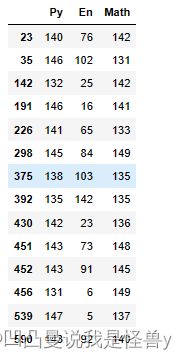
boolean索引:
cond=df['Py']==140
df[cond]
cond1=df['Py']>130
cond2=df['Math']>130
cond=cond1&cond2
df[cond]


