手写BundleAdjustment(尽量仅使用eigen库)
手写BundleAdjustment
使用手写BA解决了PnP问题,除了读取图片、显示图片用的opencv,其他基本上只使用了eigen、sophus。
代码放在了百度云上(github还在研究怎么用,以后可能会上)
链接:https://pan.baidu.com/s/1CBJMKXGeelBSuJUuk7E1mw
提取码:br5o
文章目录
-
- 手写BundleAdjustment
- 一、总览
- 二、搭建各种数据结构
-
- 1.存储一个关键点信息的KeyPoint类型
- 2.存储匹配情况的Match类型
- 三、构建一些方法,即算法
-
- 1、提取特征点的算法
- 2、计算BREIEF描述子
- 3、进行BFmatch
- 4、其他的方法
- 四、手写BA结果
一、总览
由于c++基本功及其不扎实,除了上课内容其他啥东西也没写过,因此本次实验的手写BA主要还是一个简单版的实现,在很多地方有了简化。复杂的算法逻辑等以后想加了再加,本次实验主要是搭建一个从读图、到提取特征点、到求得描述子、到匹配特征点、到求解相机位姿的一套流程框架,是对已学的视觉slam十四讲的前端内容做一个连贯的整理。
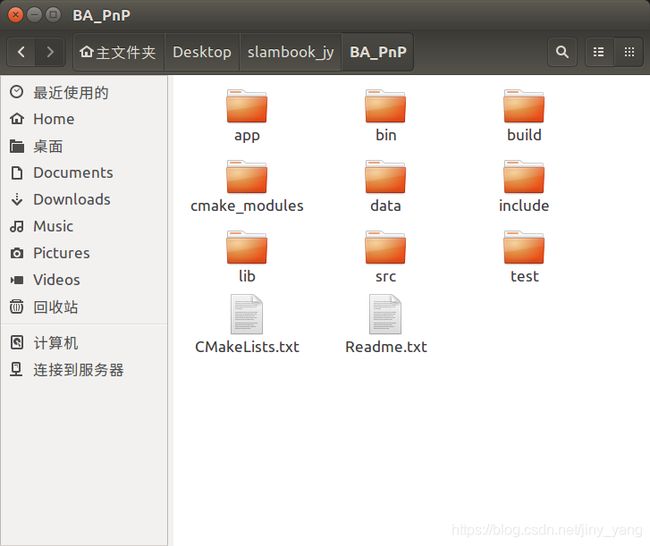
此次程序的总体框架按照高翔的十四讲上编写一个小型系统的框架来进行。如下图:

先解释下各文件夹里面装的东西。
app:主函数BA_PnP.cpp,及它的CmakeLists.txt.
bin:可执行文件.
build:编译中间文件.
cmake_modules: 啥也没有.
data:原始图片素材.
include:各种头文件,都是自己写的.
lib:不知道有啥用,应该是什么的中间文件存放地.
src:各种cpp文件,存放各种用于实现头文件的源文件.
test:啥也没有.
二、搭建各种数据结构
常言道,程序 = 数据类型 + 算法 。之前对这句话没什么体会,这次编写下来,深感这句话是真理!此篇博客就先从数据结构开始讲起。
1.存储一个关键点信息的KeyPoint类型
存储关键点,在opencv中有cv::KeyPoint类型可以直接使用,本次实验用的是自己写的类型。
KeyPoint类主要需要存储关键点的坐标信息x_,y_.为了之后匹配关键点时方便些,给它加了id_参数。pyramid_金字塔层数没有用到。
类型的方法就随便搞了几个,主要是为了学习一下头文件和源文件的链接。
注意:在头文件和源文件链接时,需要在src/CMakeLists.txt之中加上源文件的名字,不然会链接不上。
KeyPoint.h:
#ifndef _KeyPoint_H_
#define _KeyPoint_H_
#include "common_include.h"

class KeyPoint {
    public:
    EIGEN_MAKE_ALIGNED_OPERATOR_NEW;
    // typedef std::shared_ptr Ptr;

    int x_,y_;
    int id_;
    int num_;//周围一圈亮度差别大的点的个数,用来筛选,防止角点过于集中。
    int pyramid_ = -1;//金字塔层数

    KeyPoint();
    KeyPoint(int x , int y , int id , int num ):
    x_(x) , y_(y) , id_(id) , num_(num){}

    KeyPoint(int x , int y , int id , int num , int pyramid): //有金字塔的构造
    x_(x) , y_(y) , id_(id) , num_(num) , pyramid_(pyramid){}

    // KeyPoint(const cv::Mat &img1 , double threshold = 10.0 );

    long int getID(){
        return id_;
    }

    Vec2 getPoint();
};

#endif
KeyPoint.cpp:
#include "common_include.h"
#include "KeyPoint.h"

// KeyPoint::KeyPoint(const cv::Mat &img1 , double threshold){
// }

Vec2 KeyPoint::getPoint(){
    Vec2 point;
    point << x_ , y_ ;
    return point;
}
src/CMakeLists.txt:
add_library(myslam SHARED    #给类的头文件和源文件链接
    KeyPoint.cpp
    FAST_detect.cpp
    GetBrief.cpp
    BFMatch.cpp
    BundleAdjustment.cpp
    pixel2cam.cpp)

target_link_libraries(myslam
    ${THIRD_PARTY_LIBS})
2.存储匹配情况的Match类型
在opencv中有cv::DMatch类型。主要功能是储存两个匹配好的关键点的信息,分别有他们的id。id1_,id2_。和它们之间的BF距离,distance_。
Match.h:
#ifndef _MATCH_H_
#define _MATCH_H_
#include "common_include.h"

class Match{
public:
    int id1_;
    int id2_;
    int distance_;

    Match();
    Match(int x , int y , int distance):
    id1_(x) , id2_(y) , distance_(distance) {}

    ~Match(){}

    Vec2 getPoint(){
            Vec2 point;
        point << id1_ , id2_ ;
        return point;
    }

};

#endif
三、构建一些方法,即算法
1、提取特征点的算法
算法逻辑:
首先,排除掉原图像周围的一圈点,因为之后BFMatch时最多会用到特征点周围13个像素的位置的点比较,此处排除掉周围的点时干脆就去掉了20个点。
而后,遍历每个点,比较此像素点和周围16个点的像素大小。这16个点都储存在mask中,详见slam十四讲第二版的P156.
最后,如果和周围16个点中有14个点及以上是同时大于此像素点的,或者同时小于此像素点的,则判定这个点是一个特征是。(原版的FAST角点检测要求是连续的12个点大于或小于,当时为了早点把框架搭出来,就取巧了一些。)
其中的参数14可以调整为13、15、16等,不同的参数选取出来的特征点的数量不同。
FAST_detect.cpp:
#include 2、计算BREIEF描述子
BRIEF描述子算法见书本P157.
大致就是比较了单个特征点周围256对点,将其大小关系储存在了vec1中。
对所有的特征多求了描述子之后,将所有的特征点的描述子都储存在了Vecvec_之中。
vector
GetBrief.cpp:
#include 3、进行BFmatch
BFmatch的原理就是对遍历两张图片所有的特征点,计算所有的汉明距离,把距离最小的两个点视为匹配点。
可以设置一个 阈值来筛选掉一些误匹配的点。此次把阈值设为了25.
BFMatch.cpp:
#include "common_include.h"
#include "BFMatch.h"
#include "Match.h"

vector<Match> BFMatch(vector<vector<int>> Vecvec1 , vector<vector<int>> Vecvec2){
    vector<Match> matches_;
    const int d_max = 25;//25 is ok
    const int d_min = 15;
    for (int i1 = 0; i1<Vecvec1.size(); i1++){
        if (Vecvec1[i1].empty()) continue;
        // matches[i1] = Match(0,0,0);
        Match m{i1,-1,-1};
        int dis = 256;
        for (unsigned int i2 = 0; i2 < Vecvec2.size(); i2++){

            int distance = 0;
            // int dis = 256;
            for (unsigned int j = 0; j < Vecvec1[1].size(); j++){//计算汉明距离
                int k = 0 ;
                k = Vecvec1[i1][j] ^ Vecvec2[i2][j];
                distance += k;
            }
            if (distance < d_max && distance < dis && distance >= d_min) {//目前,每一次distance小于了之前的distance都输出了。应该是要对应点的最小值的点输出才行
                dis = distance;
                m.id1_ = i1;
                m.id2_ = i2;
                m.distance_ = distance;
            }

        }
        if (m.id2_ == -1) {
            continue;
        }
        matches_.push_back(m);
        // cout << "matches id1,id2,distance is: " << m.id1_<<" " << m.id2_ << " " << m.distance_ << endl;

    }
    cout << "BFMatch is over" << endl;
    // cout << matches_.size() << endl;
    return matches_;
}
4、其他的方法
其他的方法实现比较短,可以看源码理解。
BundleAdjustment.cpp部分和高博的源码相差无几,具体理解可以参照我另一篇博客:
视觉slam十四讲第ch7-PNP-3d2d手写位姿估计代码详解.
四、手写BA结果
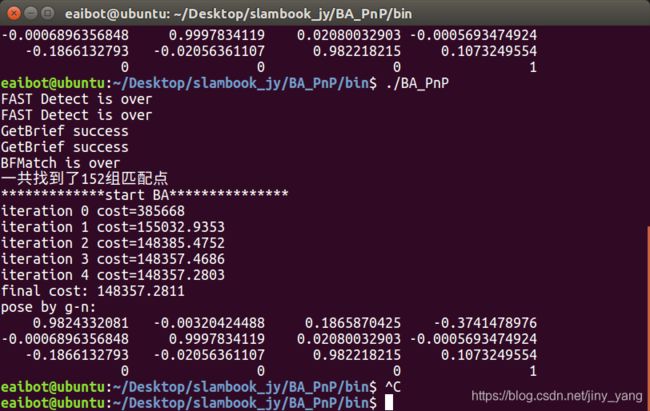
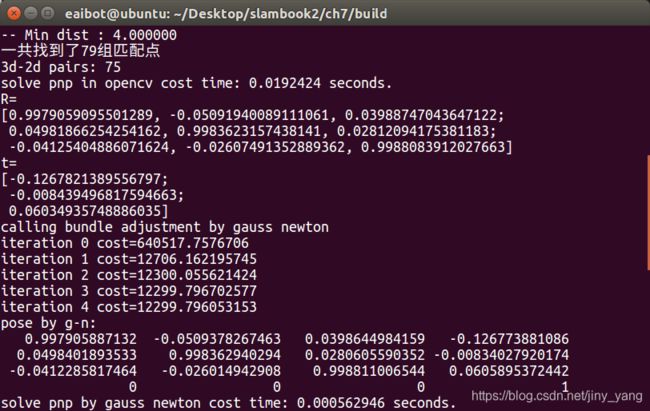
展示一下此次手写BA的成果吧,因为有好多地方进行了简化处理,最终结果和高博的结果肯定还是会有一些误差。
这是手写BA的结果:

这是高博的结果:

误差还算可以接受。
