css实现一个温度计图表
背景
最近在工作中遇到一个温度计图表,用css写起来超简单~
文末分享源代码。记得点赞+关注+收藏!
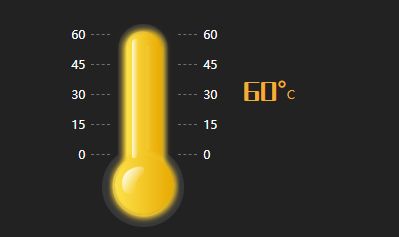
1.实现效果
2.实现步骤
2.1 温度计参数
const obj={
 max: 60,//刻度最大值
 min: 0,//刻度最小值 (默认为0,不为0的情况暂未考虑,可根据文中思路自行修改)
 value: 0,//当前值(<=刻度最大值)
 warn: 35,//预警值(当前值>预警值时,显示图表红色区域)
}
2.2 刻度
2.2.1 刻度列表
这里将刻度从0开始分为4等分(其他等分情况暂未考虑,可根据文中思路自行修改),设置的刻度最大值为4的倍数,如60,100等。
- 计算展示的刻度列表,定义空数组stepList[]
- 假设刻度最大值为60,4等分之后,没一段的长度为15,即为stepList=[0,15,30,45,60]
let step = parseInt(刻度最大值) / 4,stepList = [];
for (let i = 0; i < 5; i++) {
  stepList.unshift(step * i);
}
2.2.2 样式布局
<div class="box-lines">
 <div
    v-for="(item, index) in stepList"
    :key="index"
    class="line-item flex-row j_b"
  >
    <div class="left">{{ item }}</div>
    <div class="right">{{ item }}</div>
  </div>
</div>
2.3 温度计表盘
2.3.1 温度计底盘
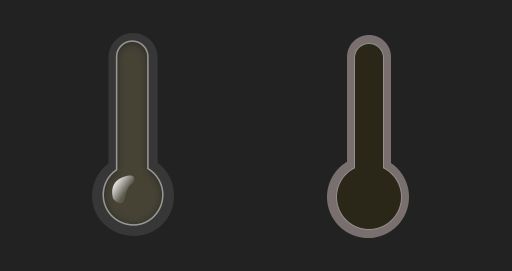
本来是准备自己写表盘背景的,奈何才疏学浅,结果不尽人意,最后让聪明可爱的ui小伙伴切了张背景图和金豆形状的阴影,咱们浅浅看下对比吧~
切图真香啊~
2.3.2 温度计线条
- 写两个伪元素定位在合适的位置
2.4 温度计内容
2.4.1 温度计圆底高亮(当温度<=0°C)
- 先画一个圆,背景渐变+box-shadow,设置过渡2.5s,延迟0.8s
width: 60px;
height: 60px;
background: linear-gradient(90deg, #fde44d 0%, #e8a901 100%);
box-shadow: 0px 1px 5px 3px #f4ca2b;
border-radius: 50%;
transition: all 2.5s;
transition-delay: 0.8s;
- 画一个宽高稍微大于圆的盒子,设置overflow为hidden,添加伪元素为圆,基于盒子底部bottom为0,水平居中,通过溢出hidden,显示满圆以下状态
- 当温度低于0°C以下,温度计圆底固定为高亮一半(也可以按照度数进行展示,可自行修改)
- 当温度等于0°C,温度计圆底显示满圆
2.4.2 温度计中间高亮(当温度>0°C)
- 画出中间矩形,背景渐变+box-shadow,设置过渡2.5s,延迟2.2s(等待圆底过渡执行完毕)
 width: 100%;
 height: 50px;
 background: linear-gradient(90deg, #fde44d 0%, #e8a901 100%);
 box-shadow: 0px 1px 5px 3px #f4ca2b;
 transition: all 2.5s;
 transition-delay: 2.2s;
- 计算当前温度占据刻度最大值的百分比 !
- 如:当前值为30,最大值为60(最小值固定为0),可得到百分比为30/60 *100%=50%,即中间的高亮区域的高度为总高度的50%
let currPer = parseInt(当前值) / parseInt(刻度最大值)
- 画一个盒子,高度与温度计长条区域的高度一致,将计算出高度的矩形作为子元素。style设置var变量,参数为占据的百分比
:style="{ '--per': currPer < 1 ? currPer : 1 }"
height: calc(var(--per) * 100%);
- 当百分比>=94%,设置矩形上半部分为圆角
.br {
  border-radius: 16px 16px 0 0;
 }
2.4.3 温度计预警高亮(当温度>预警值)
- 画出预警矩形,背景渐变+box-shadow,设置过渡2.5s,延迟2.2s(等待圆底过渡执行完毕)
box-shadow: 0px -5px 5px 0px rgb(231 0 0 / 74%);
width: 42px;
height: 60px;
background: linear-gradient(180deg, #e80000 0%, rgba(254, 100, 100, 0) 100%);
filter: blur(1px);
transition: all 2.5s;
transition-delay: 2.2s;
- 计算预警高度百分比
- 如:当前值45,预警值15,最大值为60(最小值固定为0),超出高度百分比为(45-15)/6*100%=50%
let warnPer =(parseInt(当前值) - parseInt(预警值)) /parseInt(最大值);
- 预警矩形基于中间高亮矩形顶部top为0,水平居中,层级盖在中间矩形之上
:style="{ '--per': warnPer < 1 ? warnPer : 1 }
height: calc(温度计矩形区域总高度 * var(--per));
- 当中间矩形的百分比>=94%,并且当前值超出预警值,设置预警矩形上半部分为圆角
3.实现代码
3.1 定义一个温度计组件
<template>
  <section class="container flex-row j_c">
    <div class="container-box">
      <div class="box-lines">
        <div
          v-for="(item, index) in stepList"
          :key="index"
          class="line-item flex-row j_b"
        >
          <div class="left">{{ item }}</div>
          <div class="right">{{ item }}</div>
        </div>
      </div>
      <div class="box-pan">
        <div class="box-shadow"></div>
        <div
          :class="[
            'bottom-circle',
            show && (data.value >= 0 ? 'active' : 'trans'),
          ]"
        ></div>
        <div class="bottom-center" v-show="data.value >= 0">
          <div
            :class="['active', currPer >= 0.94 && 'br', show && 'trans']"
            :style="{ '--per': currPer < 1 ? currPer : 1 }"
          >
            <div
              :class="['bottom-warn', currPer >= 0.94 && 'br']"
              v-show="data.value > data.warn"
              :style="{ '--per': warnPer < 1 ? warnPer : 1 }"
            ></div>
          </div>
        </div>
      </div>
    </div>
    <div class="container-title">{{ data.value }}°<text>C</text></div>
  </section>
</template>
<script setup>
import { onMounted, ref } from "vue";
const props = defineProps({
  show: {
    type: Boolean,
    default: false, //展示过渡效果
  },
  data: {
    type: Object,
    default: () => {},
    required: true,
  },
});
let step = parseInt(props.data.max) / 4,
  stepList = [],
  currPer = parseInt(props.data.value) / parseInt(props.data.max),
  warnPer = 0;
if (parseInt(props.data.value) > parseInt(props.data.warn)) {
  warnPer =
    (parseInt(props.data.value) - parseInt(props.data.warn)) /
    parseInt(props.data.max);
}
for (let i = 0; i < 5; i++) {
  stepList.unshift(step * i);
}
<style scoped lang="less">
.flex-row {
    display       : flex;
    flex-direction: row;
    align-items   : center;
}
.j_c {
    justify-content: center;
}
.j_b {
    justify-content: space-between;
}
.container {
  font-size: 16px;
  color: #ffffff;
  height: 280px;
  width: 300px;
  &-box {
    position: relative;
    .box-pan {
      background: url("xx/xx温度计底盘背景") no-repeat;
      background-size: 100% 100%;
      width: 83px;
      height: 203px;
      position: absolute;
      left: calc(50% - 42px);
      top: -2px;
      z-index: 1;
      &::before {
        content: "";
        width: 4px;
        height: 105px;
        background: linear-gradient(
          90deg,
          rgba(255, 255, 255, 0.34) 0%,
          rgba(255, 255, 255, 0.12) 100%
        );
        border-radius: 2px;
        opacity: 0.31;
        position: absolute;
        right: 35px;
        top: 21px;
        z-index: 13;
      }
      &::after {
        content: "";
        position: absolute;
        left: 30px;
        top: 15px;
        width: 6px;
        height: 119px;
        border-radius: 20px 0 20px 10px;
        background: linear-gradient(
          90deg,
          rgba(255, 255, 255, 0.82) 0%,
          rgba(255, 255, 255, 0) 100%
        );
        z-index: 13;
      }
      .box-shadow {
        position: absolute;
        width: 23px;
        height: 29px;
        background: url("xx/xx温度计底盘金豆阴影") no-repeat;
        background-size: 100% 100%;
        bottom: 32px;
        left: 20px;
        z-index: 13;
      }
      .bottom-circle {
        position: absolute;
        width: 70px;
        height: 0px;
        overflow: hidden;
        bottom: 2px;
        left: calc(50% - 35px);
        filter: blur(1px);
        z-index: 11;
        transition: all 2.5s;
        transition-delay: 0.8s;
        &.trans {
          height: 45px;
        }
        &.active {
          height: 75px;
        }
        &::after {
          content: "";
          width: 60px;
          height: 60px;
          background: linear-gradient(90deg, #fde44d 0%, #e8a901 100%);
          box-shadow: 0px 1px 5px 3px #f4ca2b;
          position: absolute;
          left: calc(50% - 30px);
          bottom: 10px;
          border-radius: 50%;
        }
      }
      .bottom-center {
        width: 36px;
        height: 135px; //满高
        position: absolute;
        bottom: 60px;
        left: calc(50% - 18px);
        filter: blur(1px);
        z-index: 10;
        .active {
          width: 100%;
          height: 0;
          position: absolute;
          left: 0;
          bottom: 0;
          background: linear-gradient(90deg, #fde44d 0%, #e8a901 100%);
          transition: all 2.5s;
          transition-delay: 2.2s;
          .bottom-warn {
            width: 42px;
            height: 0;
            background: linear-gradient(
              180deg,
              #e80000 0%,
              rgba(254, 100, 100, 0) 100%
            );
            filter: blur(1px);
            position: absolute;
            top: 0;
            left: calc(50% - 21px);
            z-index: 11;
            transition: all 2.5s;
            transition-delay: 2.2s;
          }
        }
        .trans {
          height: calc(var(--per) * 100%);
          box-shadow: 0px 1px 5px 3px #f4ca2b;
          .bottom-warn {
            height: calc(135px * var(--per));
            box-shadow: 0px -5px 5px 0px rgba(231, 0, 0, 0.74);
          }
        }
        .br {
          border-radius: 16px 16px 0 0;
        }
      }
    }
    .box-lines {
      .line-item {
        font-size: 12px;
        line-height: 17px;
        margin-bottom: 13px;
        &:last-child {
          margin-bottom: 0;
        }
        .left {
          margin-right: 118px;
          min-width: 25px;
          text-align: right;
          position: relative;
          &::after {
            content: "";
            width: 19px;
            opacity: 0.9;
            height: 1px;
            border-bottom: 1px dashed rgba(255, 255, 255, 0.39);
            position: absolute;
            top: calc(50% - 1px);
            right: -25px;
          }
        }
        .right {
          min-width: 25px;
          text-align: left;
          position: relative;
          &::after {
            content: "";
            width: 19px;
            opacity: 0.9;
            height: 1px;
            border-bottom: 1px dashed rgba(255, 255, 255, 0.39);
            position: absolute;
            top: calc(50% - 1px);
            left: -25px;
          }
        }
      }
    }
  }
  &-title {
    margin-left: 15px;
    font-size: 24px;
    font-family: HuXiaoBo;
    color: #f2af33;
    line-height: 31px;
    position: relative;
    text {
      font-size: 12px;
    }
  }
}
3.2 组件的使用
<template>
	<Thermometer :show="showAni" :data="thermObjLow" />
</template>
import Thermometer from "xx/xx/thermometer.vue";
const showAni = ref(false),
  thermObjHigh = ref({
    max: 60,
    min: 0,
    value: 60,
    warn: 60,
  });


