SpringBoot 整合 JWT 实现登录和拦截
前言:
用户登录的功能就是需要服务提供者知道调用者是一个合法用户,非法用户不给予服务。SpringBoot + JWT(Json web token)是目前比较成熟的方案,整体逻辑如下:
1. 服务提供者对所有调用(部分接口除外,例如登录接口)都进行拦截认证,只有认证通过才提供服务
2. 用户通过登录获取认证信息
3. 用户携带认证信息调用服务即可通过拦截认证获取服务
一、版本和工具
1. SpringBoot:2.3.2.RELEASE
2. JDK:1.8_251
3. JWT依赖:
            com.auth0
            java-jwt
            3.16.0
二、用户的基本信息
用户结构体一般信息不少,这里为了简化就写两个核心字段:
public class User {
    private String userName;
    private String password;

    public String getUserName() {
        return userName;
    }

    public void setUserName(String userName) {
        this.userName = userName;
    }

    public String getPassword() {
        return password;
    }

    public void setPassword(String password) {
        this.password = password;
    }
}
三、认证和登录服务
认证服务使用 java-jwt 包的一些方法:
import com.auth0.jwt.JWT;
import com.auth0.jwt.JWTVerifier;
import com.auth0.jwt.algorithms.Algorithm;
import com.auth0.jwt.exceptions.JWTVerificationException;
import com.auth0.jwt.interfaces.DecodedJWT;

import java.util.Date;
import java.util.HashMap;

public class JwtTokenUtils {

    private static final int EXPIRE_TIME = 5 * 60 * 1000;  // 过期时间5分钟
    private static final String SECRET_KEY = "123"; // 加密的密钥

    public static String sign(User user) {
        Date date = new Date(System.currentTimeMillis() + EXPIRE_TIME);
        HashMap head = new HashMap() {
            {
                put("typ", "JWT");
                put("alg", "HS256");
            }
        }; // 这块是 JWT 认证的一些声明信息
        Algorithm algorithm = Algorithm.HMAC256(SECRET_KEY);
        return JWT.create()
                .withHeader(head)
                .withClaim("username", user.getUserName())  // 把用户名整合到 token 里加密
                .withClaim("password", user.getPassword())  // 把用密码整合到 token 里加密,其实密码没必要
                .withExpiresAt(date).sign(algorithm);
    }

    public static boolean verity(String token) {
        try {
            Algorithm algorithm = Algorithm.HMAC256(SECRET_KEY);
            JWTVerifier verifier = JWT.require(algorithm).build();
            DecodedJWT jwt = verifier.verify(token);
            System.out.println("调用 username:" + jwt.getClaim("username"));  // 整合到 token 里加密的信息都是可以取出来的
            return true;
        } catch (IllegalArgumentException | JWTVerificationException e) {
            return false;
        }
    }

}
登录服务,这里把token直接刷到响应头里面:
import org.springframework.stereotype.Service;

import javax.servlet.http.HttpServletResponse;

@Service
public class LoginService {


    public String login(HttpServletResponse response, User user) {

        // 对账号和密码进行验证,一般是和数据库的数据对比,这里简化
        if (!user.getUserName().equals("admin")) return "账号错误";
        if (!user.getPassword().equals("admin")) return "密码错误";

        String token = JwtTokenUtils.sign(user);
        response.setHeader("token", token);
        return "登录成功";
    }

}
四、拦截器
拦截器的作用就是拦截调用:
import com.test.login.JwtTokenUtils;
import org.springframework.stereotype.Component;
import org.springframework.web.servlet.HandlerInterceptor;
import org.springframework.web.servlet.ModelAndView;

import javax.servlet.http.HttpServletRequest;
import javax.servlet.http.HttpServletResponse;

@Component
public class AuthHandlerInterceptor implements HandlerInterceptor {

    @Override
    public boolean preHandle(HttpServletRequest request, HttpServletResponse response, Object handler) throws Exception {
        System.out.println("进入拦截器.......");
        String token = request.getHeader("token");
        if (null == token) {
            System.out.println("缺少认证信息");
            return false;  // 这里一般都是抛出自定义异常给全局异常处理,这里为了简化不做扩展说明
        }
        System.out.println("header token:" + token);
        boolean auth = JwtTokenUtils.verity(token);
        System.out.println("认证结果:" + auth);
        return auth;
    }

    @Override
    public void postHandle(HttpServletRequest request, HttpServletResponse response, Object handler, ModelAndView modelAndView) throws Exception {

    }

    @Override
    public void afterCompletion(HttpServletRequest request, HttpServletResponse response, Object handler, Exception ex) throws Exception {

    }
}
注册拦截器,并配置排除登录接口:
注意:不要继承 WebMvcConfigurationSupport ,springboot 2.x 后会导致配置失效
import com.test.filter.login.AuthHandlerInterceptor;
import org.springframework.beans.factory.annotation.Autowired;
import org.springframework.context.annotation.Configuration;
import org.springframework.web.servlet.config.annotation.InterceptorRegistry;
import org.springframework.web.servlet.config.annotation.WebMvcConfigurationSupport;

@Configuration
public class WebAppConfig implements WebMvcConfigurer{

    @Autowired
    AuthHandlerInterceptor authHandlerInterceptor;

    @Override
    protected void addInterceptors(InterceptorRegistry registry) {
        registry.addInterceptor(authHandlerInterceptor)
                .excludePathPatterns("/client/login"); // 排除登录接口
    }
}
五、登录接口和测试调用接口
登录接口和测试调用接口如下:
import com.test.login.LoginService;
import com.test.login.User;
import com.test.result.Data;
import com.test.result.ResultBean;
import org.springframework.beans.factory.annotation.Autowired;
import org.springframework.web.bind.annotation.GetMapping;
import org.springframework.web.bind.annotation.RequestMapping;
import org.springframework.web.bind.annotation.RequestParam;
import org.springframework.web.bind.annotation.RestController;

import javax.servlet.http.HttpServletResponse;

@RestController
@RequestMapping("/client")
public class ControllerTest {

    @Autowired
    private LoginService loginService;

    @GetMapping("/login")
    public String login(
            HttpServletResponse response,
            @RequestParam(value = "username") String userName,
            @RequestParam(value = "password") String password
    ) {
        System.out.println("进入登录接口.....");
        User user = new User();
        user.setUserName(userName);
        user.setPassword(password);
        String loginResult = loginService.login(response, user);
        System.out.println("登录服务结果:" + loginResult);
        return loginResult;
    }

    @GetMapping("/test")
    public String name() {
        return "this is from client-1";
    }

}
六、测试
测试步骤:
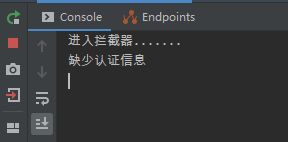
1. 在浏览器调用 /client/test 接口,日志如下:
此时拦截器对调用拦截有效;
2. 在浏览器调用 /client/login?password=admin&username=admin 接口,日志如下:
浏览器响应头有 token 信息
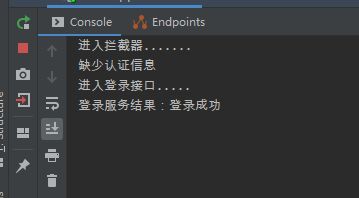
3. 把 token 信息取出来放到请求头里面再次请求 /client/test,日志如下:
浏览器响应如下:
此时拦截器认证通过,并成功调用接口。
4. 登录验证成功
七、一定要看
上面的登录比较简单,大体理清楚了逻辑,实际使用还需要加一些额外的操作:
1. 常规的登录/注销都需要借助 redis,登录的时候把用户信息和 token 写到 redis 并设置过期时间,拦截器会优先去查询 redis 是否有对应的 token,注销的时候直接把 redis 记录删除就行了。
2. 上面样例 token 有效期5分钟,用户连续操作时需要一个 token 续期方案(网上有);用户登录后一段时间不操作要有自动注销功能。
3. 其实大部分用的 token 是 bearer token,这是一种规范,可以参考 HTTP authentication - HTTP | MDN (mozilla.org),可以理解是约定的格式,请求头格式如下:Authorization: Bearer


