设计模式: Structural 结构型共 7 种模式总汇(TS实现)
设计模式: Structural 结构型共 7 种模式总汇(TS实现)
文章目录
- 设计模式: Structural 结构型共 7 种模式总汇(TS实现)
- 相关系列文章
- 前言
- 正文
-
- 0. 结构型设计模式概述
- 1. Adapter 适配器模式
-
- 1.1 适用场景
- 1.2 模式结构
- 1.3 代码示例
-
- 1.3.1 被适配者
- 1.3.2 目标接口
- 1.3.3 类适配器
- 1.3.4 对象适配器
- 1.3.5 测试 & 输出
- 1.4 效果
- 2. Bridge 桥接模式
-
- 2.1 适用场景
- 2.2 模式结构
- 2.3 代码示例
-
- 2.3.1 抽象接口定义
- 2.3.2 接口实现定义
- 2.3.3 测试 & 输出
- 2.4 比较
-
- 2.4.1 与 Builder 模式比较
- 2.5 效果
- 3. Composite 组合模式
-
- 3.1 适用场景
- 3.2 模式结构
- 3.3 代码示例
-
- 3.3.1 部件定义
- 3.3.2 测试 & 输出
- 3.4 效果
- 4. Decorator 装饰器模式
-
- 4.1 适用场景
- 4.2 模式结构
- 4.3 代码示例
-
- 4.3.1 部件定义
- 4.3.2 装饰器定义
- 4.3.3 测试 & 输出
- 4.4 比较
-
- 4.4.1 与 Adapter 模式比较
- 4.4.2 与 Composite 模式比较
- 4.5 装饰器效果
- 5. Facade 外观模式
-
- 5.1 适用场景
- 5.2 模式结构
- 5.3 代码示例
-
- 5.3.1 外观定义
- 5.3.2 子系统定义
- 5.3.3 测试 & 输出
- 5.4 比较
-
- 5.4.1 与 Mediator 模式比较
- 5.5 效果
- 6. Flyweight 享元模式
-
- 6.1 适用场景
- 6.2 模式结构
- 6.3 代码示例
-
- 6.3.1 享元定义
- 6.3.2 享元工厂(享元对象池)
- 6.3.3 测试 & 输出
- 6.4 比较
-
- 6.4.1 与 Singleton 模式比较
- 6.5 效果
- 7. Proxy 代理模式
-
- 7.1 适用场景
- 7.2 模式结构
- 7.3 代码示例
-
- 7.3.1 目标对象定义
- 7.3.2 远程代理实现
- 7.3.3 虚代理实现
- 7.3.4 保护代理
- 7.4 比较
-
- 7.4.1 与 Adapter 模式比较
- 7.4.2 与 Decorator 模式比较
- 7.5 效果
- 结语
- 其他资源
-
- 参考连接
- 完整代码示例
相关系列文章
- 设计模式: Creational 创建型的 5 种设计模式总汇(TS 实现版本)
前言
本篇来尝试另一个种的风格,练习使用更少更精炼的文字来说明
首先我们再回顾一下设计模式的分类表
| 大类 | 创建型 | 结构型 | 行为型 |
|---|---|---|---|
| 类 | Factory Method 工厂方法 | Adapter 适配器 | Interpreter 解释器 Template Method 模版方法 |
| 对象 | Abstract Factory 抽象工厂 Builder 生成器 Prototype 原型 Singleton 单例 |
Adapter 适配器 Bridge 桥接 Composite 组合 Decorator 装饰器 Facade 外观 Flyweight 享元 Proxy 代理 |
Chain of Responsibility 职责链 Command 命令 Iterator 迭代器 Mediator 中介者 Memento 备忘录 Observer 观察者 State 状态 Strategy 策略 Visitor 访问者 |
本篇要介绍的是中间这一列的 7 结构型模式(Structural Pattern)
正文
0. 结构型设计模式概述
首先先来描述一下什么叫"结构型模式"
前一篇介绍的"创建型模式"是对于 OOP 编程中对象的各种常见的 负责对象创建 的模式;而结构型模式则是负责 对象的组织结构,也就是描述对象之间是如何组装、对象间的常见关联是如何
1. Adapter 适配器模式
1.1 适用场景
首先适配器模式的适用场景如下
- 复用已经存在的类,但是该类的接口不符合需求
- 创建能与未知类型协同工作的类
- 透过引用关联来实现现有子类的复用(对象型)
白话文:
对已经存在的类、接口进行适配,也就是透过原接口转换成目标接口来对现有对象进行复用
1.2 模式结构
适配器模式分为 类适配器(class adapter) 和 对象适配器(object adapter) 两种
- 类适配器
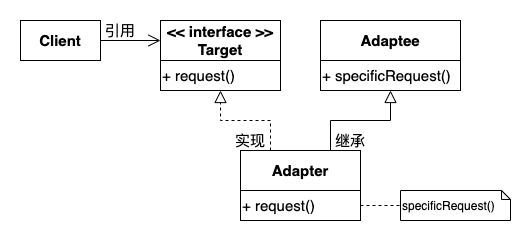
- 对象适配器
- Adaptee 被适配者:现有的类/接口
- Target 目标接口:客户端期望使用的接口
- Adapter 适配器:实现目标接口,并对现有类型进行适配
- Client 客户端:期望透过 Target 接口来调用 Adaptee 的方法
不管是类还是对象,模式中的角色主要就是以上四种;类的实现与对象的实现唯一的差异在于:
- 类模式 透过继承现有类来将现有方法纳入新对象,供目标接口实现(
request)进行调用 - 对象模式 透过对现有类进行组合的方式,将目标接口职责"委托"给现有类型
下面我们看看代码
1.3 代码示例
1.3.1 被适配者
/src/structural/adapter/Adaptee.ts
首先第一个角色是我们的现有类型/接口
export default class Adaptee {
  originRequest(n: number): number {
    return 100 * n
  }
}
它是一个 (number) => number 类型的函数,对参数值乘以 100 后返回
1.3.2 目标接口
/src/structural/adapter/Target.ts
第二个角色是用户期望调用的目标接口类型
export default interface Target {
  request(s: string): string
}
我们可以发现实际上用户期望的是 (string) => string 类型的接口,所以我们要对 Adaptee 进行适配
1.3.3 类适配器
/src/structural/adapter/class/Adapter.ts
第一种我们先参考类适配器的实现
export default class Adapter extends Adaptee implements Target {
  request(s: string) {
    const num = this.originRequest(Number(s))
    return num.toString()
  }
}
透过继承 Adaptee 来获取 this.originRequest 方法,再稍微对输入/输出进行类型转换
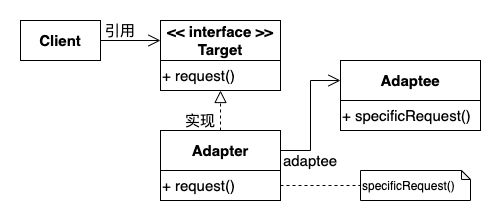
1.3.4 对象适配器
/src/structural/adapter/object/Adapter.ts
第二种则是对象适配器
export default class Adapter implements Target {
  adaptee: Adaptee

  constructor(adaptee: Adaptee) {
    this.adaptee = adaptee
  }

  request(s: string) {
    const num = this.adaptee.originRequest(Number(s))
    return num.toString()
  }
}
对象适配器不同的是不再继承现有类型,而是采用组合的方式,将职责委托给某个现有 Adaptee 对象(adaptee 属性)
1.3.5 测试 & 输出
最后则是运行代码和输出
/src/structural/adapter/class/index.ts
group('class adapter', () => {
  const adapter: Target = new Adapter()

  const res = adapter.request('123')
  log(`res = ${res}`)
})
/src/structural/adapter/object/index.ts
group('object adapter', () => {
  const adapter: Target = new Adapter(new Adaptee())

  const res = adapter.request('123')
  log(`res = ${res}`)
})
/src/structural/adapter/index.ts
import './class'
import './object'
- 运行输出

我们看到这样就可以将原本 (number) => number 类型的接口,适配为 (string) => string 类型的接口了
1.4 效果
- 类适配器
- 没办法对现有类型的子类进行适配 (不可能一一继承)
- 允许重定义 Adaptee 部分行为:继承机制允许
- 对原有类型的直接访问:作为适配器的父类存在
- 对象适配器
- 更灵活的适配:由于使用"组合"的关系,可以说能够适配任何逻辑意义类似的接口
- 重定义 Adaptee 行为较困难:由于使用"组合"的缘故,原有的 Adaptee 类内部对当前适配器是不可见的,所以没办法介入原有的 Adaptee 的行为
2. Bridge 桥接模式
2.1 适用场景
- 需要将抽象接口与行为实现进行分离
- 类的抽象和实现都需要能够进行扩展
- 抽象的实现细节应对客户端屏蔽
2.2 模式结构
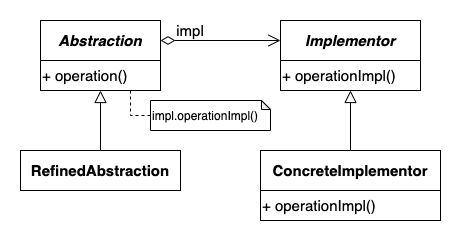
- Abstraction 接口抽象:客户端操作时依赖的抽象接口
- RefinedAbstraction 扩展接口抽象:对接口抽象基类进行扩展
- Implementor 接口实现:定义抽象接口实现的接口
- ConcreteImplmentor 具体接口实现:真正定义接口具体操作的部分
我们可以看到途中所示,我们将一个行为拆分成两个继承族:抽象接口族 & 实现接口族。"抽象接口族"透过调用"实现接口族"的接口来定义抽象行为逻辑
2.3 代码示例
2.3.1 抽象接口定义
/src/structural/bridge/abstractions.ts
首先在任何实现出现之前,应该要有用户期望/操作的抽象接口定义
export abstract class Abstraction {
  impl: Implementor

  constructor(impl: Implementor) {
    this.impl = impl
  }

  abstract operation(): void
}
由基类维护对于"接口实现对象"(impl)的引用
下面则是定义具体抽象接口类,声明更加具体的接口逻辑
export class RefinedAbstraction extends Abstraction {
  operation() {
    log('invoke operation by RefinedAbstraction')
    this.impl.operationImpl()
  }
}
2.3.2 接口实现定义
/src/structural/bridge/implementors.ts
接下来最重要的就是抽象接口的实现方式,我们定义接口实现基类
export interface Implementor {
  operationImpl(): void
}
接下来则是"接口实现"的具体实现
export class ImplementorA implements Implementor {
  operationImpl() {
    log('invoke operationImpl by ImplementorA')
  }
}

export class ImplementorB implements Implementor {
  operationImpl() {
    log('invoke operationImpl by ImplementorB')
  }
}
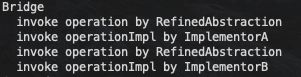
2.3.3 测试 & 输出
最后是使用的代码和输出结果
/src/structural/bridge/index.ts
const implA = new ImplementorA()
const absWithImplA: Abstraction = new RefinedAbstraction(implA)
absWithImplA.operation()

const implB = new ImplementorB()
const absWithImplB: Abstraction = new RefinedAbstraction(implB)
absWithImplB.operation()
2.4 比较
2.4.1 与 Builder 模式比较
我们可以发现,实际上桥接模式有点像是创建型模式中的创建者模式,不同点在于:
| Builder 创建者模式 | Bridge 桥接模式 | |
|---|---|---|
| 抽象/实现分离 | 对象的组合/构建 | 操作行为的抽象/实现 |
| 细粒度实现 | Builder 提供细粒度的部件构造方法 | Implementor 提供基础的可选操作 |
| 高层次抽象操作 | Director 根据 Builder 提供的接口描述产品的组合逻辑 | Abstraction 根据 Implementor 提供的小步骤操作描述完整的操作逻辑 |
2.5 效果
- 分离接口的抽象与实现:提高接口实现的灵活度、可修改性
- 提高可扩展性:对于相同接口的扩展可以透过简单增减 Abstraction/Implementor 类来实现
- 实现细节对客户透明:由于客户端是完全面对抽象层的接口描述编程,实际上与具体的 Implementor 实现类完全无关/分离
3. Composite 组合模式
3.1 适用场景
用于表示对象组合的部分-整体结构
客户端能够忽略组合对象与单体对象的不同,总是看作一个"部件",可以任意组合对象
3.2 模式结构

- Component 组件:客户端可见的部件接口
- Leaf 叶节点:没有子节点的部件
- Composite 组合部件:有任意组合子节点的部件
- Client 客户端:根据 Component 接口操作任意组合的部件
在组合模式中,不论对象如何组合 Composite、Leaf 关系,客户端总是能将某个对象视为 Component 来调用,而忽略对象内部的组合关系
3.3 代码示例
3.3.1 部件定义
/src/structural/composite/components.ts
首先是部件的统一接口
export interface Component {
  operation(s?: string): void
}
接下来是叶节点定义
export class Leaf implements Component {
  static count = 0
  id = Leaf.count++

  operation(s = '') {
    log(`${s}Leaf ${this.id} operation`)
  }
}
最后是组合部件定义
export class Composite implements Component {
  static count = 0
  id = Composite.count++

  children: Component[] = []

  operation(s = '') {
    log(`${s}Composite ${this.id} operation`)
    this.children.forEach((child) => child.operation(s + '  '))
  }
}
我们看到实际上组合部件会将调用转发,或是说广播给所有子节点部件,以此来对客户端屏蔽内部部件组合结构
3.3.2 测试 & 输出
/src/structural/composite/index.ts
首先我们先拼接一个组合对象出来
const root = new Composite()

root.children.push(new Leaf())

const child2 = new Composite()
child2.children.push(new Leaf())
child2.children.push(new Leaf())
child2.children.push(new Composite())
root.children.push(child2)

root.children.push(new Leaf())

// root {
//   child1,
//   child2: {
//     grandson1,
//     grandson2,
//     grandson3
//   },
//   child3
// }
组织结构如下方注释
接下来再调用根部件的方法看看效果
function operation(component: Component) {
  component.operation()
}

operation(root)

3.4 效果
- 可以任意组合基本对象与组合对象:由于基本对象与组合对象共同实现一个接口,所以任何用到基本对象的地方都能够使用组合对象来代替
- 简化客户端代码:客户可以将组合对象视为一个大的部件,而不需要一一调用各个部件的接口
- 部件容易扩展:由于对于客户端来说所有对象都是一种部件,所以可以很容易的增加新的部件子类来完成扩展
- 设计一般化:部件的组合总是依赖于 Component 接口;反过来说却是难以限制部件实际类型,需要运行时检查
4. Decorator 装饰器模式
4.1 适用场景
- 需要透明的给对象添加职责(扩展对象表现能力)
- 处理"可撤销"的职责
- 避免子类爆炸 or 类定义被隐藏时可扩展对象
4.2 模式结构

- Component 目标对象接口:客户端最终期望操作的目标对象接口
- Concrete Component 具体对象:继承/实现目标接口的一般对象/基础对象
- Decorator 装饰器基类:实现目标接口,并作为装饰器抽象基类可供扩展
- Concrete Decorator 具体装饰器:可以对装饰器基类进行扩展
装饰器对象可以透过保留对原有对象类型的引用,并透过调用原对象的接口来对对象能力进行扩展
4.3 代码示例
4.3.1 部件定义
/src/structural/decorator/components.ts
首先是最根部的部件接口与基础部件实现
export interface Component {
  operation(): void
}

export class ConcreteComponent implements Component {
  operation() {
    log('invoke operation in ConcreteComponent')
  }
}
4.3.2 装饰器定义
/src/structural/decorator/decorators.ts
接下来是装饰器基类与实现类的定义
export abstract class Decorator implements Component {
  component: Component

  constructor(component: Component) {
    this.component = component
  }

  abstract operation(): void
}

export class ConcreteDecorator extends Decorator {
  constructor(component: Component) {
    super(component)
  }

  operation() {
    log('invoke operation in ConcreteDecorator')
    this.component.operation()
  }
}
装饰器基类负责维护对于原本部件(component)的引用,而实现类则是委托调用 component 对象并复写 operation 接口来进行扩展
4.3.3 测试 & 输出
/src/structural/decorator/index.ts
function decorate(component: Component): Decorator {
  return new ConcreteDecorator(component)
}

const component = new ConcreteComponent()
const decoratedComponent = decorate(component)
decoratedComponent.operation()
![]()
测试代码的意义在于:原本的 ConcreteComponent 对象的操作,在加上 ConcreteDecorator 的装饰之后,对于同样一个接口 operation 的能力就得到扩展
4.4 比较
4.4.1 与 Adapter 模式比较
适配器模式的目的在于将现有对象/接口适配到目标接口,并不会添加太多具体职责
装饰器模式则是根据需要对现有接口使用动态/组合引用的方式来进行扩展
4.4.2 与 Composite 模式比较
-
不同点
组合模式的重点在于屏蔽对象的组合关系,以及更加自由的对象组合逻辑,并在运行时正确的将请求转发/广播到所有子部件
装饰器模式则是专注于为目标对象添加额外的职责
-
共同点
两者的都是使内部实现/组合对用户透明(一个屏蔽职责实现、一个屏蔽内部组合逻辑)
4.5 装饰器效果
- 比静态继承灵活:装饰器模式透过将原有对象与装饰器对象进行组合的方式进行扩展,实际调用的时候更像是一种职责的委托,比使用继承的模式更加灵活
- 避免高层次的类有太多特征:使用装饰器模式就可以不需要一次对基础的类赋予太多的特性,而是透过定义多个装饰器对象一层层的添加职责,也能尽可能的增加基础部件的可复用性
5. Facade 外观模式
5.1 适用场景
- 为复杂子系统提供简单接口
- 将子系统实现与客户端使用抽象分离
- 定义子系统各层次的入口点
5.2 模式结构
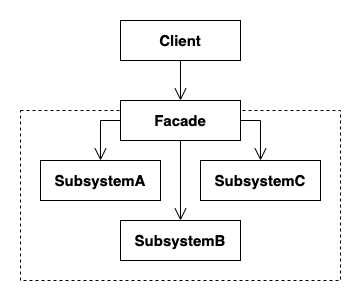
- Facade 外观类:持有多个子系统的引用,并对客户端暴露统一的抽象接口
- Subsytem 子系统:具体功能的实现,有 Facade 统一管理接入点
透过为子系统建立一个统一的对外接口(Facade),可以向客户端屏蔽系统的内部实现,提升了子系统的可以移植性与可复用性
5.3 代码示例
5.3.1 外观定义
/src/structural/facade/Facade.ts
对于客户端来说,外观类定义整个系统的全部可用接口
export default class Facade {
  subsystemA?: SubsystemA
  subsystemB?: SubsystemB
  subsystemC?: SubsystemC

  operation1() {
    log('operation1 -> SubsystemA')
    this.subsystemA?.operation()
  }

  operation2() {
    log('operation2 -> SubsystemB')
    this.subsystemB?.operation()
  }

  operation3() {
    log('operation3 -> SubsystemC')
    this.subsystemC?.operation()
  }
}
5.3.2 子系统定义
/src/structural/facade/subsystems.ts
而每个子系统对外提供有限的接口,并由外观类来掌控每个接口的接入点与调用时机
export class SubsystemA {
  operation() {
    log('invoke SubsystemA.operation')
  }
}

export class SubsystemB {
  operation() {
    log('invoke SubsystemB.operation')
  }
}

export class SubsystemC {
  operation() {
    log('invoke SubsystemC.operation')
  }
}
注意这里不定义一个子系统接口如
interface Subsystem {
    operation(): void
}
这是因为子系统之间是异构的,对于 Facade 来说是可以看到子系统的各个调用接口,所以并不存在所谓的公有子系统接口的。
5.3.3 测试 & 输出
/src/structural/facade/index.ts
首先我们先组合出一个完整独立的系统
const facade = new Facade()
facade.subsystemA = new SubsystemA()
facade.subsystemB = new SubsystemB()
facade.subsystemC = new SubsystemC()
接下来我们只需要对外观类发起请求,它就会自动将请求转发到对应的子系统进行处理
facade.operation1()
facade.operation2()
facade.operation3()

5.4 比较
5.4.1 与 Mediator 模式比较
-
不同点
中介者模式描述的是将运行时多个对象之间的复杂交互、依赖关系,转变为统一依赖于唯一的中介者来简化类与类之间的依赖关系
而外观模式的目标则是在于对外提供一个统一的抽象接口,使客户端能将整个子系统的集合视为一个完整的系统看待。当然这个完整的系统内部可能存在互相调用的逻辑,这时候也可以借助 Facade 类来实现系统内部的中介者模式
总结来说就是
- 中介者模式:描述系统内部类与类的交互、依赖关系
- 外观模式:描述多个子系统由共同的外观类对外提供统一的抽象接口
-
相同点
两个系统都存在对于多个对象接口的聚合
一个是将对象之间的调用/依赖关系聚合成只对唯一的中介者对象进行交互
而一个则是将多个子系统的调用逻辑聚合成一个统一的外观接口供客户端使用
5.5 效果
- 对客户端屏蔽子系统组件:客户端只能对外观类发起请求,所以对于客户端来说是不存在子系统的
- 子系统与客户端松耦合::由于客户端可见的部分只是外观类提供的接口,所以系统内部的组件,以及组件与组件的交互逻辑是可以独立与客户端进行改变的
- 灵活实现子系统:由于对于客户端来说子系统是不可见的,所以我们可以选择实现易用性更高的子系统组件;也可以选择实现通用性更高的可复用子系统
6. Flyweight 享元模式
6.1 适用场景
- 程序使用了大量重复/相似的对象,造成很大的存储开销
- 单个对象大多数可以分离出为外部状态
- 程序不依赖于对象的标识,只关注对象的外部状态和表现行为
6.2 模式结构
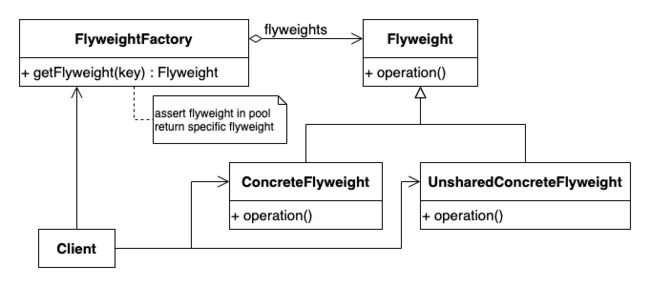
- Flyweight 享元接口:可共享/复用的对象类型接口
- Concrete Flyweight 共享享元:共享对象实现
- Unshared Concrete Flyweight 非共享享元:非共享对象实现
- Flyweight Factory 享元工厂:负责维护/管理享元对象池(pool)
在享元模式下客户端不会直接持有对于享元对象的引用,而是根据 键(key) 透过享元工厂获得享元对象后,再填入 外部状态(External State) 来获取真正的完整客户端对象
6.3 代码示例
6.3.1 享元定义
/src/structural/flyweight/flyweights.ts
在享元模式下,最重要的就是我们想要复用的对象;如果是从现有系统进行修改的话,首先第一步也是现将要复用的对象分离出外部状态以及共享对象两部分
第一部分是外部状态定义
export interface ExternalState {
  name: string
}
再来是享元对象定义(享元对象要接受一个外部状态才能表示完整对象信息)
export interface Flyweight {
  operation(state: ExternalState): void
}
接下来我们定义两个具体的享元实现,一个作为可服用的享元对象,一个作为不可复用的享元对象(注意这里添加了 id 来区别实际上被创建的享元对象,后面可以看到作用)
export class ConcreteFlyweight implements Flyweight {
  static count = 0
  id = ConcreteFlyweight.count++

  operation(state: ExternalState) {
    log(
      `ConcreteFlyweight(${this.id}) with state: name=${state.name}`
    )
  }
}

export class UnsharedConcreteFlyweight implements Flyweight {
  static count = 0
  id = UnsharedConcreteFlyweight.count++

  operation(state: ExternalState) {
    log(
      `UnsharedConcreteFlyweight(${this.id}) with state: name=${state.name}`
    )
  }
}
6.3.2 享元工厂(享元对象池)
/src/structural/flyweight/registry.ts
第二步我们需要在全局的某个地方创建一个用于管理所有享元对象的对象池(registry)
export const registry: Map<string, Flyweight> = new Map()
并给出一个工厂方法来根据键值获取对象
export const getFlyweight = (key: string) => registry.get(key)
最后建立一个工厂对象来完全负责享元对象的维护
/src/structural/flyweight/index.ts
type FlyweightAccess = [string, ExternalState]

class FlyweightFactory {
  count = 0

  SHARED_KEY = 'shared'

  getUnsharedKey(id: number) {
    return `unshared-${id}`
  }

  createSharedFlyweight(name: string): FlyweightAccess {
    const state: ExternalState = { name }
    const key = this.SHARED_KEY
    if (!registry.has(key)) {
      registry.set(key, new ConcreteFlyweight())
    }
    return [this.SHARED_KEY, state]
  }

  createUnsharedFlyweight(name: string): FlyweightAccess {
    const state: ExternalState = { name }
    const key = this.getUnsharedKey(this.count++)
    registry.set(key, new UnsharedConcreteFlyweight())
    return [key, state]
  }
}
6.3.3 测试 & 输出
/src/structural/flyweight/index.ts
const factory = new FlyweightFactory()
const a = factory.createSharedFlyweight('A')
const b = factory.createSharedFlyweight('B')
const c = factory.createSharedFlyweight('C')
const d = factory.createUnsharedFlyweight('D')
const e = factory.createUnsharedFlyweight('E')
const f = factory.createUnsharedFlyweight('F')

function operation([key, state]: FlyweightAccess) {
  registry.get(key)?.operation(state)
}

operation(a)
operation(b)
operation(c)
operation(d)
operation(e)
operation(f)
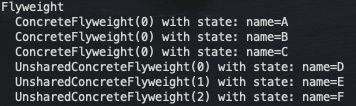
我们总是透过享元工厂来创建享元对象,对于外部客户端来说的对象就是一个 FlyweightAccess 类型,由享元对象的 句柄(本示例为一个键) 和外部状态(ExternalState)组成
使用的时候则要透过 operation 方法来同时获取共享对象和外部状态才能表现完整信息
根据工厂的实现我们还能看到共享享元对象只存在 id=0 一个对象;非共享享元则实际创建出了 3 个实例
6.4 比较
6.4.1 与 Singleton 模式比较
单例模式描述的是关于对象的创建,保证对于同一个类型只有唯一或是有限个对象实例的存在,关注的是 对象存在个数限制与创建时机
而享元对象描述的是一种 具体类型与外部状态分离 的结构,所以实际上被创建的对象个数依旧可以透过享元工厂来限制和实现单例模式。对于享元模式来说更加关注的是 共享对象与外部状态合作产生价值 的行为
6.5 效果
透过对存储空间的节省,来弥补分离出外部状态之后,运行时的对象传输、组合、计算外部状态的开销。
7. Proxy 代理模式
7.1 适用场景
- (远程代理)屏蔽实际对象的地址空间差异
- (虚代理)动态创建、维护、缓存实际可用对象
- (保护代理)控制原有对象的访问,进行一定程度的访问限制
本质上来说总归一句话
代理模式就是对原有对象添加一层访问外壳,来进行访问控制 or 实现细节补全的方法
7.2 模式结构

- Subject 目标对象接口:客户端实际操作的对象接口
- Real Subject 真实对象:真正实现接口功能实现细节的对象
- Proxy 代理对象:对目标真实对象的访问进行一层过滤/拦截,实现其他非功能性实现
简单来说就是对目标对象套了一层外壳,下面会再说明与装饰器模式的差异
7.3 代码示例
7.3.1 目标对象定义
/src/structural/proxy/subjects.ts
首先先定义基本情况下使用的普通对象与接口
export interface Subject {
  request(): void
  name1?: string
  name2?: string
  name3?: string
}

export const foo = { request() {} }

export class RealSubject implements Subject {
  static count = 0
  id = RealSubject.count++
  base?: string

  constructor(base?: string) {
    if (base) this.base = base
  }

  request() {
    const baseStr = this.base ? ` base: ${this.base} ` : ''
    log(`RealSubject(${this.id}) {${baseStr}}`)
  }
}
接下来本篇的所有代理模式都透过 ES6 的 Proxy 对象来实现
7.3.2 远程代理实现
/src/structural/proxy/proxys.ts
第一种我们先来看远程代理
/***** Remote Proxy *****/
const urlMapper = new Map<string, Subject>()
urlMapper.set('url1', new RealSubject('url1'))
urlMapper.set('url2', new RealSubject('url2'))
urlMapper.set('url3', new RealSubject('url3'))

export let config = {
  url: 'url1',
}

export const remoteProxy: Subject = new Proxy(foo, {
  get(target, key, receiver) {
    return Reflect.get(
      urlMapper.get(config.url) || target,
      key,
      receiver
    )
  },
})
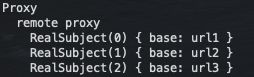
我们使用一个 Map 的键来模拟不同的地址空间的对象,并提供一个 config.url 配置项来表示当前地址空间
/src/structural/proxy/index.ts
group('remote proxy', () => {
  config.url = 'url1'
  remoteProxy.request()
  config.url = 'url2'
  remoteProxy.request()
  config.url = 'url3'
  remoteProxy.request()
})
接下来使用代理对象就会从当前地址空间找出真正的目标对象进行操作
7.3.3 虚代理实现
/src/structural/proxy/proxys.ts
第二种我们看到虚代理的实现
/***** Virtual Proxy *****/
export const virtualProxy: Subject = new Proxy(new RealSubject(), {
  get(target, key, receiver) {
    const value = Reflect.get(target, key, receiver)
    if (!value && key !== 'base') {
      log(`set property: ${key as string}`)
      Reflect.set(target, key, key, receiver)
      return key
    }
    return value
  },
})
虚代理对外来说就好像一个已经存在的完整对象,实际上是在第一次访问时才创建真正的目标对象相关资源
/src/structural/proxy/index.ts
group('virtual proxy(cache)', () => {
  log(`virtualProxy.name1 = ${virtualProxy.name1}`)
  log(`virtualProxy.name2 = ${virtualProxy.name2}`)
  log(`virtualProxy.name3 = ${virtualProxy.name3}`)
  log(`virtualProxy.name2 = ${virtualProxy.name2}`)
  log(`virtualProxy.name1 = ${virtualProxy.name1}`)
  virtualProxy.request()
})
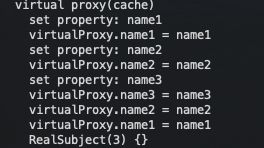
我们看到实际上 name1、name2、name3 都是在属性第一次被访问的时候才真正初始化
7.3.4 保护代理
/src/structural/proxy/proxys.ts
最后一种是保护代理,实现对于目标对象的访问控制
/***** Protection Proxy *****/
const subject: Subject = new RealSubject()
subject.name1 = 'protected name 1'
subject.name2 = 'protected name 2'
subject.name3 = 'protected name 3'

export const protectionProxy: Subject = new Proxy(subject, {
  get(target, key, receiver) {
    if (['name1', 'name2', 'name3'].includes(key as string)) {
      return Reflect.get(target, key, receiver)
    }
    throw new Error(`invalid access key '${key as string}'`)
  },
})
我们可以看到在代理实现里面 ['name1', 'name2', 'name3'] 就是我们的属性白名单,白名单以外的属性都将抛出异常
/src/structural/proxy/index.ts
group('protection proxy(access protection)', () => {
  ;['name1', 'name2', 'name3', 'base'].forEach((key) => {
    try {
      log(
        `protectionProxy.${key} = ${Reflect.get(
          protectionProxy,
          key,
          protectionProxy
        )}`
      )
    } catch (e) {
      log(`exception caught: ${e}`)
    }
  })
})

7.4 比较
7.4.1 与 Adapter 模式比较
适配器模式的目标在于适配不符合需求的接口,并没有对访问进行任何限制,也没有对原本功能进行修改或扩展
代理模式则是实现原先已有的接口,并透过对已有功能的控制管理来实现新的代理对象
7.4.2 与 Decorator 模式比较
装饰器模式关注的是对于目标对象的扩展,也就是与功能相关,可能是操作模式、操作类型、操作数据的转变
代理模式则是关注与对于目标对象的管控,管理对象的获取、创建、访问控制等功能无关的非功能性需求
7.5 效果
- 远程代理能 隐藏对象存在于不同地址空间 的事实,使用户使用远程对象的时候也像是访问本地对象一般
- 虚代理能 动态管理对象部件的创建,就好像虚拟内存一样,只有在访问的时候才真正占用内存资源
- 保护代理则是 对现有对象的访问控制管理,限制一些不可见信息或非验证用户对于关键信息的访问
结语
本篇介绍了 7 种结构型设计模式,主要关注点在于 对象之间的组织结构,供大家参考
其他资源
参考连接
| Title | Link |
|---|---|
| Design Patterns - Elements of Reusable Object-Oriented Software | |
| Typescript - 接口 | https://www.tslang.cn/docs/handbook/interfaces.html |
| 装饰器模式和代理模式的区别 | https://www.cnblogs.com/yanggb/p/10952843.html |
完整代码示例
https://github.com/superfreeeee/Blog-code/tree/main/design_pattern_js/src/structural