Java回顾(十二) File类、Druid连接池、JDBCTemplate(Spring JDBC)、HTML和CSS
1、File类
1.1、File类概述和构造方法
File:是文件和目录路径名的抽象表示
public class FileDemo01 {
    public static void main(String[] args) {
        //File(String pathname):通过将给定的路径名字符串转换为抽象路径名来创建新的File实例。
        File file1 = new File("E:\\2\\1.txt");
        System.out.println(file1);

        //File(String parent,String child):从父路径名字符串和子路径名字符串创建新的File实例。
        File file2 = new File("E:\\2","1.txt");
        System.out.println(file2);

        //File(File parent,string child):从父抽象路径名和子路径名字符串创建新的File实例。
        File file3 = new File("E:\\2");
        File file4 = new File(file3,"1.txt");
        System.out.println(file4);
    }
}
1.2、File类创建功能
public class FileDemo02 {
    public static void main(String[] args) throws IOException {
        //需求1:createNewFile()   我要在E:\2\test目录下创建一个文件java.txt
        File file1 = new File("E:\\2\\test\\java.txt");
        System.out.println(file1.createNewFile());

        //需求2:mkdir()   我要在E:\2\test目录下创建一个目录JavasE
        File file2 = new File("E:\\2\\test\\javaSE");
        System.out.println(file2.mkdir());

        //需求3:mkdirs()   我要在E:\2\test目录下创建一个多级目录JavasE\fileTest
        File file3 = new File("E:\\2\\test\\javaSE\\fileTest");
        System.out.println(file3.mkdirs());

    }
}
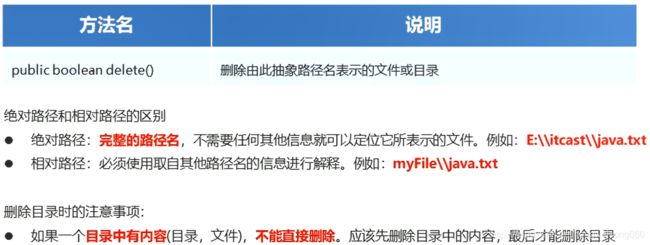
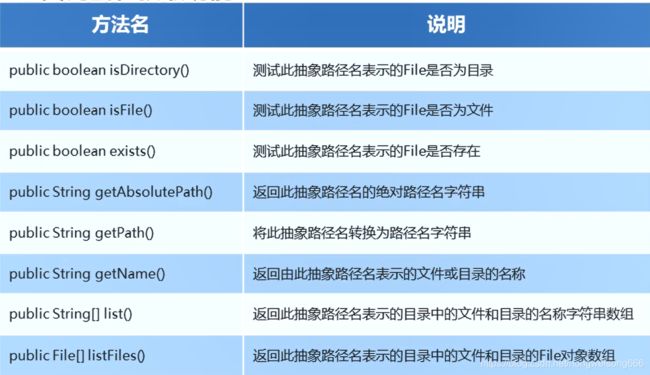
1.3、File类的判断和获取、删除
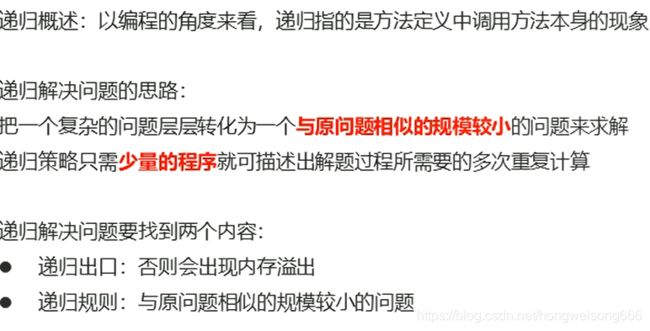
1.4、递归
public class FileDemo03 {
    public static void main(String[] args) {
        System.out.println("5的阶层是" + fn(5));
    }

    public static int fn(int num) {
        if (num == 1) {
            return 1;
        } else {
            return num * fn(num - 1);
        }
    }
}
用递归遍历文件目录
public class FileDemo03 {
    public static void main(String[] args) {
        File file = new File("E:\\2\\test");
        fn(file);
    }

    public static void fn(File file) {
        File[] files = file.listFiles();
        if(files != null){
            for (File file1:files){
                if (file1.isDirectory()){
                    fn(file1);
                }else {
                    System.out.println(file1.getAbsolutePath());
                }
            }
        }
    }
}
2、JDBC控制事务
- 方法executeQuery: 这个方法被用来执行 SELECT 语句,但也只能执行查询语句
- 方法executeUpdate: 用于执行 INSERT、UPDATE 或 DELETE 语句以及 SQL DDL(数据定义语言)语句,例如 CREATE TABLE 和 DROP TABLE
- 方法execute: 可用于执行任何SQL语句,返回一个boolean值,表明执行该SQL语句是否返回了ResultSet
3、数据库连接池
3.1、概念:其实就是一个容器(集合),存放数据库连接的容器
当系统初始化好后,容器被创建,容器中会申请一些连接对象,当用户来访问数据库时,从容器中获取连接对象,用户访问完之后,会将连接对象归还给容器。
3.2、Druid数据库连接池
3.2.1、步骤
- 1、导入jar包 druid-1.0.9.jar
- 2、定义配置文件:
* 是properties形式的
* 可以叫任意名字,可以放在任意目录下 - 3、获取数据库连接池对象:通过工厂来获取 DruidDataSourceFactory
- 4、获取连接:getConnection
public class DruidTest {
    public static void main(String[] args) throws Exception {
        Properties pro = new Properties();
        InputStream is = DruidTest.class.getClassLoader().getResourceAsStream("druid.properties");
        pro.load(is);
        DataSource ds = DruidDataSourceFactory.createDataSource(pro);
        Connection conn = ds.getConnection();
        System.out.println(conn);
    }
}
3.2.2、Druid连接池的工具类
工具类代码
/**
 * Druid连接池的工具类
 */
public class JDBCUtils {

    /**
     * 1.定义成员变量 DataSource
     */
    private static DataSource ds ;

    static{
        try {
            //1.加载配置文件
            Properties pro = new Properties();
            pro.load(JDBCUtils.class.getClassLoader().getResourceAsStream("druid.properties"));
            //2.获取DataSource
            ds = DruidDataSourceFactory.createDataSource(pro);
        } catch (IOException e) {
            e.printStackTrace();
        } catch (Exception e) {
            e.printStackTrace();
        }
    }

    /**
     * 获取连接
     */
    public static Connection getConnection() throws SQLException {
        return ds.getConnection();
    }

    /**
     * 释放资源
     */
    public static void close(Statement stmt,Connection conn){
        close(null,stmt,conn);
    }


    public static void close(ResultSet rs , Statement stmt, Connection conn){


        if(rs != null){
            try {
                rs.close();
            } catch (SQLException e) {
                e.printStackTrace();
            }
        }


        if(stmt != null){
            try {
                stmt.close();
            } catch (SQLException e) {
                e.printStackTrace();
            }
        }

        if(conn != null){
            try {
                conn.close();//归还连接
            } catch (SQLException e) {
                e.printStackTrace();
            }
        }
    }

    /**
     * 获取连接池方法
     */

    public static DataSource getDataSource(){
        return  ds;
    }

}
测试使用Druid工具类的效果,还是使用prepareStatement防止sql注入
public class DruidTest02 {
    public static void main(String[] args) {
        Connection conn = null;
        PreparedStatement pstmt = null;

        //1、给user 添加一条记录
        try {
            conn = JDBCUtils.getConnection();
            String sql = "INSERT INTO user VALUES(null,?,?);";
            pstmt = conn.prepareStatement(sql);
            pstmt.setString(1,"test");
            pstmt.setString(2,"123456");
            int i = pstmt.executeUpdate();
            System.out.println(i);
        } catch (SQLException e) {
            e.printStackTrace();
        }finally {
            JDBCUtils.close(pstmt,conn);
        }

    }
}
3.3、Spring JDBC
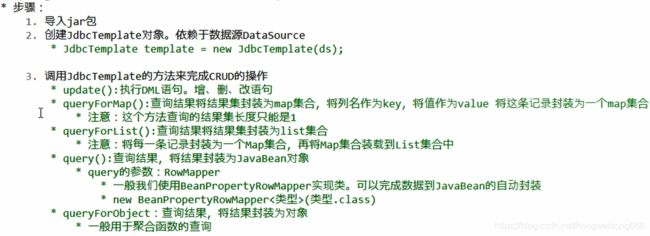
Spring框架对JDBC的简单封装。提供了一个JDBCTemplate对象简化JDBC的开发
步骤:
- 1、导入jar包
- 2、创建jdbcTemplate对象,
jdbcTemplate template = new JdbcTemplate(ds); - 3、调用jdbcTemplate的方法来完成CRUD的操作
update():执行DML语句。增、删、改语句
queryForMap():查询结果将结果集封装为map集合
queryForList():查询结果将结果集封装为list集合
query():查询结果,将结果封装为JavaBean对象
queryForObject:查询结果,将结果封装为对象
3.3.1 、JDBCTemplate入门
执行的代码
public class JDBCTemplateDemo01 {
    public static void main(String[] args) {
        //1、导入jar包
        //2、创建JDBCTemplate对象
        JdbcTemplate template = new JdbcTemplate(JDBCUtils.getDataSource());
        //3、调用方法
        String sql = "update user set password = ? where id = ?";
        int update = template.update(sql, "12321",6);
        System.out.println(update);
    }
}

输出结果为1
3.3.2 、练习一 DQL
查询数据库表中的user 表,将其封装为Emp对象的List集合
//查询数据表user中的所有信息
public class JDBCDemo02 {

    @Test
    public void test01() {
        JdbcTemplate template = new JdbcTemplate(JDBCUtils.getDataSource());
        String sql = "select * from user";
        List<User> query = template.query(sql, new BeanPropertyRowMapper<User>(User.class));
        for (User user : query) {
            System.out.println(user);
        }
    }
}
3.3.3 、练习二 DQL
查询数据库里面的记录数量
 	/**
     * 查询数据库中的记录条数
     */
    @Test
    public void test02() {
        JdbcTemplate template = new JdbcTemplate(JDBCUtils.getDataSource());
        String sql = "select count(id) from user";
        Long total = template.queryForObject(sql, Long.class);
        System.out.println(total);
    }
3.3.4 总结
4、HTML
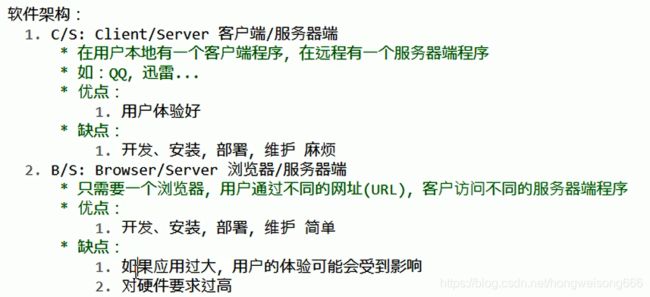
4.1、软件架构 B/S、C/S
4.2、B/S架构详解
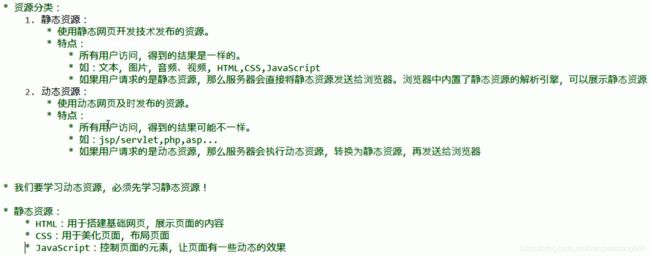
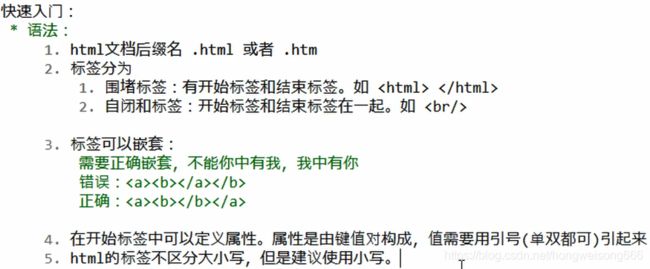
4.3、HTML入门
4.4、基本标签
4.4.1、文件标签
- html:html文档的根标签
- head:头标签,用于指定html文档的一些属性。引入外部的资源
- title:标题标签
- body:体标签
- <!DOCTYPE html>:html5中定义该文档是html文档
4.4.2、文本标签
- < br > :换行
- < h1 > ~ < h6 > :标题大小
- < p > : 段落标签
- < hr > : 一条水平线,其中的属性(color:颜色,width:宽度,size:高度,align:对齐方式)
- < > : 一条水平线
- < hr > : 一条水平线
- < b >:加粗
- < i >:斜体
- < center >:文本居中
- 属性定义
* color : rgb(值1,值2,值3): 0~255 推荐使用 #值1#值2#值3 如#FF00FF
* width: (1)、数值 width = ‘20’,默认是px(像素) (2)、数值%,相对于父元素的比例
*
4.4.3、图片标签
< img > : 展示图片
- 属性:src :指定图片的位置
- 路径的写法:
(1)、一般用相对路径,以 .开头的理解 - 相对路径
(1)、./ :代表当前目录 ./image/1.png 如果在同一级目录下的话,./可以省略
(2)、…/ :代表上一级的目录
代码如下:
<!DOCTYPE html>
<html lang="en">
<head>
    <meta charset="UTF-8">
    <title>Title</title>
</head>
<body>
    <!--展示一张图片-->
    <img src="image/avi.png" align="right" alt="古镇 " width="623" height="622"/>

<!--
    相对路径:
        * 以.开头的路径
        * ./:代表当前目录     ./image/1.png   如果在同一级目录下的话,./可以省略
          ../:代表上一级的目录
    -->
    <img src="../image/avi.png" align="left"  alt="用上一级目录显示的图片"/>

</body>
</html>
4.4.4、列表标签
- 有序列表
(1)、ol : (order list) type可以显示展示的样式 type = “A” ,从A开始排序 start :从第几个开始排序
(2)、li : 每一个列 - 无序列表
(1)、ul : type 也可以显示表示的样式 ,样式建议用css样式控制
(2)、li : 每一个列
4.4.5、连接标签
< a > :超链接 href
< target >: _blank 在新的选项卡展示页面;_self在本页内打开;规定在何处打开目标 URL。仅在 href 属性存在时使用。
    <!--新打开一个选项卡-->
    <a href="https://www.baidu.com/" target="_blank">点我</a>
    <!--在本页内打开-->
    <a href="https://www.baidu.com/" target="_self">点我</a>

    <a href="./111.html" target="_self">列表标签</a>

	<a href="https://www.baidu.com/">
        <img src="../image/avi.png" alt="图片test" align="left">
    </a>
4.4.6、块标签(div标签和span标签)结合CSS
结合css进行操作的
- div : 每一个div占满一整行。块级标签
- span : 文本信息在一行展示,行内标签 内联标签
	<span>12313</span>
    <span>12311231</span>
    <hr>
    <div>1312312</div>
    <div>131412</div>
4.4.7、语义化标签 结合CSS
html 5中为了提高程序的可读性,提供了一些标签。
- < header >
- < footer >
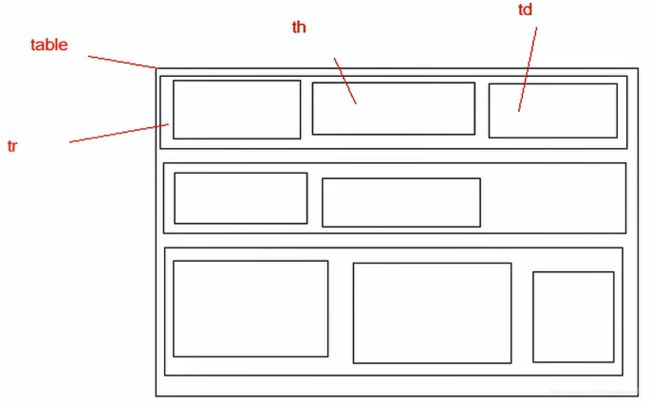
4.4.8、表格标签
- table :定义表格
width:宽度
border:边框
cellpadding:定义内容和单元格的距离
cellspacing:定义单元格之间的距离。如果指定为0,则单元格的线会合为一条
bgcolor:背景色
align:对齐方式 - tr :英文全称是"table row"的缩写答,中文含义"表行"
- td :英文全称是"table data cell",中文含义知:"定义单元格 ".
- th :英文全称是"table header cell"的缩写,中文含义"表头单元格"
rowspan :占2行
colspan:占2列
<!DOCTYPE html>
<html lang="en">
<head>
    <meta charset="UTF-8">
    <title>Title</title>
</head>
<body>
    <table border="1" width="50%" align="center" cellpadding="0" cellspacing="0" bgcolor="#faebd7">
        <tr >
            <!--占2行-->
            <th rowspan="2">编号</th>
            <th>姓名</th>
            <th>成绩</th>
        </tr>

        <tr align="center">
            <td>1</td>
            <td>hws</td>
            <td>100</td>
        </tr>

        <tr align="center">
            <td>2</td>
            <!--占2列-->
            <td colspan="2">hhh</td>
            <td>90</td>
        </tr>
    </table>
</body>
</html>
- ** < caption > ** : 表格标题
- ** < thead > ** : 表示表格的头部分
- ** < tbody > ** : 表示表格的提部分
- ** < tfoot > ** : 表示表格的脚部分
4.4.9、表单标签
使用的标签:form
form:用于定义表单的。可以定义一个范围,范围代表采集用户数据的范围
* 属性:
* action:指定提交数据的url
* method:提交数据的方式 比较常用 get 或者 post
* 表单中的数据想要被提交,必须指定其name属性
- 请求的方式 get : (1)请求参数会在地址栏中显示,会封装在请求行中(http协议) (2)请求长度有限制 (3)get请求不安全
- 请求的方式 post :(1)请求参数不会在地址栏中显示,会封装在请求体中(http协议) (2)请求长度没有限制 (3)post请求较为安全
实现的代码
<!DOCTYPE html>
<html lang="en">
<head>
    <meta charset="UTF-8">
    <title>Title</title>
</head>
<body>
    <form action="#" method="get">
        用户名:<input name="username"> <br>
        密码:<input name="password"><br>
        <input type="submit" value="登录">
    </form>
</body>
</html>
4.4.10、input
-
input : 可以通过type属性值,改变元素展示的样式
type属性:
text : 文本输入框,默认值
1、 placeholder可描述输入input 字段预期值的简短的提示信息
password : 密码输入框
radio :单选框
1、要想让多个单选框实现单选的效果,则多个单选框的name属性值必须一样。
2、一般会给每一个单选框提供value属性,指定其被选中后提交的值
3、checked属性,可以指定默认值
checkbox : 多选框
1、一般会给每一个单选框提供value属性,指定其被选中后提交的值
2、checked属性,可以指定默认值
file : 文件选择框
hiddle : 文件
按钮 :
1、普通的按钮 button,与js一起使用
2、submit 按钮
3、图片的按钮,用src < input type=“image” src="…/image/avi.png">
日期:
1、date 传值的是 birthday=2020-05-06
2、datetime-local 传值的是 birthday=2020-05-01T12%3A03**label : 指定输入项的描述信息** 注意: label的for属性一般和input的id值相对应,如果对应了,则点击label区域,会让input输入框获取焦点。
实现的代码:
<!DOCTYPE html>
<html lang="en">
<head>
    <meta charset="UTF-8">
    <title>Title</title>
</head>
<body>
    <form action="#" method="get">
        <label for="username">用户名:</label>
        <input type="text" name="username" id="username" placeholder="请输入用户名"><br>

        <label for="password">密码:</label>
        <input type="password" name="password" id="password" placeholder="请输入用户名"><br>

        <label>性别:</label>
        <input type="radio" name="gender" value="male" checked="checked">男
        <input type="radio" name="gender" value="female">女<br>

        <label>爱好:</label>
        <input type="checkbox" name="hobbies" value="shopping">购物
        <input type="checkbox" name="hobbies" value="java">java
        <input type="checkbox" name="hobbies" value="game">游戏<br>

        <input type="file" name="file"><br>

        <input type="hidden" name="id" value="11"><br>

        <label>生日</label>
        <input type="datetime-local" name="birthday">

        <label>邮箱</label>
        <input type="email" name="email">

        <input type="submit" value="提交">
    </form>
</body>
</html>
4.4.11、select 创建下拉列表
option是指定的列表项,selected是默认选中的
	<label>省份</label>
        <label>
            <select name="province" >
                <option value=" ">--请选择省份--</option>
                <option value="1" selected>浙江省</option>
                <option value="2">上海市</option>
                <option value="3">河南省</option>
            </select>
        </label><br>
4.4.12、textarea 文本域
cols : 指定列数,每一行有多少个字符
rows : 指定行数


