vue2源码解读笔记(一)
前言
第一,这篇文章比较长,需要占用你比较多时间,请使用一整段时间阅读和实践本文
第二,内容是作者代码断点+源码阅读+资料查阅核实的产出,有笔误和理解错误的地方欢迎指证
- 阅读本文的背景:当你前端的学习到了一个瓶颈
- 阅读目的:本文阅读目的:学会调试vue框架源码,读懂vue源码的init部分,理解vue的设计方式,从而提升技术深度
前置条件
- js基础扎实
- es6语法和特性熟悉
- 代码的设计模式有一定了解
- flow语法有基本了解
在开始之前,有必要学习一下 VUE 源码中用到的 flow
这里提供一个中文翻译的文档网站。参考:https://zhenyong.github.io/flowtype/docs/five-simple-examples.html#_
一、源码下载
源码下载,调试见歹佬原文:https://juejin.cn/post/6949370458793836580
(可以直接看这个歹佬的系列原文,不止技术厉害,文章也写得好。我这里是个人学习的笔记,可能你也遇到了,可以参考)
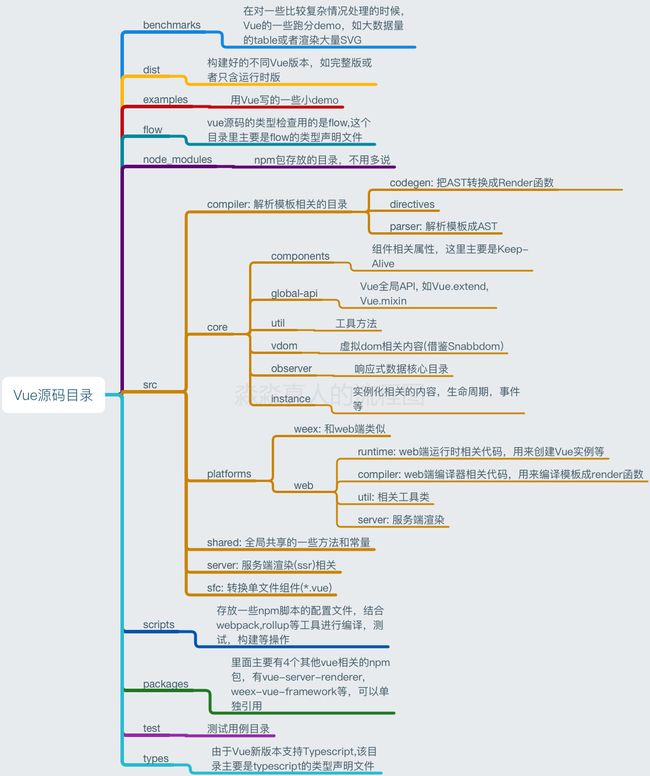
项目目录如下:
二、断点调试
在 /examples 目录下增加一个示例文件 —— test.html,在文件中添加如下内容:
Vue 源码解读
{{ msg }}
在浏览器中打开控制台,然后打开 test.html,则会进入断点调试,然后找到 Vue 构造函数所在的文件
tip:怎么找到断点对应的文件?如下如右击选Reveal in sidebar,再右侧能看到文件名
三、Vue 初始化过程
0、下一步里的options由来
src/core/global-api/index.js
/* @flow */
import { ASSET_TYPES } from 'shared/constants'
……
export function initGlobalAPI (Vue: GlobalAPI) {
  ……
  Vue.options = Object.create(null)
  ASSET_TYPES.forEach(type => {
    Vue.options[type + 's'] = Object.create(null)
  })

  // this is used to identify the "base" constructor to extend all plain-object
  // components with in Weex's multi-instance scenarios.
  Vue.options._base = Vue

  extend(Vue.options.components, builtInComponents)

  initUse(Vue)
  initMixin(Vue)
  initExtend(Vue)
  initAssetRegisters(Vue)
}
1、Vue 构造函数在 /src/core/instance/index.js 文件中
import { initMixin } from './init'
import { stateMixin } from './state'
import { renderMixin } from './render'
import { eventsMixin } from './events'
import { lifecycleMixin } from './lifecycle'
import { warn } from '../util/index'
// Vue的构造函数,类,所以首字母大写
function Vue (options) {
	// 判断环境 和 实例(instanceof是判断前面的对象,是否是后面对象(类)的实例。不是判断是否是父类)
  if (process.env.NODE_ENV !== 'production' &&
    !(this instanceof Vue)
  ) {
  	// 不是就预警,需要用new 来实例化类
    warn('Vue is a constructor and should be called with the `new` keyword')
  }
  //定义 Vue.prototype._init 方法
  this._init(options)
}

initMixin(Vue) // 定义上面_ini方法的js
stateMixin(Vue)
eventsMixin(Vue)
lifecycleMixin(Vue)
renderMixin(Vue)

export default Vue
2、this._init(options)的实现,/src/core/instance/init.js
/* @flow */

import config from '../config'
import { initProxy } from './proxy'
import { initState } from './state'
import { initRender } from './render'
import { initEvents } from './events'
import { mark, measure } from '../util/perf'
import { initLifecycle, callHook } from './lifecycle'
import { initProvide, initInjections } from './inject'
import { extend, mergeOptions, formatComponentName } from '../util/index'

let uid = 0

// 静态检查参考flow.js
// Vue入参变变量名,Class是类类型,范型指定Component(什么是范型的作用可以参考ts的:https://www.tslang.cn/docs/handbook/generics.html)
export function initMixin (Vue: Class) {
  // 负责 Vue 的初始化过程 (:?的意思是,入参有一个或没有,有则是Object类型)
  Vue.prototype._init = function (options?: Object) {
    // 这里开始建议打断点一步步看。vue实例就是this,内容是:$data: undefined,$isServer: false,$props: undefined,$ssrContext: undefined

    const vm: Component = this
    // 每个 vue 实例都有一个 _uid,并且是依次递增的
    vm._uid = uid++

	// 下面这段代码主要是用来测试代码性能的,在这个时候相当于打了一个"标记点"来测试性能。
	// window.performance用法参考:https://segmentfault.com/a/1190000014479800
	// vue源码声明使用位置:src/core/util/perf.js,学习performance API多掌握一个靠谱的js代码性能测试方式
    let startTag, endTag
    /* istanbul ignore if */
    if (process.env.NODE_ENV !== 'production' && config.performance && mark) {
      startTag = `vue-perf-start:${vm._uid}`
      endTag = `vue-perf-end:${vm._uid}`
      mark(startTag)
    }

    // a flag to avoid this being observed
    // 在其它js逻辑里使用。如果传入值的_isVue为ture时(即传入的值是Vue实例本身)不会新建observer实例(这里可以暂时理解新建observer实例就是让数据响应式)。
    vm._isVue = true
    // merge options
    // 符合第一个条件是,即当前这个Vue实例是组件
    if (options && options._isComponent) {
      //优化内部组件实例化
	  //因为动态选项合并非常慢,而且
	  //内部组件选项需要特殊处理。
      initInternalComponent(vm, options)
    } else {
       // 符合第二个条件时,即当前Vue实例不是组件。而是实例化Vue对象
       /**
       * 合并 Vue 的全局配置到根组件的局部配置,比如 Vue.component 注册的全局组件会合并到 根实例的 components 选项中
       * 至于每个子组件的选项合并则发生在两个地方:
       *   1、Vue.component 方法注册的全局组件在注册时做了选项合并
       *   2、{ components: { xx } } 方式注册的局部组件在执行编译器生成的 render 函数时做了选项合并,包括根组件中的 components 配置
       */
       // 合并两个选项,出现相同配置项时,子选项会覆盖父选项的配置
       //  mergeOptions在util/options.js,建议看一下
      vm.$options = mergeOptions(
        // 具体实现在同文件的下方,这里作省略
        resolveConstructorOptions(vm.constructor),
        options || {},
        vm
      )
    }
    /* istanbul ignore else */
    // 判断环境,开发环境直接赋值。生产环境在initProxy内判断是否可以使用porxy(ES6特性),可以则使用,不行则和else一样的处理
    // 所以说vue2其实没用到porxy代理是不准确的,代码内会根据是否环境支持来使用
    // 补充判断是否可用proxy:typeof Proxy !== 'undefined' &&  typeof Proxy === 'function' && /native code/.test(Proxy.toString())
    if (process.env.NODE_ENV !== 'production') {
      initProxy(vm)
    } else {
      vm._renderProxy = vm
    }
    // expose real self
    vm._self = vm
    // 初始化组件实例关系属性,比如 $parent、$children、$root、$refs 等
    initLifecycle(vm)
    // 初始化自定义事件
    initEvents(vm)
    // 解析组件的插槽信息,得到 vm.$slot,处理渲染函数,得到 vm.$createElement 方法,即 h 函数
    initRender(vm)
    // 调用 beforeCreate 钩子函数
    callHook(vm, 'beforeCreate')
    // 初始化组件的 inject 配置项,得到 result[key] = val 形式的配置对象,然后对结果数据进行响应式处理,并代理每个 key 到 vm 实例
    initInjections(vm) // resolve injections before data/props
    // !! **数据响应式的重点**,处理 props、methods、data、computed、watch
    initState(vm)
    // 解析组件配置项上的 provide 对象,将其挂载到 vm._provided 属性上
    initProvide(vm) // resolve provide after data/props
    // 调用 created 钩子函数
    callHook(vm, 'created')

    /* istanbul ignore if */
    if (process.env.NODE_ENV !== 'production' && config.performance && mark) {
      vm._name = formatComponentName(vm, false)
      mark(endTag)
      measure(`vue ${vm._name} init`, startTag, endTag)
    }
	// 如果发现配置项上有 el 选项,则自动调用 $mount 方法,也就是说有了 el 选项,就不需要再手动调用 $mount,反之,没有 el 则必须手动调用 $mount
    if (vm.$options.el) {
      // 调用 $mount 方法,进入挂载阶段
      vm.$mount(vm.$options.el)
    }
  }
}
3、resolveConstructorOptions说明
export function resolveConstructorOptions (Ctor: Class) {
  let options = Ctor.options
  if (Ctor.super) {
    const superOptions = resolveConstructorOptions(Ctor.super)
    const cachedSuperOptions = Ctor.superOptions
    if (superOptions !== cachedSuperOptions) {
      // super option changed,
      // need to resolve new options.
      Ctor.superOptions = superOptions
      // check if there are any late-modified/attached options (#4976)
      const modifiedOptions = resolveModifiedOptions(Ctor)
      // update base extend options
      if (modifiedOptions) {
        extend(Ctor.extendOptions, modifiedOptions)
      }
      options = Ctor.options = mergeOptions(superOptions, Ctor.extendOptions)
      if (options.name) {
        options.components[options.name] = Ctor
      }
    }
  }
  return options
}
resolveConstructorOptions方法,从字面意思来看,这个方法是来解析constructor上的options属性的。
这个方法要分成两种情况来说明,第一种是Ctor是基础Vue构造器的情况,另一种是Ctor是通过Vue.extend方法扩展的情况。
第一种、当Ctor(Ctor其实就是构造函数)是基础Vue构造器时,就是通过new关键字来新建Vue构造函数的实例。这个时候options就是Vue构造函数上的options。如下图

第二种、如果Ctor是Vue.extend创建的"子类",例如下面的情况:
var Profile = Vue.extend({
template: '{{firstName}} {{lastName}} aka {{alias}}
'
})
// Vue.mixin改变了"父类"options
Vue.mixin({ data: function () {
return {
firstName: 'Walter',
lastName: 'White',
alias: 'Heisenberg'
}
}})
new Profile().$mount('#example')
如果”自身“有新添加的options,则把新添加的options属性添加到Ctor.extendOptions属性上。调用mergeOptions方法合并"父类"构造器上的options和”自身“上的extendOptions,最后返回合并后的options。
4、initInjections说明
src/core/instance/inject.js
- 初始化 inject 配置项
- 1、得到 result[key] = val
- 2、对结果数据进行响应式处理,代理每个 key 到 vm 实例
export function initInjections (vm: Component) {
  const result = resolveInject(vm.$options.inject, vm)
  if (result) {
    // 全局打标记的一个好方式,观察者模式,切换观察对象
    toggleObserving(false)
    Object.keys(result).forEach(key => {
      /* istanbul ignore else */
      if (process.env.NODE_ENV !== 'production') {
        defineReactive(vm, key, result[key], () => {
          warn(
            `Avoid mutating an injected value directly since the changes will be ` +
            `overwritten whenever the provided component re-renders. ` +
            `injection being mutated: "${key}"`,
            vm
          )
        })
      } else {
        defineReactive(vm, key, result[key])
      }
    })
    toggleObserving(true)
  }
}
// -----分割线-----
// 上述观察的实现,src/core/observer/index.js
export let shouldObserve: boolean = true
export function toggleObserving (value: boolean) {
  shouldObserve = value
}
5、resolveInject说明
// 解析 inject 配置项,从祖代组件的 provide 配置中找到 key 对应的值,否则用 默认值,最后得到 result[key] = val
export function resolveInject (inject: any, vm: Component): ?Object {
  if (inject) {
    // inject is :any because flow is not smart enough to figure out cached
    // 上述是源码注释,看着就有趣,静态检查是用的flow.js(vue2用的js),说人家不智能,所以只能选any类型
    // 这里用create方法创建了空的对象,Object.create(null)简单理解就是result的protype是null。具体理解参考这篇博客:https://www.jianshu.com/p/28d85bebe599
    const result = Object.create(null)
    // inject 配置项的所有的 key
    const keys = hasSymbol
      ? Reflect.ownKeys(inject)
      : Object.keys(inject)

    for (let i = 0; i < keys.length; i++) {
      const key = keys[i]
      // #6574 in case the inject object is observed...
      // continue的意思是,key === '__ob__'时,for循环内,continue下的代码不执行,执行下一次的循环。可以参考:https://blog.csdn.net/ll594317566/article/details/100692203
      // 这里continue用法可以参考和学习,等价于 if (key !== '__ob__') { ... // continue 跳过的代码 }
      if (key === '__ob__') continue
      // 拿到 provide 中对应的 key
      const provideKey = inject[key].from
      let source = vm
      // 遍历所有的祖代组件,直到 根组件,找到 provide 中对应 key 的值,最后得到 result[key] = provide[provideKey]
      while (source) {
        if (source._provided && hasOwn(source._provided, provideKey)) {
          result[key] = source._provided[provideKey]
          break
        }
        source = source.$parent
      }
      // 如果上一个循环未找到,则采用 inject[key].default,如果没有设置 default 值,则抛出错误
      if (!source) {
        if ('default' in inject[key]) {
          const provideDefault = inject[key].default
          result[key] = typeof provideDefault === 'function'
            ? provideDefault.call(vm)
            : provideDefault
        } else if (process.env.NODE_ENV !== 'production') {
          warn(`Injection "${key}" not found`, vm)
        }
      }
    }
    return result
  }
}
四、总结
Vue 的初始化过程(new Vue(options))都做了什么?
- 处理组件配置项
- 初始化根组件时进行了选项合并操作,将全局配置合并到根组件的局部配置上
- 初始化每个子组件时做了一些性能优化,将组件配置对象上的一些深层次属性放到 vm.$options 选项中,以提高代码的执行效率
- 初始化组件实例的关系属性,比如 p a r e n t 、 parent、 parent、children、 r o o t 、 root、 root、refs 等
- 处理自定义事件
- 调用 beforeCreate 钩子函数
- 初始化组件的 inject 配置项,得到 ret[key] = val 形式的配置对象,然后对该配置对象进行浅层的响应式处理(只处理了对象第一层数据),并代理每个 key 到 vm 实例上
- 数据响应式,处理 props、methods、data、computed、watch 等选项
- 解析组件配置项上的 provide 对象,将其挂载到 vm._provided 属性上
- 调用 created 钩子函数
- 如果发现配置项上有 el 选项,则自动调用 $mount 方法,也就是说有了 el 选项,就不需要再手动调用 $mount 方法,反之,没提供 el 选项则必须调用 $mount
- 接下来则进入挂载阶段