Prometheus运维五 实现报警功能(邮件报警,企业微信报警,Slack报警,钉钉报警)
文章目录
- 1.Alertmanager 集成邮件告警
- 2.Alertmanager 集成企业微信告警
- 3.Alertmanager 集成 Slack 告警
- 4.Alertmanager基于Webhook的集成钉钉
-
- 4.钉钉关键字报警演示
目前官方内置的第三方通知集成包括:邮件、 即时通讯软件(如Slack、Hipchat)、移动应用消息推送(如Pushover)和自动化运维工具(例如:Pagerduty、Opsgenie、Victorops)。Alertmanager的通知方式中还可以支持Webhook,通过这种方式开发者可以实现更多个性化的扩展支持。
在Alertmanager中路由负责对告警信息进行分组匹配,并将像告警接收器发送通知。告警接收器可以通过以下形式进行配置:
receivers:
  - <receiver> ...
每一个receiver具有一个全局唯一的名称,并且对应一个或者多个通知方式:
name: <string>
email_configs:
  [ - <email_config>, ... ]
hipchat_configs:
  [ - <hipchat_config>, ... ]
pagerduty_configs:
  [ - <pagerduty_config>, ... ]
pushover_configs:
  [ - <pushover_config>, ... ]
slack_configs:
  [ - <slack_config>, ... ]
opsgenie_configs:
  [ - <opsgenie_config>, ... ]
webhook_configs:
  [ - <webhook_config>, ... ]
victorops_configs:
  [ - <victorops_config>, ... ]
1.Alertmanager 集成邮件告警
邮箱应该是目前企业最常用的告警通知方式,Alertmanager内置了对SMTP协议的支持,因此对于企业用户而言,只需要一些基本的配置即可实现通过邮件的通知。
在Alertmanager使用邮箱通知,用户只需要定义好SMTP相关的配置,并且在receiver中定义接收方的邮件地址即可。在Alertmanager中我们可以直接在配置文件的global中定义全局的SMTP配置:
global:
  [ smtp_from: <tmpl_string> ]
  [ smtp_smarthost: <string> ]
  [ smtp_hello: <string> | default = "localhost" ]
  [ smtp_auth_username: <string> ]
  [ smtp_auth_password: <secret> ]
  [ smtp_auth_identity: <string> ]
  [ smtp_auth_secret: <secret> ]
  [ smtp_require_tls: <bool> | default = true ]
完成全局SMTP之后,我们只需要为receiver配置email_configs用于定义一组接收告警的邮箱地址即可,如下所示:
name: <string>
email_configs:
  [ - <email_config>, ... ]
每个email_config中定义相应的接收人邮箱地址,邮件通知模板等信息即可,当然如果当前接收人需要单独的SMTP配置,那直接在email_config中覆盖即可:
[ send_resolved: <boolean> | default = false ]
to: <tmpl_string>
[ html: <tmpl_string> | default = '{{ template "email.default.html" . }}' ]
[ headers: { <string>: <tmpl_string>, ... } ]
如果当前收件人需要接受告警恢复的通知的话,在email_config中定义send_resolved为true即可。
如果所有的邮件配置使用了相同的SMTP配置,则可以直接定义全局的SMTP配置。
以Gmail邮箱为例,我们定义了一个全局的SMTP配置,并且通过route将所有告警信息发送到default-receiver中:
global:
  smtp_smarthost: smtp.gmail.com:587
  smtp_from: [email protected]
  smtp_auth_username: [email protected]
  smtp_auth_identity: [email protected]
  smtp_auth_password: xxxxxx

route:
  group_by: ['alertname']
  receiver: 'default-receiver'

receivers:
  - name: 'default-receiver'
    email_configs:
      - to: [email protected]
        send_resolved: true
注意:新的Google账号安全规则需要使用”应用专有密码“作为邮箱登录密码
手动拉高主机CPU使用率,使得监控样本数据满足告警触发条件。在SMTP配置正确的情况下,可以接收到如下的告警内容:

使用163邮箱报警示例:
global:
  smtp_smarthost: 'smtp.163.com:25'
  smtp_from: '[email protected]'
  smtp_auth_username: '[email protected]'
  smtp_auth_password: 'xxxxx'	# 这里是邮箱的授权密码
  smtp_require_tls: false

templates:
  - '/alertmanager/template/*.tmpl'

route:
  group_by: ['alertname','cluster','service']
  group_wait: 10s
  group_interval: 10s
  repeat_interval: 10m
  receiver: 'default-receiver'

receivers:
- name: 'default-receiver'
  email_configs:
  - to: '[email protected]'
    html: '{{ template "alert.html" . }}'
    headers: { Subject: "Prometheus 告警测试邮件" }
smtp_smarthost:是用于发送邮件的邮箱的 SMTP 服务器地址+端口;
smtp_auth_password:是发送邮箱的授权码而不是登录密码;
smtp_require_tls:不设置的话默认为 true,当为true 时会有 starttls 错误,为了简单这里设置为 false;
templates:指出邮件的模板路径;
receivers 下html 指出邮件内容模板名,这里模板名为 “alert.html”,在模板路径中的某个文件中定义。
headers:为邮件标题;
mkdir -pv /alertmanager/template/
vim /alertmanager/template/alert.tmpl
#编写邮件模板,注意:文件后缀为 tmpl
#示例:
<table>
    <tr><td>报警名</td><td>开始时间</td></tr>
        <tr><td></td><td></td></tr>
</table>
$ systemctl restart alertmanager.service
$ systemctl status alertmanager.service
$ ss -tnl|grep 9093
2.Alertmanager 集成企业微信告警
官方帮助说明文档:https://prometheus.io/docs/alerting/latest/configuration/#wechat_config
企业微信API说明文档:https://work.weixin.qq.com/api/doc/90000/90135/90665
企业微信的相关配置说明
# Whether or not to notify about resolved alerts.
[ send_resolved: <boolean> | default = false ]

# The API key to use when talking to the WeChat API.
[ api_secret: <secret> | default = global.wechat_api_secret ]

# The WeChat API URL.
[ api_url: <string> | default = global.wechat_api_url ]

# The corp id for authentication.
[ corp_id: <string> | default = global.wechat_api_corp_id ]

# API request data as defined by the WeChat API.
[ message: <tmpl_string> | default = '{{ template "wechat.default.message" . }}' ]
[ agent_id: <string> | default = '{{ template "wechat.default.agent_id" . }}' ]
[ to_user: <string> | default = '{{ template "wechat.default.to_user" . }}' ]
[ to_party: <string> | default = '{{ template "wechat.default.to_party" . }}' ]
[ to_tag: <string> | default = '{{ template "wechat.default.to_tag" . }}' ]
实践示例:
Alertmanager 的企业微信告警和邮件告警配置类似,在配置微信告警前需要准备一个微信企业号,创建自己的告警应用,并准备一些参数,配置企业微信告警需要准备的参数具体如下:
wechat_api_url: 'https://qyapi.weixin.qq.com/cgi-bin/'(默认)
to_party: '部门id'
agent_id: '应用id'
corp_id: '维信企业号ID'
api_secret: '自己创建应用的 secret'
vim /usr/local/alertmanager/alert-test.yml
#修改为如下内容
global:
  resolve_timeout: 5m
  wechat_api_url: 'https://qyapi.weixin.qq.com/cgi-bin/'
  wechat_api_secret: '应用的secret,在应用的配置页面可以看到'
  wechat_api_corp_id: '企业id,在企业的配置页面可以看到'
templates:
  - '/alertmanager/template/*.tmpl'
route:
  group_by: ['alertname']
  group_wait: 10s
  group_interval: 10s
  repeat_interval: 1h
  receiver: 'wechat'

receivers:
  - name: 'wechat'
    wechat_configs:
    - send_resolved: false
      corp_id: '企业id,在企业的配置页面可以看到'
      to_user: '@all'
      to_party: '需要发送的组'
      message: '{{ template "wechat.default.message" . }}'
      agent_id: '应用的AgentId,在应用的配置页面可以看到,没有应用就自建'
      api_secret: '应用的secret,在应用的配置页面可以看到,没有应用就自建'

inhibit_rules:	#抑制规则
- source_match:
#配置模板示例
vim /alertmanager/template/alert.tmpl
#添加如下内容:
{{ define "wechat.default.message" }}
{{- if gt (len .Alerts.Firing) 0 -}}
{{- range $index, $alert := .Alerts -}}
{{- if eq $index 0 -}}
告警类型: {{ $alert.Labels.alertname }}
告警级别: {{ $alert.Labels.severity }}

=====================
{{- end }}
===告警详情===
告警详情: {{ $alert.Annotations.message }}
故障时间: {{ $alert.StartsAt.Format "2006-01-02 15:04:05" }}
===参考信息===
{{ if gt (len $alert.Labels.instance) 0 -}}故障实例ip: {{ $alert.Labels.instance }};{{- end -}}
{{- if gt (len $alert.Labels.namespace) 0 -}}故障实例所在namespace: {{ $alert.Labels.namespace }};{{- end -}}
{{- if gt (len $alert.Labels.node) 0 -}}故障物理机ip: {{ $alert.Labels.node }};{{- end -}}
{{- if gt (len $alert.Labels.pod_name) 0 -}}故障pod名称: {{ $alert.Labels.pod_name }}{{- end }}
=====================
{{- end }}
{{- end }}

{{- if gt (len .Alerts.Resolved) 0 -}}
{{- range $index, $alert := .Alerts -}}
{{- if eq $index 0 -}}
告警类型: {{ $alert.Labels.alertname }}
告警级别: {{ $alert.Labels.severity }}

=====================
{{- end }}
===告警详情===
告警详情: {{ $alert.Annotations.message }}
故障时间: {{ $alert.StartsAt.Format "2006-01-02 15:04:05" }}
恢复时间: {{ $alert.EndsAt.Format "2006-01-02 15:04:05" }}
===参考信息===
{{ if gt (len $alert.Labels.instance) 0 -}}故障实例ip: {{ $alert.Labels.instance }};{{- end -}}
{{- if gt (len $alert.Labels.namespace) 0 -}}故障实例所在namespace: {{ $alert.Labels.namespace }};{{- end -}}
{{- if gt (len $alert.Labels.node) 0 -}}故障物理机ip: {{ $alert.Labels.node }};{{- end -}}
{{- if gt (len $alert.Labels.pod_name) 0 -}}故障pod名称: {{ $alert.Labels.pod_name }};{{- end }}
=====================
{{- end }}
{{- end }}
{{- end }}
或者可以模拟某个节点挂了来进行模板测试:
groups:
- name: node
  rules:
  - alert: server_status
    expr: up{job="node"} == 0
    for: 15s
    annotations:
      summary: "机器 {{ $labels.instance }} 挂了"
重启
systemctl restart prometheus.service
systemctl restart alertmanager.service
systemctl status alertmanager.service
验证

3.Alertmanager 集成 Slack 告警
Slack 作为 IM 办公软件,简单好用,在国外用的特别多,那如何用它来接收 Prometheus 的告警信息。
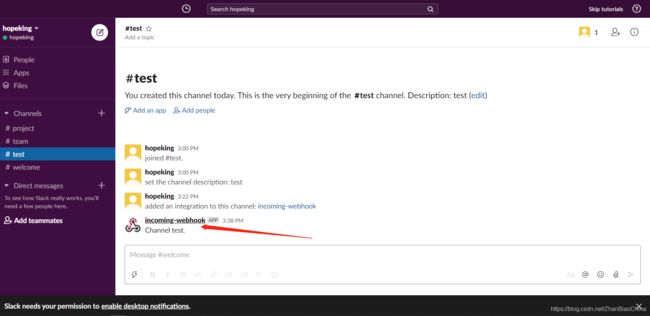
1.注册slack账号,并创建一个#test频道
地址:https://slack.com/intl/en-cn/

Slack作为一款即时通讯工具,协作沟通主要通过Channel(平台)来完成,用户可以在企业中根据用途添加多个Channel,并且通过Channel来集成各种第三方工具。Slack的强大之处在于在Channel中添加各种第三方服务的集成,用户也可以基于Slack开发自己的聊天机器人来实现一些更高级的能力,例如自动化运维,提高开发效率等。
2.为 #test 频道创建一个 incomming webhooks 应用。
点击频道标题,选择 Add an app or integration,在 app store 中搜索 incomming webhooks,选择第一个

添加成功后Slack会显示Incoming WebHooks配置和使用方式,拷贝 app webhook 地址,后面会用到。
https://hooks.slack.com/services/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
用户只需要使用Post方式向Channel发送需要通知的消息即可,例如,我们可以在命令行中通过curl模拟一次消息通知:
curl -d "payload={'text': 'Channel test.'}" https://hooks.slack.com/services/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
除了发送纯文本以外,slack还支持在文本内容中添加链接,例如:
payload={"text": "Channel test.! for details!" }
此时接收到的消息中建辉包含一个可点击的超链接地址。除了payload以外,Incomming Webhhook还支持一些其他的参数:
| 参数 | 作用/示例 |
|---|---|
| username | 设置当前聊天机器人的名称(webhookbot) |
| icon_url | 当前聊天机器人的头像地址 (https://slack.com/img/icons/app-57.png) |
| icon_emoji | 使用emoji作为聊天机器人的头像() |
| channel | 消息发送的目标channel, 需要直接发给特定用户时使用@username即可(#monitoring 或者 @username) |
例如,使用以上参数发送一条更有趣的消息:
curl -X POST --data-urlencode "payload={'channel': '#monitoring', 'username': 'webhookbot', 'text': 'This is posted to #monitoring and comes from a bot named webhookbot.', 'icon_emoji': ':ghost:'}" https://hooks.slack.com/services/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
3.在Alertmanager中使用Slack
相关文档:https://api.slack.com/messaging/webhooks
在Alertmanager的全局配置中,将Incomming Webhhook地址作为slack_api_url添加到全局配置中也可以:
global:
        slack_api_url: https://hooks.slack.com/services/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
当然,也可以在每个receiver中单独定义自己的slack_configs即可:
receivers:
  - name: 'slack'
  slack_configs:
    - channel: '#test'
      send_resolved: true
      api_url: https://hooks.slack.com/services/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
完整示例:
vim /usr/local/alertmanager/alert-test.yml
#修改为如下内容:
global:
        resolve_timeout: 1m
route:
  group_by: ['alertname']
  group_wait: 10s
  group_interval: 10s
  repeat_interval: 1h
  receiver: 'slack'	#路由

receivers:
  - name: 'slack'
    slack_configs:
     - channel: '#test'
       send_resolved: true
       api_url: https://hooks.slack.com/services/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
       text: "{{ range .Alerts }} {{ .Annotations.description}}\n {{end}} {{ .CommonAnnotations.username}} <{{.Comm
onAnnotations.link}}| click here>"
       title: "{{.CommonAnnotations.summary}}"
       title_link: "{{.CommonAnnotations.link}}"
       color: "{{.CommonAnnotations.color}}"
编辑/usr/local/prometheus/alert.rules报警配置文件
vim /usr/local/prometheus/alert.rules
#如下内容:
groups:
- name: hostStatsAlert
rules:
- alert: hostCpuUsageAlert
expr: sum(avg without (cpu)(irate(node_cpu_seconds_total{mode!='idle'}[1m]))) by (instance) > 0.5
for: 1m
labels:
severity: page
annotations:
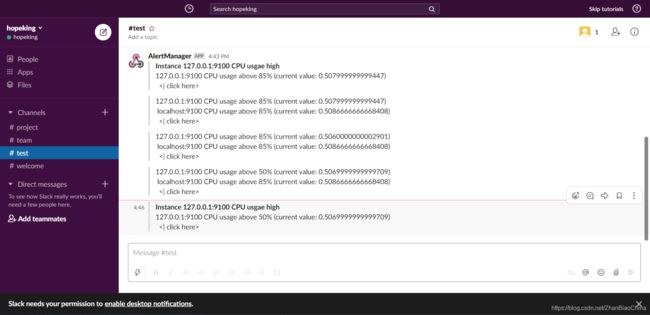
summary: "Instance {{ $labels.instance }} CPU usgae high"
description: "{{ $labels.instance }} CPU usage above 50% (current value: {{ $value }})"
- alert: hostMemUsageAlert
expr: (node_memory_MemTotal - node_memory_MemAvailable)/node_memory_MemTotal > 0.85
for: 1m
labels:
severity: page
annotations:
summary: "Instance {{ $labels.instance }} MEM usgae high"
description: "{{ $labels.instance }} MEM usage above 50% (current value: {{ $value }}"
systemctl restart alertmanager.service
systemctl status alertmanager.service
我们手动拉高当前主机的CPU利用率,在#test平台中,我们会接收到一条告警信息如下所示:
对于Incomming Webhhook支持的其它自定义参数,也可以在slack_config中进行定义,slack_config的主要配置如下:
channel: <tmpl_string>
[ send_resolved: <boolean> | default = false ]
[ api_url: <secret> | default = global.slack_api_url ]
[ icon_emoji: <tmpl_string> ]
[ icon_url: <tmpl_string> ]
[ link_names: <boolean> | default = false ]
[ username: <tmpl_string> | default = '{{ template "slack.default.username" . }}' ]
[ color: <tmpl_string> | default = '{{ if eq .Status "firing" }}danger{{ else }}good{{ end }}' ]
[ footer: <tmpl_string> | default = '{{ template "slack.default.footer" . }}' ]
[ pretext: <tmpl_string> | default = '{{ template "slack.default.pretext" . }}' ]
[ text: <tmpl_string> | default = '{{ template "slack.default.text" . }}' ]
[ title: <tmpl_string> | default = '{{ template "slack.default.title" . }}' ]
[ title_link: <tmpl_string> | default = '{{ template "slack.default.titlelink" . }}' ]
[ image_url: <tmpl_string> ]
[ thumb_url: <tmpl_string> ]
如果要覆盖默认的告警内容,直接使用Go Template即可。例如:
color: '{{ if eq .Status "firing" }}danger{{ else }}good{{ end }}'
4.Alertmanager基于Webhook的集成钉钉
帮助文档:https://ding-doc.dingtalk.com/doc#/serverapi2/qf2nxq/uKPlK
自定义钉钉报警方式,通过Alertmanager提供的webhook支持可以轻松实现这一类的扩展。除了用于支持额外的通知方式,webhook还可以与其他第三方系统集成实现运维自动化,或者弹性伸缩等。
在Alertmanager中可以使用如下配置定义基于webhook的告警接收器receiver。一个receiver可以对应一组webhook配置。
name: <string>
webhook_configs:
  [ - <webhook_config>, ... ]
每一项webhook_config的具体配置格式如下:
# Whether or not to notify about resolved alerts.
[ send_resolved: <boolean> | default = true ]

# The endpoint to send HTTP POST requests to.
url: <string>

# The HTTP client's configuration.
[ http_config: <http_config> | default = global.http_config ]
send_resolved用于指定是否在告警消除时发送回执消息。
url则是用于接收webhook请求的地址。
http_configs则是在需要对请求进行SSL配置时使用。
当用户定义webhook用于接收告警信息后,当告警被触发时,Alertmanager会按照以下格式向这些url地址发送HTTP Post请求,请求内容如下:
{
"version": "4",
"groupKey": <string>, // key identifying the group of alerts (e.g. to deduplicate)
"status": "" ,
"receiver": <string>,
"groupLabels": <object>,
"commonLabels": <object>,
"commonAnnotations": <object>,
"externalURL": <string>, // backlink to the Alertmanager.
"alerts": [
{
"labels": <object>,
"annotations": <object>,
"startsAt": "" ,
"endsAt": ""
}
]
}
1.插件下载并安装
#安装go环境
wget https://studygolang.com/dl/golang/go1.14.2.linux-amd64.tar.gz
tar -C /usr/local/ -zxvf go1.14.2.linux-amd64.tar.gz
cat << EOF >> /etc/profile
export GOROOT=/usr/local/go
export PATH=$PATH:$GOROOT/bin
EOF
source  /etc/profile
#安装钉钉插件,直接下载编译好的二进制包
cd /cd /usr/local/src
# 二进制包下载
https://github.com/timonwong/prometheus-webhook-dingtalk/releases
wget https://github.com/timonwong/prometheus-webhook-dingtalk/releases/download/v0.3.0/prometheus-webhook-dingtalk-0.3.0.linux-amd64.tar.gz
tar -zxf prometheus-webhook-dingtalk-0.3.0.linux-amd64.tar.gz -C /usr/local/
ln -s  /usr/local/prometheus-webhook-dingtalk-0.3.0.linux-amd64/prometheus-webhook-dingtalk  /usr/local/bin/prometheus-webhook-dingtalk
#查看帮助命令
prometheus-webhook-dingtalk --help
usage: prometheus-webhook-dingtalk --ding.profile=DING.PROFILE [<flags>]

Flags:
  -h, --help              Show context-sensitive help (also try --help-long and --help-man).
      --web.listen-address=":8060"
                          The address to listen on for web interface.
      --ding.profile=DING.PROFILE ...
                          Custom DingTalk profile (can be given multiple times, <profile>=<dingtalk-url>).
      --ding.timeout=5s   Timeout for invoking DingTalk webhook.
      --template.file=""  Customized template file (see template/default.tmpl for example)
      --log.level=info    Only log messages with the given severity or above. One of: [debug, info, warn,
                          error]
      --version           Show application version.
2.登陆钉钉,创建机器人并且获取token
钉钉开发者文档:https://ding-doc.dingtalk.com/
钉钉群机器人文档:https://ding-doc.dingtalk.com/doc#/serverapi2/qf2nxq
获取钉钉机器人
1)选择群组—>群设置–>添加智能群助手–>添加机器人


注意:选择过程中会有三种安全设置(这里我们只用第一种)
第一个自定义关键字是说你在以后发送的文字中必须要有这个关键字,否则发送不成功。
加签是一种特殊的加密方式,第一步,把timestamp+"\n"+密钥当做签名字符串,使用HmacSHA256算法计算签名,然后进行Base64 encode,最后再把签名参数再进行urlEncode,得到最终的签名(需要使用UTF-8字符集)。
IP地址就是说你在发送时会获取你的IP地址,如果不匹配就发送不成功。这个加密的方式可以自己选择,我们选择加签。如果你想使用IP的话,可以访问https://ip.cn/。
3.启动钉钉插件dingtalk
#复制Webhook地址,启动需要。
#现在先创建systemd文件
vim /etc/systemd/system/prometheus-webhook-dingtalk.service
#添加如下内容
[Unit]
Description=prometheus-webhook-dingtalk
After=network-online.target

[Service]
Restart=on-failure
ExecStart=/usr/local/prometheus-webhook-dingtalk-0.3.0.linux-amd64/prometheus-webhook-dingtalk --ding.profile=ops_dingding=xxxxxx#添加自己钉钉机器人的Webhook地址

[Install]
WantedBy=multi-user.target
#启动
systemctl daemon-reload
systemctl start prometheus-webhook-dingtalk
ss -tnl | grep 8060
#测试
curl   -H "Content-Type: application/json"  -d '{ "version": "4", "status": "firing", "description":"description_content"}'  http://localhost:8060/dingtalk/ops_dingding/send
prometheus-webhook-dingtalk --ding.profile="ops_dingding=https://oapi.dingtalk.com/robot/send?access_token=xxxxxx"
#注意:可以配置多个ops_dingding名字,这个名字和后续的报警url相关联
#关于这里的 -ding.profile 参数:为了支持同时往多个钉钉自定义机器人发送报警消息,因此 -ding.profile 可以在命令行中指定多次,比如:
prometheus-webhook-dingtalk \
    --ding.profile="ops_dingding1=https://oapi.dingtalk.com/robot/send?access_token=xxxxxxxxxxxx" \
    --ding.profile="ops_dingding2=https://oapi.dingtalk.com/robot/send?access_token=yyyyyyyyyyy"
  #这里就定义了两个 ops_dingding,一个 ops_dingding1,一个 ops_dingding2,用来往不同的钉钉组发送报警消息。
 # 然后在 AlertManager 的配置里面,加入相应的 receiver(注意下面的 url):
receivers:
- name: ops_dingding1
  webhook_configs:
  - send_resolved: false
    url: http://localhost:8060/dingtalk/ops_dingding1/send
- name: ops_dingding2
  webhook_configs:
  - send_resolved: false
    url: http://localhost:8060/dingtalk/ops_dingding2/send
3.1测试自定义机器人
示例关键字方法
curl 'https://oapi.dingtalk.com/robot/send?access_token=c9aeb88d191b814c7db32cb3fb27b5069727a4db1a4a5541aba3c949b0b355f6' -H 'Content-Type: application/json' -d '{"msgtype": "text","text": {"content": "king我就是我, 是不一样的烟火"}}'
PS:这里的king是关键字

示例加签方法
第一步,把timestamp+"\n"+密钥当做签名字符串,使用HmacSHA256算法计算签名,然后进行Base64 encode,最后再把签名参数再进行urlEncode,得到最终的签名(需要使用UTF-8字符集)。
| 参数 | 说明 |
|---|---|
| timestamp | 当前时间戳,单位是毫秒,与请求调用时间误差不能超过1小时 |
| secret | 密钥,机器人安全设置页面,加签一栏下面显示的SEC开头的字符串 |
签名计算代码示例(Java)
import javax.crypto.Mac;
import javax.crypto.spec.SecretKeySpec;
import org.apache.commons.codec.binary.Base64;
import java.net.URLEncoder;

public class Test {
    public static void main(String[] args) throws Exception {
        Long timestamp = System.currentTimeMillis();
        String secret = "this is secret替换为密钥";

        String stringToSign = timestamp + "\n" + secret;
        Mac mac = Mac.getInstance("HmacSHA256");
        mac.init(new SecretKeySpec(secret.getBytes("UTF-8"), "HmacSHA256"));
        byte[] signData = mac.doFinal(stringToSign.getBytes("UTF-8"));
        String sign = URLEncoder.encode(new String(Base64.encodeBase64(signData)),"UTF-8");
        System.out.println(sign);
    }

}
签名计算代码示例(Python)
#python 3.8
import time
import hmac
import hashlib
import base64
import urllib.parse

timestamp = str(round(time.time() * 1000))
secret = 'this is secret'
secret_enc = secret.encode('utf-8')
string_to_sign = '{}\n{}'.format(timestamp, secret)
string_to_sign_enc = string_to_sign.encode('utf-8')
hmac_code = hmac.new(secret_enc, string_to_sign_enc, digestmod=hashlib.sha256).digest()
sign = urllib.parse.quote_plus(base64.b64encode(hmac_code))
print(timestamp)
print(sign)
#python 2.7
import time
import hmac
import hashlib
import base64
import urllib

timestamp = long(round(time.time() * 1000))
secret = 'this is secret'
secret_enc = bytes(secret).encode('utf-8')
string_to_sign = '{}\n{}'.format(timestamp, secret)
string_to_sign_enc = bytes(string_to_sign).encode('utf-8')
hmac_code = hmac.new(secret_enc, string_to_sign_enc, digestmod=hashlib.sha256).digest()
sign = urllib.quote_plus(base64.b64encode(hmac_code))
print(timestamp)
print(sign)
第二步,把 timestamp和第一步得到的签名值拼接到URL中。
| 参数 | 说明 |
|---|---|
| timestamp | 第一步使用到的时间戳 |
| sign | 第一步得到的签名值 |
#执行py或者java脚本之后得到的值填入timestamp和sign里面
https://oapi.dingtalk.com/robot/send?access_token=XXXXXX×tamp=XXX&sign=XXX
#成功得到的值是{"errcode":0,"errmsg":"ok"}
curl 'https://oapi.dingtalk.com/robot/send?access_token=xxxxxx×tamp=xxxxxx&sign=xxxxxx' \
>    -H 'Content-Type: application/json' \
>    -d '{"msgtype": "text","text": {"content": "我就是我, 是不一样的烟火"}}'

4.钉钉关键字报警演示
关键字

4.配置Alertmanager
vim /usr/local/alertmanager/alert-test.yml
#添加如下内容
global:
# 每1分钟检查一次是否恢复
        resolve_timeout: 1m
route:
 # 采用哪个标签来作为分组依据
  group_by: ['alertname']
 # 组告警等待时间。也就是告警产生后等待10s,如果有同组告警一起发出
  group_wait: 10s
 # 两组告警的间隔时间
  group_interval: 10s
 # 重复告警的间隔时间,减少相同微信告警的发送频率
  repeat_interval: 1h
 # 设置默认接收人
  receiver: 'webhook'

receivers:
  - name: 'webhook'
    webhook_configs:
            - url: 'http://localhost:8060/dingtalk/ops_dingding/send'
# 警报被解决之后是否通知
              send_resolved: true
systemctl restart alertmanager.service
netstat -anput | grep 9093
注意:http://localhost:8060/dingtalk/ops_dingding/send,其中ops_dingding是当时运行prometheus-webhook-dingtalk指定钉钉接口参数的变量:ops_dingding,如下:–ding.profile=“ops_dingding=xxxxxx”
5.关联Prometheus并配置报警规则
#简单的
vim /usr/local/prometheus/alert.rules
#添加如下内容
groups:
- name: Node_Down
  rules:
  - alert: Node实例宕机
    expr: up == 0
    for: 10s
    labels:
      user: prometheus
      severity: Warning
    annotations:
      summary: "{{ $labels.instance }} 服务宕机"
      description: "{{ $labels.instance }} of job {{ $labels.job }} has been Down."
修改Prometheus配置文件:
$ vim /usr/local/prometheus-2.19.1.linux-amd64/prometheus.yml
# Load rules once and periodically evaluate them according to the global 'evaluation_interval'.
rule_files:
  # - "first_rules.yml"
  # - "second_rules.yml"
  - "/usr/local/prometheus/*.rules"
#promtool测试
$ ./promtool check config prometheus.yml
Checking prometheus.yml
  SUCCESS: 1 rule files found

Checking /usr/local/prometheus/alert.rules
  SUCCESS: 1 rules found

#启动
systemctl restart prometheus.service
6.测试钉钉报警功能
#关闭node_exporter
systemctl stop node_exporter.service
#发生成功系统日志输出信息
 prometheus-webhook-dingtalk: level=info ts=2020-08-13T07:25:43.847278372Z caller=entry.go:22 http_scheme=http http_proto=HTTP/1.1 http_method=POST remote_addr=[::1]:54226 user_agent=Alertmanager/0.21.0 uri=http://localhost:8060/dingtalk/ops_dingding/send resp_status=200 resp_bytes_length=2 resp_elasped_ms=219.429499 msg="request complete"

恢复通知:
