使用vite+npm封装组件库并发布到npm仓库
组件库背景:使用elementplus+vue封装了一个通过表单组件。通过JSX对el-form下的el-input和el-button等表单进行统一封装,最后达到,通过数据即可一键生成页面表单的功能。
1.使用vite创建vue项目
npm create vite@latest elementplus-auto-form -- --template vue
2.项目目录
注意此处main.js入口文件只是当前项目入口文件,组件库打包的入口文件还是封装Form表单组件下的index.js

3.封装TFrom.vue
表单+表单校验+JSX生成表单项
TForm.vue:
FormItem.jsx:
import {
ElInput,
ElSelect,
ElOption,
ElButton
} from 'element-plus'
import { defineComponent } from 'vue'
// 普通显示
const Span = (form, data) => (
{data}
)
// 输入框
const Input = (form, data) => (
)
// 文本框
const Textarea = (form, data) => (
{data.rows}
)
const setLabelValue = (_item, { optionsKey } = {}) => {
return {
label: optionsKey ? _item[optionsKey.label] : _item.label,
value: optionsKey ? _item[optionsKey.value] : _item.value,
}
}
// 选择框
const Select = (form, data) => (
{data.options.map((item) => {
return
)
const Button = (form, data) =>{
按需引入elementplus:
// element-plus按需导入
import AutoImport from 'unplugin-auto-import/vite'
import Components from 'unplugin-vue-components/vite'
import { ElementPlusResolver } from 'unplugin-vue-components/resolvers'
import vueJsx from '@vitejs/plugin-vue-jsx'
import path from 'path'

...
 plugins: [
    vue(),
    // 用到JSX语法
    vueJsx(),
    AutoImport({
      resolvers: [ElementPlusResolver()],
    }),
    Components({
      resolvers: [ElementPlusResolver()],
    }),
  ],
  resolve: {
    alias: {
      '@':  path.resolve(__dirname, 'src')
    }
  },
...
通过install插件方式进行使用:
import TForm from "./TForm.vue";

export default {
    install (app) {
        // 在app上进行扩展,app提供 component directive 函数
        // 如果要挂载原型 app.config.globalProperties 方式
        // "TForm"自定义即可
        app.component("TForm", TForm);
    }
}
4.打包配置
设置打包文件名,包路径等
注意打包入口为index.js文件(需要使用导出install方法中的组件),而不是main.js文件(main.js中引入index.js只是用于本地测试)
  build: {
		outDir: "elementplus-auto-form", //输出文件名称
		lib: {
			entry: path.resolve(__dirname, "./src/package/index.js"), //指定组件编译入口文件
			name: "elementplus-auto-form",
			fileName: "elementplus-auto-form",
		}, //库编译模式配置
		rollupOptions: {
			// 确保外部化处理那些你不想打包进库的依赖
			external: ["vue"],
			output: {
				// 在 UMD 构建模式下为这些外部化的依赖提供一个全局变量
				globals: {
					vue: "Vue",
				},
			},
		},
	},
npm run build进行打包
5.在打好的包下,创建package.json文件
在package.json文件中对,包版本等信息进行配置

{
  "name": "elementplus-auto-form",
  "version": "1.0.0",
  "description": "对elementplus的form表单进行封装,达到根据数据一键生成表单功能",
  "keywords": ["elementplus","el-form","auto-form"],
  "main": "elementplus-auto-form.js",
  "scripts": {
    "test": "echo \"Error: no test specified\" && exit 1"
  },
  "author": "xxx",
  "license": "ISC",
  "private": false
}
6.上传到npm仓库
- 在npm官网创建自己的账号并登录。
- 在打包好的文件路径下:使用npm login会跳转到npm官网进行登录;
- 登录完成后,将镜像源改为npm官方:npm config set registry=https://registry.npmjs.org
- 然后使用npm publish将包上传到npm仓库

7.从npm下载包并进行测试
将镜像切回到淘宝源:
npm config set registry https://registry.npm.taobao.org
查看当前镜像源:
npm config get registry
配置到淘宝镜像后,首先会到淘宝镜像中下载,没有则去npm官网进行下载
下载后node_modules下的包:

8.代码中使用包elementplus-auto-form
//main.js
import 'elementplus-auto-form/style.css'
import TForm from "elementplus-auto-form";

const app = createApp(App);
app.use(router).use(TForm).mount('#app')
Form.vue页面使用:
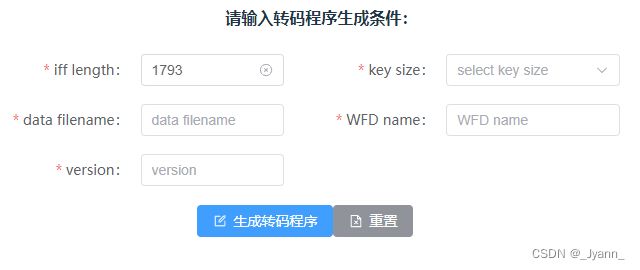
请输入转码程序生成条件:
测试数据:
import { DocumentDelete, Edit, Download } from '@element-plus/icons-vue'
import { shallowRef ,ref } from 'vue'

let checkNum = (rule, value, callback) => {
    // 函数用于检查其参数是否是非数字值,如果参数值为 NaN 或字符串、对象、undefined等非数字值则返回 true, 否则返回 false。
    if (isNaN(value)) {
        return callback("iffLength must be a number");
    }
    return callback();
}
let checkVersion = (rule, value, callback) => {
    let regex = /^V(\d{2})[A-L]$/;
    if (regex.test(value)) {
        callback();
        return true;
    } else {
        callback(new Error("Version must be similar to 'V23G'"));
        return false;
    }
}

const cronjobConfig = ref({
    rules: {
        iffLength: [
            { required: true, message: 'Please input iff length', trigger: 'blur' },
            { validator: checkNum, trigger: "blur" }
        ],
        keySize: [
            { required: true, message: 'Please select key size', trigger: 'change', }
        ],
        dataFileName: [{
            required: true,
            message: 'Please input data filename',
            trigger: 'blur',
        }],
        wfdName: [{
            required: true,
            message: 'Please input wfd name',
            trigger: 'blur',
        }],
        version: [{ required: true, message: 'Please input version', trigger: 'blur' },
            { validator: checkVersion, trigger: "blur" }
        ]
    },
    formItems: [{
            field: 'iffLength',
            prop: 'iffLength',
            label: 'iff length',
            placeholder: '1793',
            labelWidth: '150px',
            type: 'input',
            // size: 'small',
            span: 12,
        },
        {
            field: 'keySize',
            prop: 'keySize',
            type: 'select',
            label: 'key size',
            placeholder: 'select key size',
            // editable: true,
            // size: 'small',
            span: 12,
            options: [{ label: 6, value: 6 }, { label: 9, value: 9 }]
        },
        {
            field: 'dataFileName',
            prop: 'dataFileName',
            type: 'input',
            label: 'data filename',
            labelWidth: '150px',
            placeholder: 'data filename',
            // isHidden: false,
            span: 12,
        },
        {
            field: 'wfdName',
            prop: 'wfdName',
            type: 'input',
            label: 'WFD name',
            placeholder: 'WFD name',
            span: 12,
        },
        {
            field: 'version',
            prop: 'version',
            type: 'input',
            label: 'version',
            labelWidth: '150px',
            placeholder: 'version',
            span: 12,
        },
    ],
    // 按钮
    buttons: [{
            name: '生成转码程序',
            title: 'generateCronjob',
            type: 'primary',
            size: 'default', //可以是default,small,large
            icon: shallowRef(Edit),
            // 按钮是否为朴素类型
            // plain: true,
            onClick: null
        }, {
            name: '重置',
            type: 'info',
            title: 'resetCronjob',
            size: 'default',
            icon: shallowRef(DocumentDelete),
            // plain: true,
            onClick: null
        },
        {
            name: '下载转码程序',
            type: 'success',
            title: 'downloadCronjob',
            size: 'default',
            icon: shallowRef(Download),
            isHidden: true,
            // plain: true,
            onClick: null
        }
    ],
    ref: 'cronjobFormRef',
    labelWidth: '120px',
    labelPosition: 'right',
    inline: true,
    editable: true,
    // 单元列之间的间隔
    elRowGutter: 20,
    // size: 'small',
    // 是否需要form边框
    formBorder: true,
    colLayout: {
        xl: 5, //2K屏等
        lg: 8, //大屏幕,如大桌面显示器
        md: 12, //中等屏幕,如桌面显示器
        sm: 24, //小屏幕,如平板
        xs: 24 //超小屏,如手机
    }
});

export default cronjobConfig;
9.测试效果