docker部署jupyterhub+SSL (HTTPS)/证书生成
JUPYTER
-
-
-
- 1、JupyterHub简介
- 2、先决条件
- 3、安装准备
-
- 3.1、创建Dockerfile
- 3.2、创建 jupyter-docker-compose.yml
- 3.3、准备配置文件
- 4、启动jupyterhub容器
- 5、访问页面
-
- 5.1、设置其他用户名密码
- 5.2、添加用户
- 注:可能用到的命令:
- 证书生成
-
-
1、JupyterHub简介
支持多用户的 Jupyter Notebook 服务器,用于创建、管理、代理多个 Jupyter Notebook 实例。具有扩展性和可定制性。
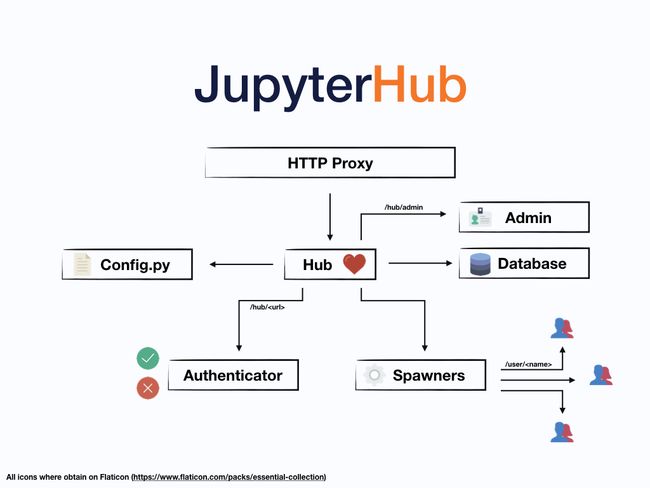
三个主要演员组成了 JupyterHub:
- 多用户集线器(龙卷风过程)
- 可配置的 http代理(node-http-proxy)
- 多个单用户 Jupyter 笔记本服务器(Python/Jupyter/tornado)
操作的基本原则是:
- 集线器启动代理。
- 默认情况下,代理将所有请求转发到集线器。
- 集线器处理登录并按需生成单用户服务器。
- 集线器配置代理以将 URL 前缀转发到单用户笔记本服务器。
2、先决条件
- 运行 Ubuntu 18.04 的服务器,您具有 root 访问权限。
- 您的服务器上至少有1.5GB的 RAM。
3、安装准备
这个jupyterhub/jupyterhubdocker镜像只是一个运行Hub服务本身的镜像。它不提供单用户服务器所需的其他 Jupyter 组件,例如 Notebook 安装。要运行单用户服务器(可能与集线器在同一系统上或不在同一系统上),必须安装 Jupyter Notebook 4 或更高版本。
/srv/jupyterhub 适用于所有安全和运行时文件
/etc/jupyterhub 对于所有配置文件
/var/log 对于日志文件
3.1、创建Dockerfile
FROM jupyterhub/jupyterhub:1.4
RUN python3 -m pip install jupyterlab notebook
RUN apt-get update\
 && apt-get install vim -y\
 && apt-get install sudo
生成镜像
docker build -t jupyterhub:leotest .
3.2、创建 jupyter-docker-compose.yml
version: '3.1'
services:
    jupyter_project:
        image: 'jupyterhub:leotest'
        restart: always
        container_name: jupyterhub
        command: jupyterhub
        ports:
          - 8002:8000
        volumes:
          - /home/leojiang/jupyterhub/srv:/srv/jupyterhub
          - /home/leojiang/jupyterhub/home:/home
          - /var/run/docker.sock:/var/run/docker.sock:rw
          - /home/leojiang/jupyterhub/log:/var/log/
          #- /home/leojiang/jupyterhub/cert/server.crt:/server.crt:rw
          #- /home/leojiang/jupyterhub/cert/server.key:/server.key:rw
3.3、准备配置文件
jupyterhub_config.py
#要生成带有设置和描述的默认配置文件:
#jupyterhub --generate-config

# 是否有向系统添加用户的权限
c.LocalAuthenticator.create_system_users = True
c.DummyAuthenticator.password = "some_password"
# 一组初始管理员用户
c.Authenticator.admin_users = set(['jupyterhub','admin'])
# 您可以使用一组来限制允许哪些用户登录
#c.Authenticator.allowed_users = {'mal', 'zoe', 'inara', 'kaylee'}
# 仪表板中访问的最高级别目录。打开后所有用户可以相互访问
# c.Spawner.notebook_dir = '/home'
# SSL 证书
#c.JupyterHub.ssl_key = '/server.key'
#c.JupyterHub.ssl_cert = '/server.crt'
# 可以设置这个wheel组的人员都是管理员
c.PAMAuthenticator.admin_groups = {'wheel'}
# 设置为True,则管理员有权在各自的机器上以其他用户的身份登录,以进行调试
c.JupyterHub.admin_access = True
SSL证书(另一种配置方式)
c.JupyterHub.external_ssl_authorities = Dict()
文件 dict 具有以下格式(您必须至少指定一个证书):
{
    'key': '/server.key',
    'cert': '/server.crt',
    'ca': '/ca.crt'
}
4、启动jupyterhub容器
启动
docker-compose -f jupyter-docker-compose.yml up -d
进入容器设置admin用户的密码(需要手动设置)
docker exec -it jupyterhub_container_id bash

root@c8119764d982:/srv/jupyterhub# passwd admin
New password:
Retype new password:
passwd: password updated successfully
root@c8119764d982:/srv/jupyterhub#
提示:admin用户默认拥有sudo权限,如果其他用户想添加需要手动配置 eg: add jupyterhub user
vim /etc/sudoers
jupyterhub      ALL=(ALL:ALL) ALL
5、访问页面
web:
http://host_ip:8002
如果配置文件中指定了证书则使用https访问,生成证书下方有提示
https://host_ip:8002
5.1、设置其他用户名密码
打开command交互界面

admin@c8119764d982:~$ sudo passwd jupyterhub
New password:
Retype new password:
passwd: password updated successfully
admin@c8119764d982:~$
5.2、添加用户
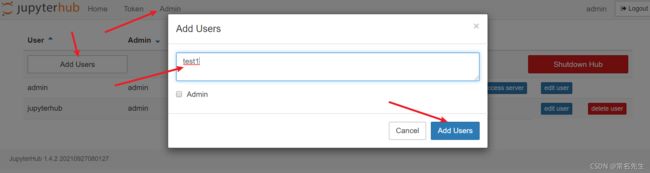
注:可能用到的命令:
1、添加用户到用户组
chmod 775 /home/ -R
usermod -a -G group username
2、要接入LDAP需要在容器中安装jupyterhub-ldapauthenticator,
pip install jupyterhub-ldapauthenticator
useradd -d /home/enjiafe enjiafe
3、用户共享目录给其他用户,可以使用软连接
  ln -s source dist        #建立软连接
  rm -rf  symbolic_name    #删除软连接
* 当其他用户连接到组用户,可以访问修复文件,但是其他用户创建的文件只能创建者自己修改其他人只有读权限,但是用户组用户有删除权限。
证书生成
Linux系统下生成证书

生成秘钥key,运行:

$ openssl genrsa -des3 -out server.key 2048
1
会有两次要求输入密码,输入同一个即可

输入密码

然后你就获得了一个server.key文件.
以后使用此文件(通过openssl提供的命令或API)可能经常回要求输入密码,如果想去除输入密码的步骤可以使用以下命令:

$ openssl rsa -in server.key -out server.key

创建服务器证书的申请文件server.csr,运行:

openssl req -new -key server.key -out server.csr

其中Country Name填CN,Common Name填主机名也可以不填,如果不填浏览器会认为不安全.(例如你以后的url为https://abcd/xxxx….这里就可以填abcd),其他的都可以不填.
创建CA证书:

openssl req -new -x509 -key server.key -out ca.crt -days 3650

此时,你可以得到一个ca.crt的证书,这个证书用来给自己的证书签名.
创建自当前日期起有效期为期十年的服务器证书server.crt:

openssl x509 -req -days 3650 -in server.csr -CA ca.crt -CAkey server.key -CAcreateserial -out server.crt

ls你的文件夹,可以看到一共生成了5个文件:

ca.crt   ca.srl    server.crt   server.csr   server.key
1
其中,server.crt和server.key就是你的nginx需要的证书文件.
另一种生成证书方式
openssl req -x509 -nodes -days 365 -newkey rsa:2048 -keyout xxlaila.cn.key -out xxlaila.cn.crt -subj "/CN=*.xxlaila.cn"
去除UTF-8 BOM,要不win上无法识别
sed -i '1s/^\xEF\xBB\xBF//' your.cer
ldap
git地址
官方参考