Spring Boot实现Web的常用功能
Spring Boot实现Web的常用功能
- Spring MVC整合支持
-
- Spring MVC自动配置介绍
- Spring MVC功能扩展实现
-
-
- 项目基础环境搭建
- 功能呢扩展实现
-
- SpringBoot整合Servlet三大组件
-
- 组件注册整合Servlet三大组件
-
-
- 使用组件注册方式整合Servlet
- 使用组件注册方式整合Filter
- 使用组件注册方式整合Listener
-
- 路径扫描整合Servlet三大组件
-
-
- 使用路径扫描方式整合Servlet、Filter、Listener
- 效果测试
-
- 文件上传与下载
-
- 文件上传
- 文件下载
Spring MVC整合支持
Spring MVC自动配置介绍
在SpringBoot项目中,一旦引入了Web依赖启动器spring-boot-starter-web那么SpringBoot整合Spring MVC框架默认实现的一些AutoConfiguration自动配置类会自动生效,刻几乎在无任何额外配置的情况下进行进行Web开发。Spring Boot整合SpringMVCWeb开发主要提供了以下自动配置的功能特性。
(1)内置了两个视图解析器
(2)支持静态资源以及WebJars
(3)自动注册了转换器和格式化器
(4)支持Http消息转换器
(5)自动注册了消息代码解析器
(6)支持静态项目首页index/html
(7)支持定制应用图标favicon.ico
(8)自动初始化Web数据绑定器ConfigurableWebBindindInitializer
Spring MVC功能扩展实现
Spring Boot整合Spring MVC进行Web开发时提供了许多自动化配置,开发时还需要开发者对一些功能进行扩展实现。
示例:
项目基础环境搭建
(1)创建chapter05的spring Boot项目,并在依赖中选择Web模块下的Web依赖启动和TemplateEnginess模块下的Thymeleaf依赖启动器,chapter05的内容与项目shitu一样。

功能呢扩展实现
使用Spring Boot整合Spring MVC进行Web开发,实现简单的页面跳转功能。
(1)注册视图管理器在项目的com.itheima.config包下创建一个实现WebMVCConfigure接口的配置类MyMVCconfig。
package com.itheima.config;
import org.springframework.beans.factory.annotation.Autowired;
import org.springframework.context.annotation.Configuration;
import org.springframework.web.servlet.config.annotation.InterceptorRegistry;
import org.springframework.web.servlet.config.annotation.ViewControllerRegistry;
import org.springframework.web.servlet.config.annotation.WebMvcConfigurer;

@Configuration
public class MyMVCconfig implements WebMvcConfigurer {
    @Override
    public void addViewControllers(ViewControllerRegistry registry){
        registry.addViewController("/toLoginPage").setViewName("login");
        registry.addViewController("/login.html").setViewName("login");
    }
访问http://localhost:8080/toLoginPage和http://localhost:8080/login.html
在此之前先注释掉LoginController代码。


可以看出WebMVCConfigure接口定义的用户请求控制方法也实现了用户请求控制跳转的效果。
(2)注册自定义拦截器,在项目com.itheima.config包下创建一个自定义拦截器类MyInterceptor,
package com.itheima.config;

import org.springframework.lang.Nullable;
import org.springframework.stereotype.Component;
import org.springframework.web.servlet.HandlerInterceptor;
import org.springframework.web.servlet.ModelAndView;

import javax.servlet.http.HttpServletRequest;
import javax.servlet.http.HttpServletResponse;
import java.util.Calendar;

@Component
public class MyInterceptor implements HandlerInterceptor {
    @Override
    public boolean preHandle(HttpServletRequest request, HttpServletResponse response,Object handler)throws Exception{
        String uri=request.getRequestURI();
        Object loginUser=request.getSession().getAttribute("loginUser");
        if(uri.startsWith("/admin") && null==loginUser){
            response.sendRedirect("/toLoginPage");
            return false;
        }
        return true;
    }
    @Override
    public void postHandle(HttpServletRequest request, HttpServletResponse response, Object handle, @Nullable ModelAndView modelAndView)throws Exception{
        request.setAttribute("currentYear", Calendar.getInstance().get(Calendar.YEAR));
    }
    @Override
    public  void afterCompletion(HttpServletRequest request,HttpServletResponse response,Object handler,@Nullable Exception ex)throws Exception{

    }
}
然后再自定义配置类MyMVCconfig中,重写addInterceptor()方法注册自定义拦截器
@Autowired
    private MyInterceptor myInterceptor;
    @Override
    public void addInterceptors(InterceptorRegistry registry){
        registry.addInterceptor(myInterceptor).addPathPatterns("/**").excludePathPatterns("/login,html");
    }
在注册自定义拦截器是,使用addPathPatterns(“/***”)方法拦截所有路径请求,excludePathPatterns(“/login.html”)方法对“login.html”路径请求进行了放行处理
访问http://localhost:8080/admin,会自动跳转到
http://localhost:8080/toLoginPage

SpringBoot整合Servlet三大组件
进行Servlet开发时,通常首先定义Servlet、Filter、Listener三大组件,然后在文件web.xml中进行配置。Spring Boot提供了组件注册和路径扫描两种方式整合Servlet三大组件。
组件注册整合Servlet三大组件
使用组件注册方式整合Servlet
(1)创建自定义Servlet类,创建一个名为com.itheima.servletComponent的包在该包下创建一个继承了HttpSetvlet的类
package com.itheima.servletComponent;

import org.springframework.stereotype.Component;

import javax.servlet.ServletException;
import javax.servlet.http.HttpServlet;
import javax.servlet.http.HttpServletRequest;
import javax.servlet.http.HttpServletResponse;
import java.io.IOException;

@Component
public class MyServlet extends HttpServlet {
    @Override
    protected void  doGet(HttpServletRequest request, HttpServletResponse response)throws ServletException, IOException {
        this.doPost(request,response);
    }
    @Override
    protected void doPost(HttpServletRequest request,HttpServletResponse response)throws ServletException,IOException{
        response.getWriter().write("hello MyServlet");
    }
}
(2)创建Servlet组件配置类,在com.itheima.config包下创建一个Servlet组件配置类ServletConfig,用来Servlet相关组件进行注册
package com.itheima.config;

import com.itheima.servletComponent.MyServlet;
import org.springframework.boot.web.servlet.ServletRegistrationBean;
import org.springframework.context.annotation.Bean;
import org.springframework.context.annotation.Configuration;

@Configuration
public class ServletConfig {
    @Bean
    public ServletRegistrationBean getSetvlet(MyServlet myServlet){
        ServletRegistrationBean registrationBean=new ServletRegistrationBean(myServlet,"/myServlet");
        return  registrationBean;
    }
}
使用组件注册方式整合Filter
(1)创建自定义Filter类,在com.itheima.servletComponent包下创建一个类MyFilter
package com.itheima.servletComponent;

import org.springframework.stereotype.Component;

import javax.servlet.*;
import java.io.IOException;
import java.util.logging.LogRecord;

@Component
public class MyFilter implements Filter {
    @Override
    public void init(FilterConfig filterConfig)throws ServletException{}
    @Override
    public void doFilter(ServletRequest servletRequest, ServletResponse servletResponse, FilterChain filterChain) throws IOException, ServletException {
        System.out.println("hello myFilter");
        filterChain.doFilter(servletRequest,servletResponse);
    }
    @Override
    public void destroy(){}
}
(2)向Servlet组件配置类注册自定义Filter类,在ServletConfig代码中加入以下代码,将自定义Filter类使用组件注册方式进行注册
 @Bean
    public FilterRegistrationBean getFilter(MyFilter filter){
        FilterRegistrationBean registrationBean=new FilterRegistrationBean(filter);
        registrationBean.setUrlPatterns(Arrays.asList("/toLoginPage","/myFilter"));
        return registrationBean;
    }
(3)访问http://localhost:8080/myFilter,由于我们没有编写路径对应请求处理方法,浏览器会报404,但是会打印出myFilter

![]()
使用组件注册方式整合Listener
(1)创建自定义类Listener,在com.itheima.servletComponent包下创建一个类MyListener。
package com.itheima.servletComponent;

import org.springframework.stereotype.Component;

import javax.servlet.ServletContextEvent;
import javax.servlet.ServletContextListener;

@Component
public class MyListener implements ServletContextListener {
    @Override
    public void contextInitialized(ServletContextEvent servletContextEvent){
        System.out.println("contextInitialized");
    }
    @Override
    public void contextDestroyed(ServletContextEvent servletContextEvent){
        System.out.println("contextDestroyed...");
    }
}
(2)向Servlet组件配置类注册自定义Listener类,打开之前创建的Servlet组件配置类ServletConfig,将该自定义listener类使用组件注册方式进行注册。
 @Bean
    public ServletListenerRegistrationBean getServletListener(MyListener myListener){
        ServletListenerRegistrationBean registrationBean=new ServletListenerRegistrationBean(myListener);
        return registrationBean;
    }
路径扫描整合Servlet三大组件
使用路径扫描方式整合Servlet、Filter、Listener
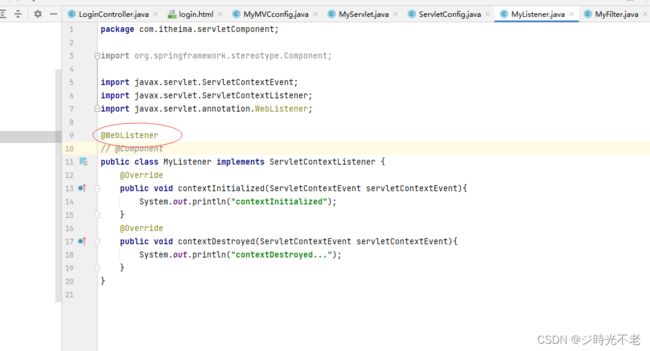
将ServletConfig全部注释掉,然后分别注释掉MyServlet、MyFilter、MyListener中的@Component,然后分别增加@WebServlet
MyServlet

MyFilter

MyListener

然后在主程序启动类上添加@ServletComponentScan

效果测试
启动项目,在浏览器上访问http://localhost:8080/anntationServlet


然后访问http://localhost:8080/antionMyServlet

然后点击Exit退出Spring Boot

文件上传与下载
文件上传
(1)编写文件上传表单页面
在templates模板引擎文件夹下创建一个用来上传文件的upload.html模板页面
Title
上传成功
(2)在全局配置文件中添加文件上传的相关配置
spring.servlet.multipart.max-file-size=10MB
spring.servlet.multipart.max-request-size=50MB
spring.servlet.multipart.max-file-size用来限制单个上传文件的大小
spring.servlet.multipart.max-request-size用来限制总文件的大小。
(3)进行文件上传处理实现文件功能。
在之前的com.itheima.controller包下创建一个管理文件上传下载的控制类FileController
package com.itheima.controller;

import org.springframework.stereotype.Controller;
import org.springframework.ui.Model;
import org.springframework.web.bind.annotation.GetMapping;
import org.springframework.web.bind.annotation.PostMapping;
import org.springframework.web.multipart.MultipartFile;

import java.io.File;
import java.util.UUID;

@Controller
public class FileController {
    @GetMapping("/toUpload")
    public String toUpload(){
        return "upload";
    }
    @PostMapping("/uploadFile")
    public  String uploadFile(MultipartFile[] fileUpload, Model model){
        model.addAttribute("uploadStatus","上传成功");
        for(MultipartFile file:fileUpload){
            String fileName=file.getOriginalFilename();
            fileName= UUID.randomUUID()+"_"+fileName;
            String dirPath="E:/file/";
            File filePath=new File(dirPath);
            if (!filePath.exists()){
                filePath.mkdirs();
            }
            try{
                file.transferTo(new File(dirPath+fileName));
            }catch (Exception e){
                e.printStackTrace();
                model.addAttribute("uploadStatus","上传失败"+e.getMessage());
            }
        }
        return "upload";
    }
}
(4)启动项目,访问http://localhost:8080/toUpload


文件下载
(1)添加文件下载工具类依赖
            commons-io
            commons-io
            2.6
(2)定制下载页面,创建一个download.html
    Title


  文件下载列表


        启动命令.txt
         下载文件


        游戏下载链接30.xlsx
         下载文件
(3)编写文件下载处理方法,在之前创建文件管理控制类FileController中编写文件下载的处理方法
package com.itheima.controller;


import org.apache.commons.io.FileUtils;
import org.springframework.http.HttpHeaders;
import org.springframework.http.HttpStatus;
import org.springframework.http.MediaType;
import org.springframework.http.ResponseEntity;
import org.springframework.stereotype.Controller;
import org.springframework.ui.Model;
import org.springframework.web.bind.annotation.*;
import org.springframework.web.multipart.MultipartFile;

import javax.servlet.http.HttpServletRequest;
import java.io.File;
import java.net.URLEncoder;
import java.nio.charset.StandardCharsets;
import java.util.UUID;

@Controller
public class FileController {
    @GetMapping("/toUpload")
    public String toUpload(){
        return "upload";
    }
    @PostMapping("/uploadFile")
    public  String uploadFile(MultipartFile[] fileUpload, Model model){
        model.addAttribute("uploadStatus","上传成功");
        for(MultipartFile file:fileUpload){
            String fileName=file.getOriginalFilename();
            fileName= UUID.randomUUID()+"_"+fileName;
            String dirPath="E:/file/";
            File filePath=new File(dirPath);
            if (!filePath.exists()){
                filePath.mkdirs();
            }
            try{
                file.transferTo(new File(dirPath+fileName));
            }catch (Exception e){
                e.printStackTrace();
                model.addAttribute("uploadStatus","上传失败"+e.getMessage());
            }
        }
        return "upload";
    }
    @GetMapping("/toDownload")
    public String toDownload(){
        return "download";
    }
    @GetMapping("/download")
    public ResponseEntity fileDownload(HttpServletRequest request,String filename)throws Exception{
        //指定要下载的文件根路径
        String dirPath="E:/file/";
        //创建该文件对象
        File file=new File(dirPath+File.separator+filename);
        //设置响应头
        HttpHeaders headers=new HttpHeaders();
        filename=getFilename(request,filename);
        //通知浏览器以下载方式打开
        headers.setContentDispositionFormData("attachment",filename);
        //定义以流的形式下载返回文件数据
        headers.setContentType(MediaType.APPLICATION_OCTET_STREAM);
        try {
            return new ResponseEntity<>(FileUtils.readFileToByteArray(file), headers, HttpStatus.OK);
        } catch (Exception e) {
            e.printStackTrace();
            return new ResponseEntity(e.getMessage().getBytes(),HttpStatus.EXPECTATION_FAILED);
        }
    }
    //根据不同浏览器进行编码设置,返回编码的文件名
    private String getFilename(HttpServletRequest request,String filename)throws Exception{
        //IE不同版本User-Agent中出现的关键词
        String[] IEBrowserKeyWords={"MEIE","Trident","Edge"};
        //获取请求头代理消息
        String userAgent=request.getHeader("User-Agent");
        for(String keyWord:IEBrowserKeyWords){
            if(userAgent.contains(keyWord)){
                //IE内核浏览器,统一为UTF-8编码显示
                return URLEncoder.encode(filename,"UTF-8").replace("+"," ");
            }

        }
        //火狐等其他浏览器用ISO-8859-1编码显示
        return new String(filename.getBytes("UTF-8"),"ISO-8859-1");
    }
}


