Hexo-Next主题搭建个人博客最新配置教程!
Hexo-Next主题搭建个人博客最新配置教程!
个人博客
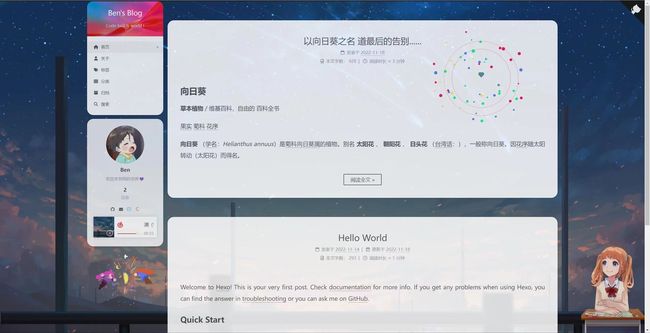
网页预览:https://benn314.github.io/
Hexo-Next 是一款我很喜欢的主题,布局简约,很适合用于搭配 live-2d 和 网格动画,打造属于自己的个人博客。博客目前部署于 Github Pages
相关Github仓库
https://github.com/Benn314/Benn314.github.io
博客源码
使用工具:Node.js、Vscode、Git
1 安装Hexo
新建 blog 文件夹,进入此目录下
安装Hexo脚手架
npm install -g hexo-cli
初始化Hexo
hexo init
下载 NexT 主题,
cd themes
git clone https://github.com/theme-next/hexo-theme-next
或者 到 next 的 GitHub 仓库下载压缩包添加 themes 目录下并重命名为 hexo-theme-next
启动本地服务查看
hexo s
Common Instruction
hexo clean :清除 public 静态目录hexo s :本地启动默认指定 4000 端口预览 (s 是 server 是缩写 也就是启动 hexo 服务)hexo g :生成 public 静态目录hexo d : 部署
在 Hexo 中有两份 主要的配置文件,其名称都是 _config.yml
站点配置文件 :位于站点根目录下(/_config.yml),主要包含 Hexo 本身的站点配置主题配置文件 :位于主题目录下(themes/hexo-theme-next/_config.yml),这份配置由主题作者提供,主要用于配置主题相关的选项
2 主题(Gemini)
主题配置文件
scheme : Gemini
3 配置menu
站点配置文件
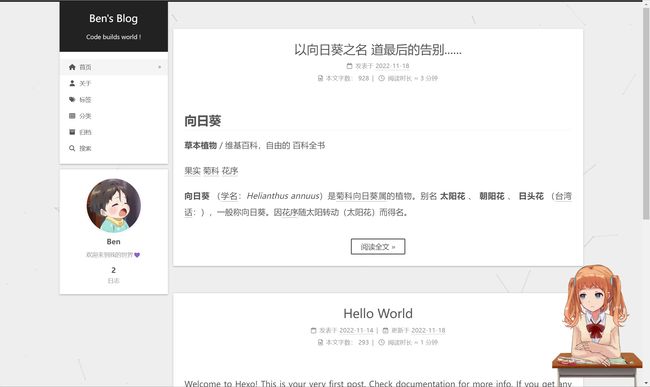
title : Ben's Blog
subtitle : "Code builds world !"
description : "欢迎来到我的世界"
keywords :
author : Ben
language : zh- CN
timezone : "Asia/Shanghai"
主题配置文件
menu :
home : / | | fa fa- home
about : /about/ | | fa fa- user
tags : /tags/ | | fa fa- tags
categories : /categories/ | | fa fa- th
archives : /archives/ | | fa fa- archive
menu_settings :
icons : true
badges : false
4 隐藏网页底部 powered By Hexo / 强力驱动
全局搜索并注释掉相应代码即可
5 配置代码块高亮风格
highlight 和 prismjs 是两种代码块风格,现在 highlight 是主流,且二者只能开启其一
站点配置文件
highlight :
enable : true
line_number : true
auto_detect : true
tab_replace : ""
wrap : true
hljs : false
prismjs :
enable : false
preprocess : true
line_number : true
tab_replace : ""
主题配置文件
codeblock :
theme :
light : github- dark
dark : github- dark
prism :
light : prism
dark : prism- dark
copy_button :
enable : true
style : mac
复制按钮我选择了 mac 风格,确实是好看
可在 https://theme-next.js.org/highlight/ 中查看各个代码风格主题,选择自己喜欢的代码风格
6 文章添加阴影
blog\themes\hexo-theme-next\source\css_common\components\post\index.styl
if (hexo-config('motion.transition.post_block')) {
    .post-block {
      visibility: hidden;
      margin-top: 60px;
      margin-bottom: 60px;
      padding: 25px;
      border-radius: 20px 20px 20px 20px;
      -webkit-box-shadow: 0 0 5px rgba(202, 203, 203, .5);
      -moz-box-shadow: 0 0 5px rgba(202, 203, 204, .5);
    }
    .pagination, .comments {
      visibility: hidden;
    }
  }
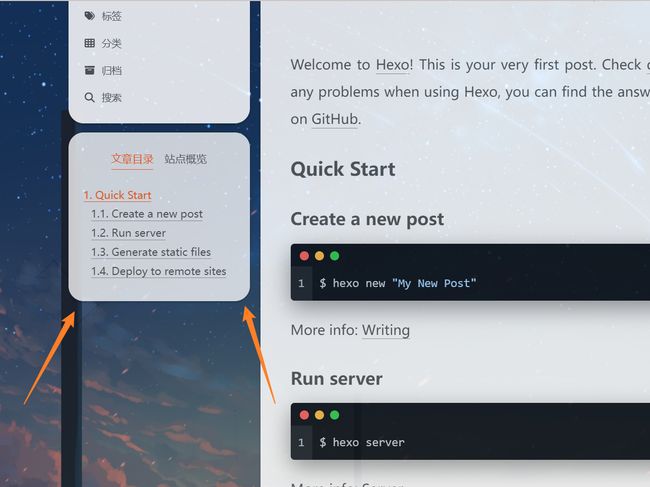
7 显示当前浏览进度
主题配置文件
back2top :
enable : true
sidebar : true
scrollpercent : true
8 文章分享功能
等有了域名以后才能在addthis中配置
9 Local Search本地搜索
安装插件 hexo-generator-searchdb,执行以下命令:
npm install hexo-generator-searchdb --save
修改 hexo/_config.yml 站点配置文件 ,新增以下内容到末尾位置:
search :
path : search.xml
field : post
format : html
limit : 10000
修改 主题配置文件 ,启用本地搜索功能:
local_search :
enable : true
10 设置favicon.ico图标
在 EasyIcon 中找一张(32 * 32)的 ico 图标,或者去别的网站下载或者制作,并将图标名称改为 favicon.ico,然后把图标放在 /themes/next/source/images 里,并且修改主题配置文件 :
favicon :
small : /images/favicon- 16x16- next.png
medium : /images/favicon- 32x32- next.png
apple_touch_icon : /images/apple- touch- icon- next.png
safari_pinned_tab : /images/logo.svg
没找到满意的 所以还是用官方默认的图标
11 修改文章底部的#号的标签
新版本的next无需修改
12 增加文章字数统计和阅读时长
安装 hexo-word-counter 插件
npm install hexo-word-counter
站点配置文件
symbols_count_time :
symbols : true
time : true
total_symbols : true
total_time : true
exclude_codeblock : false
wpm : 275
suffix : "mins."
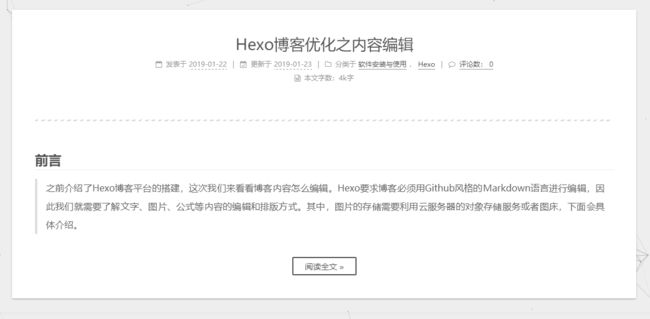
13 阅读全文
直接在文章中添加
我们可以添加前言引用来对文章进行总结提炼 详情可点击阅读全文~
14 添加作者头像
进入主题配置文件 ,找到下面这行
avatar :
url : /images/avatar.gif
上传自定义的图片到下列目录:/themes/next/source/images/,更改 avatar 路径完成!
avatar :
url : /images/Ben.jpg
rounded : true
rotated : true
15 修改加载动画
全局搜索 pace 然后设置 pace: true 开启
pace :
enable : true
color : blue
theme : bounce
16 添加本站运行时间
修改 /blog/themes/next/layout/_partials/footer.njk 文件,在末尾加入如下代码:
载入天数...
17 鼠标点击动画
爱心特效
在 /themes/next/source/js/ 下新建文件 clicklove.js 并添加代码:
! function ( e, t, a ) { function n ( ) { c ( ".heart{width: 10px;height: 10px;position: fixed;background: #f00;transform: rotate(45deg);-webkit-transform: rotate(45deg);-moz-transform: rotate(45deg);}.heart:after,.heart:before{content: '';width: inherit;height: inherit;background: inherit;border-radius: 50%;-webkit-border-radius: 50%;-moz-border-radius: 50%;position: fixed;}.heart:after{top: -5px;}.heart:before{left: -5px;}" ) , o ( ) , r ( ) } function r ( ) { for ( var e= 0 ; e< d. length; e++ ) d[ e] . alpha<= 0 ? ( t. body. removeChild ( d[ e] . el) , d. splice ( e, 1 ) ) : ( d[ e] . y-- , d[ e] . scale+= .004 , d[ e] . alpha-= .013 , d[ e] . el. style. cssText= "left:" + d[ e] . x+ "px;top:" + d[ e] . y+ "px;opacity:" + d[ e] . alpha+ ";transform:scale(" + d[ e] . scale+ "," + d[ e] . scale+ ") rotate(45deg);background:" + d[ e] . color+ ";z-index:99999" ) ; requestAnimationFrame ( r) } function o ( ) { var t= "function" == typeof e. onclick&& e. onclick; e. onclick = function ( e ) { t&& t ( ) , i ( e) } } function i ( e ) { var a= t. createElement ( "div" ) ; a. className= "heart" , d. push ( { el : a, x : e. clientX- 5 , y : e. clientY- 5 , scale : 1 , alpha : 1 , color : s ( ) } ) , t. body. appendChild ( a) } function c ( e ) { var a= t. createElement ( "style" ) ; a. type= "text/css" ; try { a. appendChild ( t. createTextNode ( e) ) } catch ( t) { a. styleSheet. cssText= e} t. getElementsByTagName ( "head" ) [ 0 ] . appendChild ( a) } function s ( ) { return "rgb(" + ~ ~ ( 255 * Math. random ( ) ) + "," + ~ ~ ( 255 * Math. random ( ) ) + "," + ~ ~ ( 255 * Math. random ( ) ) + ")" } var d= [ ] ; e. requestAnimationFrame = function ( ) { return e. requestAnimationFrame|| e. webkitRequestAnimationFrame|| e. mozRequestAnimationFrame|| e. oRequestAnimationFrame|| e. msRequestAnimationFrame|| function ( e ) { setTimeout ( e, 1e3 / 60 ) } } ( ) , n ( ) } ( window, document) ;
在 \themes\next\layout_layout.njk 文件末尾添加:
烟花动画
在 themes/next/source/js/ 里面新建文件 fireworks.js 并添加代码:
"use strict" ; function updateCoords ( e ) { pointerX = ( e. clientX || e. touches[ 0 ] . clientX) - canvasEl. getBoundingClientRect ( ) . left, pointerY = e. clientY || e. touches[ 0 ] . clientY - canvasEl. getBoundingClientRect ( ) . top } function setParticuleDirection ( e ) { var t = anime. random ( 0 , 360 ) * Math. PI / 180 , a = anime. random ( 50 , 180 ) , n = [ - 1 , 1 ] [ anime. random ( 0 , 1 ) ] * a; return { x : e. x + n * Math. cos ( t) , y : e. y + n * Math. sin ( t) } } function createParticule ( e, t ) { var a = { } ; return a. x = e, a. y = t, a. color = colors[ anime. random ( 0 , colors. length - 1 ) ] , a. radius = anime. random ( 16 , 32 ) , a. endPos = setParticuleDirection ( a) , a. draw = function ( ) { ctx. beginPath ( ) , ctx. arc ( a. x, a. y, a. radius, 0 , 2 * Math. PI , ! 0 ) , ctx. fillStyle = a. color, ctx. fill ( ) } , a } function createCircle ( e, t ) { var a = { } ; return a. x = e, a. y = t, a. color = "#F00" , a. radius = 0.1 , a. alpha = 0.5 , a. lineWidth = 6 , a. draw = function ( ) { ctx. globalAlpha = a. alpha, ctx. beginPath ( ) , ctx. arc ( a. x, a. y, a. radius, 0 , 2 * Math. PI , ! 0 ) , ctx. lineWidth = a. lineWidth, ctx. strokeStyle = a. color, ctx. stroke ( ) , ctx. globalAlpha = 1 } , a } function renderParticule ( e ) { for ( var t = 0 ; t < e. animatables. length; t++ ) { e. animatables[ t] . target. draw ( ) } } function animateParticules ( e, t ) { for ( var a = createCircle ( e, t) , n = [ ] , i = 0 ; i < numberOfParticules; i++ ) { n. push ( createParticule ( e, t) ) } anime. timeline ( ) . add ( { targets : n, x : function ( e ) { return e. endPos. x } , y : function ( e ) { return e. endPos. y } , radius : 0.1 , duration : anime. random ( 1200 , 1800 ) , easing : "easeOutExpo" , update : renderParticule } ) . add ( { targets : a, radius : anime. random ( 80 , 160 ) , lineWidth : 0 , alpha : { value : 0 , easing : "linear" , duration : anime. random ( 600 , 800 ) } , duration : anime. random ( 1200 , 1800 ) , easing : "easeOutExpo" , update : renderParticule, offset : 0 } ) } function debounce ( e, t ) { var a; return function ( ) { var n = this , i = arguments; clearTimeout ( a) , a = setTimeout ( function ( ) { e . apply ( n, i) } , t) } } var canvasEl = document. querySelector ( ".fireworks" ) ; if ( canvasEl) { var ctx = canvasEl. getContext ( "2d" ) , numberOfParticules = 30 , pointerX = 0 , pointerY = 0 , tap = "mousedown" , colors = [ "#FF1461" , "#18FF92" , "#5A87FF" , "#FBF38C" ] , setCanvasSize = debounce ( function ( ) { canvasEl. width = 2 * window. innerWidth, canvasEl. height = 2 * window. innerHeight, canvasEl. style. width = window. innerWidth + "px" , canvasEl. style. height = window. innerHeight + "px" , canvasEl. getContext ( "2d" ) . scale ( 2 , 2 ) } , 500 ) , render = anime ( { duration : 1 / 0 , update : function ( ) { ctx. clearRect ( 0 , 0 , canvasEl. width, canvasEl. height) } } ) ; document. addEventListener ( tap, function ( e ) { "sidebar" !== e. target. id && "toggle-sidebar" !== e. target. id && "A" !== e. target. nodeName && "IMG" !== e. target. nodeName && ( render. play ( ) , updateCoords ( e) , animateParticules ( pointerX, pointerY) ) } , ! 1 ) , setCanvasSize ( ) , window. addEventListener ( "resize" , setCanvasSize, ! 1 ) } "use strict" ; function updateCoords ( e ) { pointerX = ( e. clientX || e. touches[ 0 ] . clientX) - canvasEl. getBoundingClientRect ( ) . left, pointerY = e. clientY || e. touches[ 0 ] . clientY - canvasEl. getBoundingClientRect ( ) . top } function setParticuleDirection ( e ) { var t = anime. random ( 0 , 360 ) * Math. PI / 180 , a = anime. random ( 50 , 180 ) , n = [ - 1 , 1 ] [ anime. random ( 0 , 1 ) ] * a; return { x : e. x + n * Math. cos ( t) , y : e. y + n * Math. sin ( t) } } function createParticule ( e, t ) { var a = { } ; return a. x = e, a. y = t, a. color = colors[ anime. random ( 0 , colors. length - 1 ) ] , a. radius = anime. random ( 16 , 32 ) , a. endPos = setParticuleDirection ( a) , a. draw = function ( ) { ctx. beginPath ( ) , ctx. arc ( a. x, a. y, a. radius, 0 , 2 * Math. PI , ! 0 ) , ctx. fillStyle = a. color, ctx. fill ( ) } , a } function createCircle ( e, t ) { var a = { } ; return a. x = e, a. y = t, a. color = "#F00" , a. radius = 0.1 , a. alpha = 0.5 , a. lineWidth = 6 , a. draw = function ( ) { ctx. globalAlpha = a. alpha, ctx. beginPath ( ) , ctx. arc ( a. x, a. y, a. radius, 0 , 2 * Math. PI , ! 0 ) , ctx. lineWidth = a. lineWidth, ctx. strokeStyle = a. color, ctx. stroke ( ) , ctx. globalAlpha = 1 } , a } function renderParticule ( e ) { for ( var t = 0 ; t < e. animatables. length; t++ ) { e. animatables[ t] . target. draw ( ) } } function animateParticules ( e, t ) { for ( var a = createCircle ( e, t) , n = [ ] , i = 0 ; i < numberOfParticules; i++ ) { n. push ( createParticule ( e, t) ) } anime. timeline ( ) . add ( { targets : n, x : function ( e ) { return e. endPos. x } , y : function ( e ) { return e. endPos. y } , radius : 0.1 , duration : anime. random ( 1200 , 1800 ) , easing : "easeOutExpo" , update : renderParticule } ) . add ( { targets : a, radius : anime. random ( 80 , 160 ) , lineWidth : 0 , alpha : { value : 0 , easing : "linear" , duration : anime. random ( 600 , 800 ) } , duration : anime. random ( 1200 , 1800 ) , easing : "easeOutExpo" , update : renderParticule, offset : 0 } ) } function debounce ( e, t ) { var a; return function ( ) { var n = this , i = arguments; clearTimeout ( a) , a = setTimeout ( function ( ) { e . apply ( n, i) } , t) } } var canvasEl = document. querySelector ( ".fireworks" ) ; if ( canvasEl) { var ctx = canvasEl. getContext ( "2d" ) , numberOfParticules = 30 , pointerX = 0 , pointerY = 0 , tap = "mousedown" , colors = [ "#FF1461" , "#18FF92" , "#5A87FF" , "#FBF38C" ] , setCanvasSize = debounce ( function ( ) { canvasEl. width = 2 * window. innerWidth, canvasEl. height = 2 * window. innerHeight, canvasEl. style. width = window. innerWidth + "px" , canvasEl. style. height = window. innerHeight + "px" , canvasEl. getContext ( "2d" ) . scale ( 2 , 2 ) } , 500 ) , render = anime ( { duration : 1 / 0 , update : function ( ) { ctx. clearRect ( 0 , 0 , canvasEl. width, canvasEl. height) } } ) ; document. addEventListener ( tap, function ( e ) { "sidebar" !== e. target. id && "toggle-sidebar" !== e. target. id && "A" !== e. target. nodeName && "IMG" !== e. target. nodeName && ( render. play ( ) , updateCoords ( e) , animateParticules ( pointerX, pointerY) ) } , ! 1 ) , setCanvasSize ( ) , window. addEventListener ( "resize" , setCanvasSize, ! 1 ) } ;
打开 themes/next/layout/_layout.njk ,在
里添加如下代码:
{% if theme.fireworks %}
打开主题配置文件 ,添加:
fireworks : true
18 背景动画
丝带背景动画
canvas_ribbon :
enable : false
size : 300
alpha : 0.6
zIndex : -1
网格背景动画
打开 next/layout/_layout.njk ,在
{% if theme.canvas_nest %}


{% endif %}
这里怀疑src里的链接配置的 count=99,所以设置了内联式 count=150(默认也是150), 设置后count的数量明显增加
配置项
color:线条颜色, 默认: ‘0,0,0’ ;三个数字分别为(R,G,B),注意用, 分割
opacity:线条透明度(0~1),默认 0.5
count:线条的总数量,默认 150
zIndex:背景的z-index属性,css属性用于控制所在层的位置,默认:-1
打开主题配置文件 ,添加以下代码:
canvas_nest : true
canvas_nest : false
19 文章结束标志
在路径 \themes\next\layout\_macro 中新建 passage-end-tag.swig 文件,并添加以下内容
{% if not is_index %}
-------------已经到底啦!
{% endif %}
打开 \themes\next\layout\_macro\post.njk 文件,在post-body 之后(END POST BODY),post-footer 之前添加以下代码:
  {% if not is_index %}
    {% include 'passage-end-tag.swig' %}
  {% endif %}
20 配置live-2d模型
安装 hexo-helper-live2d 插件
npm install -save hexo-helper-live2d
这个默认是 shizuku 不用配置,安装后直接在站点显示,但如果想要性能优化,配置模型相关信息的话,需要再安装 shizuku
在站点配置文件 中添加参数:(想要配置参数的话,需要重新下载专门的模型包)
live2d :
enable : true
scriptFrom : local
pluginRootPath : live2dw/
pluginJsPath : lib/
pluginModelPath : assets/
tagMode : false
log : false
model :
use : live2d- widget- model- <你喜欢的模型名字>
display :
position : right
mobile :
show : true
可供选择模型:
live2d-widget-model-chitose

live2d-widget-model-epsilon2_1

live2d-widget-model-gf

live2d-widget-model-haru/01 (use npm install --save live2d-widget-model-haru)

live2d-widget-model-haru/02 (use npm install --save live2d-widget-model-haru)

live2d-widget-model-haruto

live2d-widget-model-hibiki

live2d-widget-model-hijiki

live2d-widget-model-izumi

live2d-widget-model-koharu

live2d-widget-model-miku

live2d-widget-model-ni-j

live2d-widget-model-nico

live2d-widget-model-nietzsche

live2d-widget-model-nipsilon

live2d-widget-model-nito

live2d-widget-model-shizuku

live2d-widget-model-tororo

live2d-widget-model-tsumiki

live2d-widget-model-unitychan

live2d-widget-model-wanko

live2d-widget-model-z16
上面模型的选择可在lived2d中选择,并下载相应的模型:(这里先选择了 wanko,个人最喜欢的两个模型 wanko 和 shizuku)
npm install live2d-widget-model-wanko --save
安装 shizuku 模型时建议 cnpm,速度很快且用npm安装这个模型容易出现 network error
下载cnpm淘宝源
npm install -g cnpm --registry = https://registry.npm.taobao.org
安装 shizuku 模型
npm install live2d-widget-model-shizuku --save
hexo-helper-live2d 相当于 live2d 的脚手架,不能只下载 model,删除了 hexo-helper-live2d,live2d 模型无法生成
21 侧边栏社交链接
在主题配置文件 中,开启 social 并选择想要的社交链接,取消注释
social :
如果官方自带的社交链接不满足自己的需求,我们可以自定义想要的图标并附上链接
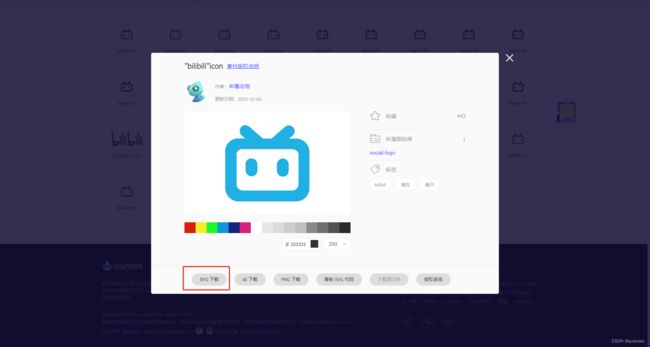
自定义icon图标
首先去 iconfont-阿里巴巴矢量图库 下载 svg 格式的图标,需要什么图标则搜索相应图标并下载,然后把图标放在 \themes\next\source\images 目录下
这里以 bilibili 和 CSDN 为例:
在 \themes\next\source\css 目录下的 main.styl 添加代码
/* 侧边栏图标格式设置 */
.bilibili {
  background-image: url('/images/bilibili.svg');
  background-size: 1em 1em;
  opacity: 0.55;
  background-position: 0.05rem 0.2rem;
  background-repeat: no-repeat;
  height: 1rem;
  width: 1rem;
  border-radius: 0rem;
  /*鼠标停留在图标上时,图标呈现发光效果*/
  &:hover {
      opacity: 1;
    }
}

.csdn {
  background-image: url('/images/csdn.svg');
  background-size: 1em 1em; /*第一个参数是宽 第二个是高*/
  opacity: 0.55;
  background-position: 0.05rem 0.2rem;
  background-repeat: no-repeat;
  height: 1rem;
  width: 1rem;
  border-radius: 0rem;
  /*鼠标停留在图标上时,图标呈现发光效果*/
  &:hover {
      opacity: 1;
    }
}
在主题配置文件 中,开启 social 并在 social 项下图片来源设置为 fa bilibili 和 fa csdn
social :
Github : https: //github.com/Benn314 | | fab fa- github
E-mail : [email protected] | | fa fa- envelope
Bilibili : https: //space.bilibili.com/362721207? spm_id_from=333.1007.0.0 | | fa bilibili
CSDN : https: //blog.csdn.net/Bennnnnnn? spm=1000.2115.3001.5343 | | fa csdn
social_icons :
enable : true
icons_only : true
transition : false
22 添加fork me on github入口
首先到 GitHub Corners 或者 GitHub Ribbons 选择自己喜欢的图标,然后copy相应的代码粘贴到 themes/next/layout/_layout.njk 文件中,把代码中的href后面的值替换成你要跳转的地址,比如你的GitHub主页
23 更换博客背景
更换主背景
把准备好的背景图放入 themes\hexo-theme-next\source\images 中
新版本需要新建 hexo/source/_data/styles.styl,即在 hexo目录的 source文件夹下新建 _data 文件夹,文件夹中新建 styles.styl
注意:是新建在 hexo目录下 source文件夹里,而不是主题文件 next目录下的 source文件夹
打开 styles.styl,添加如下:
//背景图片设置
body {
    background-image: url(/images/background.jpg);
    background-repeat: no-repeat;
    background-attachment: fixed;
    background-size: 100% 100%;
}
配置项
background-image:url 为图片路径,可以直接使用链接,也可以是图片路径(将自定义图片放入hexo\public\images路径下)
background-repeat:若果背景图片不能全屏,那么是否平铺显示,充满屏幕
background-attachment:背景是否随着网页上下滚动而滚动,fixed 为固定
background-size:图片展示大小,这里设置 100%,100% 的意义为:如果背景图片不能全屏,那么是否通过拉伸的方式将背景强制拉伸至全屏显示
background-size: cover // 填充
打开主题配置文件 ,将 custom_file_path 的 sytle 注释打开
custom_file_path :
variable : source/_data/variables.styl
style : source/_data/styles.styl
添加侧边栏背景
[外链图片转存失败,源站可能有防盗链机制,建议将图片保存下来直接上传(img-WqMIX7ZS-1669188613116)(https://images.unsplash.com/photo-1668871333606-ef8461d43922?ixlib=rb-4.0.3&ixid=MnwxMjA3fDB8MHxlZGl0b3JpYWwtZmVlZHw0fHx8ZW58MHx8fHw%3D&auto=format&fit=crop&w=600&q=60)]
对 themes\hexo-theme-next\source\css_schemes\Pisces_header.styl 中 site-brand-container的background进行修改
.site-brand-container {
  // background: var(--theme-color); // 默认背景
  background: url('https://images.unsplash.com/photo-1668871333606-ef8461d43922?ixlib=rb-4.0.3&ixid=MnwxMjA3fDB8MHxlZGl0b3JpYWwtZmVlZHw0fHx8ZW58MHx8fHw%3D&auto=format&fit=crop&w=600&q=60');
  // background: url('https://images.unsplash.com/photo-1661961110144-12ac85918e40?ixlib=rb-4.0.3&ixid=MnwxMjA3fDF8MHxlZGl0b3JpYWwtZmVlZHw4NHx8fGVufDB8fHx8&auto=format&fit=crop&w=600&q=60');
  // background: url('https://images.unsplash.com/photo-1668735648397-9defaa967b15?ixlib=rb-4.0.3&ixid=MnwxMjA3fDB8MHxlZGl0b3JpYWwtZmVlZHwxMDV8fHxlbnwwfHx8fA%3D%3D&auto=format&fit=crop&w=600&q=60');
  // background: url('https://images.unsplash.com/photo-1668765005700-021ea0bb9250?ixlib=rb-4.0.3&ixid=MnwxMjA3fDB8MHxlZGl0b3JpYWwtZmVlZHwxMDN8fHxlbnwwfHx8fA%3D%3D&auto=format&fit=crop&w=600&q=60');
  //background: url('https://images.unsplash.com/photo-1668681919287-7367677cdc4c?ixlib=rb-4.0.3&ixid=MnwxMjA3fDB8MHxlZGl0b3JpYWwtZmVlZHwxNTV8fHxlbnwwfHx8fA%3D%3D&auto=format&fit=crop&w=600&q=60');
  background-size: cover; // 填充
  //background-size: 100% 100%;

  .site-nav-on & {
    +tablet-mobile() {
      box-shadow: 0 0 16px rgba(0, 0, 0, .5);
    }
  }
}
扩展
unsplash是一个高清大图免费下载的好网站,提供了大量的图片和外链API,可以用来当作自己的博客背景
24 设置透明度
单独给每个区域设置opacity会出现很多问题,例如搜索框弹出会被覆盖图层导致无法进行本地搜索
最理想是进行全局设置,在 blog\source\_data\styles.styl 中 直接设置body的透明度为0.85 全体透明化,opacity的值可以自行调整
//背景图片设置
body {
    background-image: url(/images/bg1.jpg);
    background-repeat: no-repeat;
    background-attachment: fixed;
    background-size: 100% 100%;
    opacity: 0.85;
    //可选
    +mobile(){
      background-image: url(https://ziyuan.lruihao.cn/images/bg_cell.png);
      background-size: cover;
    }
}
文章区域位置调整
设置了布局(调整位置信息) 不需要可以删掉下面的margin和padding(默认值没有设置margin和padding)或者修改其值
blog\themes\hexo-theme-next\source\css_common\components\post\index.styl
.use-motion {
  if (hexo-config('motion.transition.post_block')) {
    .post-block {
      visibility: hidden;
      margin-top: 60px;
      margin-bottom: 60px;
	  margin-left: 2px;
      padding-top: 45px;
      // border-radius: 20px 20px 20px 20px;
      -webkit-box-shadow: 0 0 5px rgba(202, 203, 203, .5);
      -moz-box-shadow: 0 0 5px rgba(202, 203, 204, .5);
      opacity: 0.95; // 添加透明度
    }
    .pagination, .comments {
      visibility: hidden;
    }
  }
25 边框圆角
在之前新建的 _data 目录下新建 variables.styl,类似新建 styles.styl。打开 variables.styl,添加如下:
// 圆角设置
$border-radius-inner     = 20px 20px 20px 20px;
$border-radius           = 20px;
打开 custom_file_path 中 variable 的注释
custom_file_path:

variable: source/_data/variables.styl
此时有一个问题就是 侧边栏-分类左下/右下 的圆角明显有一层阴影,下图是修正过的(图片只是为了指明位置)
原因是开启 back2top 的 sidebar 和 scrollpercent,back2top的阴影背景覆盖了圆角,把阴影背景改为透明便可解决,因为我们需要的只是scrollpercent
/themes/next/source/css/_variables/Gemini.styl 内代码,将 $body-bg-color 赋值为透明 transparent
// Variables of Gemini scheme
// ==================================================

@import "Pisces.styl";

// Settings for some of the most global styles.
// --------------------------------------------------
$body-bg-color           = #eee;
// $body-bg-color           = transparent;
// Borders.
// --------------------------------------------------
$box-shadow-inner        = 0 2px 2px 0 rgba(0, 0, 0, .12), 0 3px 1px -2px rgba(0, 0, 0, .06), 0 1px 5px 0 rgba(0, 0, 0, .12);
$box-shadow              = 0 2px 2px 0 rgba(0, 0, 0, .12), 0 3px 1px -2px rgba(0, 0, 0, .06), 0 1px 5px 0 rgba(0, 0, 0, .12), 0 -1px .5px 0 rgba(0, 0, 0, .09);

// $border-radius-inner     = 20px;
// $border-radius           = 20px;

$border-radius-inner     = initial;
$border-radius           = initial;
// $border-radius-inner     = 0 0 3px 3px;
// $border-radius           = 3px;
修改侧边栏顶部圆角
在 blog\themes\hexo-theme-next\source\css\_common\outline\header\index.styl 中对 site-brand-container(审查元素得知) 进行修改
.site-brand-container {
  display: flex;
  flex-shrink: 0;
  padding: 0 10px;
  border-radius: 18.8px 18.8px 0 0; // 上边圆角 下边尖角 不设置20px 20px 0 0的原因是因为下面的sidebar的class="header"有一点白色溢出 所以把圆角设置小点对其进行覆盖
}
左下/右下角不需要设置圆角,不然反而不美观
26 调整back2top透明度和位置
调整透明度
进入 blog\themes\hexo-theme-next\source\css\_variables\Pisces.styl,根据自身博客修改透明度至满意值
// 调整透明度
// Back to top
$b2t-opacity  = .94; // 默认 .6
$b2t-opacity-hover  = .99; // 默认 .8
调整位置靠左
调整位置靠左的原因是设计把live-2d放到右边,而此时back2top按钮不管是在live-2d图层上方(不美观)还是下方(按钮无法被点击且看不到百分比)效果都不理想,故把按钮调整至靠左位置
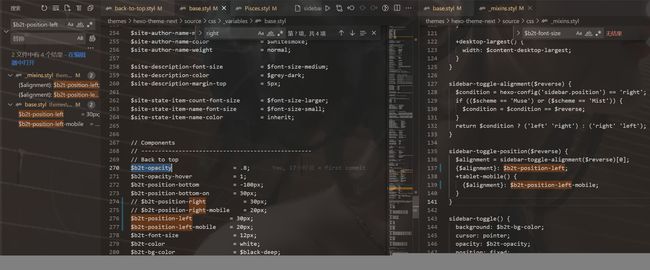
在 blog\themes\hexo-theme-next\source\css_variables\base.styl 中有Back to top的基本参数信息,我们把 $b2t-position-right 和 $b2t-position-right-mobile 注释掉,使其默认靠左
// Components
// --------------------------------------------------
// Back to top
$b2t-opacity                  = .8;
$b2t-opacity-hover            = 1;
$b2t-position-bottom          = -100px;
$b2t-position-bottom-on       = 30px;
// $b2t-position-right           = 30px; //注释掉 themes\hexo-theme-next\source\css\_mixins.styl的逻辑也可以注释掉 不然可能有warnning
// $b2t-position-right-mobile    = 20px;//注释掉 themes\hexo-theme-next\source\css\_mixins.styl的逻辑也可以注释掉 不然可能有warnning
$b2t-font-size                = 12px;
$b2t-color                    = white;
$b2t-bg-color                 = $black-deep;

$sidebar-toggle-inner-size    = 16px;
$sidebar-toggle-padding       = 5px;
$sidebar-toggle-size          = $sidebar-toggle-inner-size + $sidebar-toggle-padding * 2;
这里从right修改成left无效的原因是值没有变 只是换了个变量名 当然没用呀 名字只是用来区分而已 你叫右边叫做tan90都没问题
然后在 themes\hexo-theme-next\source\css_common\components\back-to-top.styl 末尾添加如下两行代码并注释 margin-right: 8px;
if (hexo-config('back2top.enable')) {
  .back-to-top {
    font-size: $b2t-font-size;

    span {
      //margin-right: 8px; // 注释掉(默认设置是这个 给改成末尾两行)
    }
    ...
    ...
    padding-right: 5px; // 新添加的代码
    left: 30px; // // 新添加的代码
  }
}
27 添加README.md文件
每个项目下一般都有一个 README.md 文件,但是使用 hexo 部署到仓库后,项目下是没有 README.md 文件的
在 Hexo 目录下的 source 根目录下添加一个 README.md 文件,修改站点配置文件 _config.yml,将 skip_render 参数的值设置为
skip_render: README.md
保存退出即可 再次使用 hexo d 命令部署博客的时候就不会在渲染 README.md 文件了
28 侧栏Celeste(旋转的小人)
这里罗列两种位置摆放效果
放在 blog\themes\hexo-theme-next\layout_macro\sidebar.njk
{%- if theme.back2top.enable and theme.back2top.sidebar %}
0%
{%- endif %}
{% endmacro %}
放在 blog\themes\hexo-theme-next\layout\_layout.njk
{%- if theme.sidebar.display !== 'remove' %}
{% block sidebar %}{% endblock %}
{%- endif %}
<-- 旋转的小人 -->
我个人比较倾向放置到 _layout.njk,动画位置不会固定在浏览器窗口位置,而是会随着滚动而消失,阅读文章不因为动画而分心,才能更加专注
添加了旋转小人后 动画性能下降 会有存在动画冲突或者只是单纯动画加载过多导致性能下降(卡顿)
29 懒加载开启(性能优化)
进入 主题配置文件 ,添加:
lazyload : true
30 加入网易云音乐播放器
在网页搜索网易云音乐,选择音乐,并生成外链播放器,获取 iframe 标签
< iframeframeborder = " no" border = " 0" marginwidth = " 0" marginheight = " 0" width = 330height = 86src = " //music.163.com/outchain/player?type=2&id=1433584979&auto=1&height=66" > iframe > 建议把标签放到侧边栏,在 Blog/themes/next/layout/_macro/sidebar.njk 或 themes\hexo-theme-next\layout\_layout.njk 文件下,选择位置粘贴进去,不同位置效果不同
由于网易云外链播放器每次只能选择一首歌,如果想要让播放器的功能更加全面丰富,我们可以通过安装插件 Aplayer来满足我们的需求
31 添加Aplayer音乐播放器(进阶)
安装
npm install aplayer --save
将文件中的dist文件夹复制到路径:blog/themes/next/source
在目录 blog/themes/next/source/dist 下新建 music.js 文件,内容是:
我的版本
const ap = new APlayer ( {
container : document. getElementById ( 'aplayer' ) ,
fixed : true ,
audio : [
{
name : '溯(钢琴版)' ,
artist : '柳轻颂' ,
url : 'http://music.163.com/song/media/outer/url?id=1433584979.mp3' ,
cover : 'http://p1.music.126.net/qX7knUIlpmbJ34UBzCCS6w==/109951164802366812.jpg?param=130y130' ,
} ,
{
name : "夢灯籠" ,
artist : 'RADWIMPS' ,
url : '/images/夢灯籠.mp3' ,
cover : 'http://p2.music.126.net/sSxbRt9RpC6s_MaewyDJfA==/18597139672292692.jpg?param=130y130' ,
} ,
{
name : '前前前世 (movie ver.)' ,
artist : 'RADWIMPS' ,
url : '/images/前前前世-_movie-ver._-RADWIMPS.mp3' ,
cover : 'http://p2.music.126.net/sSxbRt9RpC6s_MaewyDJfA==/18597139672292692.jpg?param=130y130' ,
} ,
{
name : 'Supermarket Flowers' ,
artist : 'Ed Sheeran' ,
url : '/images/Supermarket Flowers.mp3' ,
cover : 'http://p2.music.126.net/99_i681E6ZE74t_xue6PUA==/109951166151204092.jpg?param=130y130' ,
} ,
{
name : 'スパークル(火花)——《你的名字。》插曲' ,
artist : 'ゆう十' ,
url : 'http://music.163.com/song/media/outer/url?id=1984045303.mp3' ,
cover : 'http://p2.music.126.net/SiTInUUumsPdSdndv1MCyw==/109951167903888878.jpg?param=130y130' ,
} ,
{
name : 'euphoria' ,
artist : ' ' ,
url : 'http://music.163.com/song/media/outer/url?id=1814327255.mp3' ,
cover : '/images/susan1.jpg' ,
} ,
{
name : 'Friend' ,
artist : 'Kozoro' ,
url : 'http://music.163.com/song/media/outer/url?id=33004707.mp3' ,
cover : 'http://p2.music.126.net/FR7zKYB8ujNRoWQuGCHbGg==/109951163288692527.jpg?param=130y130' ,
} ,
{
name : 'One Last Time' ,
artist : '廖泽蓝' ,
url : 'http://music.163.com/song/media/outer/url?id=1870680152.mp3' ,
cover : 'http://p1.music.126.net/Y_Io_ln1-ujiL9eFdyQvmQ==/109951166291345875.jpg?param=130y130' ,
}
]
} ) ;
歌曲信息可自行添加自己喜欢的
配置项
name:歌曲名称
artist:作者
url:连接(具体怎样操作看下面步骤)
cover:是图片连接,可以是本地图片,也可以是在线图片,本地放在 source/images然后修改路径即可
url添加歌曲方法
网易云网页播放一首歌曲
将网址中的 id 进行复制:https://music.163.com/#/song?id=1411358329
将下面代码中的 id 修改为你想添加歌曲的 id:http://music.163.com/song/media/outer/url?id=xxx.mp3 (网易云音乐在线播放歌曲模板)
引用头文件
在路径:blog/themes/next/layout下找到 _layout.njk 文件,然后将下面的代码添加到: (在body里面就可以)
完成后需要重新部署才能看到效果
aplayer我采用的是吸底的效果,详细信息请查阅 官方文档
因为了有了 aplayer 插件 所有原先的 back2top 会被遮挡 需要重新调整位置
padding-right : 5px;
// left : 30px; // 原先修改过后的位置 加了aplayer后 重新定义位置如下
left : 15%
32 删除了默认的landscope主题(性能优化)
压缩内存
33 评论系统
根据网上对国内国外的评价系统对比,可知Valine是近几年大受欢迎的博客评价系统,但由于作者已经放弃了对 Valine 的维护,bug一堆尚未解决,所以最终敲定用基于Valine开发的新版本Waline作为本博客的评价系统
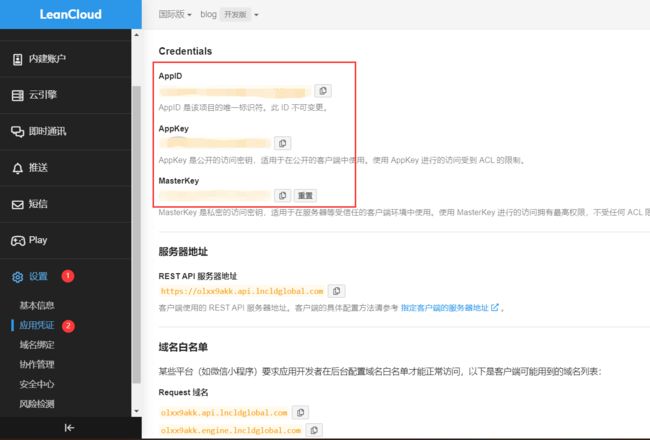
LeanCloud 设置 (数据库)
登录open in new window 或 注册open in new window LeanCloud 国际版 并进入 控制台open in new window
点击左上角 创建应用open in new window 并起一个你喜欢的名字 (请选择免费的开发版):
进入应用,选择左下角的 设置 > 应用 Key。你可以看到你的 APP ID,APP Key 和 Master Key。请记录它们,以便后续使用。
国内版需要完成备案接入
如果你正在使用 Leancloud 国内版 (leancloud.cnopen in new window),我们推荐你切换到国际版 (leancloud.appopen in new window)。否则,你需要为应用额外绑定已备案 的域名,同时购买独立 IP 并完成备案接入:
登录国内版并进入需要使用的应用
选择 设置 > 域名绑定 > API 访问域名 > 绑定新域名 > 输入域名 > 确定。
按照页面上的提示按要求在 DNS 上完成 CNAME 解析。
购买独立 IP 并提交工单完成备案接入。(独立 IP 目前价格为 ¥ 50/个/月)
Vercel 部署 (服务端)
[外链图片转存失败,源站可能有防盗链机制,建议将图片保存下来直接上传(img-tpoItsXd-1669188613146)(https://vercel.com/button)]
点击上方按钮,跳转至 Vercel 进行 Server 端部署。
如果你未登录的话,Vercel 会让你注册或登录,请使用 GitHub 账户进行快捷登录。
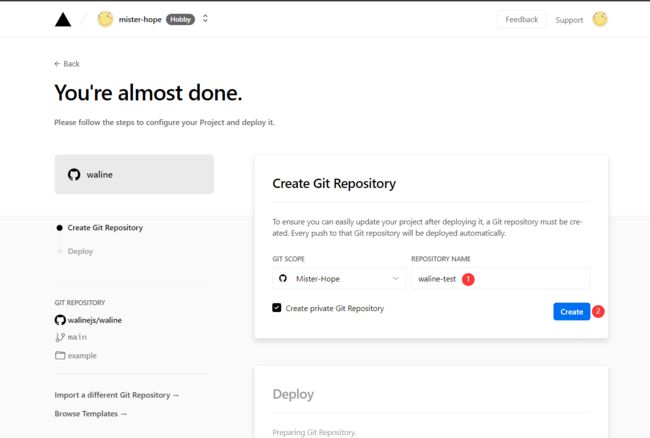
输入一个你喜欢的 Vercel 项目名称并点击 Create 继续:
此时 Vercel 会基于 Waline 模板帮助你新建并初始化仓库,仓库名为你之前输入的项目名。
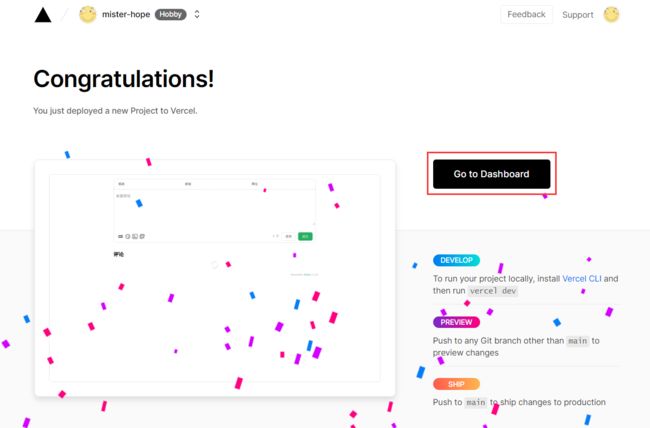
一两分钟后,满屏的烟花会庆祝你部署成功。此时点击 Go to Dashboard 可以跳转到应用的控制台。
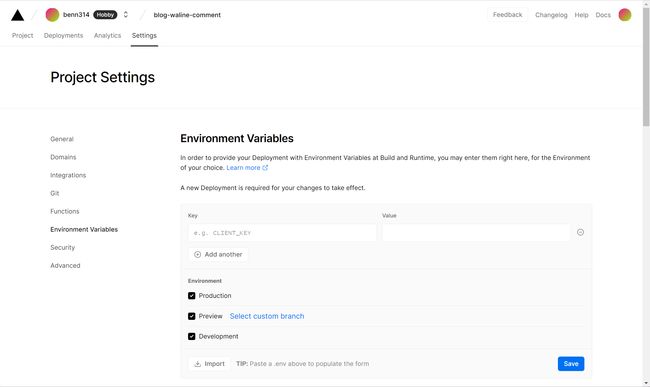
点击顶部的 Settings - Environment Variables 进入环境变量配置页,并配置三个环境变量 LEAN_ID, LEAN_KEY 和 LEAN_MASTER_KEY 。它们的值分别对应上一步在 LeanCloud 中获得的 APP ID, APP KEY, Master Key。
需要进入项目中的 Settings,而不是总设置里,总设置里没有 Environment Variables 选项配置
如果你使用 LeanCloud 国内版,请额外配置 LEAN_SERVER 环境变量,值为你绑定好的域名。
环境变量配置完成之后点击顶部的 Deployments 点击顶部最新的一次部署右侧的 Redeploy 按钮进行重新部署。该步骤是为了让刚才设置的环境变量生效。
此时会跳转到 Overview 界面开始部署,等待片刻后 STATUS 会变成 Ready。此时请点击 Visit ,即可跳转到部署好的网站地址,此地址即为你的服务端地址。
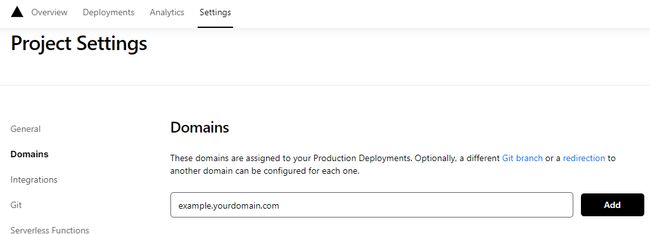
绑定域名 (可选)
点击顶部的 Settings - Domains 进入域名配置页
输入需要绑定的域名并点击 Add
在域名服务器商处添加新的 CNAME 解析记录
Type
Name
Value
CNAME
example
cname.vercel-dns.com
等待生效,你可以通过自己的域名来访问了
评论系统:example.yourdomain.com
评论管理:example.yourdomain.com/ui
在Next中配置
先到你hexo的站点目录下安装waline:
npm install @waline/hexo-next --save
找到Next主题配置文件,_config.yml进行如下配置,方便日后升级覆盖:
waline :
enable : true
serverURL : blog- waline- comment.vercel.app
placeholder : 请文明评论呀~
avatar : mm
meta : [ nick, mail, link]
pageSize : 10
lang : zh- cn
visitor : true
comment_count : true
requiredFields : [ nick, mail]
libUrl :
评论-邮箱通知
详细可查看官方文档
当网站有用户发布评论或者用户回复评论时,Waline 支持对博主和回复评论作者进行通知。
博主通知支持多种方式,包括 QQ、微信、邮件等。
当访客的评论收到回复时,我们会对访客进行邮件通知。
这里主要介绍邮件通知
邮件通知需要配置以下环境变量:
SMTP_SERVICE: SMTP 邮件发送服务提供商。(例如:QQ)
你可以在 这里 查看所有支持的运营商。
如果你的运营商不受支持,你必须填写 SMTP_HOST 和 SMTP_PORT。
SMTP_HOST: SMTP 服务器地址,一般可以在邮箱的设置中找到。SMTP_PORT: SMTP 服务器端口,一般可以在邮箱的设置中找到。
SMTP_USER: SMTP 邮件发送服务的用户名,一般为登录邮箱。SMTP_PASS: SMTP 邮件发送服务的密码,一般为邮箱登录密码,部分邮箱(例如 163)是单独的 SMTP 密码。SMTP_SECURE: 是否使用 SSL 连接 SMTP。SITE_NAME: 网站名称,用于在消息中显示。SITE_URL: 网站地址,用于在消息中显示。AUTHOR_EMAIL: 博主邮箱,用来接收新评论通知。如果是博主发布的评论则不进行提醒通知。
以下是选填的环境变量:
SENDER_NAME: 自定义发送邮件的发件人 (可选项我只添加了这个) SENDER_EMAIL: 自定义发送邮件的发件地址MAIL_SUBJECT: 自定义评论回复邮件标题MAIL_TEMPLATE: 自定义评论回复邮件内容MAIL_SUBJECT_ADMIN: 自定义新评论通知邮件标题MAIL_TEMPLATE_ADMIN: 自定义新评论通知邮件内容
注:SMTP_USER 和 AUTHOR_EMAIL都需要是完整的邮箱地址([email protected] )
如果你跟我一样使用QQ邮箱作为消息通知的话,使用的 SMTP_PASS 填入的是授权码而不是邮箱登录密码,SMTP_PASS 要到你邮箱开启,填入授权码:
添加评论表情包
在主题配置文件下的 waline 添加如下 emoji 代码
waline :
enable : true
... ...
emoji : [
https: //unpkg.com/@waline/[email protected] /tw- emoji,
//unpkg.com/@waline/[email protected] /bilibili,
//unpkg.com/@waline/[email protected] /alus,
https: //unpkg.com/@waline/[email protected] /weibo,
]
更多表情参考 自定义表情
不要忘记了重新部署 Deployed 喔!不然效果无法显示
还有一个问题 就是大伙评论的东西 不刷新不出来
原因 jsdeliver被墙 参考链接: jsdelivr被墙,hexo-next切换为自定义CDN
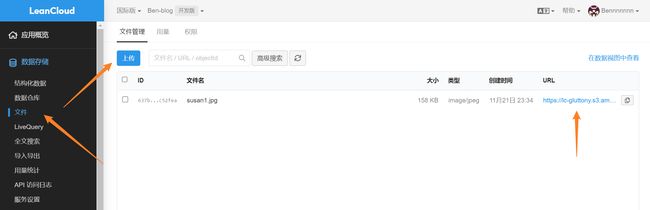
leanClound作为数据库,同时可以用来作为图床存储文件,使其文件添加url地址
34 背景图上传CDN图床(性能优化)
由于无缓存刷新(或者第一次加载页面)的时候 背景图片加载很慢(只有900多k)所以上传到CDN图床 https://cdnjson.com/
我的背景图链接:https://cdnjson.com/images/2022/11/21/bg1.jpg
35 解决因live-2d与busuanzi代码冲突导致阅读次数无法显示的问题
吐槽:位置信息不懂更改(bullshit)
通过修改 busuanzi 的解决
因为 busuanzi 的代码较短,而且本身用的外部的代码,改起来比较容易。
新建 busuanzi.js 到 themes\hexo-theme-next\source\js\ 目录下,并copy
var bszCaller, bszTag; ! function ( ) { var c, d, e, a = ! 1 , b = [ ] ; ready = function ( c ) { return a || "interactive" === document. readyState || "complete" === document. readyState ? c . call ( document) : b. push ( function ( ) { return c . call ( this ) } ) , this } , d = function ( ) { for ( var a = 0 , c = b. length; c > a; a++ ) b[ a] . apply ( document) ; b = [ ] } , e = function ( ) { a || ( a = ! 0 , d . call ( window) , document. removeEventListener ? document. removeEventListener ( "DOMContentLoaded" , e, ! 1 ) : document. attachEvent && ( document. detachEvent ( "onreadystatechange" , e) , window == window. top && ( clearInterval ( c) , c = null ) ) ) } , document. addEventListener ? document. addEventListener ( "DOMContentLoaded" , e, ! 1 ) : document. attachEvent && ( document. attachEvent ( "onreadystatechange" , function ( ) { / loaded|complete / . test ( document. readyState) && e ( ) } ) , window == window. top && ( c = setInterval ( function ( ) { try { a || document. documentElement. doScroll ( "left" ) } catch ( b) { return } e ( ) } , 5 ) ) ) } ( ) , bszCaller = { fetch : function ( a, b ) { var c = "BusuanziCallback_" + Math. floor ( 1099511627776 * Math. random ( ) ) ; window[ c] = this . evalCall ( b) , a = a. replace ( "=BusuanziCallback" , "=" + c) , scriptTag = document. createElement ( "SCRIPT" ) , scriptTag. type = "text/javascript" , scriptTag. defer = ! 0 , scriptTag. src = a, scriptTag. referrerPolicy = "no-referrer-when-downgrade" , document. getElementsByTagName ( "HEAD" ) [ 0 ] . appendChild ( scriptTag) } , evalCall : function ( a ) { return function ( b ) { ready ( function ( ) { try { a ( b) , s = document. querySelector ( '[src*=BusuanziCallback]' ) , s. parentElement. removeChild ( s) } catch ( c) { bszTag. hides ( ) } } ) } } } , bszCaller. fetch ( "//busuanzi.ibruce.info/busuanzi?jsonpCallback=BusuanziCallback" , function ( a ) { bszTag. texts ( a) , bszTag. shows ( ) } ) , bszTag = { bszs : [ "site_pv" , "page_pv" , "site_uv" ] , texts : function ( a ) { this . bszs. map ( function ( b ) { var c = document. getElementById ( "busuanzi_value_" + b) ; c && ( c. innerHTML = a[ b] ) } ) } , hides : function ( ) { this . bszs. map ( function ( a ) { var b = document. getElementById ( "busuanzi_container_" + a) ; b && ( b. style. display = "none" ) } ) } , shows : function ( ) { this . bszs. map ( function ( a ) { var b = document. getElementById ( "busuanzi_container_" + a) ; b && ( b. style. display = "inline" ) } ) } } ;
可以把修改后的静态文件放在博客里,然后修改 themes\hexo-theme-next\layout_third-party\statistics\busuanzi-counter.njk
{%- endif %}
冲突解决原理参考链接:https://ouuan.moe/post/2022/08/busuanzi-and-live2d
NexT主题已集成了不蒜子的访客人数和文章阅读统计功能
主题配置文件
busuanzi_count :
enable : true
total_visitors : false
total_visitors_icon : fa fa- user
total_views : false
total_views_icon : fa fa- eye
post_views : true
post_views_icon : far fa- eye
我只开启了文章访问次数 总访问人数和总访问次数有bug尚未修复 如需开启请先修复
修复参考链接: https://muyuuuu.github.io/2019/11/22/busuanzi-notdisplay/
部分参考文章
感谢各位博主撰写了一篇篇博客搭建的教学文章,使我(小白)的博客网站能够一步步搭建起来,下面是参考文章链接
基于Hexo-Next主题博客的美化
Hexo 博客 NexT 主题的安装使用
hexo的next主题个性化教程:打造炫酷网站
Hexo博客优化之Next主题美化
Hexo-Next 主题博客个性化配置超详细,超全面(两万字)
NexT主题优化
Hexo的Next主题美化设置
hexo博客next主题美化
NexT Highlight Theme Preview
Next 主题设置代码高亮
Hexo搭建博客NexT主题之AddThis分享文章的配置
hexo笔记四:next主题添加作者头像
next主题如何添加动态背景canvas_nest
next主题博客添加canvas_nest动画背景
next主题自定义侧边栏链接图标(新方法)
nexT主题更改背景图片和边框圆角
Hexo博客第三方主题next进阶教程
「通知」博客已添加夜间(暗色调)模式
next主题配置透明色等
next主题美化——背景图片、动画
Hexo Next主题中使用gitment评论功能
Hexo+NexT8.1+Waline踩坑记录
Hexo博客的优化-提升访问速度,SEO
pjax原理和使用
Hexo: Next 主题使用 Waline 评论系统
[不蒜子]文章阅读次数
修补hexo-next不蒜子不显示问题
busuanzi 访问量统计与 live2d 插件同时使用导致 busuanzi 不显示的根本原因以及解决方法
【python】smtp发送邮件(账号密码+账号授权码说明)
Fluid -15- Waline 邮件通知
������������������������������������
你可能感兴趣的:(git,github)
Trunk:Rust WASM 应用的终极打包工具
徐天铭Paxton
Trunk:RustWASM应用的终极打包工具trunkBuild,bundle&shipyourRustWASMapplicationtotheweb.项目地址:https://gitcode.com/gh_mirrors/tr/trunk项目介绍Trunk是一款专为Rust语言设计的WASM网页应用打包工具。它能够帮助开发者轻松构建、打包并发布Rust编写的WASM应用到Web平台。Trunk
centos 7 安装docker-compose
1.下载docker-compose#官方推荐(太慢)curl-L"https://github.com/docker/compose/releases/download/1.26.2/docker-compose-$(uname-s)-$(uname-m)"-o/usr/local/bin/docker-compose#国内(更快)curl-Lhttps://get.daocloud.io/do
宝塔安装mayfly-go
mayans005
数据库
mayfly-go:web版linux(终端文件脚本进程)、数据库(mysqlpgsql)、redis(单机哨兵集群)、mongo统一管理操作平台。1、终端执行命令下载程序包wgethttps://gitee.com/objs/mayfly-go/releases/download/v1.3.0/mayfly-go-linux-amd64.zip2、在宝塔新建一个MySQL数据库,将下载程序包中的
开源项目推荐:Mayfly-go
周风队
开源项目推荐:Mayfly-gomayfly-goweb版linux(终端文件脚本进程)、数据库(mysqlpgsql高斯达梦)、redis(单机哨兵集群)、mongo统一管理操作平台。项目地址:https://gitcode.com/gh_mirrors/ma/mayfly-goMayfly-go是一个基于浏览器的统一管理操作平台,它支持多种数据库和系统管理功能。该项目主要使用Go语言和前端框架
推荐项目:Mayfly-Go - 高性能的时间序列数据库
齐游菊Rosemary
推荐项目:Mayfly-Go-高性能的时间序列数据库mayfly-goweb版linux(终端文件脚本进程)、数据库(mysqlpgsql高斯达梦)、redis(单机哨兵集群)、mongo统一管理操作平台。项目地址:https://gitcode.com/gh_mirrors/ma/mayfly-go项目简介是一款由Dromara团队开发的高性能、轻量级时间序列数据库(TimeSeriesData
Mayfly-Go 开源项目教程
方蕾嫒Falcon
Mayfly-Go开源项目教程mayfly-goweb版linux(终端文件脚本进程)、数据库(mysqlpgsql高斯达梦)、redis(单机哨兵集群)、mongo统一管理操作平台。项目地址:https://gitcode.com/gh_mirrors/ma/mayfly-go项目介绍Mayfly-Go是一个基于Go语言开发的开源项目,旨在提供一个轻量级、高性能的微服务框架。该项目由Dromar
Picgo 配置--免费图床使用
三金C_C
工具’ 工具使用 picgo 图床
下载pigco,然后去github建一个仓库,可以命名为https://github.com/jacinli/image-hosting这是一个免费的图床方案使用了picgo+github仓库的方案可以配置CDN,强烈建议配置cdn(见最下)1.准备GitHub仓库创建仓库:登录GitHub,点击右上角的“+”号,选择“Newrepository”。给仓库取一个名字(比如image-hosting
关于pytorch3d的安装
诚威_lol_中大努力中
人工智能 pytorch 人工智能 python
更新1:2025_2_04今天发现,原来的pytorch3d不见了,在我的aaa1环境中。重新安装,我发现最好用的还是去github下载最新的pytorch3d的zip,unzip之后,进去pipinstall-e.然后安装成功!1、参考文章1:windows安装PyTorch3D详细指南-哔哩哔哩(bilibili.com)这篇文章巨好2、参考文章2:pytorch3d/INSTALL.mdat
Vs code搭建uniapp-vue项目
.try-
uni-app
安装vue环境npminstall-g@vue/clinode版本建议18或者18以上vuecreate-pdcloudio/uni-preset-vue项目名称----正式版vuecreate-pdcloudio/uni-preset-vue#alpha项目名称----alpha版Vue3/Vite版npxdegitdcloudio/uni-preset-vue#vite项目名称---js-正式
Midscene.js自然语言驱动的网页自动化全指南
Hello.Reader
前端技术 人工智能 javascript 自动化 开发语言
一、概述网页自动化在数据抓取、UI测试和业务流程优化中发挥着重要作用。然而,传统工具如Selenium和Puppeteer要求用户具备编程技能,编写复杂的选择器和脚本维护成本高昂。Midscene.js通过自然语言接口革新了这一领域,用户只需描述任务(如“点击登录按钮”或“提取产品价格”),AI即可自动执行,大幅降低技术门槛。Midscene.js由web-infra-dev团队开发,开源于Git
golang jwt挖坑
qiang527052
golang个人笔记 golang jwt
golangjwt使用golangjwt使用中遇到的一个坑,特此记录。具体描述:因为公司需要,现有架构jwt生成token的代码是java实现的,然后现在在golang中需要对此token进行解析。java用到的jar包:io.jsonwebtoken.jjwt0.9.0golang用到的库:github.com/dgrijalva/jwt-gojava生成token测试代码如下:publicst
XPipe:一款新型开源终端管理神器
修己xj
工具 开源
最近,一位朋友在使用Docker时遇到了一个问题:他对宿主机与容器之间的文件复制以及在容器内执行命令等操作感到困惑。这让我开始思考,如果有一款远程管理工具能够直接连接到容器内部,操作是否会变得更加便捷?恰巧,今天在浏览GitHub时,我发现了这样一款名为XPipe的工具。工具介绍XPipe是一款创新的Shell连接中心和远程文件管理器,它能够让你从本地机器轻松访问整个服务器基础设施。这款工具运行在
DeepSeek关键RL算法GRPO,有人从头跑通了,贡献完整代码
强化学习曾小健2
大语言模型LLM 算法
DeepSeek关键RL算法GRPO,有人从头跑通了,贡献完整代码机器之心2025年03月02日11:54北京选自GitHub作者:AndriyBurkov机器之心编译GRPO(GroupRelativePolicyOptimization)是DeepSeek-R1成功的基础技术之一,我们之前也多次报道过该技术,比如《DeepSeek用的GRPO占用大量内存?有人给出了些破解方法》。简单来说,GR
github上传文件方法格式
镜宇秋霖丶
github github
echo"#myHtmlFirst1.0">>README.mdgitinitgitaddREADME.md(这条指令改成下面的)gitadd.gitcommit-m"firstcommit"
[email protected] :xxxxxxxxx/myHtmlFirst1.0.gitgitpush-uoriginmain以上是第一次上传以
探索未来桌面应用的极限:QtWebEngine深度剖析与推荐
张姿桃Erwin
探索未来桌面应用的极限:QtWebEngine深度剖析与推荐去发现同类优质开源项目:https://gitcode.com/在追求极致用户体验和无缝互联网集成的时代,QtWebEngine犹如一座桥梁,将Chromium的强大力量与Qt框架的灵活性完美融合,为开发者打开了无限可能的大门。本文将深入解析这一开源宝藏,探讨其技术内核,应用场景,并揭示它的独特魅力。项目介绍QtWebEngine——是一
Tenacity(Python的坚韧重试库)
ftpeak
Python python 开发语言 网络爬虫
概述Tenacity是一个基于Apache2.0协议的通用重试库,用Python编写,旨在简化向任何代码添加重试逻辑的过程。它起源于已停止维护的retrying库的分叉版本。Tenacity不兼容retrying的API,但新增了大量功能并修复了长期存在的错误。文档:Tenacity—Tenacitydocumentation主页:https://github.com/jd/tenacity核心功
如何把master迁出的bug修改分支,合并、删除本地、删除远端
软考真题app
bug
要将fix/xxxxxx_20250319分支合并到master并删除本地及远程分支,请按以下步骤操作:1.切换到master分支并更新gitcheckoutmaster#切换到master分支gitpulloriginmaster#拉取远程master的最新代码2.合并分支到mastergitmergefix/xxxxxx_20250319#将fix/xxxxxx_20250319合并到当前分支
SQLAdmin 开源项目教程
羿辰果Gemstone
SQLAdmin开源项目教程项目地址:https://gitcode.com/gh_mirrors/sq/sqladmin项目介绍SQLAdmin是一个灵活的Admin接口,专为SQLAlchemy模型设计。它支持SQLAlchemy的同步/异步引擎,并与Starlette和FastAPI框架集成。SQLAdmin使用WTForms进行表单构建,并支持SQLModel。其用户界面基于Tabler。
探索未来技术前沿:FastAPI火箭-boilerplate,打造高性能API的超级引擎!
黎杉娜Torrent
探索未来技术前沿:FastAPI火箭-boilerplate,打造高性能API的超级引擎!fastapi-rocket-boilerplateFastAPIRocketBoilerplatetobuildanAPIbasedinPythonwithitsmostmoderntechnologies!项目地址:https://gitcode.com/gh_mirrors/fa/fastapi-roc
SQLAdmin 教程:安装与配置指南
俞淑瑜Sally
SQLAdmin教程:安装与配置指南sqladminSQLAlchemyAdminforFastAPIandStarlette项目地址:https://gitcode.com/gh_mirrors/sq/sqladmin1.项目目录结构及介绍在sqladmin开源项目中,主要的目录结构如下:docs:存放项目的文档资料,包括Markdown格式的说明文件。sqladmin:核心代码库,包含主要的功
探索数据库管理的新纪元:SQLAdmin - 易用的 SQLAlchemy 管理界面
孔祯拓Belinda
探索数据库管理的新纪元:SQLAdmin-易用的SQLAlchemy管理界面sqladminSQLAlchemyAdminforFastAPIandStarlette项目地址:https://gitcode.com/gh_mirrors/sq/sqladmin项目简介在数据管理和Web开发的世界里,SQLAdmin是一个创新性的开源项目,它为SQLAlchemy模型提供了一个灵活且直观的后台管理界
OpenAI Agents SDK 中文文档 中文教程 (7)
wtsolutions
openai agents sdk python openai sdk 中文 文档
英文文档原文详见OpenAIAgentsSDKhttps://openai.github.io/openai-agents-python/本文是OpenAI-agents-sdk-python使用翻译软件翻译后的中文文档/教程。分多个帖子发布,帖子的目录如下:(1)OpenAI代理SDK,介绍及快速入门(2)OpenAIagentssdk,agents,运行agents,结果,流,工具,交接(3)
万字总结(含理解):git reset、revert、checkout --file、stash、rebase、merge
周里奥
git git 学习
结尾附基本常用命令gitcommit--amend改写提交gitreset回滚代码仓库gitcheckout--file放弃暂存区的修改gitreset测试过程gitrevert测试过程reset和revert区别gitstash测试过程merge对比rebase模拟冲突产生情况git常用命令gitcommit--amend改写提交重写上一次的提交信息,不会生成新的版本号执行了一次提交,提交信息是
Git使用 从入门到入土 收藏吃灰系列 (十三) git stash、git check-pick、git tag、git diff
张时贰
Git & 原理 & 指令 学习 git github
文章目录一、前言二、gitstash存储到堆栈三、Gittag标签四、gitcherry-pick挑选合并五、gitdiff本节速览gitstash堆栈gittag标签gitcherry-pick挑选合并gitdiff比较信息差异本节开始都是一些不怎么用的命令,或者一些使用技巧,了解即可一、前言参考安装Git详细安装教程参考视频B站Git最新教程通俗易懂,这个有点长,感觉讲的精华不多参考视频『Gi
SourceTree安装与使用
缘来的精彩
sourceTree git
一、简介:一个用于Windows和Mac的免费Git客户端。Sourcetree简化了如何与Git存储库进行交互,这样您就可以集中精力编写代码。通过Sourcetree的简单GitGUI可视化和管理存储库。官网下载地址:Sourcetree|FreeGitGUIforMacandWindowsSourceTree下载-SourceTree最新版下载V3.4.22-阔思亮本文介绍的版本为source
Nginx核心知识100讲
janthinasnail
linux
详见:作者网站:http://www.taohui.pub/视频原网站:https://time.geekbang.org/course/intro/138?device=geekTime.android视频地址:https://www.bilibili.com/video/BV1w7411v74u文档地址:https://github.com/russelltao/geektime-nginx
git如何进行版本回退
hutaotaotao
git git
目录情况1:工作区发生改变但还未gitadd情况2:已经gitadd但还未gitcommit情况3:已经gitcommit但还未gitpush情况4:已经gitpush情况1:工作区发生改变但还未gitadd情况描述:工作区发生变化,比如修改了代码,但还未gitadd,即还未保存在暂存区,此时如何操作?如果是想放弃这些更改:则可以使用gitrestore命令。在不带任何参数时,gitrestore
【Git】深入理解 Git 版本回退:方法与实践
丶2136
# 版本控制 git
目录一、版本回退的基本概念1.1GitReset1.2GitRevert二、本地与远程分支的版本回退2.1本地回退2.2远程分支回退三、已提交但未推送的情况3.1查看提交状态3.2回滚本地提交四、已提交并推送到远程的情况4.1使用`gitreset`强制回退4.2强制推送更改五、使用`gitrevert`撤销提交5.1撤销特定提交5.2推送更改六、回退后的问题与解决总结Git是一个强大的版本控制工
vLLM 部署大模型
哦豁灬
深度学习 LLM 人工智能 vLLM 大模型部署 LLM
1介绍vLLM是来自UCBerkeley的LMSYS在LLM推理方面的最新工作(没错就是搞出Vicuna的那个group),最大亮点是采用PagedAttention技术,结合ContinuousBatching,极大地优化了realtime场景下的LLMserving的throughput与内存使用。vllmgithub仓库1.1安装安装命令:pip3installvllm#vllm==0.2.
Midscene.js 简介
有个人神神叨叨
javascript ai 人工智能
名称:Midscene.js口号:JoyfulAutomationbyAI(通过AI实现愉悦的自动化)官网:https://midscenejs.com/项目地址:https://github.com/web-infra-dev/midscene社区链接:Twitter:https://x.com/midscene_aiDiscord:https://discord.gg/2JyBHxszE4La
jquery实现的jsonp掉java后台
知了ing
java jsonp jquery
什么是JSONP?
先说说JSONP是怎么产生的:
其实网上关于JSONP的讲解有很多,但却千篇一律,而且云里雾里,对于很多刚接触的人来讲理解起来有些困难,小可不才,试着用自己的方式来阐释一下这个问题,看看是否有帮助。
1、一个众所周知的问题,Ajax直接请求普通文件存在跨域无权限访问的问题,甭管你是静态页面、动态网页、web服务、WCF,只要是跨域请求,一律不准;
2、
Struts2学习笔记
caoyong
struts2
SSH : Spring + Struts2 + Hibernate
三层架构(表示层,业务逻辑层,数据访问层) MVC模式 (Model View Controller)
分层原则:单向依赖,接口耦合
1、Struts2 = Struts + Webwork
2、搭建struts2开发环境
a>、到www.apac
SpringMVC学习之后台往前台传值方法
满城风雨近重阳
springMVC
springMVC控制器往前台传值的方法有以下几种:
1.ModelAndView
通过往ModelAndView中存放viewName:目标地址和attribute参数来实现传参:
ModelAndView mv=new ModelAndView();
mv.setViewName="success
WebService存在的必要性?
一炮送你回车库
webservice
做Java的经常在选择Webservice框架上徘徊很久,Axis Xfire Axis2 CXF ,他们只有一个功能,发布HTTP服务然后用XML做数据传输。
是的,他们就做了两个功能,发布一个http服务让客户端或者浏览器连接,接收xml参数并发送xml结果。
当在不同的平台间传输数据时,就需要一个都能解析的数据格式。
但是为什么要使用xml呢?不能使json或者其他通用数据
js年份下拉框
3213213333332132
java web ee
<div id="divValue">test...</div>测试
//年份
<select id="year"></select>
<script type="text/javascript">
window.onload =
简单链式调用的实现技术
归来朝歌
方法调用 链式反应 编程思想
在编程中,我们可以经常遇到这样一种场景:一个实例不断调用它自身的方法,像一条链条一样进行调用
这样的调用你可能在Ajax中,在页面中添加标签:
$("<p>").append($("<span>").text(list[i].name)).appendTo("#result");
也可能在HQ
JAVA调用.net 发布的webservice 接口
darkranger
webservice
/**
* @Title: callInvoke
* @Description: TODO(调用接口公共方法)
* @param @param url 地址
* @param @param method 方法
* @param @param pama 参数
* @param @return
* @param @throws BusinessException
Javascript模糊查找 | 第一章 循环不能不重视。
aijuans
Way
最近受我的朋友委托用js+HTML做一个像手册一样的程序,里面要有可展开的大纲,模糊查找等功能。我这个人说实在的懒,本来是不愿意的,但想起了父亲以前教我要给朋友搞好关系,再加上这也可以巩固自己的js技术,于是就开始开发这个程序,没想到却出了点小问题,我做的查找只能绝对查找。具体的js代码如下:
function search(){
var arr=new Array("my
狼和羊,该怎么抉择
atongyeye
工作
狼和羊,该怎么抉择
在做一个链家的小项目,只有我和另外一个同事两个人负责,各负责一部分接口,我的接口写完,并全部测联调试通过。所以工作就剩下一下细枝末节的,工作就轻松很多。每天会帮另一个同事测试一些功能点,协助他完成一些业务型不强的工作。
今天早上到公司没多久,领导就在QQ上给我发信息,让我多协助同事测试,让我积极主动些,有点责任心等等,我听了这话,心里面立马凉半截,首先一个领导轻易说
读取android系统的联系人拨号
百合不是茶
android sqlite数据库 内容提供者 系统服务的使用
联系人的姓名和号码是保存在不同的表中,不要一下子把号码查询来,我开始就是把姓名和电话同时查询出来的,导致系统非常的慢
关键代码:
1, 使用javabean操作存储读取到的数据
package com.example.bean;
/**
*
* @author Admini
ORACLE自定义异常
bijian1013
数据库 自定义异常
实例:
CREATE OR REPLACE PROCEDURE test_Exception
(
ParameterA IN varchar2,
ParameterB IN varchar2,
ErrorCode OUT varchar2 --返回值,错误编码
)
AS
/*以下是一些变量的定义*/
V1 NUMBER;
V2 nvarc
查看端号使用情况
征客丶
windows
一、查看端口
在windows命令行窗口下执行:
>netstat -aon|findstr "8080"
显示结果:
TCP 127.0.0.1:80 0.0.0.0:0 &
【Spark二十】运行Spark Streaming的NetworkWordCount实例
bit1129
wordcount
Spark Streaming简介
NetworkWordCount代码
/*
* Licensed to the Apache Software Foundation (ASF) under one or more
* contributor license agreements. See the NOTICE file distributed with
Struts2 与 SpringMVC的比较
BlueSkator
struts2 spring mvc
1. 机制:spring mvc的入口是servlet,而struts2是filter,这样就导致了二者的机制不同。 2. 性能:spring会稍微比struts快。spring mvc是基于方法的设计,而sturts是基于类,每次发一次请求都会实例一个action,每个action都会被注入属性,而spring基于方法,粒度更细,但要小心把握像在servlet控制数据一样。spring
Hibernate在更新时,是可以不用session的update方法的(转帖)
BreakingBad
Hibernate update
地址:http://blog.csdn.net/plpblue/article/details/9304459
public void synDevNameWithItil()
{Session session = null;Transaction tr = null;try{session = HibernateUtil.getSession();tr = session.beginTran
读《研磨设计模式》-代码笔记-观察者模式
bylijinnan
java 设计模式
声明: 本文只为方便我个人查阅和理解,详细的分析以及源代码请移步 原作者的博客http://chjavach.iteye.com/
import java.util.ArrayList;
import java.util.List;
import java.util.Observable;
import java.util.Observer;
/**
* “观
重置MySQL密码
chenhbc
mysql 重置密码 忘记密码
如果你也像我这么健忘,把MySQL的密码搞忘记了,经过下面几个步骤就可以重置了(以Windows为例,Linux/Unix类似):
1、关闭MySQL服务
2、打开CMD,进入MySQL安装目录的bin目录下,以跳过权限检查的方式启动MySQL
mysqld --skip-grant-tables
3、新开一个CMD窗口,进入MySQL
mysql -uroot
再谈系统论,控制论和信息论
comsci
设计模式 生物 能源 企业应用 领域模型
再谈系统论,控制论和信息论
偶然看
oracle moving window size与 AWR retention period关系
daizj
oracle
转自: http://tomszrp.itpub.net/post/11835/494147
晚上在做11gR1的一个awrrpt报告时,顺便想调整一下AWR snapshot的保留时间,结果遇到了ORA-13541这样的错误.下面是这个问题的发生和解决过程.
SQL> select * from v$version;
BANNER
-------------------
Python版B树
dieslrae
python
话说以前的树都用java写的,最近发现python有点生疏了,于是用python写了个B树实现,B树在索引领域用得还是蛮多了,如果没记错mysql的默认索引好像就是B树...
首先是数据实体对象,很简单,只存放key,value
class Entity(object):
'''数据实体'''
def __init__(self,key,value)
C语言冒泡排序
dcj3sjt126com
算法
代码示例:
# include <stdio.h>
//冒泡排序
void sort(int * a, int len)
{
int i, j, t;
for (i=0; i<len-1; i++)
{
for (j=0; j<len-1-i; j++)
{
if (a[j] > a[j+1]) // >表示升序
自定义导航栏样式
dcj3sjt126com
自定义
-(void)setupAppAppearance
{
[[UILabel appearance] setFont:[UIFont fontWithName:@"FZLTHK—GBK1-0" size:20]];
[UIButton appearance].titleLabel.font =[UIFont fontWithName:@"FZLTH
11.性能优化-优化-JVM参数总结
frank1234
jvm参数 性能优化
1.堆
-Xms --初始堆大小
-Xmx --最大堆大小
-Xmn --新生代大小
-Xss --线程栈大小
-XX:PermSize --永久代初始大小
-XX:MaxPermSize --永久代最大值
-XX:SurvivorRatio --新生代和suvivor比例,默认为8
-XX:TargetSurvivorRatio --survivor可使用
nginx日志分割 for linux
HarborChung
nginx linux 脚本
nginx日志分割 for linux 默认情况下,nginx是不分割访问日志的,久而久之,网站的日志文件将会越来越大,占用空间不说,如果有问题要查看网站的日志的话,庞大的文件也将很难打开,于是便有了下面的脚本 使用方法,先将以下脚本保存为 cutlog.sh,放在/root 目录下,然后给予此脚本执行的权限
复制代码代码如下:
chmo
Spring4新特性——泛型限定式依赖注入
jinnianshilongnian
spring spring4 泛型式依赖注入
Spring4新特性——泛型限定式依赖注入
Spring4新特性——核心容器的其他改进
Spring4新特性——Web开发的增强
Spring4新特性——集成Bean Validation 1.1(JSR-349)到SpringMVC
Spring4新特性——Groovy Bean定义DSL
Spring4新特性——更好的Java泛型操作API
Spring4新
centOS安装GCC和G++
liuxihope
centos gcc
Centos支持yum安装,安装软件一般格式为yum install .......,注意安装时要先成为root用户。
按照这个思路,我想安装过程如下:
安装gcc:yum install gcc
安装g++: yum install g++
实际操作过程发现,只能有gcc安装成功,而g++安装失败,提示g++ command not found。上网查了一下,正确安装应该
第13章 Ajax进阶(上)
onestopweb
Ajax
index.html
<!DOCTYPE html PUBLIC "-//W3C//DTD XHTML 1.0 Transitional//EN" "http://www.w3.org/TR/xhtml1/DTD/xhtml1-transitional.dtd">
<html xmlns="http://www.w3.org/
How to determine BusinessObjects service pack and fix pack
blueoxygen
BO
http://bukhantsov.org/2011/08/how-to-determine-businessobjects-service-pack-and-fix-pack/
The table below is helpful. Reference
BOE XI 3.x
12.0.0.
y BOE XI 3.0 12.0.
x.
y BO
Oracle里的自增字段设置
tomcat_oracle
oracle
大家都知道吧,这很坑,尤其是用惯了mysql里的自增字段设置,结果oracle里面没有的。oh,no 我用的是12c版本的,它有一个新特性,可以这样设置自增序列,在创建表是,把id设置为自增序列
create table t
(
id number generated by default as identity (start with 1 increment b
Spring Security(01)——初体验
yang_winnie
spring Security
Spring Security(01)——初体验
博客分类: spring Security
Spring Security入门安全认证
首先我们为Spring Security专门建立一个Spring的配置文件,该文件就专门用来作为Spring Security的配置