03_学习springdoc与微服务结合_简述
文章目录
- 1 前言
- 2 基本结构
- 3 网关的配置
-
- 3.1 ✍️ pom.xml 引入依赖
- 3.2 application.yml 的配置
-
- 3.2.1 Gateway 的配置
- 3.2.2 Eureka Client 的配置
- 3.2.3 Springdoc 的配置
- 3.3 Springdoc 配置类
- 4 影片服务 backend-film 的配置
-
- 4.1 ✍️ pom.xml 引入依赖
- 4.2 application.yml 的配置
-
- 4.2.1 Eureka Client 的配置
- 4.2.2 Springdoc 的配置
- 4.3 Springdoc 配置类
- 5 结语
1 前言
最近尝试了下 在微服务中使用 springdoc,感觉还蛮有意思的,现在把关键步骤记录下来。
做为一个平时学习的小项目,我使用的是比较新的 Spring Boot 3.x 和 Java 17。
springdoc 的官网是 https://springdoc.org/ 。本文主要简述了一些配置,至于 swagger 的注解如何使用,请参考我的另一篇文章 《01_学习springdoc的基本使用》
2 基本结构
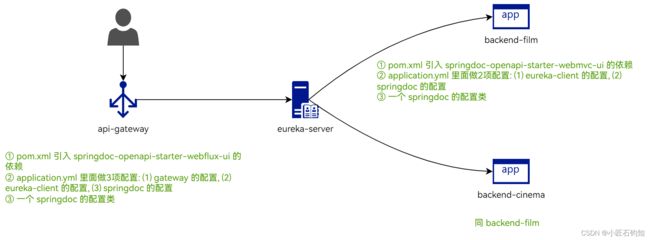
微服务这边,用到了 Spring Cloud Gateway 、Eureka Server、Eureka Client,如下图:
上图的 backend-film 和 backend-cinema 分别是 影片服务 和 影院服务。结构很简洁,另外,图中我也简述了每个模块,在结合 springdoc 的时候,需要引入的依赖和相应的配置。
3 网关的配置
3.1 ✍️ pom.xml 引入依赖
<dependency>
   <groupId>org.springdocgroupId>
   <artifactId>springdoc-openapi-starter-webflux-uiartifactId>

dependency>
如上,引入 webflux-ui 的依赖。至于为什么是 webflux-ui 而不是 webmvc-ui 呢❔ 原因是 spring-cloud-starter-gateway 它自带 spring-boot-starter-webflux 的依赖,也就是说,Gateway 本身用的是 webflux,那 springdoc 咱也就用 webflux-ui 呗。
3.2 application.yml 的配置
3.2.1 Gateway 的配置
spring:
  application:
    name: api-gateway
  cloud:
    gateway:
      discovery:
        locator:
          enabled: true
      routes:
        # 影院: 所有 /cateye/backend-cinema/** 的请求 都去影院服务
        - id: backend-cinema-service
          uri: lb://backend-cinema
          predicates:
            - Path=/cateye/backend-cinema/**
          filters:
            - name: CircuitBreaker
              args:
                name: movieHallCircuitBreaker
                fallbackUri: forward:/fallback/cinema
            # 跳过 2 个前缀, 也就是 /cateye/backend-cinema/
            - StripPrefix=2
        # 影片: 所有 /cateye/backend-film/** 的请求 都去影片服务
        - id: backend-film-service
          uri: lb://backend-film
          predicates:
            - Path=/cateye/backend-film/**
          filters:
            - name: CircuitBreaker
              args:
                name: filmCircuitBreaker
                fallbackUri: forward:/fallback/film
            # 跳过 2 个前缀, 也就是 /cateye/backend-film/
            - StripPrefix=2
3.2.2 Eureka Client 的配置
eureka:
  client:
    serviceUrl:
      # eureka server 集群
      defaultZone: http://peer1:8100/eureka/,http://peer2:8101/eureka/,http://peer3:8102/eureka/
  instance:
    prefer-ip-address: true
3.2.3 Springdoc 的配置
server:
  # 网关的端口是 8080
  port: 8080
  # server.forward-headers-strategy=framework 和 后面的 springdoc.cache.disabled=true
  # 有很大的用处, 它们会影响到 swagger ui 页面的 generated server url
  forward-headers-strategy: framework

springdoc:
  swagger-ui:
    urls:
      # 指定影院服务 OpenAPI 3.0 json 结构的 api 描述 所在的 url 路径
      # 这个 name 就是类 org.springdoc.core.models.GroupedOpenApi 的 group 名称
      # 此 name 和后面的 springdoc 配置类有很大的关系
      - name: backend-cinema
        url: /cateye/backend-cinema/v3/api-docs
      # 指定影片服务 OpenAPI 3.0 json 结构的 api 描述 所在的 url 路径
      - name: backend-film
        # swagger 的 api-doc.json 默认是在 /v3/api-docs 接口下
        # 由于前面 gateway 的 route 配置,去掉了 2 个前缀, 所以下面的 url 是对的
        url: /cateye/backend-film/v3/api-docs
  cache:
    disabled: true
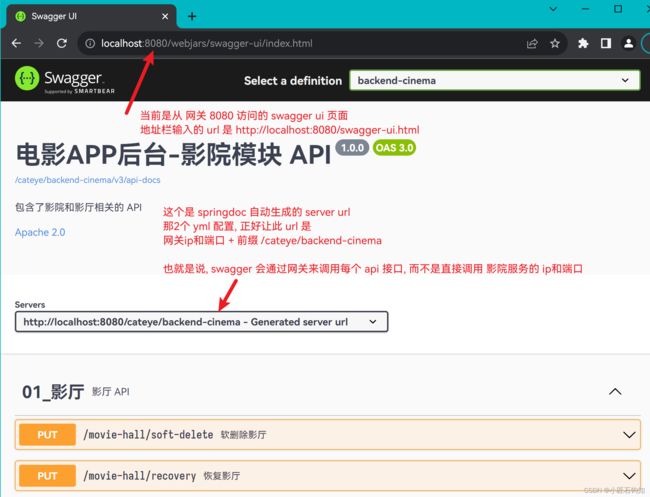
百闻不如一见,server.forward-headers-strategy=framework 和 springdoc.cache.disabled=true 的效果如下图:
3.3 Springdoc 配置类
import org.springdoc.core.models.GroupedOpenApi;
import org.springframework.cloud.gateway.route.RouteDefinition;
import org.springframework.cloud.gateway.route.RouteDefinitionLocator;
import org.springframework.context.annotation.Bean;
import org.springframework.context.annotation.Configuration;
import org.springframework.context.annotation.Lazy;

import java.util.ArrayList;
import java.util.List;

@Configuration
public class MySpringdocConfig {
    @Bean
    @Lazy(false)
    public List<GroupedOpenApi> apis(RouteDefinitionLocator locator) {
        List<GroupedOpenApi> groups = new ArrayList<>();
        List<RouteDefinition> definitions = locator.getRouteDefinitions().collectList().block();
        definitions.stream().filter(routeDefinition -> routeDefinition.getId().matches(".*-service")).forEach(routeDefinition -> {
            // 这个 -service 对应于前面 application.yml 网关的配置
            String name = routeDefinition.getId().replaceAll("-service", "");
            // 下面这个 pathsToMatch 其实没有什么用, 随便写个 /abc/** , 不拼接 name 都可以
            // 但是 group(name) 这句,是和 application.yml 的 springdoc 的配置相关联的
            GroupedOpenApi.builder().pathsToMatch("/cateye/" + name + "/**").group(name).build();
        });
        return groups;
    }
}
效果如下图:
4 影片服务 backend-film 的配置
4.1 ✍️ pom.xml 引入依赖
<dependency>
   <groupId>org.springdocgroupId>
   <artifactId>springdoc-openapi-starter-webmvc-uiartifactId>

dependency>
因为习惯了 Spring MVC,并且 Webflux 的性能好像也不比 MVC 强很多,所以继续用 MVC 吧,等后续有时间,好好琢磨下 Webflux。
4.2 application.yml 的配置
4.2.1 Eureka Client 的配置
和前面网关的一样
4.2.2 Springdoc 的配置
server:
  # 影片服务的端口是 8300
  port: 8300
  forward-headers-strategy: framework

# springdoc 禁用缓存
springdoc:
  cache:
    disabled: true
4.3 Springdoc 配置类
除了写代码,我们还可以使用注解来配置 OpenAPI ,springdoc 的 github demo 已有展示,我这里就不赘述了,我还是喜欢代码形式的配置。springdoc 的 github demo 详见文末链接。
import io.swagger.v3.oas.models.OpenAPI;
import io.swagger.v3.oas.models.info.Info;
import io.swagger.v3.oas.models.info.License;
import org.springframework.context.annotation.Bean;
import org.springframework.context.annotation.Configuration;

@Configuration
public class MySpringdocConfig {

    @Bean
    public OpenAPI api() {
        return new OpenAPI()
                // 设置一些标题什么的
                .info(new Info()
                        .title("电影APP后台-影片模块 API")
                        .version("1.0.0")
                        .description("包含了影片和演员相关的 API")
                        .license(new License()
                                .name("Apache 2.0")
                                .url("https://www.apache.org/licenses/LICENSE-2.0")));
    }
}
5 结语
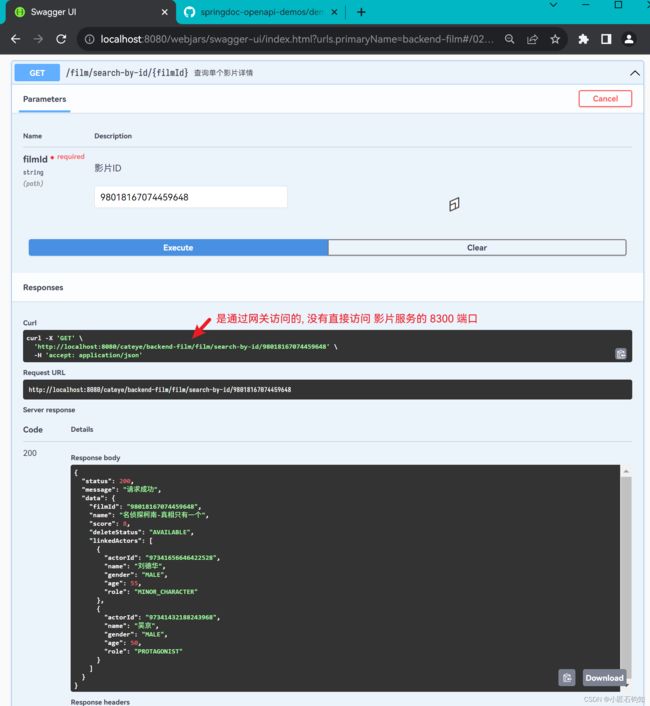
完事儿了,其实也不难,就是些配置。访问接口也可以访问通,如下图:
本文参考了 springdoc 官方 github 上的 demo 项目,链接是 https://github.com/springdoc/springdoc-openapi-demos/tree/2.x/demo-microservices 。除了 demo-microservices,官方还有很多 demo 可以参考。
等后续再研究下 springdoc 与 oauth 的结合。
感谢阅读~


