matlab相机内参标定
这篇主要记录一下使用matlab进行相机标定的方法,想了解相机内参标定原理的朋友可以参考我上一篇的内容相机的内参标定(实现原理+具体操作流程+实验结果)_相机内参标定_qq_41361687的博客-CSDN博客
一、安装
打开matlab,如果在应用程序(app)中没有找到camera calibrator,就需要进行安装,点击左上角的“获取更多应用程序”,搜索camera calibration,在搜索结果中找到Computer Vision ToolBox,然后点击安装,成功后重启matlab就会在app工具栏中找到camera calibrator。
二、使用
点击打开camera calibrator后,点击add images下拉栏中的from camera就可以连上usb相机并显示实时画面。或者直接点击add images从本地打开已经采集好的棋盘格图片数据。
如果在打开数据的过程中报错,提示说未安装相关驱动,

就需要额外手动安装驱动。可以通过主页的附加功能中的get hardware support packages进行安装,之后找到对应usb_cam的驱动一路next安装就可以了,重新加载就可以正常显示相机画面。
如果选择的是实时相机的数据,需要手动设置数据的保存路径以及采集的时间间隔,设置好后需要点击三角号

开始进行数据采集(默认20张)。采集时可以是固定相机移动标定板也可以是固定标定板移动相机,总之有个相对运动过程。采集之前还需要在弹出的窗口中设置一下棋盘格最小方格的尺寸,单位默认是mm。
numImages = 9;
files = cell(1, numImages);
for i = 1:numImages
    files{i} = fullfile(matlabroot, 'toolbox', 'vision', 'visiondata', ...
        'calibration', 'slr', sprintf('image%d.jpg', i));
end

% Display one of the calibration images
magnification = 25;
I = imread(files{1});
figure; imshow(I, InitialMagnification = magnification);
title("One of the Calibration Images");
估计相机参数
% Detect the checkerboard corners in the images.
[imagePoints, boardSize] = detectCheckerboardPoints(files);

% Generate the world coordinates of the checkerboard corners in the
% pattern-centric coordinate system, with the upper-left corner at (0,0).
squareSize = 29; % in millimeters
worldPoints = generateCheckerboardPoints(boardSize, squareSize);

% Calibrate the camera.
imageSize = [size(I, 1), size(I, 2)];
cameraParams = estimateCameraParameters(imagePoints, worldPoints, ...
                                     ImageSize = imageSize);

% Evaluate calibration accuracy.
figure; showReprojectionErrors(cameraParams);
title("Reprojection Errors");
可以得到重投影误差结果
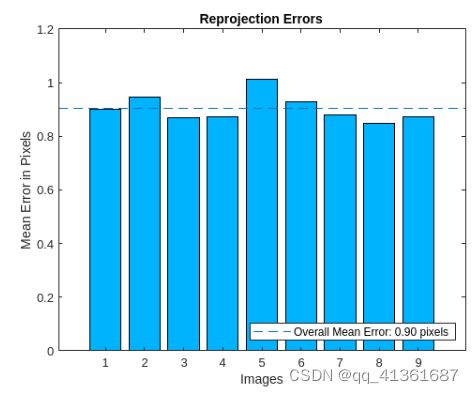
实际标定结果一般重投影误差小于0.5即认为标定精度较高。
通过这批数据还可以计算出标定板相对于相机的外参。效果图如下:
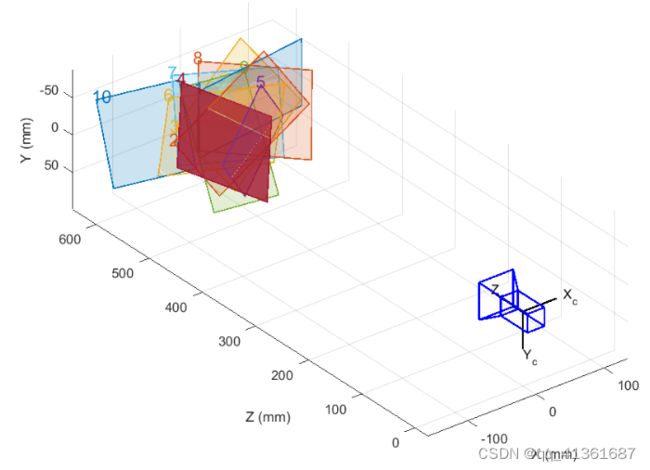
具体外参参数计算的代码实现:
% Detect the checkerboard.
[imagePoints, boardSize] = detectCheckerboardPoints(im);

% Adjust the imagePoints so that they are expressed in the coordinate system
% used in the original image, before it was undistorted.  This adjustment
% makes it compatible with the cameraParameters object computed for the original image.
imagePoints = imagePoints + newOrigin; % adds newOrigin to every row of imagePoints

% Extract camera intrinsics.
camIntrinsics = cameraParams.Intrinsics;

% Compute extrinsic parameters of the camera.
camExtrinsics = estimateExtrinsics(imagePoints, worldPoints, camIntrinsics);
三、结果保存
标定结束后,可以通过

导出我们测量出的相机内参参数。

划红线的部分是几个比较有用的参数。从上到下分别是径向畸变系数(3阶),切向畸变系数(2阶),世界坐标单位是mm,内参矩阵,焦距(分fx,fy),成像平面原点(理想情况是图像宽高中心位置),成像平面原点坐标(单位是像素)。
至此使用matlab进行相机内参标定就完成了。
更具体的代码实现以及标定工具箱的其他用途,可以查阅matlab的官网说明:
Camera Calibration- MATLAB & Simulink- MathWorks 中国
同时,也感谢学习整理过程中查阅的几位大佬的博客内容,大家有兴趣可以移步阅读:
Matlab相机内参标定及参数理解_E去不复返的博客-CSDN博客
用matlab对相机进行标定获取相机内参_matlab 相机标定_ciky奇的博客-CSDN博客