怎样封装WPF用户控件的一些实践
JHRS开发框架之公用组件WPF用户控件封装,这个系列的文章旨在记录工作中使用WPF开发新的医疗项目中,有感于必须统一掉一些规范上的事情,并且提高团队开发效率,遂折腾了这么一个半吊子的框架,这个标题WPF企业级开发框架搭建指南,2020从入门到放弃可能会唬住一些人,但看到这些零碎文字的朋友就凑和着看吧,如果能帮助到你,那也荣幸了。
继上一篇介绍了怎样封装ViewModel的基类,但随着项目大了,一个功能点一个功能点的做,真的累,很多系统里面,在局部有很多相似的功能,数据展示几乎一样的,或许不一样的只是摆放的位置,显示的样式不同罢了;这种东西,一个功能一个功能的实现,那就有点朝着996的状态发展了;因此在JHRS框架中,也体现了懒人干活的思想,那就是能封装成控件的,坚决搞成一个控件,供大家享乐。
JHRS开发框架之公用组件WPF用户控件封装
当然,用户控件可以套在用户控件里面,一个拥有复杂功能的页面,可以由众多的用户控件组成,最终你会发现,用户控件封装得越优雅,做复杂的功能页面也不会很难了,只需要像搭积木那样,把控件丢上去,数据绑定上就完事了,最后如果要调整样式,稍微调整下就OK了。
WPF用户控件封装
因为框架中引入了Prism将各子系统模块化了,所以我们在WPF用户控件封装的时候,分为两种情况,一种是封装整个系统公用的用户控件,另外一种是各子模块自己的用户控件;整个系统公用的用户控件,需要保持着高扩展性,灵活性,即使后期对该控件增加功能,也要尽量做到不影响已经使用该控件的页面(Page),还需要让使用的页面可以灵活的设置一些属性以满足不同页面(Page)的功能需求。
在框架中只封装了3个基本的用户控件,动态列的DataGrid,可调接口的Combobox,动态分页表格。
JHRS开发框架动态列的DataGrid
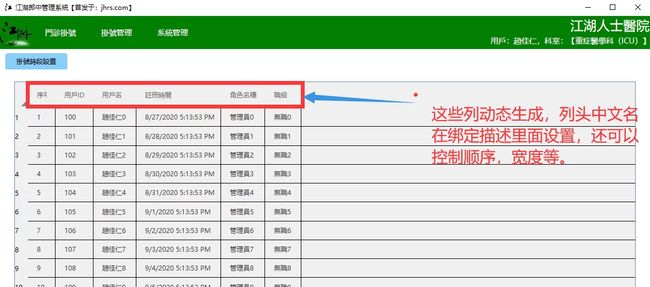
大部分管理系统,都离不开表格展示数据,而WPF项目中,基本上都会使用DataGrid来展示数据;熟悉WPF开发的朋友都知道,如果手工撸一个表格,那代码贼烦人,需要一个列一个列的写代码并绑定数据;而在JHRS框架中提供的思路是基于注解的方式(自定义BindDescriptionAttribute类用于描述每列)动态生成每一列数据并自动绑定数据,对于复杂的列,如某一列里面展示为下拉框(ComoboBox)或者更复杂的展示,只需要在资源(Resources)里面定义DataTemplate即可,然后动态加载就可以了。对于最每一行的操作列,也是一样的套路。
动态列的DataGrid封装思路是:编写一个DataGridEx类,继承自DataGrid类,在DataGridEx类中,需要定义一个依赖属性我们称为DataSource,用它来绑定数据,然后在DataSourceProperty的回调函数里面把DataSource赋值给原本的 ItemSource属性,最后重写OnInitialized方法,将数据源传入DataGrid的扩展方法GenerateColumns动态生成列就完成了WPF用户控件封装,详见下方代码。
DataGridEx类源码
///
/// 輕量級的DataGrid擴展
///
public class DataGridEx : DataGrid
{
///
/// 構造函數
///
public DataGridEx()
{
this.AutoGenerateColumns = false;
this.Loaded += DataGridEx_Loaded;
this.LoadingRow += PagingDataList_LoadingRow;
}
///
/// 给表格添加样式
///
///
///
private void DataGridEx_Loaded(object sender, RoutedEventArgs e)
{
this.CanUserAddRows = false;
}
///
/// 生成序号
///
///
///
private void PagingDataList_LoadingRow(object sender, DataGridRowEventArgs e)
{
if (EnableRowNumber)
//需要分页
e.Row.Header = e.Row.GetIndex() + 1;
}
///
/// 操作列key
///
public string OperatingKey { get; set; } = string.Empty;
///
/// 操作列的宽度
///
public DataGridLength OperationWidth { get; set; }
///
/// 是否启用序号
///
public bool EnableRowNumber { get; set; } = true;
///
/// 禁止显示的列
///
public string DisableCloumn { get; set; }
public IEnumerable以上的基本上是完整的源码,github是参见这里。
DataGridExtensions扩展类源码
///
/// DataGrid扩展方法
///
public static class DataGridExtensions
{
///
/// 动态生成列
///
/// DataGrid控件实例
/// 列插入位置
/// 数据源
/// 操作列资源
/// 操作列宽度
public static void GenerateColumns(this DataGrid dataGrid, int index, object data, string operationKey, DataGridLength operationWidth)
{
IList list = GetColumns(data);
//Window win = Application.Current.Windows.OfType().SingleOrDefault(x => x.IsActive);
//Page page = win.GetChildObject("page");
//if (page == null) throw new Exception("未獲取到當前窗口名稱爲page的(Page)頁面對象,原因:沒有爲Page設置Name,且名稱必須爲【page】!");
Page page = GetParentObject(dataGrid, "page");
for (int i = 0; i < list.Count; i++)
{
switch (list[i].ShowAs)
{
case ShowScheme.普通文本:
dataGrid.Columns.Insert(i + index, new DataGridTextColumn
{
Header = list[i].HeaderName,
Binding = new Binding(list[i].PropertyName),
Width = list[i].Width
});
break;
case ShowScheme.自定义:
if (page.FindResource(list[i].ResourceKey) != null)
{
DataGridTemplateColumn val = new DataGridTemplateColumn();
val.Header = list[i].HeaderName;
val.Width = list[i].Width;
val.CellTemplate = page.FindResource(list[i].ResourceKey) as DataTemplate;
dataGrid.Columns.Insert(i + index, val);
}
break;
}
}
if (!string.IsNullOrWhiteSpace(operationKey) && page != null)
{
var resource = page.FindResource(operationKey);
if (resource!=null)
{
var col = new DataGridTemplateColumn() { Header = "操作", Width = operationWidth };
col.CellTemplate = resource as DataTemplate;
dataGrid.Columns.Add(col);
}
}
}
///
/// 获取数据源对象到列的映射关系
///
///
/// GetColumns(object data)
{
List list = new List();
var pros = data.GetType().GenericTypeArguments[0].GetProperties();
foreach (var item in pros)
{
var a = item.GetCustomAttribute();
if (a != null) { a.PropertyName = item.Name; list.Add(a); }
}
return list.OrderBy(x => x.DisplayIndex).ToArray();
}
///
/// 查找父级控件
///
/// (DependencyObject obj, string name) where T : FrameworkElement
{
DependencyObject parent = VisualTreeHelper.GetParent(obj);
while (parent != null)
{
if (parent is T && (((T)parent).Name == name | string.IsNullOrEmpty(name)))
{
return (T)parent;
}
parent = VisualTreeHelper.GetParent(parent);
}
return null;
}
} 完整的参见这里。
BindDescriptionAttribute注解类
在调用web api从服务器端返回的数据中,需要在本地的WPF项目定义相关的实体类,并且在实体类的属性上标记绑定描述类(BindDescriptionAttribute),这个类直接描述了展面如何展示(一般用DataGrid,可按此思路扩展不规则表单),这也是WPF用户控件封装之前的准备工作。
///
    /// DataGrid绑定数据源描述
    ///
    public class BindDescriptionAttribute : Attribute
    {
        ///
        /// 列名
        ///
        public string HeaderName { get; set; }

        ///
        /// 显示为
        ///
        public ShowScheme ShowAs { get; set; }

        ///
        /// 显示顺序
        ///
        public int DisplayIndex { get; set; }

        ///
        /// DataGrid列绑定属性名称
        ///
        public string PropertyName { get; set; }

        ///
        /// 应用内的容模板Key
        ///
        public string ResourceKey { get; set; }

        ///
        /// 列宽
        ///
        public DataGridLength Width { get; set; }

        ///
        /// 列宽ByGrid
        ///
        public GridLength CloumnWidth { get; set; }


        ///
        /// DataGrid绑定数据源描述
        ///
        /// 列名
        /// 显示为
        /// 宽度
        /// 显示顺序
        /// 自定义列Key
        public BindDescriptionAttribute(string headerName, ShowScheme showAs = ShowScheme.普通文本, string width = "Auto", int displayIndex = 0, string resourceKey = "")
        {
            HeaderName = headerName;
            DisplayIndex = displayIndex;
            ResourceKey = resourceKey;
            ShowAs = showAs;
            var convert = new DataGridLengthConverter();
            Width = (DataGridLength)convert.ConvertFrom(width);
            var gridCOnvert = new GridLengthConverter();
            CloumnWidth = (GridLength)gridCOnvert.ConvertFrom(width);

            if (showAs == ShowScheme.自定义 && string.IsNullOrWhiteSpace(resourceKey))
                throw new ArgumentException($"自定义列时需要指定{nameof(resourceKey)}参数!");
        }
    }

    ///
    /// 展示方式
    ///
    public enum ShowScheme
    {
        普通文本 = 1,
        自定义 = 4
    }
上方的枚举ShowScheme则描述了对应的列的显示方案,是该使用普通的文本还是加载数据模板(DataTemplate)。
如何使用DataGridEx实现动态表格功能
要使用自己扩展的动态DataGrid其实是跟使用常规的DataGrid是一样的,只是区别是绑定数据是使用DataSource属性而已,下面就是WPF用户控件封装之动态表格xaml,如下代码所示:
上面代中
        ///
        /// 綁定分頁數據
        ///
        [WaitComplete]
        protected async override Task BindPagingData()
        {
            List list = new List();
            for (int i = 0; i < 15; i++)
            {
                list.Add(new Account
                {
                    Name = "趙佳仁" + i,
                    RegTime = DateTime.Now.AddDays(i),
                    RoleName = "管理員" + i,
                    Title = "無職" + i,
                    UserID = 100 + i
                });
            }
            PageData = list;
            await Task.Delay(200);
            return true;
        }
而Account类则是这样定义的。
    public class Account
    {
        [BindDescription("用戶ID")]
        public int UserID { get; set; }
        [BindDescription("用戶名")]
        public string Name { get; set; }
        [BindDescription("註冊時間")]
        public DateTime RegTime { get; set; }
        [BindDescription("角色名穩")]
        public string RoleName { get; set; }
        [BindDescription("職級")]
        public string Title { get; set; }
    }
完整的代码参见这里。下图是最终的效果:
WPF用户控件封装
Combobox扩展控件
原生的Combobox是WPF提供的下拉框控件,如果约定在整个系统里面,所有的下拉框控件默认项为请选择,如下图所示:
统一的给加上这个的话,在框架中是这样做的,先自定义一个BaseComboBox类,继承自ComboBox类,并在代码里面添加一个默认项,代码如下:
using JHRS.Http;
using System;
using System.Collections;
using System.Collections.Generic;
using System.Linq;
using System.Net.Http;
using System.Text;
using System.Threading.Tasks;
using System.Windows;
using System.Windows.Controls;

namespace JHRS.Core.Controls.Common
{
    ///
    /// 下拉框控件基类
    ///
    public abstract class BaseComboBox : ComboBox
    {
        ///
        /// 下拉框数据源
        ///
        public IList Data
        {
            get { return (IList)GetValue(DataProperty); }
            set
            {
                AddDefault(value);
                SetValue(DataProperty, value);
            }
        }

        ///
        /// 已登录获取到Token客户端对象
        ///
        protected HttpClient AuthClient => AuthHttpClient.Instance;

        ///
        /// 服务器配置
        ///
        protected string BaseUrl => AuthHttpClient.Instance.BaseAddress!.ToString();

        // Using a DependencyProperty as the backing store for Data.  This enables animation, styling, binding, etc...
        public static readonly DependencyProperty DataProperty =
            DependencyProperty.Register("Data", typeof(IList), typeof(BaseComboBox), new PropertyMetadata(null, (d, e) =>
            {
                BaseComboBox c = (BaseComboBox)d;
                var list = e.NewValue as IList;
                if (list != null)
                    c.AddDefault(list);
                c.Data = list;
                c.ItemsSource = list;
            }));

        ///
        /// 构造函数
        ///
        public BaseComboBox()
        {
            this.Initialized += OnInitialized;
        }

        ///
        /// 下拉框初始化事件,子类实现,可以加载各自数据。
        ///
        ///
        ///
        protected abstract void OnInitialized(object sender, EventArgs e);

        private string DefaultSelectedValue = "-1";
        private string DefaultSelectedText = "—請選擇—";

        ///
        /// 添加默认项:请选择
        ///
        ///
        private void AddDefault(IList data)
        {
            if (data == null || data.Count == 0) return;
            var pros = data[0].GetType().GetProperties();
            bool hasSelect = false;
            var s = pros.FirstOrDefault(x => x.Name == SelectedValuePath);
            var d = pros.FirstOrDefault(x => x.Name == DisplayMemberPath);
            if (s == null) throw new Exception("未給ComboBox指定SelectedValuePath屬性,注意:屬性區分大小寫!");
            if (d == null) throw new Exception("未给ComboBox指定DisplayMemberPath屬性,注意:屬性區分大小寫!");
            foreach (var item in data)
            {
                if (s == d && (s.GetValue(item, null) + "") == DefaultSelectedText)
                {
                    hasSelect = true;
                    break;
                }
                else if ((s.GetValue(item, null) + "") == DefaultSelectedValue && (d.GetValue(item, null) + "") == DefaultSelectedText)
                {
                    hasSelect = true;
                    break;
                }
            }
            if (hasSelect == false)
            {
                var subType = data.GetType().GenericTypeArguments[0];
                if (subType.Name.StartsWith("<>f__AnonymousType")) return;
                var m = Activator.CreateInstance(subType);
                if (s != d)
                {
                    s.SetValue(m, Convert.ChangeType(DefaultSelectedValue, s.PropertyType), null);
                    d.SetValue(m, Convert.ChangeType(DefaultSelectedText, d.PropertyType), null);
                }
                else
                {
                    d.SetValue(m, Convert.ChangeType(DefaultSelectedText, d.PropertyType), null);
                }
                data.Insert(0, m);
            }
        }
    }
}上面的就是完整代码,需要注意的是,在上面的代码中,处理匿名类型有Bug,并没有修复,强类型的绑定是会添加【—請選擇—】这个默认项的。
业务相关的ComboBox下拉框
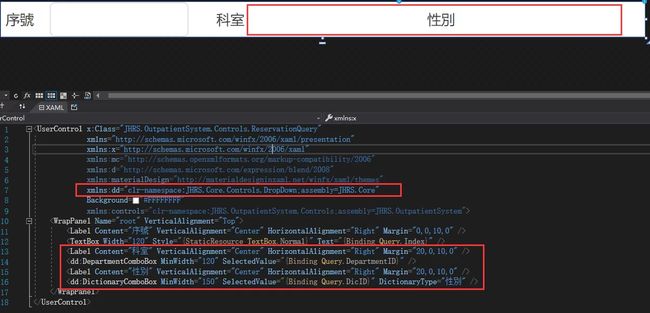
在实际项目里面,会有很多下拉框的数据源是需要调用接口获取的,将它封装后就可以避免在很多的功能页面(Page)或者控件里面再调接口来获取数据给ComboBox绑定数据,因此封装后直接拖过去用就完事了,这是WPF用户控件封装之下拉框。
在框架里面封装了像科室,字典,通用业务状态的下拉框,这里只放一个科室的下拉框示例代码,因为科室是需要调接口获取的,下方注释掉的WPF用户控件封装代码就是真实项目中调用接口获取数据来绑定的代码。
using JHRS.Core.Controls.Common;
using JHRS.Core.Models;
using System;
using System.Collections.Generic;

namespace JHRS.Core.Controls.DropDown
{
    ///
    /// 科室下拉框
    ///
    public class DepartmentComboBox : BaseComboBox
  {
    ///
    /// 初始化科室數據,可調用接口獲取數據。
    ///
    ///
    ///
    protected override void OnInitialized(object sender, EventArgs e)
    {
      this.DisplayMemberPath = "Name";
      this.SelectedValuePath = "Id";

      //var response = await RestService.For(AuthHttpClient.Instance).GetAll();
      //if (response.Succeeded)
      //{
      //  Data = response.Data as IList;
      //}

      List list = new List();
      for (int i = 0; i < 20; i++)
      {
        list.Add(new DepartmentOutputDto
        {
          Id = i + 1,
          Name = $"測試科室{i + 1}"
        });
      }
      base.Data = list;
    }
  }

}
封装后下拉框怎样使用
如下图所示一样,在演示框架中,WPF用户控件封装之后的控件是直接将其拖到用户控件相关位置,然后绑定你需要获取的值即可,使用的地方不需要关注科室的数据从哪儿来的,你只需要知道你用什么属性取接收选中的值即可。
以上就是使用的方法,接下来看看如何封装分页表格。
动态分页表格
每个系统里面分页表格是大头,或者说是比较复杂的功能,而在框架里面是将表格和分页控件封装到一起形成一个用户控件,在需要使用的地方,也是直接拖过去,并调用分页接口获取数据绑定即可;WPF用户控件封装表格的每一列展示什么数据,也是采用最上面介绍的最基础的动态表格思想解决的。
分页表格控件XAML代码
在这个WPF用户控件封装的xaml代码中,主要放了两个控件,一个DataGrid表格控件,一个Pagination分页控件。后台的C#代码如下:
using JHRS.Core.Extensions;
using JHRS.Filter;
using System;
using System.Collections.Generic;
using System.Linq;
using System.Text;
using System.Threading.Tasks;
using System.Windows;
using System.Windows.Controls;
using System.Windows.Data;
using System.Windows.Documents;
using System.Windows.Input;
using System.Windows.Media;
using System.Windows.Media.Imaging;
using System.Windows.Navigation;
using System.Windows.Shapes;
namespace JHRS.Core.Controls.DataGrids
{
///
/// PagingDataGrid.xaml 的交互逻辑
///
public partial class PagingDataGrid : UserControl
{
public PagingDataGrid()
{
InitializeComponent();
pagingDataList.AutoGenerateColumns = false;
}
///
/// 生成序号
///
///
///
private void pagingDataList_LoadingRow(object sender, DataGridRowEventArgs e)
{
if (EnablePagination)
//需要分页
e.Row.Header = (PagingData.PageIndex - 1) * PagingData.PageSize + e.Row.GetIndex() + 1;
else
//不需要分页
e.Row.Header = e.Row.GetIndex() + 1;
}
///
/// 表格数据源
///
public IEnumerable PageData
{
get { return (IEnumerable)GetValue(PageDataProperty); }
set { SetValue(PageDataProperty, value); }
}
//是否已经生成了列并建立了绑定关系
private bool IsGenerateColumns = false;
// Using a DependencyProperty as the backing store for PageData. This enables animation, styling, binding, etc...
public static readonly DependencyProperty PageDataProperty =
DependencyProperty.Register("PageData", typeof(IEnumerable), typeof(PagingDataGrid), new PropertyMetadata((d, e) =>
{
PagingDataGrid pagingDataGrid = d as PagingDataGrid;
if (pagingDataGrid.IsGenerateColumns) return;
int num = 0;
if (pagingDataGrid.EnableRowNumber) num++;
if (pagingDataGrid.EnableCheckBoxColumn) num++;
pagingDataGrid.pagingDataList.GenerateColumns(num, e.NewValue, pagingDataGrid.OperatingKey, pagingDataGrid.OperatingWidth);
pagingDataGrid.IsGenerateColumns = true;
}));
///
/// 分页控件数据源
///
public PagingData PagingData
{
get { return (PagingData)GetValue(PagingDataProperty); }
set { SetValue(PagingDataProperty, value); }
}
// Using a DependencyProperty as the backing store for PagingData. This enables animation, styling, binding, etc...
public static readonly DependencyProperty PagingDataProperty =
DependencyProperty.Register("PagingData", typeof(PagingData), typeof(PagingDataGrid));
///
/// 是否启用分页功能
///
public bool EnablePagination { get; set; } = true;
///
/// 是否启用序号
///
public bool EnableRowNumber { get; set; } = true;
///
/// 是否复选框列
///
public bool EnableCheckBoxColumn { get; set; } = false;
///
/// 复选框列是否启用全选功能
///
public bool EnableSelectAll { get; set; } = false;
///
/// 操作列的Key
///
public string OperatingKey { get; set; }
///
/// 操作列宽
///
public DataGridLength OperatingWidth { get; set; }
///
/// 当前选中数据
///
public IEnumerable CheckedList
{
get { return (IEnumerable)GetValue(SelectedListProperty); }
set { SetValue(SelectedListProperty, value); }
}
// Using a DependencyProperty as the backing store for SelectedList. This enables animation, styling, binding, etc...
public static readonly DependencyProperty SelectedListProperty =
DependencyProperty.Register("CheckedList", typeof(IEnumerable), typeof(PagingDataGrid),
new FrameworkPropertyMetadata(null, FrameworkPropertyMetadataOptions.BindsTwoWayByDefault));
///
/// 初始化表格行为
///
private void InintBehavior()
{
if (!EnablePagination) ucDataGrid.Children.Remove(ucPagination);
if (!EnableRowNumber) pagingDataList.Columns.Remove(pagingDataList.Columns.FirstOrDefault(x => x.Header.ToString() == "序号"));
if (!EnableCheckBoxColumn) pagingDataList.Columns.Remove(isCheckbox);
if (!EnableSelectAll) isCheckbox.Header = "选择";
}
///
/// 用户控件初始化
///
///
///
private void UserControl_Loaded(object sender, RoutedEventArgs e)
{
InintBehavior();
}
///
/// 复选框全选事件
///
///
///
private void CheckBox_Click(object sender, RoutedEventArgs e)
{
var c = sender as CheckBox;
CheckedAll(pagingDataList, c.IsChecked);
CheckedList = GetSelected();
}
///
/// 全选
///
///
///
private void CheckedAll(DependencyObject parent, bool? isChecked)
{
int numVisuals = VisualTreeHelper.GetChildrenCount(parent);
for (int i = 0; i < numVisuals; i++)
{
DependencyObject v = VisualTreeHelper.GetChild(parent, i);
CheckBox child = v as CheckBox;
if (child == null)
{
CheckedAll(v, isChecked);
}
else
{
child.IsChecked = isChecked;
break;
}
}
}
///
/// 获取所有选中项
///
/// GetSelected()
{
List list = new List();
foreach (var item in pagingDataList.ItemsSource)
{
var m = isCheckbox.GetCellContent(item);
var c = m.GetChildObject("chkItem");
if (c != null && c.IsChecked == true)
{
list.Add(item);
}
}
return list;
}
///
/// 单击选中事件
///
///
///
private void chkItem_Click(object sender, RoutedEventArgs e)
{
CheckedList = GetSelected();
}
}
} 如何使用动态分页表格
在需要使用的页面(Page)或者控件里面,将WPF用户控件封装后的控件拖进来就可以了,完整的xaml代码如下
上面代码中
        ///
        /// 綁定分頁數據
        ///
        [WaitComplete]
        protected async override Task BindPagingData()
        {
            var request = this.GetQueryRules(Query);
            var response = await RestService.For(AuthClient).GetPageingData(request);
            if (response.Succeeded)
            {
                PageData = response.Data.Rows;
                this.PagingData.Total = response.Data.Total;
            }
            return response;
        }
总结一下
合理的进行WPF用户控件封装,可以减少很多重复的代码,本文阐述了怎样封装用户控件的思想,实际项目中,可以结合团队情况和项目状况来封装,总之身处IT江湖,名正言顺的偷偷懒也是向老板多要工资的理由,因为你干活又快又好,哪个包工头不喜欢呢?
下一篇将介绍一下在团队开发中,关于目录文件遵循的一些原则,如果有更好的方式,也欢迎大家提出来。
- 开源地址:https://github.com/jhrscom/jhrs
- 官方博客:https://jhrs.com
本系列相关阅读
- WPF企业级开发框架搭建指南(启示录)
- JHRS开发框架之基础类库
- JHRS开发框架之第三方框架选型
- JHRS开发框架之WPF调用Web API封装
- JHRS开发框架之客户端入口项目
- JHRS开发框架之各子系统如何整合
- JHRS开发框架之怎样设计合理的ViewModel基类
- JHRS开发框架之公用组件用户控件的封装
- JHRS开发框架之建议遵循的一些建目录文件原则
- JHRS开发框架之WPF数据验证
- JHRS开发框架之ViewModel相互传参和弹框回传参的解决办法
- JHRS开发框架之踩坑记(终章)


