PCL点云——滤波算法

PCL点云——滤波算法

文章目录

  • PCL点云——滤波算法
    • @[TOC]
  • 0、点云滤波概述
    • 0.1 Why
    • 0.2 How
  • 一、直通滤波PassThrough
    • 1.1 原理
    • 1.3 PCL类
    • 1.3 例子
      • 1.3.1 Z轴
      • 1.3.2 Z、X轴(多维度直通滤波)
  • 二、VoxelGrid (降采样)
    • 2.1 原理
    • 2.2 PCL例程
      • 2.2.1 pcl:VoxelGrid 方法
      • 2.2.2 pcl:ApproximateVoxelGrid 方法
      • 2.2.3 显示点云函数
      • 2.2.4 pcl:VoxelGrid完整示例
      • 2.2.5 出现的问题及解决办法
  • 三、离群点移除
    • 3.1 概述
      • 3.1.1 Why
      • 3.1.2 How
    • 3.2 实现方式
      • 3.2.1 StatisticalOutlierRemoval(统计学离群点移除过滤器)
      • 3.2.2 ConditionalRemoval 条件滤波 & RadiusOutlierRemoval 半径离群值滤波
      • 3.2.3 双边滤波
  • 点云滤波器继承关系
  • 参考文章链接

0、点云滤波概述

0.1 Why

在获取点云数据时,由于设备精度、操作者经验、环境因素等带来的影响,以及电磁波衍射特性、被测物体表面性质变化和数据拼接配准操作过程的影响,点云数据中将不可避免地出现一些噪声点。实际应用中除了这些测量随机误差产生的噪声点之外,由于受到外界干扰如视线遮挡、障碍物等因素的影响,点云数据中往往存在着一些离主体点云较远的离散点,即离群点。不同的获取设备点云噪声结构也有不同。

点云滤波针对的情形:
1.下采样,数据量过大,不易于处理
2.离群点,通常由遮挡引起
3.点云数据的密度不均匀,需要平滑
4.噪声数据

0.2 How

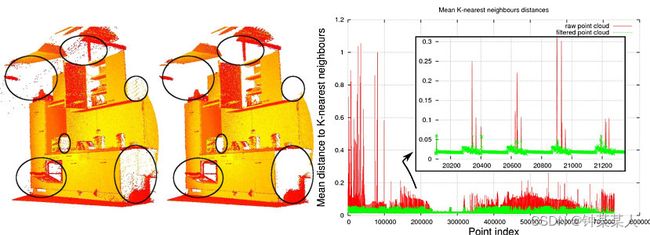
下图显示了一个噪声消除的示例。 由于测量误差,某些数据集会出现大量阴影点。 这使局部点云3D特征的估算变得复杂。通常通过对每个点的邻域进行统计分析,并修剪掉不符合特定条件的那些异常值,进而可以过滤掉某些异常值。
PCL点云——滤波算法_第1张图片
PCL中实现这些稀疏离群值的消除,需要计算数据集中的点与邻居距离的分布。 即对于每个点,都会计算从它到所有相邻点的平均距离。 通过假设结果分布是具有均值和标准差的高斯分布,可以将那些平均距离在**【由全局距离均值和标准差定义的区间】**之外的所有点视为离群值,并将之从数据集中进行修剪。

一、直通滤波PassThrough

1.1 原理

过滤掉在指定维度方向上取值不在给定值域内的点。
首先,指定一个维度以及该维度下的值域,其次,遍历点云中的每个点,判断该点在指定维度上的取值是否在值域内,删除取值不在值域内的点,最后,遍历结束,留下的点即构成滤波后的点云。直通滤波器简单高效,适用于消除背景等操作

1.3 PCL类

class pcl: : PassThrough< PointT >

类 PassThrough 实现对用户给定点云某个字段的限定下,对点云进行简单的基本过滤,例如限制过滤掉点云中所有 X 字段不在某个范围内的点,该类的使用比较灵活但完全取决于用户的限定字段和对应条件 。

关键成员函数

void setFilterFieldName (const std : :string &field_name)

设置限定字段的名称字符串 field_name ,例如”z”等。

  void setFilterLimits (const double &limit_min, const double & limit_max)

设置滤波限制条件,包括最小值 limit_min 和最大值 limit_max。 该函数与 setFilterFieldName( )一起使用,点云中所有点的setFilterFieldName( )设置的字段的值未在用户所设定区间范围外的点将被删除。参数 limit_min 为允许的区间范围的最小值,默认为 DBL_ MIN , limit_ max 为允许的区间范围的最大值,默认为DB L_MAX.

 void setFilterLimitsNegative (bool &!imit_negative):

设置返回滤波限制条件外的点还是内部点, limit_negative 默认值为 false,输出点云为在设定字段的设定范围内的点集,如果设置为 true 则刚好相反 。 警告:该方法将来将会被移除,用 setNegative( )函数代替。

1.3 例子

1.3.1 Z轴

#include 
#include 
#include 
#include 
#include 
#include 

int user_data;

int main(int argc, char **argv){
	//Create and load the point cloud
	pcl::PointCloud<pcl::PointXYZ>::Ptr cloud(new pcl::PointCloud<pcl::PointXYZ>);
	pcl::PointCloud<pcl::PointXYZ>::Ptr cloudFiltred(new pcl::PointCloud<pcl::PointXYZ>);
	pcl::io::loadPLYFile("C:\\0APractice\\PclLearning\\CloudFilters\\20230712-05-VG.ply", *cloud);

	//Create the filtering object
	pcl::PassThrough<pcl::PointXYZ> pass;
	pass.setInputCloud(cloud);
	pass.setFilterFieldName("z");
	pass.setFilterLimits(-115, 50);
	pass.filter(*cloudFiltred);

	boost::shared_ptr<pcl::visualization::PCLVisualizer> viewer(new pcl::visualization::PCLVisualizer("3D viewer"));
	
	viewer->initCameraParameters();
	int V1(0);
	viewer->createViewPort(0.0, 0.0, 0.5, 1.0, V1);
	
	int V2(0);
	viewer->createViewPort(0.5, 0.0, 1.0, 1.0, V2);
	
	viewer->addCoordinateSystem(0.2);

	viewer->addPointCloud<pcl::PointXYZ>(cloud, "cloud", V1);
	viewer->addPointCloud<pcl::PointXYZ>(cloudFiltred, "cloudFiltred", V2);
	viewer->spin();
	
	pcl::io::savePLYFileASCII("C:\\0APractice\\PclLearning\\CloudFilters\\20230712-05-VG-PH.ply", *cloudFiltred);

    while(!viewer->wasStopped()){ 
        user_data++;
    }
    return 0;
}

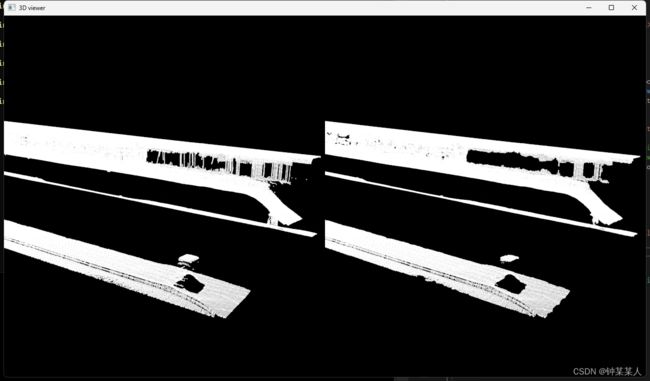
实现效果:
PCL点云——滤波算法_第2张图片

1.3.2 Z、X轴(多维度直通滤波)

先规定要卡阈值的对象,例如X,Y,Z,I,R,G,B等,取得或者去掉某一个值范围外的点集;

#include 
#include 
#include 
#include 
int
testfilters_passthrough(int argc, char** argv)
{
    srand(time(0));
    pcl::PointCloud<pcl::PointXYZ>::Ptr cloud(new pcl::PointCloud<pcl::PointXYZ>);
    pcl::PointCloud<pcl::PointXYZ>::Ptr cloud_filtered(new pcl::PointCloud<pcl::PointXYZ>);
    pcl::PointCloud<pcl::PointXYZ>::Ptr cloud_filtered_xz(new pcl::PointCloud<pcl::PointXYZ>);
    pcl::PointCloud<pcl::PointXYZ>::Ptr cloud_filtered_xyz(new pcl::PointCloud<pcl::PointXYZ>);
    //填入点云数据
    cloud->width = 10;
    cloud->height = 1;
    cloud->points.resize(cloud->width * cloud->height);
    for (size_t i = 0; i < cloud->points.size(); ++i)
    {
        cloud->points[i].x = rand() / (RAND_MAX + 1.0f) - 0.5;
        cloud->points[i].y = rand() / (RAND_MAX + 1.0f) - 0.5;
        cloud->points[i].z = rand() / (RAND_MAX + 1.0f) - 0.5;
    }
    std::cerr << "Cloud before filtering: " << std::endl;
    for (size_t i = 0; i < cloud->points.size(); ++i)
        std::cerr << "    " << cloud->points[i].x << " "
        << cloud->points[i].y << " "
        << cloud->points[i].z << std::endl;
    // 创建滤波器对象,第一次对Z卡阈值
    pcl::PassThrough<pcl::PointXYZ> pass(true);
    pass.setInputCloud(cloud);
    pass.setFilterFieldName("z"); //通过z滤波
    pass.setFilterLimits(0.0, 1.0);
    pass.setNegative (true);//设置为true,则输出范围外的点
    pass.filter(*cloud_filtered);
 
    // 第二次对X卡阈值滤波
    pcl::IndicesConstPtr cloud_filtered_other = pass.getRemovedIndices();//获取上一步剩下的点,即cloud_filtered以外的点
    pass.setIndices(cloud_filtered_other); //对cloud_filtered_other中的点进行滤波处理
    pass.setFilterFieldName("x");
    pass.setFilterLimits(0.0, 1.0);
    pass.setNegative(false);
    pass.filter(*cloud_filtered_xz);
 
    //这样滤波也能成功,但是结果不对,所以想多次滤波还是按照上面的方式
    //pass.setInputCloud(cloud_filtered_xz);
    //pass.setFilterFieldName("y");
    //pass.setFilterLimits(-1.0,0.0);
    //pass.filter(*cloud_filtered_xyz);
 
 
    std::cerr << "Cloud after filtering: " << std::endl;
    for (size_t i = 0; i < cloud_filtered->points.size(); ++i)
        std::cerr << "    " << cloud_filtered->points[i].x << " "
        << cloud_filtered->points[i].y << " "
        << cloud_filtered->points[i].z << std::endl;
    std::cerr << "Cloud after filtering2: " << std::endl;
    for (size_t i = 0; i < cloud_filtered_xz->points.size(); ++i)
        std::cerr << "    " << cloud_filtered_xz->points[i].x << " "
        << cloud_filtered_xz->points[i].y << " "
        << cloud_filtered_xz->points[i].z << std::endl;
    //std::cerr << "Cloud after filtering3: " << std::endl;
    //for (size_t i = 0; i < cloud_filtered_xyz->points.size(); ++i)
    //    std::cerr << "    " << cloud_filtered_xyz->points[i].x << " "
    //    << cloud_filtered_xyz->points[i].y << " "
    //    << cloud_filtered_xyz->points[i].z << std::endl;
    //return (0);
}

二、VoxelGrid (降采样)

2.1 原理

体素滤波重心法(pcl:VoxelGrid):pcl中实现体素滤波的方法是通过输入的点云数据创建一个三维体素栅格,用每一个体素内的所有点的重心近似显示体素中的其他点。即原始点最终用一个重心进行表示
体素滤波中心法(pcl:ApproximateVoxelGrid):以体素栅格中心点作为采样后的点,因此在栅格内没有点存在的情况下依旧可以采样到点,导致采样的点数是多于重心方法采样的点。
pcl::VoxelGrid pcl::ApproximateVoxelGrid:opc:VoxelGrid方法比pc:ApproximateVoxelGrid慢,但是更好的保留了原始点云的局部形态特征。

体素滤波主要用来进行降采样,并且一定程度上保特点云的形态特征。但是实际上,经过体素滤波过滤的点云出现了与原始点云不一致的情况。因此针对位姿要求比较精确或其他场景,应慎重使用

2.2 PCL例程

2.2.1 pcl:VoxelGrid 方法

// 该函数输入的为pcl::PointXYZ类型的点云,为减少函数的书写,可以将其设置为模板函数
pcl::PointCloud<pcl::PointXYZ>::Ptr PointFilter::voxelGrid(
    const pcl::PointCloud<pcl::PointXYZ>::Ptr& pointCloud, float sampleStep)
{
    if (pointCloud->empty()) {
        qWarning().noquote() << "VoxelGrid: The input point cloud is empty.";
        return std::make_shared<pcl::PointCloud<pcl::PointXYZ>>();
    }

    auto filterPointCloud = std::make_shared<pcl::PointCloud<pcl::PointXYZ>>();
    pcl::VoxelGrid<pcl::PointXYZ> voxelGrid; 					// 创建滤波器对象
    voxelGrid.setInputCloud(pointCloud);	 					// 设置待滤波点云
    voxelGrid.setLeafSize(sampleStep, sampleStep, sampleStep);  //设置体素边长
    voxelGrid.filter(*filterPointCloud);

    return filterPointCloud;
}

2.2.2 pcl:ApproximateVoxelGrid 方法

// 该函数输入的为pcl::PointXYZ类型的点云,为减少函数的书写,可以将其设置为模板函数
pcl::PointCloud<pcl::PointXYZ>::Ptr PointFilter::approximateGrid(
    const pcl::PointCloud<pcl::PointXYZ>::Ptr& pointCloud, float sampleStep)
{
    if (pointCloud->empty()) {
        qWarning().noquote() << "ApproximateVoxelGrid: The input point cloud is empty.";
        return std::make_shared<pcl::PointCloud<pcl::PointXYZ>>();
    }

    auto filterPointCloud = std::make_shared<pcl::PointCloud<pcl::PointXYZ>>();
    pcl::ApproximateVoxelGrid<pcl::PointXYZ> approximaterGrid;			// 创建滤波器对象
    approximaterGrid.setInputCloud(pointCloud);							// 设置待滤波点云
    approximaterGrid.setLeafSize(sampleStep, sampleStep, sampleStep);   //设置体素边长
    approximaterGrid.filter(*filterPointCloud);

    return filterPointCloud;
}

2.2.3 显示点云函数

template <typename PointT>
void showMultiplePointCloud(const typename pcl::PointCloud<PointT>::Ptr& srcPointCloud,
                            const typename pcl::PointCloud<PointT>::Ptr& colorPointCloud)
{
    auto viewer = std::make_shared<pcl::visualization::PCLVisualizer>("viewer");
    pcl::visualization::PointCloudColorHandlerCustom<PointT> srcColor(srcPointCloud, 255, 255, 255);
    viewer->addPointCloud<PointT>(srcPointCloud, srcColor, "SrcPointCloud");

    pcl::visualization::PointCloudColorHandlerCustom<PointT> color(srcPointCloud, 255, 0, 0);
    viewer->addPointCloud<PointT>(colorPointCloud, color, "ColorPointCloud");

    viewer->setPointCloudRenderingProperties(pcl::visualization::PCL_VISUALIZER_POINT_SIZE, 2,
                                             "PointCloud");
    viewer->addCoordinateSystem(0.01);
    while (!viewer->wasStopped()) {
        viewer->spinOnce(100);
    }
    return;
}

2.2.4 pcl:VoxelGrid完整示例

#include 
#include 
#include 
#include 
#include 
#include 

#include 

int user_data;

int main(int argc, char **argv){
	pcl::PointCloud<pcl::PointXYZ>::Ptr cloud(new pcl::PointCloud<pcl::PointXYZ>);
	pcl::PointCloud<pcl::PointXYZ>::Ptr cloud_filtered(new pcl::PointCloud<pcl::PointXYZ>);
	/*pcl::PCLPointCloud2::Ptr cloud(new pcl::PCLPointCloud2());
	pcl::PCLPointCloud2::Ptr cloud_filtered(new pcl::PCLPointCloud2);*/

	//Load point cloud
	pcl::PCDReader reader;
	reader.read("C:\\0APractice\\PclLearning\\VoxelGrid\\bunny.pcd", *cloud);

	std::cerr << "PointCloud before filtering" << cloud->width * cloud->height << "data points (" << pcl::getFieldsList(*cloud) << ")." << endl;

	//Create Voxel filter that is 1cm long, 1cm wide and 1cm high
	float leftSize = 0.01f;
	//Creatd the filrering object
	pcl::VoxelGrid<pcl::PointXYZ> sor;
	sor.setInputCloud(cloud);
	sor.setLeafSize(leftSize, leftSize, leftSize);
	sor.filter(*cloud_filtered);

	std::cerr << "PointCloud after filtering" << cloud_filtered->width * cloud_filtered->height << "data points (" << pcl::getFieldsList(*cloud_filtered) << ").";

	//Output the filtered cloud into 
	pcl::PLYWriter writer;
	writer.write("C:\\0APractice\\PclLearning\\VoxelGrid\\bunny_filtered.ply", *cloud_filtered);

	/*pcl::visualization::CloudViewer viewer("Cloud");
	viewer.showCloud(cloud);
	*/
	boost::shared_ptr<pcl::visualization::PCLVisualizer> viewer(new pcl::visualization::PCLVisualizer("3D viewer"));
	pcl::visualization::PointCloudColorHandlerCustom<pcl::PointXYZ> cloud_color(cloud, 0, 255, 0);
	pcl::visualization::PointCloudColorHandlerCustom<pcl::PointXYZ> cloudFiltered_color(cloud_filtered, 255, 0, 0);
	viewer->addPointCloud <pcl::PointXYZ>(cloud, cloud_color,"cloud");
	viewer->addPointCloud <pcl::PointXYZ>(cloud_filtered,cloudFiltered_color,"cloudFiltered");
	viewer->spin();  //Prevent point cloude display from stalling

	/*pcl::visualization::CloudViewer viewer("CloudFiltered");
	viewer.showCloud(cloud); */
	
    while(!viewer->wasStopped()){ 
        user_data++;
    }
    return 0;
}

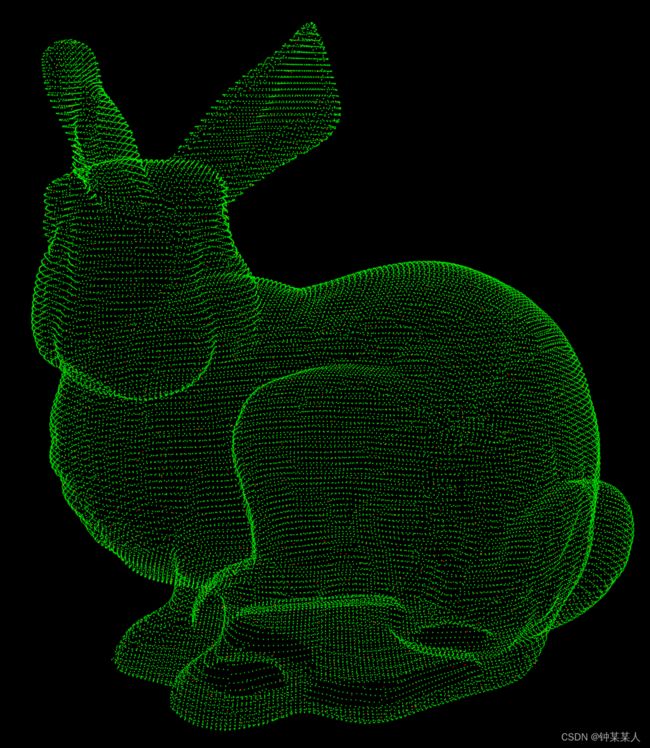
PCL点云——滤波算法_第3张图片
上图绿色的点为精简前的点云,红色点为体素网格精简后的点云数据

双屏对比

pcl_viewer -multiview 1 ./data/table_scene_mug_stereo_textured.pcd ./data/table_scene_mug_stereo_textured_downsampled.pcd

2.2.5 出现的问题及解决办法

问题1

[pcl::VoxelGrid::applyFilter] Leaf size is too small for the input dataset. Integer indices would overflow.

在这里插入图片描述
原理分析:

点云VoxelGridFilter(体素格下采样/抽稀)是一种能显著减少点云的数据量,并保持其形状特征和空间结构信息与原始点云基本没差别的算法。
其核心是:将点云分割成一个个微小的立方体,落在立方体内的所有点用一个重心点来最终表示,对所有的小立方体处理后得到最终的点云结果
·取重心点比所有点取平均值的算法稍慢,但是其结果更准确下采样设置的**voxelGridFilter.set_leaf_size(rate,rate,rate)值越大,最后保留的点云越少**。

报错原因:

划分的立方体格子的个数index是int32位,由于输入的点云的x,y,Z跨度太大,导致划分的立方体个数超出了int32的最大大小,因此报错。
故需要对原始点云进行一点小小的操作。

解决办法:

1. 对精度要求没那么高的话,可以将leaf size大小设置大一些。
2. 将要降采样的点云先分割成几块、在做降采样。
3. 使用 OctreeVoxelGridFilter,参考PCL论坛。

方案:VoxelGrid体素滤波器有一个函数sor.setIndices(indices);,其中indices就是大体素点云拆分成一个个小点云团的分区序号数组,这个数组的构建通过OcrTree的近邻搜索加以构建,其中50000是Octree的分辨率,一般较大的点云需要设的大一些,如果设的过小,还是有可能在调用子函数subFilter产生相同的[pcl::VoxelGrid::applyFilter] Leaf size is too small for the input dataset. Integer indices would overflow错误。一个简单的用法如下:

#include 
#include 
#include 
#include 
#include 
#include 
#include 

#include 

#include 
#include 
#include 

int user_data;
typedef pcl::PointXYZ PointType;

pcl::PointCloud<PointType>::Ptr subFilter(pcl::PointCloud<PointType>::Ptr pointcloud, pcl::IndicesPtr indices, float cell_x, float cell_y, float cell_z) {
	pcl::PointCloud<PointType>::Ptr filtered_pointcloud(new pcl::PointCloud<PointType>);
	pcl::VoxelGrid<PointType> sor;
	sor.setInputCloud(pointcloud);
	sor.setIndices(indices);
	sor.setLeafSize(cell_x, cell_y, cell_z);
	sor.filter(*filtered_pointcloud); // No problem :)
	return filtered_pointcloud;
}

pcl::PointCloud<PointType>::Ptr OctFilter(pcl::PointCloud<PointType>::Ptr cloudIn, float cell_x, float cell_y, float cell_z) {
	pcl::octree::OctreePointCloudSearch<PointType> octree(50000);  // // Octree resolution - side length of octree voxels
	octree.setInputCloud(cloudIn);
	octree.addPointsFromInputCloud();
	pcl::PointCloud<PointType>::Ptr filtered_cloud(new pcl::PointCloud<PointType>);
	for (auto it = octree.leaf_begin(); it != octree.leaf_end(); ++it) {

		pcl::IndicesPtr indexVector(new std::vector<int>);
		pcl::octree::OctreeContainerPointIndices& container = it.getLeafContainer();

		container.getPointIndices(*indexVector);
		*filtered_cloud += *subFilter(cloudIn, indexVector, cell_x, cell_y, cell_z);
	}
	return filtered_cloud;
}

int main(int argc, char **argv){
	
	//Create point cloud class and load the cloud
	pcl::PointCloud<PointType>::Ptr laserCloudIn(new pcl::PointCloud<PointType>);
	pcl::io::loadPLYFile<PointType>("C:\\0APractice\\PclLearning\\OctreeVoxelGrid\\20230712-05.ply", *laserCloudIn);
	//Creatd point cloud to save the filtered cloud
	pcl::PointCloud<PointType>::Ptr laserCloudOut(new pcl::PointCloud<PointType>);

	*laserCloudOut = *OctFilter(laserCloudIn, 1.0f, 1.0f, 1.0f);  // set your voxel size

	std::cout << "PointCloud bedore filtering " << laserCloudIn->width * laserCloudIn->height << "data points" << endl;
	std::cout << "PointCloud after filtering" << laserCloudOut->width * laserCloudOut->height << "data point" <<endl;

	boost::shared_ptr<pcl::visualization::PCLVisualizer> viewer(new pcl::visualization::PCLVisualizer("3D viewer"));
	pcl::visualization::PointCloudColorHandlerCustom <PointType> cloud_color(laserCloudIn, 0, 255, 0);
	pcl::visualization::PointCloudColorHandlerCustom <PointType> filtered_color(laserCloudOut, 255, 0, 0);

	viewer->initCameraParameters();
	int V1(0);
	viewer->createViewPort(0.0, 0.0, 0.5, 1.0, V1);
	int V2(0);
	viewer->createViewPort(0.5, 0.0, 1.0, 1.0, V2);

	viewer->addPointCloud<PointType>(laserCloudIn, cloud_color, "cloud",V1);
	viewer->addPointCloud<PointType>(laserCloudOut, filtered_color, "cloudFiltered", V2);
	viewer->spin();

	pcl::io::savePLYFileASCII("C:\\0APractice\\PclLearning\\OctreeVoxelGrid\\20230712 - 05.ply", *laserCloudOut);

	while (!viewer->wasStopped()) {
		user_data++;
	}

	return 0;
}

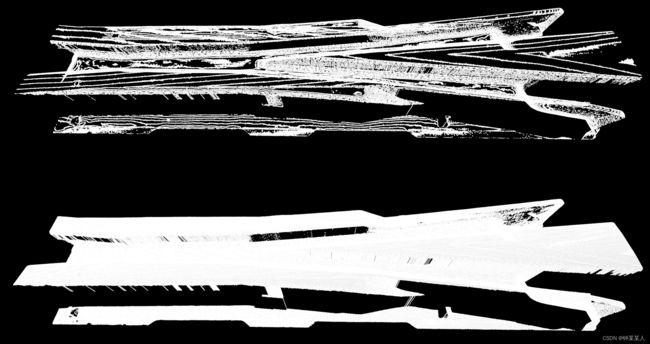
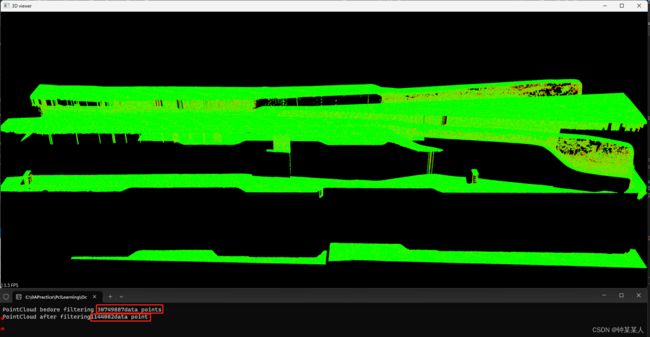
PCL点云——滤波算法_第4张图片
上图所示,原始点云数据为30749887个点(绿色点),降采样后为1144082个点(红色点)。

该方法点云数量精简原理如下
体素网格尺寸数据:*laserCloudOut = *OctFilter(laserCloudIn, 1.0f, 1.0f, 1.0f);
八叉树分辨率(八叉树体素的边长):pcl::octree::OctreePointCloudSearch octree(500000);

三、离群点移除

3.1 概述

3.1.1 Why

激光扫描通常会生成不同点密度*(表面密度?不是投影密度) *的点云数据集。此外,测量误差会导致稀疏的异常值,从而进一步破坏结果。这会使局部点云特征(例如表面法线或曲率变化)的估计复杂化,从而导致错误的值,进而可能导致点云配准失败。通过对每个点的邻域进行统计分析,并对不符合特定条件的部分进行修整,可以解决其中一些不规则现象。

3.1.2 How

稀疏离群值的消除基于输入数据集中点到邻居距离的分布的计算
对于每个点,计算从它到所有相邻点的平均距离。通过假设结果分布是具有均值和标准差的高斯分布,可以将其平均距离在由全局距离均值和标准差定义的区间之外的所有点视为离群值并从数据集中进行修剪。 下图显示了稀疏离群值分析和删除的效果:原始数据集显示在左侧,结果数据集显示在右侧。数据集图显示了滤波前后每个点的邻域中平均K最近邻距离
PCL点云——滤波算法_第5张图片

3.2 实现方式

3.2.1 StatisticalOutlierRemoval(统计学离群点移除过滤器)

实现步骤

1、查找每一个点的所有邻域点
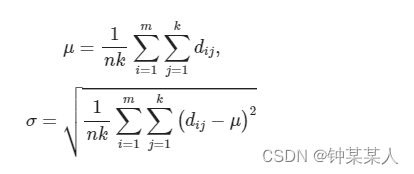
2、计算每个点到其邻居的距离dij,其中i=[1,…,m]表示共m个点,j=[1,…,k]每个点有k个邻居
3、根据高斯分布d∼N(μ,σ)模型化距离参数,计算所有点与邻居的μ(距离的均值),σ(距离的标准差),如下:
PCL点云——滤波算法_第6张图片
4、为每一个点,计算其与邻居的距离均值
在这里插入图片描述
5、遍历所有点,如果其距离的均值大于高斯分布的指定置信度,则移除,比如:
在这里插入图片描述

代码实现

#include 
#include 
#include 
#include 

#include 

int user_data;

int main(int argc, char **argv){
	//Create and load the point cloud
	pcl::PointCloud<pcl::PointXYZ>::Ptr cloud(new pcl::PointCloud<pcl::PointXYZ>);
	pcl::PointCloud<pcl::PointXYZ>::Ptr SORCloud(new pcl::PointCloud<pcl::PointXYZ>);
	pcl::PointCloud<pcl::PointXYZ>::Ptr SORCloud_out(new pcl::PointCloud<pcl::PointXYZ>);

	//Load the point cloud
	pcl::io::loadPLYFile<pcl::PointXYZ>("C:\\0APractice\\PclLearning\\StatisticalOutlierRemoval\\20230712-05-VG-PH.ply", *cloud);

	//Create the filter, analyze 50 neighborhood points of each point,set the multiple of the standard deviation to 1.
	//If a point is more than 1 standard deviaton away form the average distance,the point is marked as outlier, and it is removed and stored.
	pcl::StatisticalOutlierRemoval<pcl::PointXYZ> sor;
	sor.setInputCloud(cloud);
	sor.setMeanK(50);
	sor.setStddevMulThresh(1.0);
	sor.filter(*SORCloud);

	pcl::PLYWriter writer;
	writer.write<pcl::PointXYZ>("C:\\0APractice\\PclLearning\\StatisticalOutlierRemoval\\20230712-05-VG-PH-SOR.ply", *SORCloud, false);
	sor.setNegative(true);
	sor.filter(*SORCloud_out);

	boost::shared_ptr<pcl::visualization::PCLVisualizer> viewer(new pcl::visualization::PCLVisualizer("3D viewer"));
	
	viewer->initCameraParameters();
	int V1(0);
	viewer->createViewPort(0.0, 0.0, 0.5, 1.0, V1);
	
	int V2(0);
	viewer->createViewPort(0.5, 0.0, 1.0, 1.0, V2);
	
	viewer->addCoordinateSystem(0.2);

	viewer->addPointCloud<pcl::PointXYZ>(cloud, "cloud", V1);
	viewer->addPointCloud<pcl::PointXYZ>(SORCloud, "cloudFiltred", V2);
	viewer->spin();
	
    while(!viewer->wasStopped()){ 
        user_data++;
    }
    return 0;
}

PCL点云——滤波算法_第7张图片

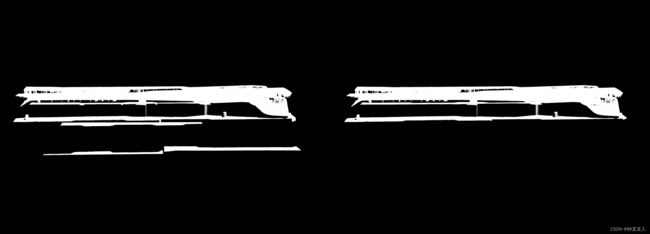
单图对比:黄色部分为移除的离群点,蓝绿色部分为保留的点

pcl_viewer ./data/table_scene_lms400_inliers.pcd ./data/table_scene_lms400_outliers.pcd

双图对比:左图为已处理群点后的点云,右图为被移除的点云

pcl_viewer -multiview 1 ./data/table_scene_lms400_inliers.pcd ./data/table_scene_lms400_outliers.pcd

3.2.2 ConditionalRemoval 条件滤波 & RadiusOutlierRemoval 半径离群值滤波

条件滤波:设置不同维度滤波规则进行滤波
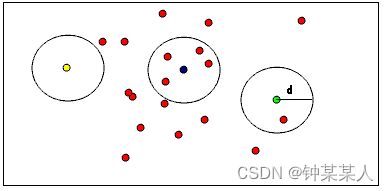
半径离群值滤波:用户指定邻居的个数,要每个点必须在指定半径内具有指定个邻居才能保留在PointCloud中。例如,如果指定了1个邻居,则只会从PointCloud中删除黄点。如果指定了2个邻居,则黄色和绿色的点都将从PointCloud中删除。
PCL点云——滤波算法_第8张图片
代码实现
Step1:定义点云显示函数

#include 
#include 
#include 
#include 
#include 
#include 
#include 

int user_data;

int main(int argc, char **argv) {
	
	//Create and load the point cloud 
	pcl::PointCloud<pcl::PointXYZ>::Ptr cloud(new pcl::PointCloud<pcl::PointXYZ>);
	pcl::PointCloud<pcl::PointXYZ>::Ptr cloudFiltered(new pcl::PointCloud<pcl::PointXYZ>);

	pcl::io::loadPLYFile<pcl::PointXYZ>("C:\\0APractice\\PclLearning\\ConditionalRemoval\\20230712-05-VG-PH.ply", *cloud);
	
	if (strcmp(argv[1], "-r") == 0) {
		//RadiusOutlierRemoval
		pcl::RadiusOutlierRemoval<pcl::PointXYZ> outrem;//Create the filter

		outrem.setInputCloud(cloud);
		outrem.setRadiusSearch(0.8);			//Set the search radius to 0.8m
		outrem.setMinNeighborsInRadius(5);		//If there are less than 50 points in the range, so the point is outlier
		outrem.filter(*cloudFiltered);			//Executive filtering 
	}else if (strcmp(argv[1], "-c") == 0) {
		//Create conditional removal filter
		pcl::ConditionAnd<pcl::PointXYZ>::Ptr 
			range_cond(new pcl::ConditionAnd<pcl::PointXYZ>());
		range_cond->addComparison(pcl::FieldComparison<pcl::PointXYZ>::ConstPtr(
			new pcl::FieldComparison<pcl::PointXYZ>("z", pcl::ComparisonOps::GT, 0.0)));
		range_cond->addComparison(pcl::FieldComparison<pcl::PointXYZ>::ConstPtr(
			new pcl::FieldComparison<pcl::PointXYZ>("z", pcl::ComparisonOps::LT, 0.8)));

		//build the filter
		pcl::ConditionalRemoval<pcl::PointXYZ> condrem;
		condrem.setCondition(range_cond);
		condrem.setInputCloud(cloud);
		condrem.setKeepOrganized(true);
		//apply filter
		condrem.filter(*cloudFiltered);
	}
	else {
		std::cerr << "please specify command line arg '-r' or '-c'" << std::endl;
		exit(0);
	}
	std::cerr << "Cloud before filtering: " << std::endl;

	boost::shared_ptr<pcl::visualization::PCLVisualizer> viewer(new pcl::visualization::PCLVisualizer("3D viewer"));

	viewer->initCameraParameters();
	int V1(0);
	viewer->createViewPort(0.0, 0.0, 1.0, 0.5, V1);
	int V2(0);
	viewer->createViewPort(0.0, 0.5, 1.0, 1.0, V2);
	viewer->addCoordinateSystem(0.2);

	viewer->addPointCloud<pcl::PointXYZ>(cloud, "cloud", V1);
	viewer->addPointCloud<pcl::PointXYZ>(cloudFiltered, "cloudFiltred", V2);
	viewer->spin();
	   
	while (!viewer->wasStopped()) {
		user_data++;
	}
	return 0;
}

PCL点云——滤波算法_第9张图片

3.2.3 双边滤波

双边滤波算法,是通过取邻近采样点的加权平均来修正当前采样点的位置,从而达到滤波效果。同时也会有选择地剔除部分与当前采样点“差异”太大的相邻采样点,从而达到保持原特征的目的。
双边滤波可以帮我们保留边缘信息,其实质也是计算邻居像素的加权平均和,非常类似于高斯卷积。不同之处在于双边滤波器在平滑的同时考虑到与邻边像素颜色值的差异,进而保留边缘信息。双边滤波器的关键思想是一个像素对另一个像素影响程度,不应该只和位置距离有关,还应该具有相似的像素颜色值。即相等距离情况下,颜色值接近的像素点权重应当高一些,颜色值差异大的像素点权重应当小一些。因此,双边滤波器是一种非线性滤波器

于是,双边滤波bilateral filter(BF)的定义如下:
在这里插入图片描述
这里通过归一化因子Wp保证像素的权重和为1.0:
在这里插入图片描述
双边滤波里的两个权重域的概念:
空间域(spatial domain S)和像素范围域(range domain R),这个是它跟高斯滤波等方法的最大不同点。
双边滤波的
核函数是空间域核与像素范围域核的综合结果
:在图像的平坦区域,像素值变化很小,对应的像素范围域权重接近于1,此时空间域权重起主要作用,相当于进行高斯模糊;在图像的边缘区域,像素值变化很大,像素范围域权重变大,从而保持了边缘的信息
在这里插入图片描述
其中σdσr是平滑参数,I(i,j)i (k,l)分别是像素(i,j)(k,l)的强度。计算出权重后,将其归一化:
PCL点云——滤波算法_第10张图片
其中ID为像素(i,j)去噪后的强度。

代码演示:

#include 
#include 
#include 
#include 
#include 
#include 

int user_data;

void BilateralFilter(pcl::PointCloud<pcl::PointXYZI>::Ptr &input, pcl::PointCloud<pcl::PointXYZI>::Ptr &output) {
	pcl::search::KdTree<pcl::PointXYZI>::Ptr tree1(new pcl::search::KdTree<pcl::PointXYZI>);

	pcl::BilateralFilter < pcl::PointXYZI> fbf;
	fbf.setInputCloud(input);
	fbf.setSearchMethod(tree1);
	fbf.setHalfSize(0.1);
	fbf.filter(*output);

}

int main(int argc, char **argv) {

	pcl::PointCloud<pcl::PointXYZI>::Ptr cloud(new pcl::PointCloud<pcl::PointXYZI>);
	pcl::PointCloud<pcl::PointXYZI>::Ptr cloudFiltered(new pcl::PointCloud<pcl::PointXYZI>);

	pcl::io::loadPLYFile<pcl::PointXYZI>("C:\\0APractice\\PclLearning\\BilateralFilter\\20230712-05.ply", *cloud);
	BilateralFilter(cloud, cloudFiltered);
	
	boost::shared_ptr<pcl::visualization::PCLVisualizer> viewer(new pcl::visualization::PCLVisualizer("3D viewer"));

	viewer->initCameraParameters();
	int V1(0);
	viewer->createViewPort(0.0, 0.0, 1.0, 0.5, V1);
	int V2(0);
	viewer->createViewPort(0.0, 0.5, 1.0, 1.0, V2);
	viewer->addCoordinateSystem(0.2);

	viewer->addPointCloud<pcl::PointXYZI>(cloud, "cloud", V1);
	viewer->addPointCloud<pcl::PointXYZI>(cloudFiltered, "cloudFiltred", V2);
	viewer->spin();
	   
	while (!viewer->wasStopped()) {
		user_data++;
	}
	return 0;
}

点云滤波器继承关系

参考文章链接

https://blog.csdn.net/weixin_44044411/article/details/128423091
你可能感兴趣的:(算法,3d)