docker离线部署elasticsearch(容器化,集群,鉴权)
目录
1、准备elasticsearch镜像
2、上传安装包并加载镜像(集群的每个节点均需执行)
3、创建本地挂载目录并修改文件权限(集群的每个节点均需执行)
4、调高JVM线程数限制数量(不修改启动时会报错,集群的每个节点均需执行)
5、创建简单实例,获取证书文件
6、运行容器(集群的每个节点均需执行)
7、将密码存储在Elasticsearch密钥库中(集群的每个节点均需执行)
8、修改elasticsearch的配置文件(elasticsearch.yml)(集群的每个节点均需执行)
9、重启elasticsearch容器,设置访问密码
版本说明
elasticsearch:elasticsearch:7.16.2
1、准备elasticsearch镜像
参考下载地址:
docker下载命令:docker pull elasticsearch:7.16.2
docker保存镜像命令:docker save -o /momo/app/elasticsearch-7.16.2.tar elasticsearch:7.16.2
镜像其他版本地址:https://hub.docker.com/_/elasticsearch/tags
2、上传安装包并加载镜像(集群的每个节点均需执行)
上传文件至指定文件夹下(/momo/app)
切换当前目录至 /momo/app
加载镜像命令:
docker load -i elasticsearch-7.16.2.tar3、创建本地挂载目录并修改文件权限(集群的每个节点均需执行)
# 创建目录
mkdir -p /momo/app/elasticsearch/config
mkdir -p /momo/app/elasticsearch/data
mkdir -p /momo/app/elasticsearch/logs
# 修改文件夹权限
chmod 777 /momo/app/elasticsearch/config
chmod 777 /momo/app/elasticsearch/data
chmod 777 /momo/app/elasticsearch/logs
创建并修改配置文件
vim /momo/app/elasticsearch/config/elasticsearch.yml内容如下(其中需要修改ip、端口号、节点名)
cluster.name: elasticsearch-cluster
node.name: es-node1
network.bind_host: 172.23.12.1
network.publish_host: 172.23.12.1
http.port: 9201
transport.tcp.port: 9301
http.cors.enabled: true
http.cors.allow-origin: "*"
node.master: true
node.data: true
discovery.zen.minimum_master_nodes: 3
discovery.seed_hosts: ["172.23.12.1:9301","172.23.12.2:9301","172.23.12.3:9301"]
cluster.initial_master_nodes: ["es-node1","es-node2","es-node3"]
indices.fielddata.cache.size: 20%
indices.breaker.total.use_real_memory: false
indices.breaker.fielddata.limit: 40%
indices.breaker.request.limit: 40%
indices.breaker.total.limit: 95%
4、调高JVM线程数限制数量(不修改启动时会报错,集群的每个节点均需执行)
vim /etc/sysctl.conf


vm.max_map_count=655360
配置生效:sysctl -p
5、创建简单实例,获取证书文件
docker run --name es-test \
-e "discovery.type=single-node" \
-p 9200:9200 \
-p 9300:9300 \
-d elasticsearch:7.16.2
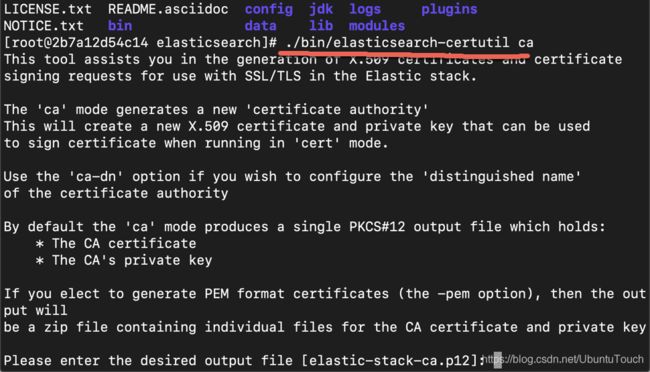
进入容器(docker exec -it es-test bash),为 TLS 生成一个证书(./bin/elasticsearch-certutil ca)
一直回车即可,直到结束退出容器
将文件复制到宿主机
docker cp es-test:/usr/share/elasticsearch/elastic-stack-ca.p12 \
/momo/app/elasticsearch/config/

docker cp es-test:/usr/share/elasticsearch/config/jvm.options \
/momo/app/elasticsearch/config/
将以上两个文件分别上传至其他节点,并修改文件权限
chmod 777 /momo/app/elasticsearch/config/elastic-stack-ca.p12临时容器使用完毕删除,停止临时容器(docker stop es-test)、删除临时容器(docker rm es-test)
6、运行容器(集群的每个节点均需执行)
docker run --net=host --restart always --name=elasticsearch-9201 \
-e "TZ=Asia/Shanghai" \
-v /momo/app/elasticsearch/config/jvm.options: \
/usr/share/elasticsearch/config/jvm.options \
-v /momo/app/elasticsearch/config/elasticsearch.yml: \
/usr/share/elasticsearch/config/elasticsearch.yml \
-v /momo/app/elasticsearch/data:/usr/share/elasticsearch/data \
-v /momo/app/elasticsearch/logs:/usr/share/elasticsearch/logs \
-v /momo/app/elasticsearch/config/elastic-stack-ca.p12: \
/usr/share/elasticsearch/config/elastic-stack-ca.p12 \
-d elasticsearch:7.16.2
7、将密码存储在Elasticsearch密钥库中(集群的每个节点均需执行)
进入容器(docker exec -it cluster-elasticsearch-9201 bash),并执行命令
./bin/elasticsearch-keystore add xpack.security.transport.ssl.keystore.secure_password

./bin/elasticsearch-keystore add xpack.security.transport.ssl.truststore.secure_password8、修改elasticsearch的配置文件(elasticsearch.yml)(集群的每个节点均需执行)
在文件最后添加以下内容
xpack.security.enabled: true
xpack.security.transport.ssl.enabled: true
xpack.security.transport.ssl.keystore.type: PKCS12
xpack.security.transport.ssl.verification_mode: certificate
xpack.security.transport.ssl.keystore.path: /usr/share/elasticsearch/config/elastic-stack-ca.p12
xpack.security.transport.ssl.truststore.path: /usr/share/elasticsearch/config/elastic-stack-ca.p12
xpack.security.transport.ssl.truststore.type: PKCS12
9、重启elasticsearch容器,设置访问密码
重启容器(docker restart cluster-elasticsearch-9201)
进入容器(docker exec -it cluster-elasticsearch-9201 bash)
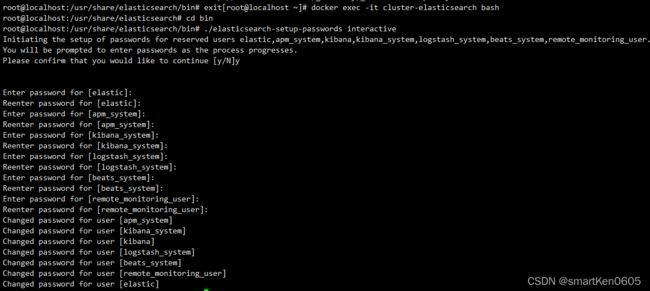
设置密码(./bin/elasticsearch-setup-passwords interactive)

