Qual+Android方案Unlock学习 以Oneplus7Pro为例

目录
背景
Unpack guacamole_21_H.04_190416.ops
Unlock探究
开发者选项–允许解锁
fastboot oem unlock
extract LinuxLoader from abl
过程分析
FH读写分区
逆向MSM Download
USB抓包
token & pk 逆向结果
尝试修改分区实现unlock
VerifiedBoot Protocol 分析
结束
参考
hack渗透视频教程,扫码免费领
背景
严格意义上来说本文应该叫做: <<我本来只是想救个砖,但是却逆向了刷机工具尝试搞清楚android unlock的原理>> :D
前段时间因为一些工作需求想给手里的测试机(一加7Pro)刷个ColorOS,因为之前想体验Android12,机器是刷了个userdebug的lineageos,遂尝试了卡刷、sideload等之后机器被我搞坏了,开机直接recovery,报错信息是什么 mount fs的时候失败了 :( 没办法只能救转了,逛了一圈论坛发现有人提供9008刷机工具(https://www.oneplusbbs.com/forum.php?mod=viewthread&tid=4730052),通过万能的9008救回来之后,我就想做点别的: 把他的firehose“偷”出来玩玩。
Unpack guacamole_21_H.04_190416.ops
刷机工具解压之后就几个文件,一个刷机工具 msmdownloadtoolv4.0.88,还有个guacamole_21_H.04_190416.ops,一看就是固件包,然后就是一些完整性校验用的文件。
根据经验,这类刷机包里应该是内置了firehouse的,可以考虑两条路:
-
解包,直接把firehose提出来
-
内存dump,在刷机工具尝试给手机传输firehose的时候的时候内存dump,从内存里根据ELF文件头给截出来
方法2是我最开始尝试的办法,但是dump了几次,发现了好几个ELF,但是都不对,所以尝试方法1 :D 很显然这个包是厂商自己搞得加密,不过网上已经有大佬分析了(早用方法1就少走弯路了),所以根据 How to Extract/Decrypt OnePlus OPS Firmware(https://www.droidwin.com/how-to-extract-oneplus-ops-firmware/) 提供的工具,可以成功吧固件包解开,获取到firehose
# muhe @ muheMacBookAir in ~/Work/play_with_oneplus7pro on git:main x [22:01:37]
$ ls -al prog_firehose_*
-rw-r--r--@ 1 muhe staff 726400 Oct 28 22:46 prog_firehose_ddr.elf
-rw-r--r--@ 1 muhe staff 726272 Oct 28 22:46 prog_firehose_lite.elf
随便试了一把读分区,是可以的,说明firehose是没问题的 :)
然后就想着顺手看点别的,研究研究Qual+Android平台的解锁BL是怎么实现的,遂有了后续的过程。
Unlock探究
开发者选项–允许解锁
参考android-9-r1, 因为现在用的一加的系统的是Android9的
没在开发这里允许解锁BL的话,直接fastboot oem unlock是不行的
-
onOemUnlockConfirmed
https://cs.android.com/android/platform/superproject/+/android-9.0.0_r1:packages/apps/Settings/src/com/android/settings/development/OemUnlockPreferenceController.java;l=132
public void onOemUnlockConfirmed() {
  mOemLockManager.setOemUnlockAllowedByUser(true);
}
-
setOemUnlockAllowedByUser
https://cs.android.com/android/platform/superproject/+/android-9.0.0_r1:frameworks/base/core/java/android/service/oemlock/OemLockManager.java;drc=b45a2ea782074944f79fc388df20b06e01f265f7;l=114
@RequiresPermission(android.Manifest.permission.MANAGE_USER_OEM_UNLOCK_STATE)
  public void setOemUnlockAllowedByUser(boolean allowed) {
      try {
          mService.setOemUnlockAllowedByUser(allowed);
      } catch (RemoteException e) {
          throw e.rethrowFromSystemServer();
      }
  }
-
setOemUnlockAllowedByUser
https://cs.android.com/android/platform/superproject/+/android-9.0.0_r1:frameworks/base/services/core/java/com/android/server/oemlock/OemLockService.java;l=156;drc=b45a2ea782074944f79fc388df20b06e01f265f7;bpv=0;bpt=1
// The user has the final say so if they allow unlock, then the device allows the bootloader
// to OEM unlock it.
@Override
public void setOemUnlockAllowedByUser(boolean allowedByUser) {
  if (ActivityManager.isUserAMonkey()) {
      // Prevent a monkey from changing this
      return;
  }

  enforceManageUserOemUnlockPermission();
  enforceUserIsAdmin();

  final long token = Binder.clearCallingIdentity();
  try {
      if (!isOemUnlockAllowedByAdmin()) {
          throw new SecurityException("Admin does not allow OEM unlock");
      }

      if (!mOemLock.isOemUnlockAllowedByCarrier()) {
          throw new SecurityException("Carrier does not allow OEM unlock");
      }

      mOemLock.setOemUnlockAllowedByDevice(allowedByUser);
      setPersistentDataBlockOemUnlockAllowedBit(allowedByUser);
  } finally {
      Binder.restoreCallingIdentity(token);
  }
}
-
setPersistentDataBlockOemUnlockAllowedBit
https://cs.android.com/android/platform/superproject/+/android-9.0.0_r1:frameworks/base/services/core/java/com/android/server/oemlock/OemLockService.java;drc=b45a2ea782074944f79fc388df20b06e01f265f7;bpv=0;bpt=1;l=232
/**
* Always synchronize the OemUnlockAllowed bit to the FRP partition, which
* is used to erase FRP information on a unlockable device.
*/
private void setPersistentDataBlockOemUnlockAllowedBit(boolean allowed) {
  final PersistentDataBlockManagerInternal pdbmi
          = LocalServices.getService(PersistentDataBlockManagerInternal.class);
  // if mOemLock is PersistentDataBlockLock, then the bit should have already been set
  if (pdbmi != null && !(mOemLock instanceof PersistentDataBlockLock)) {
      Slog.i(TAG, "Update OEM Unlock bit in pst partition to " + allowed);
      pdbmi.forceOemUnlockEnabled(allowed);
  }
}
-
pdbmi.forceOemUnlockEnabled(allowed);
https://cs.android.com/android/platform/superproject/+/android-9.0.0_r1:frameworks/base/services/core/java/com/android/server/PersistentDataBlockService.java;l=677;bpv=0;bpt=1
@Override
public void forceOemUnlockEnabled(boolean enabled) {
  synchronized (mLock) {
      doSetOemUnlockEnabledLocked(enabled);
      computeAndWriteDigestLocked();
  }
}
-
doSetOemUnlockEnabledLocked
https://cs.android.com/android/platform/superproject/+/android-9.0.0_r1:frameworks/base/services/core/java/com/android/server/PersistentDataBlockService.java;drc=b45a2ea782074944f79fc388df20b06e01f265f7;bpv=0;bpt=1;l=421
private void doSetOemUnlockEnabledLocked(boolean enabled) {
  try {
      FileChannel channel = getBlockOutputChannel();

      channel.position(getBlockDeviceSize() - 1);

      ByteBuffer data = ByteBuffer.allocate(1);
      data.put(enabled ? (byte) 1 : (byte) 0);
      data.flip();
      channel.write(data);
      channel.force(true);
  } catch (IOException e) {
      Slog.e(TAG, "unable to access persistent partition", e);
      return;
  } finally {
      SystemProperties.set(OEM_UNLOCK_PROP, enabled ? "1" : "0");
  }
}
设备文件的某个位置写1,看起来是修改配置了
private static final String PERSISTENT_DATA_BLOCK_PROP = "ro.frp.pst";
在一加上看是 :
130|OnePlus7Pro:/ $ getprop ro.frp.pst
/dev/block/bootdevice/by-name/config
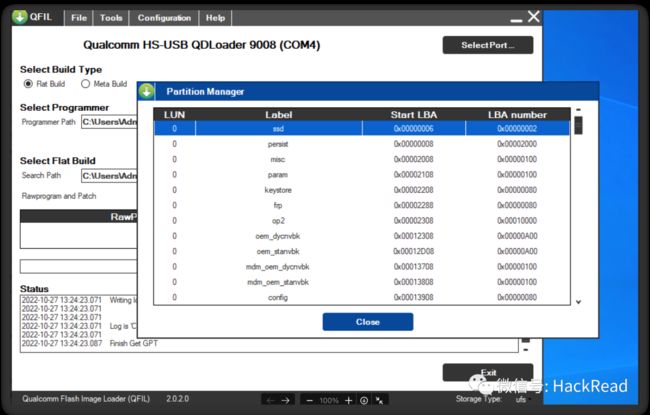
那么操作就是写这个分区了,把enbale标志位写进去,尝试进edl把config读出来看看
PS C:\Users\Admin> adb reboot edl
PS C:\Users\Admin>
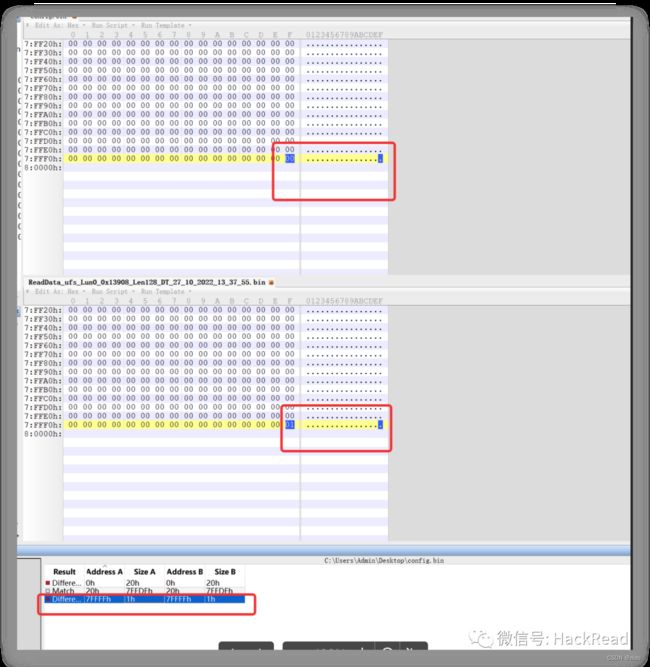 设置了这个标志位之后:
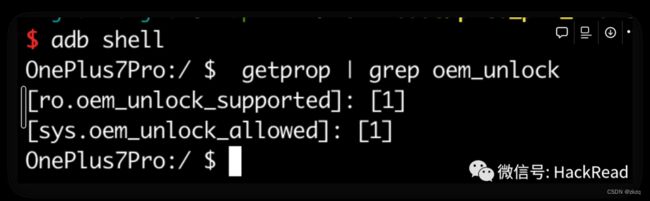
发现设备已经是允许unlock操作了(这里的允许是允许你去 fastboot oem unlock)
fastboot oem unlock
extract LinuxLoader from abl
-
把
UEFI PI Firmware Volume从abl.elf里切出来 -
uefi-firmware-parser 解析
$ uefi-firmware-parser -e test
/usr/local/bin/uefi-firmware-parser:38: SyntaxWarning: "is not" with a literal. Did you mean "!="?
if parser.type() is not 'unknown':
/usr/local/bin/uefi-firmware-parser:141: SyntaxWarning: "is" with a literal. Did you mean "=="?
if parser.type() is 'unknown':
Firmware Volume: 8c8ce578-8a3d-4f1c-9935-896185c32dd3 attr 0x0003feff, rev 2, cksum 0xd3be, size 0x22000 (139264 bytes)
Firmware Volume Blocks: (272, 0x200)
File 0: 9e21fd93-9c72-4c15-8c4b-e77f1db2d792 type 0x0b, attr 0x00, state 0x07, size 0x204c2 (132290 bytes), (firmware volume image)
  Section 0: type 0x02, size 0x204aa (132266 bytes) (Guid Defined section)
    Guid-Defined: ee4e5898-3914-4259-9d6e-dc7bd79403cf offset= 0x18 attrs= 0x1 (PROCESSING_REQUIRED)
      Section 0: type 0x19, size 0x4 (4 bytes) (Raw section)
      Section 1: type 0x17, size 0x6d0c4 (446660 bytes) (Firmware volume image section)
        Firmware Volume: 8c8ce578-8a3d-4f1c-9935-896185c32dd3 attr 0x0003feff, rev 2, cksum 0xa27, size 0x6d0c0 (446656 bytes)
          Firmware Volume Blocks: (6979, 0x40)
          File 0: ffffffff-ffff-ffff-ffff-ffffffffffff type 0xf0, attr 0x00, state 0x07, size 0x2c (44 bytes), (ffs padding)
          File 1: f536d559-459f-48fa-8bbc-43b554ecae8d type 0x09, attr 0x00, state 0x07, size 0x6d038 (446520 bytes), (application)
            Section 0: type 0x15, size 0x1c (28 bytes) (User interface name section)
            Name: LinuxLoader
            Section 1: type 0x10, size 0x6d004 (446468 bytes) (PE32 image section)
Dumping...
Wrote: ./volume-0.fv
Wrote: ./volume-0/filesystem.ffs
Wrote: ./volume-0/file-9e21fd93-9c72-4c15-8c4b-e77f1db2d792/file.obj
Wrote: ./volume-0/file-9e21fd93-9c72-4c15-8c4b-e77f1db2d792/section0.guid
Wrote: ./volume-0/file-9e21fd93-9c72-4c15-8c4b-e77f1db2d792/section0/section0.raw
Wrote: ./volume-0/file-9e21fd93-9c72-4c15-8c4b-e77f1db2d792/section0/section1.fv
Wrote: ./volume-0/file-9e21fd93-9c72-4c15-8c4b-e77f1db2d792/section0/section1/volume-ee4e5898-3914-4259-9d6e-dc7bd79403cf.fv
Wrote: ./volume-0/file-9e21fd93-9c72-4c15-8c4b-e77f1db2d792/section0/section1/volume-ee4e5898-3914-4259-9d6e-dc7bd79403cf/filesystem.ffs
Wrote: ./volume-0/file-9e21fd93-9c72-4c15-8c4b-e77f1db2d792/section0/section1/volume-ee4e5898-3914-4259-9d6e-dc7bd79403cf/file-ffffffff-ffff-ffff-ffff-ffffffffffff/file.obj
Wrote: ./volume-0/file-9e21fd93-9c72-4c15-8c4b-e77f1db2d792/section0/section1/volume-ee4e5898-3914-4259-9d6e-dc7bd79403cf/file-f536d559-459f-48fa-8bbc-43b554ecae8d/file.obj
Wrote: ./volume-0/file-9e21fd93-9c72-4c15-8c4b-e77f1db2d792/section0/section1/volume-ee4e5898-3914-4259-9d6e-dc7bd79403cf/file-f536d559-459f-48fa-8bbc-43b554ecae8d/section0.ui
Wrote: ./volume-0/file-9e21fd93-9c72-4c15-8c4b-e77f1db2d792/section0/section1/volume-ee4e5898-3914-4259-9d6e-dc7bd79403cf/file-f536d559-459f-48fa-8bbc-43b554ecae8d/section1.pe
Wrote: ./volume-0/file-9e21fd93-9c72-4c15-8c4b-e77f1db2d792/section0/guided.preamble
Wrote: ./volume-0/file-9e21fd93-9c72-4c15-8c4b-e77f1db2d792/section0/guided.certs
./volume-0/file-9e21fd93-9c72-4c15-8c4b-e77f1db2d792/section0/section1/volume-ee4e5898-3914-4259-9d6e-dc7bd79403cf/file-f536d559-459f-48fa-8bbc-43b554ecae8d/section1.pe就是我们需要的LinuxLoader
过程分析
这算是UEFI的一个应用程序
然后就去找 fastboot oem unlock 对应的处理逻辑 :

如果没有在设置-开发者选项中点击允许解锁BL,直接oem unlock是不行的,

在abl中也找到了对应的报错信息:

这里没符号不太好理解,要么找edk2的源码做参考辅助分析,要么某个基线代码build一份带符号的abl出来,这里因为没有在设置中 “允许解锁boot loader” 所以可以结合上面AOSP中的代码做辅助分析。
看看LinuxLoader的源码会更好理解
这里其实是判断了两个标志位:
-
unlock: 解锁,不验证BL了
-
unlock_critical: 设置后了之后才能刷对应的敏感分区

edk2开源实现中默认的保护分区,这个是可以修改的
结合LinuxLoader的源码,网上可以找到一些leak的实现,能用于辅助分析
在入口 LinuxLoaderEntry 开始的时候,会初始化一个Deviceinfo的结构体
// Initialize verified boot & Read Device Info
Status = DeviceInfoInit ();
if (Status != EFI_SUCCESS) {
DEBUG ((EFI_D_ERROR, "Initialize the device info failed: %r\\n", Status));
goto stack_guard_update_default;
}
结构体如下:
#define DEVICE_MAGIC "ANDROID-BOOT!"
#define DEVICE_MAGIC_SIZE 13
#define MAX_VERSION_LEN 64
#define MAX_VB_PARTITIONS 32
#define MAX_USER_KEY_SIZE 2048

enum unlock_type {
UNLOCK = 0,
UNLOCK_CRITICAL,
};
typedef struct device_info {
CHAR8 magic[DEVICE_MAGIC_SIZE];
BOOLEAN is_unlocked;
BOOLEAN is_unlock_critical;
BOOLEAN is_charger_screen_enabled;
CHAR8 bootloader_version[MAX_VERSION_LEN];
CHAR8 radio_version[MAX_VERSION_LEN];
BOOLEAN verity_mode; // TRUE = enforcing, FALSE = logging
UINT32 user_public_key_length;
CHAR8 user_public_key[MAX_USER_KEY_SIZE];
UINT64 rollback_index[MAX_VB_PARTITIONS];
struct usb_composition usb_comp;
} DeviceInfo;
EFI_STATUS
ReadWriteDeviceInfo (vb_device_state_op_t Mode, void *DevInfo, UINT32 Sz)
{
EFI_STATUS Status = EFI_INVALID_PARAMETER;
QCOM_VERIFIEDBOOT_PROTOCOL *VbIntf;

Status = gBS->LocateProtocol (&gEfiQcomVerifiedBootProtocolGuid, NULL,
                              (VOID **)&VbIntf);
if (Status != EFI_SUCCESS) {
  DEBUG ((EFI_D_ERROR, "Unable to locate VB protocol: %r\\n", Status));
  return Status;
}

Status = VbIntf->VBRwDeviceState (VbIntf, Mode, DevInfo, Sz);
if (Status != EFI_SUCCESS) {
  DEBUG ((EFI_D_ERROR, "VBRwDevice failed with: %r\\n", Status));
  return Status;
}

return Status;
}
# VerifiedBoot Protocol
gEfiQcomVerifiedBootProtocolGuid =   { 0x8e5eff91, 0x21b6, 0x47d3, { 0xaf, 0x2b, 0xc1, 0x5a, 0x1, 0xe0, 0x20, 0xec } }
可以根据这个gEfiQcomVerifiedBootProtocol 去基线中搜到对应的实现,这里就无法展示了。
结合利用FH读出来的devinfo分区:
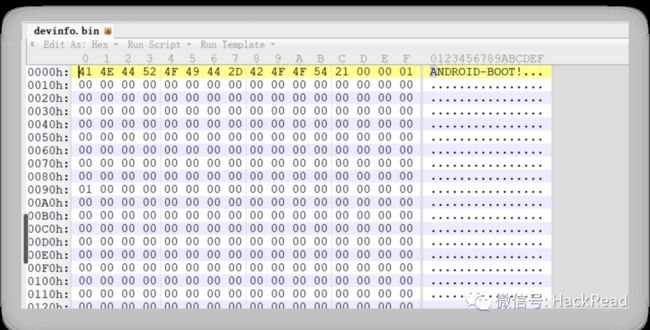
看来
BOOLEAN is_unlocked;
BOOLEAN is_unlock_critical;
都是0,这个和目前未解锁的状态是符合的。
FH读写分区
这里我本来想用QFIL的,但是一加的firehose显然是自己改过的,只能读,写的话有个认证token,所以考虑了开源实现 edl,这个工具我发现对xiaomi和oneplus有支持,
就在我想着能一把梭实现 r/w的时候,悲剧发生了 :
# jiazhenjie @ mbp in ~/tools/edl on git:01f84bf o [16:54:13] C:1 $ python3 edl.py w devinfo /Users/jiazhenjie/Downloads/devinfo.bin --loader=/Users/jiazhenjie/Downloads/prog_firehose_ddr.elf --memory=UFS --lun=4 Qualcomm Sahara / Firehose Client V3.52 (c) B.Kerler 2018-2021. main - Using loader /Users/jiazhenjie/Downloads/prog_firehose_ddr.elf ... main - Waiting for the device main - Device detected :) main - Mode detected: firehose firehose - Chip serial num: 2360036966 (0x8cab4e66) firehose - Supported Functions: program,read,nop,patch,configure,setbootablestoragedrive,erase,power,firmwarewrite,getstorageinfo,benchmark,emmc,ufs,fixgpt,getsha256digest,gethwversion,getrfversion,getprjversion,setprojmodel,sha256init,sha256final firehose - firehose firehose - [LIB]: Couldn't detect MaxPayloadSizeFromTargetinBytes firehose firehose - [LIB]: Couldn't detect TargetName firehose - TargetName=Unknown firehose - MemoryName=UFS firehose - Version=1 firehose_client - Supported functions: ----------------- program,read,nop,patch,configure,setbootablestoragedrive,erase,power,firmwarewrite,getstorageinfo,benchmark,emmc,ufs,fixgpt,getsha256digest,gethwversion,getrfversion,getprjversion,setprojmodel,sha256init,sha256final firehose - Writing to physical partition 4, sector 962718, sectors 1 Traceback (most recent call last): File "/Users/jiazhenjie/tools/edl/edl.py", line 358, inbase.run() File "/Users/jiazhenjie/tools/edl/edl.py", line 340, in run fh.handle_firehose(cmd, options) File "/Users/jiazhenjie/tools/edl/edl/Library/firehose_client.py", line 651, in handle_firehose if self.firehose.cmd_program(lun, startsector, filename): File "/Users/jiazhenjie/tools/edl/edl/Library/firehose.py", line 438, in cmd_program data += self.modules.addprogram() File "/Users/jiazhenjie/tools/edl/edl/Library/Modules/init.py", line 64, in addprogram return self.ops.addprogram() File "/Users/jiazhenjie/tools/edl/edl/Library/Modules/oneplus.py", line 233, in addprogram pk, token = self.ops.generatetoken(True) AttributeError: 'NoneType' object has no attribute 'generatetoken'
这个需要逆向刷机工具来分析了
逆向MSM Download
喜闻乐见的逆向环节
USB抓包
因为每次都会发token,所以想着抓个包,如果固定,那就万事大吉,结果发现不固定
这两个值并不是固定的,应该是固定算法+一些随机数算出来的
核心逻辑还是在计算这两个值,算是在刷写分区之前的验证工作,根据edl中的代码可知大概的逻辑,辅助逆向就方便多了
token & pk 逆向结果
先把结论放前面
-
prodkey固定 b2fad511325185e5
-
random_postfix 是随机字符串 // 这个可以写成固定值,反正是刷机工具生成的
-
时间戳 随机
-
pk 随机
head = c4b95538c57df231
tail = 5b0217457e49381b
cf = 0
soc_sn = 2360036966
ModelVerifyPrjName = 18821
Version = guacamole_21_H.04_190416
prodkey = b2fad511325185e5
random_postfix = 随机的16字节字符串

ModelVerifyHashToken = sha256(prodkey + ModelVerifyPrjName + random_postfix)
secret = sha256(head + ModelVerifyPrjName + cf + soc_sn + Version + 时间戳 + ModelVerifyHashToken + tail)
items = [ModelVerifyPrjName, random_postfix, ModelVerifyHashToken, Version, cf, soc_sn, timestamp, secret]

pk = 随机16字节字符串
aeskey = b"\x10\x45\x63\x87\xE3\x7E\x23\x71" + bytes(pk, 'utf-8') + b"\xA2\xD4\xA0\x74\x0f\xD3\x28\x96"
aesiv = b"\x9D\x61\x4A\x1E\xAC\x81\xC9\xB2\xD3\x76\xD7\x49\x31\x03\x63\x79"
pdata = "FEF0FFDA0CEF3E6C50E187E4A37D1B7DB860877A5F0ABFEC491DAC8DD5FD7F77D5D2859ADCDABED5B3018929CA10A00E786A675CD19184BB9BF2EF66A19AC234E4FD7EDFA8EB19E039B0FDD7BE0D3BC8DEA2453A6058D5370C923C9C4E632F3DEB1DA9F66F7BEA5B6D050B88C202BD5EEAA654DBF7AF410A14F5CB7DD481AEFAA6175685D565005D21CBBC2D62F860143FFE971F2845B2BD93A03ABDF6EE61F93E35740D8E2A09F89EB702D7E604914F0EDCE86F754FB994C1F82A20A094C8814EAD18FA6F24396A62A9C83D5412A53D740E662B7A9699ACA4352773B2F79374FF764EBC16143578481C0AD01135AE4BBA477C056320F690F4427E0635E91CEE"

token = hex(aes_cbc(items, key, iv))
为什么edl直接刷会失败呢?
-
没获取到prjid(18821),所以我在patch里直接硬编码了
-
prodkey不对
    def getprodkey(self, projid):
-       if projid in ["18825", "18801"]: # key_guacamoles, fajiita
+       if projid in ["18825", "18801", "18821"]: # key_guacamoles, fajiita, guacamole
            prodkey = "b2fad511325185e5"
        else: # key_op7t/op8/N10
            prodkey = "7016147d58e8c038"
@@ -164,7 +165,6 @@ class oneplus(metaclass=LogBase):
            rand = int(random.randint(0, 0x100))
            nr = (rand & 0xFF) % 0x3E
            pk += chr(val[nr])
其他地方这个工具都是对的,逆向过程的笔记没整理,也比较简单,没壳没混淆的,找到关键位置慢慢看就行了。
尝试修改分区实现unlock
想模拟一下把ufs吹下来修改后焊回去的操作
修改了edl之后发现是可以正常写分区的

修改devinfo之后刷回去,发现还是locked,看来只改这里是不行的, GG~

VerifiedBoot Protocol 分析
abl分析的时候提到了这个protocol,所以想搞清楚为什么失败就要看看这里
根据boot_images/QcomPkg/Drivers/VerifiedBootDxe/VerifiedBootDxe.inf
可知对应的实现在同目录的 VerifiedBootDxe.c 中
这里注册了这个protocol
EFI_STATUS
EFIAPI
VerifiedBootDxeEntryPoint(IN EFI_HANDLE ImageHandle,
                        IN EFI_SYSTEM_TABLE *SystemTable)
{
EFI_STATUS Status;
EFI_HANDLE Handle = NULL;

Status = gBS->InstallMultipleProtocolInterfaces(
    &Handle, &gEfiQcomVerifiedBootProtocolGuid,
    (VOID **)&QCOMVerifiedBootProtocol, NULL);

return Status;
}
要看的方法是 VBRwDeviceState 对应的是 QCOM_VB_RWDeviceState,这个代码很长就不贴了,只放关键的一部分:
/* We use devinfo partition when the device is not secure */
AsciiStrnCpy((CHAR8 *)img_name, "devinfo", AsciiStrLen("devinfo"));
if (convert_char8_to_char16(img_name, img_label, AsciiStrLen("devinfo")) != EFI_SUCCESS) {
  status = RETURN_INVALID_PARAMETER;
  goto exit;
}
显然,只有没烧efuse的时候才会用devinfo作为存放是否unlock的标志,这一点也符合预期,至此这次探索基本上就结束了。
结束
我也把firehose和对edl的patch放到了github,过程也确实好玩:) 不过还是有不少没研究到的地方,比如他的verifyboot实现是否安全啥的 -。-
参考
https://www.droidwin.com/how-to-extract-oneplus-ops-firmware/
https://zhuanlan.zhihu.com/p/427390226
https://github.com/theopolis/uefi-firmware-parser
https://blog.omitol.com/2017/09/30/Bypass-QCOM-Secure-Boot
https://tjtech.me/analyze-oem-unlocking-under-android.html
https://www.oneplusbbs.com/forum.php?mod=viewthread&tid=4730052
原文地址: https://o0xmuhe.github.io/2022/11/01/Qual-Android%E6%96%B9%E6%A1%88Unlock%E5%A声明:⽂中所涉及的技术、思路和⼯具仅供以安全为⽬的的学习交流使⽤,任何⼈不得将其⽤于⾮法⽤途以及盈利等⽬的,否则后果⾃⾏承担。所有渗透都需获取授权!
hack渗透视频教程,扫码免费领