利用Python提取函数图像数据并拟合曲线
目录
- 1. 前言
- 2. 数据提取
-
- 2.1 图像预处理
- 2.2 提取数据
- 3. 曲线拟合
- 4. 优化代码
1. 前言
学校导师要求拟合曲线,但只有函数图像没有数据,图像和公式都不懂就负责把系数算出来。
代码在 jupyter notebook 上跑的
环境:
Python 3.7.4
conda 4.8.3
(2021.09.07)
以前的代码使用起来很不方便,根据一些私信遇到的问题对整体代码进行了修改,加强一点实用性,有需要的可以直接看 2.1图像预处理 然后跳转到 第4节 看优化后的代码,如果使用时出现问题再看2、3节的思路或解释。
提前说一些可能遇到的问题:
(1)图像质量要比较好(没有歪斜、扭曲、模糊、噪声等问题),图像的背景部分最好是纯白,否则可能需要调整一下二值化或边缘提取的参数。
(2)图像预处理不管用ps还是画图或者别的方法,要处理的和展示效果差不多,坐标轴边框清晰而且外面没有别的更大的矩形框(因为是用的类似直方图的原理判断的坐标轴位置),坐标轴内部除了曲线部分没有网格线等别的多余线条。
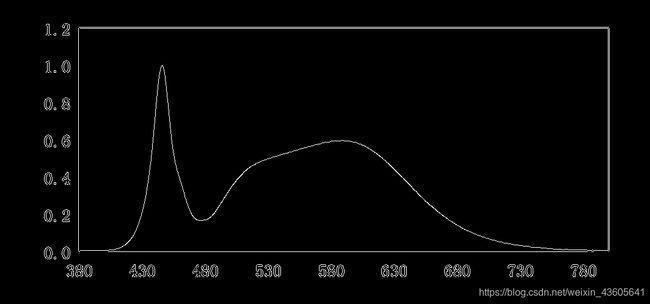
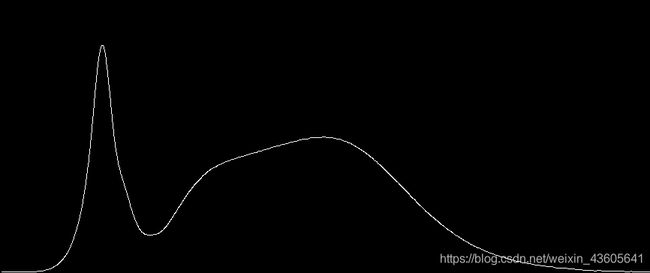
(3)运行第4节中的代码会依次输出二值化、边缘提取、函数曲线、根据提取坐标画的函数4幅图像,可以确定每个步骤是否成功提取了需要的函数图像。如有问题,通常调整二值化或边缘提取部分的一些阈值参数可以解决。
2. 数据提取
2.1 图像预处理
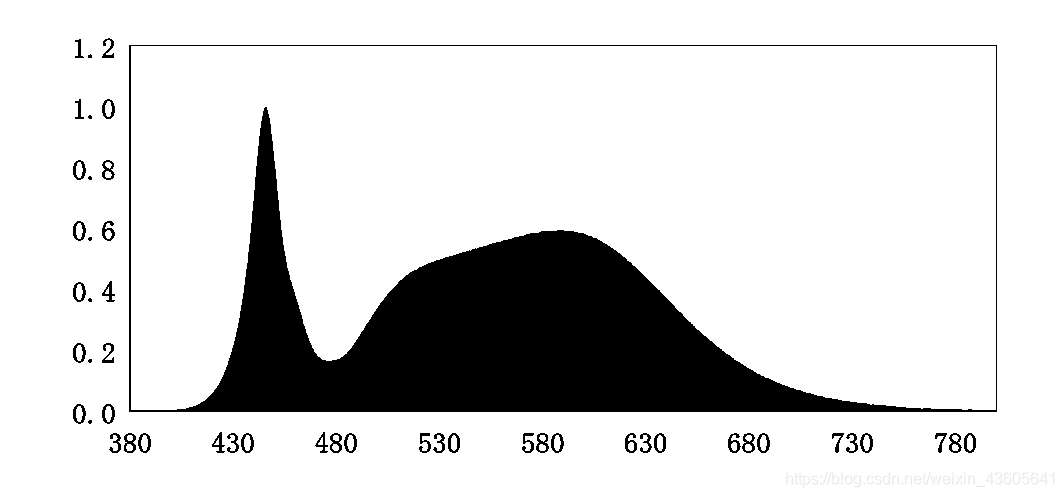
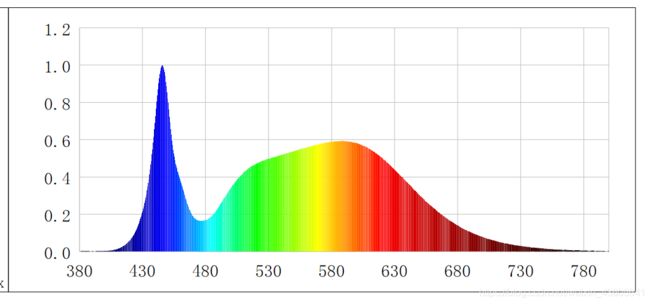
原始图像如图所示:
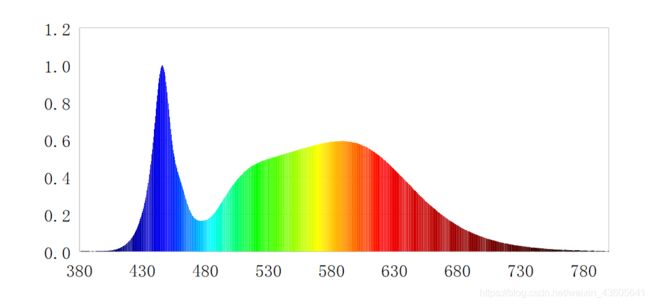
利用画图对原始图像进行简单处理,去除外围的边框线和内部的网格线,保留曲线部分以及坐标轴的边界线,方便后续数据提取:
2.2 提取数据
- 导入要用的模块和包
import numpy as np
import pandas as pd
import cv2 as cv
import matplotlib.pyplot as plt
%matplotlib inline
%config ZMQInteractiveShell.ast_node_interactivity = "all"
- 图像二值化
# 打开图片
img = cv.imread('D:/learning/Function coordinates/test/p1_1.png')
# 灰度化
gary_img = cv.cvtColor(img, cv.COLOR_BGR2GRAY)
# 二值化
ret, binary_img = cv.threshold(gary_img, 240, 255, cv.THRESH_BINARY)
cv.imshow('binary_img', binary_img)
cv.waitKey(0)
cv.destroyAllWindows()
- 图像边缘提取
# 边缘提取
xgrd = cv.Sobel(binary_img,cv.CV_16SC1,1,0)
ygrd = cv.Sobel(binary_img,cv.CV_16SC1,0,1)

egde_output = cv.Canny(xgrd,ygrd,50,150)
cv.imshow('canny_edge',egde_output)
cv.waitKey(0)
cv.destroyAllWindows()
- 提取图像曲线区域
# 图像像素按行和列求和
column_sum_img = np.sum(egde_output, axis=0)
row_sum_img = np.sum(egde_output, axis=1)
# 排序
sort_column_sum = np.sort(column_sum_img)
sort_column_sum_indices = np.argsort(column_sum_img)
sort_row_sum = np.sort(row_sum_img)
sort_row_sum_indices = np.argsort(row_sum_img)
打印4个排序结果:
sort_column_sum = [0, 0, 0, ··· , 15300, 16065, 17085, 92820, 93075, 94350]
sort_column_sum_indices = [0, 1007, 1008, ··· , 113, 75, 111, 997, 995, 128]
sort_row_sum = [0, 0, 0, ··· , 31620, 36465, 45135, 204000, 222105, 222615]
sort_row_sum_indices = [0, 467, 466, ··· , 440, 435, 450, 411, 46, 44]
图像黑色部分像素值为0,白色部分像素值为255,通过像素值累加得到坐标轴的边界位置。
在本例中为 997,995,128 列和 411,46,44 行,这样就可以提取出图像中曲线区域。
观察图像也可以验证,左边一条白线,右边两条白线,下面一条白线,上面两条白线
fc = egde_output[47:411, 129:995]
cv.imshow('function_curve', fc)
cv.waitKey(0)
cv.destroyAllWindows()
In: fc.shape
Out: (364, 866)
In: fc
Out: array([[  0,   0,   0, ...,   0,   0,   0],
       		[  0,   0,   0, ...,   0,   0,   0],
       		[  0,   0,   0, ...,   0,   0,   0],
       		...,
       		[  0,   0,   0, ...,   0,   0,   0],
       		[  0,   0, 255, ..., 255, 255, 255],
       		[  0,   0,   0, ...,   0,   0,   0]], dtype=uint8)
由于有些图像本身的问题,可能在坐标轴边框附近存在一些噪点,因此可以通过打印数据大致看一下边界区域是否存在噪点,手动置零。
- 提取图像数据
min_x = 380
max_x = 800
min_y = 0.0
max_y = 1.2

x_axis = np.empty([364, 866])
y_axis = np.empty([866, 364])

x_interval = (max_x-min_x)/867
x_value = np.arange(min_x+x_interval, max_x, x_interval)
y_interval = (max_y-min_y)/365
y_value = np.arange(max_y-y_interval, min_y, -y_interval)

x_axis[:,] = x_value
y_axis[:,] = y_value
y_axis = y_axis.T

x_fc = x_axis.T[fc.T==255]
y_fc = y_axis.T[fc.T==255]
其中,min_x、max_x、min_y、max_y 根据坐标轴的取值范围确定;
x_axis 和 y_axis 为函数图像中每个像素的 x 轴坐标与 y 轴坐标所生成的矩阵;
x_interval 和 y_interval 为函数图像行和列的间隔值;
为了一定程度减少提取数据的误差,本文假设之前提取曲线区域时的行和列对应 min_x、max_x、min_y、max_y ,即 46 行对应 max_y,411 行对应 min_y,128 列对应 min_y,995 列对应 max_y。曲线区域的大小为 (364, 866),则 x 轴和 y 轴间隔数为 867 和 365。
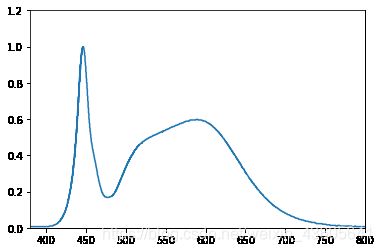
x_fc、y_fc 为曲线上每个像素对应的 x 轴和 y 轴坐标,数据索引时的两次转置是因为需要将数据点按从上到下,从左到右的顺序提取,方便后续画图验证。
x_axis =
array([[380.48442907, 380.96885813, 381.4532872 , ..., 798.5467128 , 799.03114187, 799.51557093],
       [380.48442907, 380.96885813, 381.4532872 , ..., 798.5467128 , 799.03114187, 799.51557093],
       [380.48442907, 380.96885813, 381.4532872 , ..., 798.5467128 , 799.03114187, 799.51557093],
       ...,
       [380.48442907, 380.96885813, 381.4532872 , ..., 798.5467128 , 799.03114187, 799.51557093],
       [380.48442907, 380.96885813, 381.4532872 , ..., 798.5467128 , 799.03114187, 799.51557093],
       [380.48442907, 380.96885813, 381.4532872 , ..., 798.5467128 , 799.03114187, 799.51557093]])

y_axis =
array([[1.19671233, 1.19671233, 1.19671233, ..., 1.19671233, 1.19671233, 1.19671233],
       [1.19342466, 1.19342466, 1.19342466, ..., 1.19342466, 1.19342466, 1.19342466],
       [1.19013699, 1.19013699, 1.19013699, ..., 1.19013699, 1.19013699, 1.19013699],
       ...,
       [0.00986301, 0.00986301, 0.00986301, ..., 0.00986301, 0.00986301, 0.00986301],
       [0.00657534, 0.00657534, 0.00657534, ..., 0.00657534, 0.00657534, 0.00657534],
       [0.00328767, 0.00328767, 0.00328767, ..., 0.00328767, 0.00328767, 0.00328767]])
plt.xlim(380, 800)
plt.ylim(0, 1.2)
plt.plot(x_fc,y_fc)
ps:在计算 x_value 和 y_value 两行代码中碰到过报错
ValueError: could not broadcast input array from shape (365) into shape (866,364)
但是计算公式理论上没有问题,估计是类似数值溢出的问题,通过对取值范围适当加减一个间隔可以解决。
y_value = np.arange(max_y-y_interval, min_y+y_interval, -y_interval)
- 存储数据
先通过 x_fc.shape 看下数据点的个数为 1471
xy_data = np.empty([2, 1471])
xy_data[0] = x_fc
xy_data[1] = y_fc
xy_data = xy_data.T

data = pd.DataFrame(xy_data)
data.columns=['x','y']
writer = pd.ExcelWriter('D:/learning/Function coordinates/test/p1_data.xlsx')    # 写入Excel文件
data.to_excel(writer, 'page_1', float_format='%.5f')    # ‘page_1’是写入excel的sheet名
writer.save()
writer.close()
3. 曲线拟合
import numpy as np
import pandas as pd
from sympy import *
import matplotlib.pyplot as plt
from scipy.optimize import curve_fit
%config ZMQInteractiveShell.ast_node_interactivity = "all"

df = pd.read_excel('D:/learning/Function coordinates/test/p1_data.xlsx', index_col = 0)
X = df['x'].values
Y = df['y'].values

def function1(x,a1,a2,a3,b1,b2,b3,c11,c12,c2,c3):
    return 2*a1 / (np.exp(-(x-b1)/c11)+np.exp((x-b1)/c12)) +\
            a2 * (b2**2) / (x**2) * np.exp(-((x-b2)/(x*c2))**2) +\
            a3 * (b3**2) / (x**2) * np.exp(-((x-b3)/(x*c3))**2)
popt, pcov = curve_fit(function1, X, Y, bounds=([0.,0.,0.,380.,400.,400.,0.,0.,0.,0.],
                                            [1.,0.6,0.6,520.,800.,800.,20.,100.,100.,100.]))
print(popt)
# print(pcov)

Y1 = 2*popt[0] / (np.exp(-(X-popt[3])/popt[6])+np.exp((X-popt[3])/popt[7]))
Y2 = popt[1] * (popt[4]**2) / (X**2) * np.exp(-((X-popt[4])/(X*popt[8]))**2)
Y3 = popt[2] * (popt[5]**2) / (X**2) * np.exp(-((X-popt[5])/(X*popt[9]))**2)

plt.plot(X, Y, label='data')
plt.plot(X, function1(X,*popt), label='fit')
plt.plot(X, Y1, label='T1')
plt.plot(X, Y2, label='T2')
plt.plot(X, Y3, label='T3')
plt.legend(loc='upper right')

拟合曲线里面具体的计算原理不太了解。
拟合时 curve_fit() 中 bounds 里面的两个列表对应系数 a1,a2,a3,b1,b2,b3,c11,c12,c2,c3 的最小值和最大值,其数值会在一定程度影响拟合效果,打印的 popt 是系数的值。
拟合公式为:

顺便计算了一下拟合曲线的绝对误差:
In: abs(Y - function1(X,*popt)).sum()
Out: 16.800576957203255
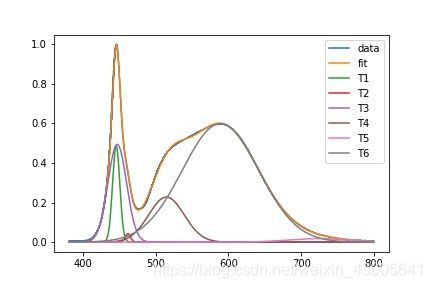
def gs6(x,a1,a2,a3,a4,a5,a6,b1,b2,b3,b4,b5,b6,c1,c2,c3,c4,c5,c6):
    return a1*np.exp(-((x-b1)/c1)**2)+\
            a2*np.exp(-((x-b2)/c2)**2)+\
            a3*np.exp(-((x-b3)/c3)**2)+\
            a4*np.exp(-((x-b4)/c4)**2)+\
            a5*np.exp(-((x-b5)/c5)**2)+\
            a6*np.exp(-((x-b6)/c6)**2)
popt, pcov = curve_fit(gs6, X, Y, bounds=([0.,0.,0.,0.,0.,0.,400.,400.,400.,400.,400.,400.,0.,0.,0.,0.,0.,0.],
                                            [1.2,1.2,1.2,0.6,0.6,0.6,510.,510.,510.,800.,800.,800.,20.,20.,20.,100.,90.,90.]))
print(popt)
# print(pcov)

Y1 = popt[0]*np.exp(-((X-popt[6])/popt[12])**2)
Y2 = popt[1]*np.exp(-((X-popt[7])/popt[13])**2)
Y3 = popt[2]*np.exp(-((X-popt[8])/popt[14])**2)
Y4 = popt[3]*np.exp(-((X-popt[9])/popt[15])**2)
Y5 = popt[4]*np.exp(-((X-popt[10])/popt[16])**2)
Y6 = popt[5]*np.exp(-((X-popt[11])/popt[17])**2)

plt.plot(X, Y, label='data')
plt.plot(X, gs6(X,*popt), label='fit')
plt.plot(X, Y1, label='T1')
plt.plot(X, Y2, label='T2')
plt.plot(X, Y3, label='T3')
plt.plot(X, Y4, label='T4')
plt.plot(X, Y5, label='T5')
plt.plot(X, Y6, label='T6')
plt.legend(loc='upper right')
In: abs(Y - gs6(X,*popt)).sum()
Out: 6.379130579724297
4. 优化代码
import numpy as np
import pandas as pd
import cv2
import os
import matplotlib.pyplot as plt
from scipy.optimize import curve_fit
from sympy import *


def get_edge(sum_values, sum_sort_indices, thresh):
    low, high = False, False
    edge = np.zeros(2)

    for i in sum_sort_indices:
        if i < thresh:
            if low:
                if i > edge[0] and sum_values[i] > (0.95*sum_values[int(edge[0])]):
                    edge[0] = i
            else:
                edge[0] = i
                low = True
        elif i > thresh:
            if high:
                if i < edge[1] and sum_values[i] > (0.95*sum_values[int(edge[1])]):
                    edge[1] = i
            else:
                edge[1] = i
                high = True

    return edge.astype('int')


def get_function_coordinates(img_path, x_range, y_range, save_excel = False):
    img_gary = cv2.imread(img_path, 0)
    h, w = img_gary.shape
    # 二值化,像素值>250取255,否则取0
    ret, img_binary = cv2.threshold(img_gary, 250, 255, cv2.THRESH_BINARY)
    cv2.imshow('img_binary', img_binary)
    cv2.waitKey(0)
    cv2.destroyAllWindows()

    # 边缘提取
    xgrd = cv2.Sobel(img_binary, cv2.CV_16SC1, 1, 0)
    ygrd = cv2.Sobel(img_binary, cv2.CV_16SC1, 0, 1)
    edge_output = cv2.Canny(xgrd, ygrd, 50, 150)
    cv2.imshow('img_edge', edge_output)
    cv2.waitKey(0)
    cv2.destroyAllWindows()

    column_sum = np.sum(edge_output, axis=0)  # 按列求和
    row_sum = np.sum(edge_output, axis=1)  # 按行求和

    x1, x2 = get_edge(column_sum, np.argsort(column_sum)[::-1], w/2)
    y1, y2 = get_edge(row_sum, np.argsort(row_sum)[::-1], h/2)

    fun_range = edge_output[y1+1:y2, x1+1:x2]
    # 边缘置零, 坐标轴附近可能会出现噪点, 根据个例的情况处理
    fun_range[:,0:2] = 0
    cv2.imshow('img_fun', fun_range)
    cv2.waitKey(0)
    cv2.destroyAllWindows()

    f_h, f_w = fun_range.shape
    min_x, max_x = x_range
    min_y, max_y = y_range

    x_axis = np.empty([f_h, f_w])
    y_axis = np.empty([f_w, f_h])

    x_value = np.linspace(min_x, max_x, f_w)
    y_value = np.linspace(max_y, min_y, f_h)
    x_axis[:,] = x_value
    y_axis[:,] = y_value
    y_axis = y_axis.T

    x_fc = x_axis.T[fun_range.T==255]
    y_fc = y_axis.T[fun_range.T==255]

    plt.xlim(x_range)
    plt.ylim(y_range)
    plt.plot(x_fc,y_fc)
    plt.show()

    if save_excel:
        xy_data = np.empty([2, x_fc.shape[0]])
        xy_data[0] = x_fc
        xy_data[1] = y_fc
        xy_data = xy_data.T

        data = pd.DataFrame(xy_data)
        data.columns=['x','y']
        excel_path = os.path.splitext(img_path)[0] + '.xlsx'
        writer = pd.ExcelWriter(excel_path)    # 写入Excel文件
        data.to_excel(writer, 'page_1', float_format='%.5f')    # ‘page_1’是写入excel的sheet名
        writer.save()
        writer.close()

    return x_fc, y_fc

'''
数据提取参数解释
img_path: 函数图像路径
x_range: 函数图像x轴的取值范围
y_range: 函数图像y轴的取值范围
save_excel: 不需要存excel就设False, 存储的excel文件默认和函数图像文件同名同路径
'''
img_path = 'D:/learning/Function coordinates/test/p1_1.png'
x_range = [380, 800]
y_range = [0, 1.2]
save_excel = True
X, Y = get_function_coordinates(img_path, x_range, y_range, save_excel)


'''
下面是拟合曲线部分, 如果不需要保存坐标数据, 得到的 X,Y 可以直接进行拟合
需要拟合的函数和拟合后的可视化还是要自己写的
'''
def function1(x,a1,a2,a3,b1,b2,b3,c11,c12,c2,c3):
    return 2*a1 / (np.exp(-(x-b1)/c11)+np.exp((x-b1)/c12)) +\
            a2 * (b2**2) / (x**2) * np.exp(-((x-b2)/(x*c2))**2) +\
            a3 * (b3**2) / (x**2) * np.exp(-((x-b3)/(x*c3))**2)
popt, pcov = curve_fit(function1, X, Y, bounds=([0.,0.,0.,380.,400.,400.,0.,0.,0.,0.],
                                            [1.,0.6,0.6,520.,800.,800.,20.,100.,100.,100.]))
print(popt)
# print(pcov)

Y1 = 2*popt[0] / (np.exp(-(X-popt[3])/popt[6])+np.exp((X-popt[3])/popt[7]))
Y2 = popt[1] * (popt[4]**2) / (X**2) * np.exp(-((X-popt[4])/(X*popt[8]))**2)
Y3 = popt[2] * (popt[5]**2) / (X**2) * np.exp(-((X-popt[5])/(X*popt[9]))**2)

plt.xlim(x_range)
plt.ylim(y_range)
plt.plot(X, Y, label='data')
plt.plot(X, function1(X,*popt), label='fit')
plt.plot(X, Y1, label='T1')
plt.plot(X, Y2, label='T2')
plt.plot(X, Y3, label='T3')
plt.legend(loc='upper right')
plt.show()
