zookeeper应用场景(一)
一、zookeeper客户端api
1、官方Java客户端api
引入zookeeper client依赖
    org.apache.zookeeper
    zookeeper
    3.9.0
1)Zookeeper主要的构造方法参数
/**
     *
     * @param connectString 标识zookeeper连接,ip:port对应一个zookeeper节点,如果有多个就就用逗号分隔,客户端会选择任意一个节点建立连接
     * @param sessionTimeout 建立连接会话超时时间
     * @param watcher 用于接收到来自己zookeeper集群的事件
     * @throws IOException
     */
    public ZooKeeper(String connectString, int sessionTimeout, Watcher watcher) throws IOException {
        this(connectString, sessionTimeout, watcher, false);
    }
使用ZooKeeper对象连接zookeeper集群
public class ZkClientTest {

    private static final String CLUSTER_CONNECT_STR = "175.178.8.229:2191,175.178.8.229:2192,175.178.8.229:2193,175.178.8.229:2194";

    public static void main(String[] args) throws IOException, InterruptedException, KeeperException {
        final CountDownLatch countDownLatch = new CountDownLatch(1);
        ZooKeeper zooKeeper = new ZooKeeper(CLUSTER_CONNECT_STR, 4000, new Watcher() {
            @Override
            public void process(WatchedEvent watchedEvent) {
                if (Event.KeeperState.SyncConnected==watchedEvent.getState()) {
                    countDownLatch.countDown();
                    System.out.println("建立连接");
                }
            }
        });
        System.out.println("连接中");
        countDownLatch.await();
        System.out.println(zooKeeper.getState());
        // 创建持久节点
        zooKeeper.create("/user", "gaorufeng".getBytes(StandardCharsets.UTF_8), ZooDefs.Ids.OPEN_ACL_UNSAFE, CreateMode.PERSISTENT);
    }
}
2)Zookeeper主要方法
- create(path, data, acl,createMode): 创建一个给定路径的 znode,并在 znode 保存 data[]的 数据,createMode指定 znode 的类型。
- delete(path, version):如果给定 path 上的 znode 的版本和给定的 version 匹配, 删除 znode。
- exists(path, watch):判断给定 path 上的 znode 是否存在,并在 znode 设置一个 watch。
- getData(path, watch):返回给定 path 上的 znode 数据,并在 znode 设置一个 watch。
- setData(path, data, version):如果给定 path 上的 znode 的版本和给定的 version 匹配,设置 znode 数据。
- getChildren(path, watch):返回给定 path 上的 znode 的孩子 znode 名字,并在 znode 设置一个 watch。
- sync(path):把客户端 session 连接节点和 leader 节点进行同步。
同步创建节点
@Test
public void createTest() throws KeeperException, InterruptedException {
    String path = zooKeeper.create(ZK_NODE, "data".getBytes(), ZooDefs.Ids.OPEN_ACL_UNSAFE, CreateMode.PERSISTENT);
    log.info("created path: {}",path);
}
异步创建节点
@Test
public void createAsycTest() throws InterruptedException {
     zooKeeper.create(ZK_NODE, "data".getBytes(), ZooDefs.Ids.OPEN_ACL_UNSAFE,
             CreateMode.PERSISTENT,
             (rc, path, ctx, name) -> log.info("rc  {},path {},ctx {},name {}",rc,path,ctx,name),"context");
    TimeUnit.SECONDS.sleep(Integer.MAX_VALUE);
}
修改节点数据
@Test
public void setTest() throws KeeperException, InterruptedException {

    Stat stat = new Stat();
    byte[] data = zooKeeper.getData(ZK_NODE, false, stat);
    log.info("修改前: {}",new String(data));
    zooKeeper.setData(ZK_NODE, "changed!".getBytes(), stat.getVersion());
     byte[] dataAfter = zooKeeper.getData(ZK_NODE, false, stat);
    log.info("修改后: {}",new String(dataAfter));
}
2、Curator开源客户端
Curator 包含了几个包:
- curator-framework是对ZooKeeper的底层API的一些封装。
- curator-client提供了一些客户端的操作,例如重试策略等。
- curator-recipes封装了一些高级特性,如:Cache事件监听、选举、分布式锁、分布式计数器、分布式Barrier等
			org.apache.zookeeper
			zookeeper
			3.9.0


			org.apache.curator
			curator-recipes
			5.1.0


					org.apache.zookeeper
					zookeeper
1)创建客户端实例
- 使用工厂类CuratorFrameworkFactory的静态newClient()方法。
// 重试策略
RetryPolicy retryPolicy = new ExponentialBackoffRetry(1000, 3)
//创建客户端实例
CuratorFramework client = CuratorFrameworkFactory.newClient(zookeeperConnectionString, retryPolicy);
//启动客户端
client.start();- 使用工厂类CuratorFrameworkFactory的静态builder构造者方法。
//随着重试次数增加重试时间间隔变大,指数倍增长baseSleepTimeMs * Math.max(1, random.nextInt(1 << (retryCount + 1)))
RetryPolicy retryPolicy = new ExponentialBackoffRetry(1000, 3);

CuratorFramework client = CuratorFrameworkFactory.builder()
                .connectString(CLUSTER_CONNECT_STR)
                .sessionTimeoutMs(5000)  // 会话超时时间
                .connectionTimeoutMs(5000) // 连接超时时间
                .retryPolicy(retryPolicy)
                .namespace("base") // 包含隔离名称
                .build();
client.start();- connectionString:服务器地址列表,在指定服务器地址列表的时候可以是一个地址,也可以是多个地址。如果是多个地址,那么每个服务器地址列表用逗号分隔, 如 host1:port1,host2:port2,host3;port3 。
- retryPolicy:重试策略,当客户端异常退出或者与服务端失去连接的时候,可以通过设置客户端重新连接 ZooKeeper 服务端。而 Curator 提供了 一次重试、多次重试等不同种类的实现方式。在 Curator 内部,可以通过判断服务器返回的 keeperException 的状态代码来判断是否进行重试处理,如果返回的是 OK 表示一切操作都没有问题,而 SYSTEMERROR 表示系统或服务端错误。
| 策略名称 |
描述 |
| ExponentialBackoffRetry |
重试一组次数,重试之间的睡眠时间增加 |
| RetryNTimes |
重试最大次数 |
| RetryOneTime |
只重试一次 |
| RetryUntilElapsed |
在给定的时间结束之前重试 |
- 超时时间:Curator 客户端创建过程中,有两个超时时间的设置。一个是 sessionTimeoutMs 会话超时时间,用来设置该条会话在 ZooKeeper 服务端的失效时间。另一个是 connectionTimeoutMs 客户端创建会话的超时时间,用来限制客户端发起一个会话连接到接收 ZooKeeper 服务端应答的时间。sessionTimeoutMs 作用在服务端,而 connectionTimeoutMs 作用在客户端。
2)创建节点
 @Test
public void testCreate() throws Exception {
    String path = curatorFramework.create().forPath("/curator-node");
    curatorFramework.create().withMode(CreateMode.PERSISTENT).forPath("/curator-node","some-data".getBytes())
    log.info("curator create node :{}  successfully.",path);
}
在 Curator 中,可以使用 create 函数创建数据节点,并通过 withMode 函数指定节点类型(持久化节点,临时节点,顺序节点,临时顺序节点,持久化顺序节点等),默认是持久化节点,之后调用 forPath 函数来指定节点的路径和数据信息。
3)一次性创建带层级结构的节点
@Test
public void testCreateWithParent() throws Exception {
    String pathWithParent="/node-parent/sub-node-1";
    String path = curatorFramework.create().creatingParentsIfNeeded().forPath(pathWithParent);
    log.info("curator create node :{}  successfully.",path);
}
4)获取数据
@Test
public void testGetData() throws Exception {
    byte[] bytes = curatorFramework.getData().forPath("/curator-node");
    log.info("get data from  node :{}  successfully.",new String(bytes));
}
5)更新节点
@Test
public void testSetData() throws Exception {
    curatorFramework.setData().forPath("/curator-node","changed!".getBytes());
    byte[] bytes = curatorFramework.setData().forPath("/curator-node");
    log.info("get data from  node /curator-node :{}  successfully.",new String(bytes));
}
6)删除节点
@Test
public void testDelete() throws Exception {
    String pathWithParent="/node-parent";
    curatorFramework.delete().guaranteed().deletingChildrenIfNeeded().forPath(pathWithParent);
}
guaranteed:该函数的功能如字面意思一样,主要起到一个保障删除成功的作用,其底层工作方式是:只要该客户端的会话有效,就会在后台持续发起删除请求,直到该数据节点在 ZooKeeper 服务端被删除。
deletingChildrenIfNeeded:指定了该函数后,系统在删除该数据节点的时候会以递归的方式直接删除其子节点,以及子节点的子节点。
7)异步接口
Curator 引入了BackgroundCallback 接口,用来处理服务器端返回来的信息,这个处理过程是在异步线程中调用,默认在 EventThread 中调用,也可以自定义线程池。
public interface BackgroundCallback
{
    /**
     * Called when the async background operation completes
     *
     * @param client the client
     * @param event operation result details
     * @throws Exception errors
     */
    public void processResult(CuratorFramework client, CuratorEvent event) throws Exception;
}
如上接口,主要参数为 client 客户端,和服务端事件event。
inBackground 异步处理默认在EventThread中执行
@Test
public void test() throws Exception {
    curatorFramework.getData().inBackground((item1, item2) -> {
        log.info(" background: {}", item2);
    }).forPath(ZK_NODE);

    TimeUnit.SECONDS.sleep(Integer.MAX_VALUE);
}
8)指定线程池
@Test
public void test() throws Exception {
    ExecutorService executorService = Executors.newSingleThreadExecutor();

    curatorFramework.getData().inBackground((item1, item2) -> {
        log.info(" background: {}", item2);
    },executorService).forPath(ZK_NODE);

    TimeUnit.SECONDS.sleep(Integer.MAX_VALUE);
}
9)Curator 监听器
/**
 * Receives notifications about errors and background events
 */
public interface CuratorListener
{
    /**
     * Called when a background task has completed or a watch has triggered
     *
     * @param client client
     * @param event the event
     * @throws Exception any errors
     */
    public void         eventReceived(CuratorFramework client, CuratorEvent event) throws Exception;
}
针对 background 通知和错误通知。使用此监听器之后,调用inBackground 方法会异步获得监听
Curator Caches:
Curator 引入了 Cache 来实现对 Zookeeper 服务端事件监听,Cache 事件监听可以理解为一个本地缓存视图与远程 Zookeeper 视图的对比过程。Cache 提供了反复注册的功能。Cache 分为两类注册类型:节点监听和子节点监听。
node cache:
NodeCache 对某一个节点进行监听
public NodeCache(CuratorFramework client,
                         String path)
Parameters:
client - the client
path - path to cache
可以通过注册监听器来实现,对当前节点数据变化的处理
public void addListener(NodeCacheListener listener)
     Add a change listener
Parameters:
listener - the listener
@Slf4j
public class NodeCacheTest extends AbstractCuratorTest{
public static final String NODE_CACHE="/node-cache";
@Test
public void testNodeCacheTest() throws Exception {
createIfNeed(NODE_CACHE);
NodeCache nodeCache = new NodeCache(curatorFramework, NODE_CACHE);
nodeCache.getListenable().addListener(new NodeCacheListener() {
@Override
public void nodeChanged() throws Exception {
log.info("{} path nodeChanged: ",NODE_CACHE);
printNodeData();
}
});
nodeCache.start();
}
public void printNodeData() throws Exception {
byte[] bytes = curatorFramework.getData().forPath(NODE_CACHE);
log.info("data: {}",new String(bytes));
}
}
path cache:
PathChildrenCache 会对子节点进行监听,但是不会对二级子节点进行监听,
public PathChildrenCache(CuratorFramework client,
                         String path,
                         boolean cacheData)
Parameters:
client - the client
path - path to watch
cacheData - if true, node contents are cached in addition to the stat
可以通过注册监听器来实现,对当前节点的子节点数据变化的处理
public void addListener(PathChildrenCacheListener listener)
     Add a change listener
Parameters:
listener - the listener
@Slf4j
public class PathCacheTest extends AbstractCuratorTest{
public static final String PATH="/path-cache";
@Test
public void testPathCache() throws Exception {
createIfNeed(PATH);
PathChildrenCache pathChildrenCache = new PathChildrenCache(curatorFramework, PATH, true);
pathChildrenCache.getListenable().addListener(new PathChildrenCacheListener() {
@Override
public void childEvent(CuratorFramework client, PathChildrenCacheEvent event) throws Exception {
log.info("event: {}",event);
}
});
// 如果设置为true则在首次启动时就会缓存节点内容到Cache中
pathChildrenCache.start(true);
}
}tree cache:
TreeCache 使用一个内部类TreeNode来维护这个一个树结构。并将这个树结构与ZK节点进行了映射。所以TreeCache 可以监听当前节点下所有节点的事件。
public TreeCache(CuratorFramework client,
                         String path,
                         boolean cacheData)
Parameters:
client - the client
path - path to watch
cacheData - if true, node contents are cached in addition to the stat
可以通过注册监听器来实现,对当前节点的子节点,及递归子节点数据变化的处理
public void addListener(TreeCacheListener listener)
     Add a change listener
Parameters:
listener - the listener
@Slf4j
public class TreeCacheTest extends AbstractCuratorTest{
public static final String TREE_CACHE="/tree-path";
@Test
public void testTreeCache() throws Exception {
createIfNeed(TREE_CACHE);
TreeCache treeCache = new TreeCache(curatorFramework, TREE_CACHE);
treeCache.getListenable().addListener(new TreeCacheListener() {
@Override
public void childEvent(CuratorFramework client, TreeCacheEvent event) throws Exception {
log.info(" tree cache: {}",event);
}
});
treeCache.start();
}
}二、分布式命名服务应用
1、分布式api目录
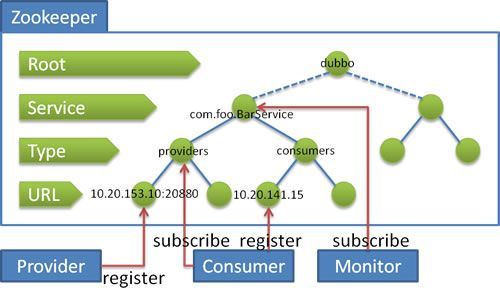
为分布式系统中各种API接口服务的名称、链接地址,提供类似JNDI(Java命名和目录接口)中的文件系统的功能。借助于ZooKeeper的树形分层结构就能提供分布式的API调用功能。
著名的Dubbo分布式框架就是应用了ZooKeeper的分布式的JNDI功能。在Dubbo中,使用ZooKeeper维护的全局服务接口API的地址列表。大致的思路为:
- 服务提供者(Service Provider)在启动的时候,向ZooKeeper上的指定节点/dubbo/${serviceName}/providers写入自己的API地址,这个操作就相当于服务的公开。
- 服务消费者(Consumer)启动的时候,订阅节点/dubbo/{serviceName}/providers下的服务提供者的URL地址,获得所有服务提供者的API。
2、分布式节点的命名
一个分布式系统通常会由很多的节点组成,节点的数量不是固定的,而是不断动态变化的。比如说,当业务不断膨胀和流量洪峰到来时,大量的节点可能会动态加入到集群中。而一旦流量洪峰过去了,就需要下线大量的节点。再比如说,由于机器或者网络的原因,一些节点会主动离开集群。
如何为大量的动态节点命名呢?一种简单的办法是可以通过配置文件,手动为每一个节点命名。但是,如果节点数据量太大,或者说变动频繁,手动命名则是不现实的,这就需要用到分布式节点的命名服务。
可用于生成集群节点的编号的方案:
(1)使用数据库的自增ID特性,用数据表存储机器的MAC地址或者IP来维护。
(2)使用ZooKeeper持久顺序节点的顺序特性来维护节点的NodeId编号。
在第2种方案中,集群节点命名服务的基本流程是:
- 启动节点服务,连接ZooKeeper,检查命名服务根节点是否存在,如果不存在,就创建系统的根节点。
- 在根节点下创建一个临时顺序ZNode节点,取回ZNode的编号把它作为分布式系统中节点的NODEID。
- 如果临时节点太多,可以根据需要删除临时顺序ZNode节点。
3、分布式的id生成器
在分布式系统中,分布式ID生成器的使用场景非常之多:
- 大量的数据记录,需要分布式ID。
- 大量的系统消息,需要分布式ID。
- 大量的请求日志,如restful的操作记录,需要唯一标识,以便进行后续的用户行为分析和调用链路分析。
- 分布式节点的命名服务,往往也需要分布式ID。
- 。。。
传统的数据库自增主键已经不能满足需求。在分布式系统环境中,迫切需要一种全新的唯一ID系统,这种系统需要满足以下需求:
(1)全局唯一:不能出现重复ID。
(2)高可用:ID生成系统是基础系统,被许多关键系统调用,一旦宕机,就会造成严重影响。
有哪些分布式的ID生成器方案呢?大致如下:
- Java的UUID。
- 分布式缓存Redis生成ID:利用Redis的原子操作INCR和INCRBY,生成全局唯一的ID。
- Twitter的SnowFlake算法。
- ZooKeeper生成ID:利用ZooKeeper的顺序节点,生成全局唯一的ID。
- MongoDb的ObjectId:MongoDB是一个分布式的非结构化NoSQL数据库,每插入一条记录会自动生成全局唯一的一个“_id”字段值,它是一个12字节的字符串,可以作为分布式系统中全局唯一的ID。
基于Zookeeper实现分布式ID生成器
在ZooKeeper节点的四种类型中,其中有以下两种类型具备自动编号的能力
- PERSISTENT_SEQUENTIAL持久化顺序节点。
- EPHEMERAL_SEQUENTIAL临时顺序节点。
ZooKeeper的每一个节点都会为它的第一级子节点维护一份顺序编号,会记录每个子节点创建的先后顺序,这个顺序编号是分布式同步的,也是全局唯一的。
可以通过创建ZooKeeper的临时顺序节点的方法,生成全局唯一的ID
@Slf4j
public class IDMaker extends CuratorBaseOperations {

    private String createSeqNode(String pathPefix) throws Exception {
        CuratorFramework curatorFramework = getCuratorFramework();
        //创建一个临时顺序节点
        String destPath = curatorFramework.create()
                .creatingParentsIfNeeded()
                .withMode(CreateMode.EPHEMERAL_SEQUENTIAL)
                .forPath(pathPefix);
        return destPath;
    }

    public String  makeId(String path) throws Exception {
        String str = createSeqNode(path);
        if(null != str){
            //获取末尾的序号
            int index = str.lastIndexOf(path);
            if(index>=0){
                index+=path.length();
                return index<=str.length() ? str.substring(index):"";
            }
        }
        return str;
    }
}
测试
@Test
public void testMarkId() throws Exception {
    IDMaker idMaker = new IDMaker();
    idMaker.init();
    String pathPrefix = "/idmarker/id-";

    for(int i=0;i<5;i++){
        new Thread(()->{
            for (int j=0;j<10;j++){
                String id = null;
                try {
                    id = idMaker.makeId(pathPrefix);
                    log.info("{}线程第{}个创建的id为{}",Thread.currentThread().getName(),
                            j,id);
                } catch (Exception e) {
                    e.printStackTrace();
                }
            }
        },"thread"+i).start();
    }

    Thread.sleep(Integer.MAX_VALUE);

}
基于Zookeeper实现SnowFlakeID算法
Twitter(推特)的SnowFlake算法是一种著名的分布式服务器用户ID生成算法。SnowFlake算法所生成的ID是一个64bit的长整型数字,如图10-2所示。这个64bit被划分成四个部分,其中后面三个部分分别表示时间戳、工作机器ID、序列号。
SnowFlakeID的四个部分,具体介绍如下:
(1)第一位 占用1 bit,其值始终是0,没有实际作用。
(2)时间戳 占用41 bit,精确到毫秒,总共可以容纳约69年的时间。
(3)工作机器id占用10 bit,最多可以容纳1024个节点。
(4)序列号 占用12 bit。这个值在同一毫秒同一节点上从0开始不断累加,最多可以累加到4095。
在工作节点达到1024顶配的场景下,SnowFlake算法在同一毫秒最多可以生成的ID数量为: 1024 * 4096 =4194304,在绝大多数并发场景下都是够用的。
SnowFlake算法的优点:
- 生成ID时不依赖于数据库,完全在内存生成,高性能和高可用性。
- 容量大,每秒可生成几百万个ID。
- ID呈趋势递增,后续插入数据库的索引树时,性能较高。
SnowFlake算法的缺点:
- 依赖于系统时钟的一致性,如果某台机器的系统时钟回拨了,有可能造成ID冲突,或者ID乱序。
- 在启动之前,如果这台机器的系统时间回拨过,那么有可能出现ID重复的危险。
基于zookeeper实现雪花算法:
public class SnowflakeIdGenerator {

    /**
     * 单例
     */
    public static SnowflakeIdGenerator instance =
            new SnowflakeIdGenerator();


    /**
     * 初始化单例
     *
     * @param workerId 节点Id,最大8091
     * @return the 单例
     */
    public synchronized void init(long workerId) {
        if (workerId > MAX_WORKER_ID) {
            // zk分配的workerId过大
            throw new IllegalArgumentException("woker Id wrong: " + workerId);
        }
        instance.workerId = workerId;
    }

    private SnowflakeIdGenerator() {

    }


    /**
     * 开始使用该算法的时间为: 2017-01-01 00:00:00
     */
    private static final long START_TIME = 1483200000000L;

    /**
     * worker id 的bit数,最多支持8192个节点
     */
    private static final int WORKER_ID_BITS = 13;

    /**
     * 序列号,支持单节点最高每毫秒的最大ID数1024
     */
    private final static int SEQUENCE_BITS = 10;

    /**
     * 最大的 worker id ,8091
     * -1 的补码(二进制全1)右移13位, 然后取反
     */
    private final static long MAX_WORKER_ID = ~(-1L << WORKER_ID_BITS);

    /**
     * 最大的序列号,1023
     * -1 的补码(二进制全1)右移10位, 然后取反
     */
    private final static long MAX_SEQUENCE = ~(-1L << SEQUENCE_BITS);

    /**
     * worker 节点编号的移位
     */
    private final static long WORKER_ID_SHIFT = SEQUENCE_BITS;

    /**
     * 时间戳的移位
     */
    private final static long TIMESTAMP_LEFT_SHIFT = WORKER_ID_BITS + SEQUENCE_BITS;

    /**
     * 该项目的worker 节点 id
     */
    private long workerId;

    /**
     * 上次生成ID的时间戳
     */
    private long lastTimestamp = -1L;

    /**
     * 当前毫秒生成的序列
     */
    private long sequence = 0L;

    /**
     * Next id long.
     *
     * @return the nextId
     */
    public Long nextId() {
        return generateId();
    }

    /**
     * 生成唯一id的具体实现
     */
    private synchronized long generateId() {
        long current = System.currentTimeMillis();

        if (current < lastTimestamp) {
            // 如果当前时间小于上一次ID生成的时间戳,说明系统时钟回退过,出现问题返回-1
            return -1;
        }

        if (current == lastTimestamp) {
            // 如果当前生成id的时间还是上次的时间,那么对sequence序列号进行+1
            sequence = (sequence + 1) & MAX_SEQUENCE;

            if (sequence == MAX_SEQUENCE) {
                // 当前毫秒生成的序列数已经大于最大值,那么阻塞到下一个毫秒再获取新的时间戳
                current = this.nextMs(lastTimestamp);
            }
        } else {
            // 当前的时间戳已经是下一个毫秒
            sequence = 0L;
        }

        // 更新上次生成id的时间戳
        lastTimestamp = current;

        // 进行移位操作生成int64的唯一ID

        //时间戳右移动23位
        long time = (current - START_TIME) << TIMESTAMP_LEFT_SHIFT;

        //workerId 右移动10位
        long workerId = this.workerId << WORKER_ID_SHIFT;

        return time | workerId | sequence;
    }

    /**
     * 阻塞到下一个毫秒
     */
    private long nextMs(long timeStamp) {
        long current = System.currentTimeMillis();
        while (current <= timeStamp) {
            current = System.currentTimeMillis();
        }
        return current;
    }
}
三、实现分布式分布式队列
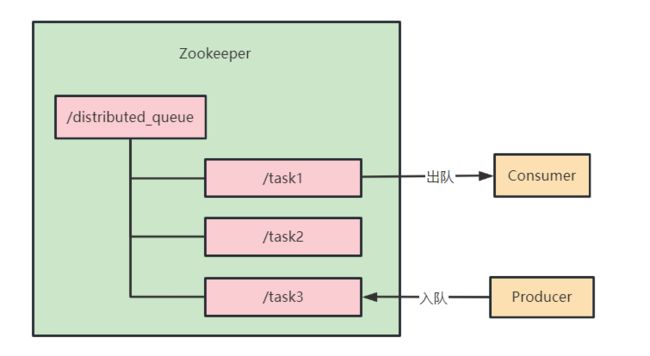
常见的消息队列有:RabbitMQ,RocketMQ,Kafka等。Zookeeper作为一个分布式的小文件管理系统,同样能实现简单的队列功能。Zookeeper不适合大数据量存储,官方并不推荐作为队列使用,但由于实现简单,集群搭建较为便利,因此在一些吞吐量不高的小型系统中还是比较好用的。
1、设计思路
- 创建队列根节点:在Zookeeper中创建一个持久节点,用作队列的根节点。所有队列元素的节点将放在这个根节点下。
- 实现入队操作:当需要将一个元素添加到队列时,可以在队列的根节点下创建一个临时有序节点。节点的数据可以包含队列元素的信息。
- 实现出队操作:当需要从队列中取出一个元素时,可以执行以下操作:
-
- 获取根节点下的所有子节点。
- 找到具有最小序号的子节点。
- 获取该节点的数据。
- 删除该节点。
- 返回节点的数据。
/**
 * 入队
 * @param data
 * @throws Exception
 */
public void enqueue(String data) throws Exception {
    // 创建临时有序子节点
    zk.create(QUEUE_ROOT + "/queue-", data.getBytes(StandardCharsets.UTF_8),
            ZooDefs.Ids.OPEN_ACL_UNSAFE, CreateMode.EPHEMERAL_SEQUENTIAL);
}

/**
 * 出队
 * @return
 * @throws Exception
 */
public String dequeue() throws Exception {
    while (true) {
        List children = zk.getChildren(QUEUE_ROOT, false);
        if (children.isEmpty()) {
            return null;
        }

        Collections.sort(children);

        for (String child : children) {
            String childPath = QUEUE_ROOT + "/" + child;
            try {
                byte[] data = zk.getData(childPath, false, null);
                zk.delete(childPath, -1);
                return new String(data, StandardCharsets.UTF_8);
            } catch (KeeperException.NoNodeException e) {
                // 节点已被其他消费者删除,尝试下一个节点
            }
        }
    }
}
2、使用Apache Curator实现分布式队列
Apache Curator是一个ZooKeeper客户端的封装库,提供了许多高级功能,包括分布式队列。
public class CuratorDistributedQueueDemo {
    private static final String QUEUE_ROOT = "/curator_distributed_queue";

    public static void main(String[] args) throws Exception {
        CuratorFramework client = CuratorFrameworkFactory.newClient("localhost:2181",
                new ExponentialBackoffRetry(1000, 3));
        client.start();

        // 定义队列序列化和反序列化
        QueueSerializer serializer = new QueueSerializer() {
            @Override
            public byte[] serialize(String item) {
                return item.getBytes();
            }

            @Override
            public String deserialize(byte[] bytes) {
                return new String(bytes);
            }
        };

        // 定义队列消费者
        QueueConsumer consumer = new QueueConsumer() {
            @Override
            public void consumeMessage(String message) throws Exception {
                System.out.println("消费消息: " + message);
            }

            @Override
            public void stateChanged(CuratorFramework curatorFramework, ConnectionState connectionState) {

            }
        };

        // 创建分布式队列
        DistributedQueue queue = QueueBuilder.builder(client, consumer, serializer, QUEUE_ROOT)
                .buildQueue();
        queue.start();

        // 生产消息
        for (int i = 0; i < 5; i++) {
            String message = "Task-" + i;
            System.out.println("生产消息: " + message);
            queue.put(message);
            Thread.sleep(1000);
        }

        Thread.sleep(10000);
        queue.close();
        client.close();
    }
}
3、注意事项
使用Curator的DistributedQueue时,默认情况下不使用锁。当调用QueueBuilder的lockPath()方法并指定一个锁节点路径时,才会启用锁。如果不指定锁节点路径,那么队列操作可能会受到并发问题的影响。
在创建分布式队列时,指定一个锁节点路径可以帮助确保队列操作的原子性和顺序性。分布式环境中,多个消费者可能同时尝试消费队列中的消息。如果不使用锁来同步这些操作,可能会导致消息被多次处理或者处理顺序出现混乱。当然,并非所有场景都需要指定锁节点路径。如果您的应用场景允许消息被多次处理,或者处理顺序不是关键问题,那么可以不使用锁。这样可以提高队列操作的性能,因为不再需要等待获取锁。
// 创建分布式队列
QueueBuilder builder = QueueBuilder.builder(client, consumer, serializer, "/order");
//指定了一个锁节点路径/orderlock,用于实现分布式锁,以保证队列操作的原子性和顺序性。
queue = builder.lockPath("/orderlock").buildQueue();
//启动队列,这时队列开始监听ZooKeeper中/order节点下的消息。
queue.start(); 

