SpringBoot核心(依赖管理、自动配置)
前后端分离模式
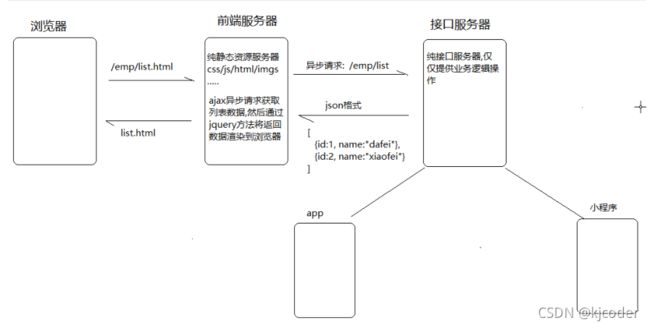
浏览器发送请求到前端服务器,前端服务器会将该请求路径下的静态资源返回给浏览器,返回的同时会发送异步请求给后端服务器,后端服务器将数据查询出来并以json格式将数据返回,前端服务器将返回的数据通过jQuery等方式将数据渲染到页面上进行响应
传统的开发模式:
- 前后端严重耦合,前端需要改bug调试时,需要在当前电脑安装一整套后端的开发工具,启动后端程序
- 还要求后端人员会html,js等前端语言
- 前端页面也会嵌入很多后端的代码
- 一旦后端换了一套语言,前端也需要重新开发
- 沟通成本,调试成本,前后端开发进度相互影响,从而大大降低开发效率
前后端分离:
- 前后端责任清晰,前端只需要进行页面端的展示,后端只需要提供数据即可
- 两者可同时进行开发,提高开发效率
- 可应对复杂多变的前端需求
- 增强代码可维护性
springboot+crud
准备阶段
-
将之前ssm中的domain、mapper、query、service、web包中的所有类迁移到springboot项目中,并导入相关的依赖坐标
-
在配置文件中配置数据库连接四要素,springboot采用的默认连接池是 Hikari,如果要想使用 Druid 作为连接池也是可以的,直接导入Druid的场景启动器即可,就会把Hikari覆盖掉
spring.datasource.driver-class-name=com.mysql.cj.jdbc.Driver spring.datasource.url=jdbc:mysql:///rbac?serverTimezone=GMT%2B8 spring.datasource.username=root spring.datasource.password=admin<dependency> <groupId>com.alibabagroupId> <artifactId>druid-spring-boot-starterartifactId> <version>1.1.21version> dependency>
集成MyBatis
-
Mybatis 集成到 SpringBoot需添加整合依赖
mybatis-spring-boot-starter -
配置 MapperScannerConfigurer 对象,扫描指定的mapper包,在主程序类上添加
@MapperScan@MapperScan("cn.kjcoder.mapper") //如果需要配置domain包中实体类的别名,在主配置文件中配置 mybatis.type-aliases-package=cn.kjcoder.domain //打印 SQL 日志 logging.level.cn.kjcoder.mapper=trace
注:如关联数据库配置文件,数据源,SqlSessionFactory工厂,springboot都已经帮我们配置好了
-
事务管理,只需在业务层实现类上或者其方法上直接贴
@Transactional注解即可 -
配置代理,Spring Boot 默认优先选择 CGLIB 代理,如果需要改为优先使用 JDK 代理,需要做以下配置
spring.aop.proxy-target-class=false
集成web
-
mvc集成到 SpringBoot需添加整合依赖
spring-boot-starter-web -
静态资源处理
 # 告诉 Spring Boot 什么访问的路径是找静态资源
 spring.mvc.static-path-pattern=/static/**
集成 Thymeleaf
- 添加依赖
spring-boot-starter-thymeleaf - 禁用掉缓存
spring.thymeleaf.cache=false
控制器增强器用于5xx错误
自己定义一个控制器增强器,专门用于统一异常处理,该方式一般用于 5xx 类错误
@ControllerAdvice// 控制器增强器
public class ExceptionControllerAdvice {

    @ExceptionHandler(RuntimeException.class) //处理什么类型的异常
    public String handleRuntimeException(Model model,RuntimeException e){
        e.printStackTrace();
        model.addAttribute("errorMsg",e.getMessage());
        return "error";
    }

   @ExceptionHandler(ArithmeticException.class)// 处理什么类型的异常
   public String handleRuntimeException(Model model,ArithmeticException e){
       e.printStackTrace();
       model.addAttribute("errorMsg","除数不能为零");
       return "error";//指定错误页面视图名称
   }
}
<span th:text="${errorMsg}">span>
添加拦截器
-
编写拦截器
@Component public class HelloInterceptor implements HandlerInterceptor { @Override public boolean preHandle(HttpServletRequest request, HttpServletResponse response, Object handler) throws Exception { System.err.println("请求进来了"); return true; } } -
配置自定义拦截器,实现 WebMvcConfigurer 接口,在 addInterceptors 方法注册拦截器
@Configuration
public class WebMvcJavaConfig implements WebMvcConfigurer {
    @Autowired
    private HelloInterceptor helloInterceptor;

    @Override
    public void addInterceptors(InterceptorRegistry registry) {
        registry.addInterceptor(helloInterceptor)
                //对哪些资源起拦截过滤作用
                .addPathPatterns("/**")
                //对哪些资源不起拦截过滤作用
                .excludePathPatterns("/static/**");
    }
}
日志
日志级别由低到高 trace < debug < info < warn < error
- (方式一) 可以在业务层类上添加
@Slf4j,日志信息会在控制台输出 - (方式二) 在类中定义一个静态 Logger 对象,传入当前类的作用是方便输出日志时可以清晰地看到该日志信息是属于哪个类的:
private static final Logger log = LoggerFactory.getLogger(当前类.class),日志信息会在控制台输出
切换运行环境
在实际开发中,一个系统是有多套运行环境的,如开发时有开发的环境,测试时有测试的环境,不同的环境中,系统的参数设置是不同的
# 在 application.properties 中指定需要使用的环境即可
spring.profiles.active=dev
spring整合Thymeleaf
-
添加依赖
<dependency> <groupId>org.thymeleafgroupId> <artifactId>thymeleaf-spring5artifactId> <version>3.0.12.RELEASEversion> dependency> -
配置视图解析器
<bean id="templateResolver" class="org.thymeleaf.spring5.templateresolver.SpringResourceTemplateResolver"> <property name="prefix" value="/WEB-INF/views/" /> <property name="suffix" value=".html" /> <property name="templateMode" value="HTML" /> <property name="cacheable" value="false" /> bean> <bean id="templateEngine" class="org.thymeleaf.spring5.SpringTemplateEngine"> <property name="templateResolver" ref=""/> bean> <bean class="org.thymeleaf.spring5.view.ThymeleafViewResolver"> <property name="templateEngine" ref="templateEngine"/> <property name="characterEncoding" value="UTF-8"/> bean> -
编写控制器,在页面中通过Thymeleaf中的指令对model中进行取值
Thymeleaf 标签
th:text :字符串、数值、布尔等,不希望被 Thymeleaf 解析为变量,而是显示字面量
//针对字面量
<td align="center" th:text="${e.username}">yoonatd>
//针对普通字符串与表达式拼接的情况
<span th:text="|欢迎您:${name}|">span>
js模板:
- 在 script 标签中通过 th:inline=“javascript” 来声明这是要特殊处理的 JS 脚本
<script th:inline="javascript"></script>
- 其次使用如下语法结构进行取值
[[]]
if(document.getElementById("currentPageId").value >= [[${pr.totalPage}]]){
    document.getElementById("currentPageId").value = [[${pr.totalPage}]];
}
th:value:对需要回显的数据进行效验,如果为null,就不显示,否则就显示该值
员工用户名:<input type="text" name="username" th:value="${employee?.username}">
th:checked:符合条件就为选中状态
是否管理员:<input type="checkbox" name="admin" value="1" th:checked="${employee?.admin}">
<option value ="3" th:selected="${pr.pageSize == 3}">3option>
th:if:如果符合条件就进行员工密码输入框的展示
<span th:if="${employee == null}">员工密码:<input type="text" name="password" th:value="${employee?.password}"><br/>
th:each:循环遍历某一个集合
//有索引方式遍历
<tr class="trEles" th:each="e,stat:${pr.data}">
........
tr>
//无索引方式遍历

<option th:each="d:${departments}"
        th:value="${d.id}"
        th:text="${d.name}"
        th:selected="${d.id == employee?.dept?.id}">
option>
th:href:
<a th:href="|javascript:goPage(${pr.totalPage})|">末页a>
基础入门
为什么用SpringBoot
能快速创建出生产级别的Spring应用
可以整合所有系列的Spring组件
减少配置文件的编写
SpringBoot优点
- 创建独立Spring应用
- 内嵌web服务器
- 自动starter依赖,简化构建配置
- 自动配置Spring以及第三方功能
- 提供生产级别的监控、健康检查及外部化配置
- 无代码生成、无需编写XML
是整合Spring技术栈的一站式微服务框架
是简化Spring技术栈的快速开发脚手架 (帮我们搭建好所有的配置,只需专注开发业务功能)
微服务
-
微服务是一种架构风格
-
一个应用拆分为一组小型服务
-
每个服务运行在自己的进程内,也就是可独立部署和升级
-
服务之间使用轻量级HTTP交互
-
服务围绕业务功能拆分
-
可以由全自动部署机制独立部署
-
去中心化,服务自治。服务可以使用不同的语言、不同的存储技术
分布式的解决
- 采用SpringBoot + SpringCloud
(首先由SpringBoot来帮我们构建多个应用,然后由SpringCloud将这些应用连接起来,在通信过程中产生的数据由SpringCloud Data Flow数据流进行数据传输)
入门
- 引入父依赖和需要用到的web场景启动器
<parent>
    <groupId>org.springframework.bootgroupId>
    <artifactId>spring-boot-starter-parentartifactId>
    <version>2.3.4.RELEASEversion>
parent>

<dependencies>
    <dependency>
        <groupId>org.springframework.bootgroupId>
        <artifactId>spring-boot-starter-webartifactId>
    dependency>
dependencies>
- 创建一个主程序
/**
 * @SpringBootApplication:标注这是一个SpringBoot应用
 */
@SpringBootApplication
public class MainApplication {
    public static void main(String[] args) {
        SpringApplication.run(MainApplication.class,args);
    }
}

注:/* 主程序所在包及其下面的所有子包里面的组件都会被默认扫描进来,或者在 SpringBootApplication 注解中添加属性,指定要扫描的包路径:例 @SpringBootApplication(scanBasePackages="cn.kjcoder")*/
- 编写业务
@RestController == (@Controller + @ResponseBody)
public class HelloController {
    @RequestMapping("/hello")
    public String sayHello(){
        return "hello springboot 2.0!";
    }
}
容器功能(底层相关注解)
@Configuration((proxyBeanMethods=true|false):告诉SpringBoot这是一个配置类 == 配置文件,作用于类上
proxyBeanMethods:代理bean的方法,默认为true
-
Full(proxyBeanMethods = true)、【组件依赖,类中组件之间有依赖关系用Full模式,保证每个@Bean方法被调用多少次返回的组件都是单例的】 -
Lite(proxyBeanMethods = false)【类组件之间无依赖关系用Lite模式加快容器启动过程,每个@Bean方法被调用多少次返回的组件都是新创建的,多例的】
给容器中添加组件相关注解:
@Bean、 @Component、@Controller、@Service、@Repository 、@ComponentScan
@Import({xxx.class,xxx.class}):调用指定组件的无参构造器,创建出指定类型的对象放入容器中,默认组件的名字就是全类名
-
配置类里面使用@Bean标注在方法上给容器注册组件,默认是单实例的
-
配置类本身也是组件
@Conditional:条件装配(按照条件装配规则(@Conditional),最终会按需配置):满足Conditional指定的条件,才进行组件的创建,并存入容器中
@ImportResource("classpath:beans.xml"): 当我们在beans配置文件中向容器注入了很多组件,又不想使用@bean注解一个一个迁移到配置类中,该注解就能通过原生配置文件引入的方式将配置文件中的组件自动存入容器中
配置绑定:
@EnableAutoConfiguration:该注解表示开启自动化配置。如果项目中添加了spring-boot-starter-xxx依赖,因此在开启了自动化配置之后会自动进行相关场景的配置。
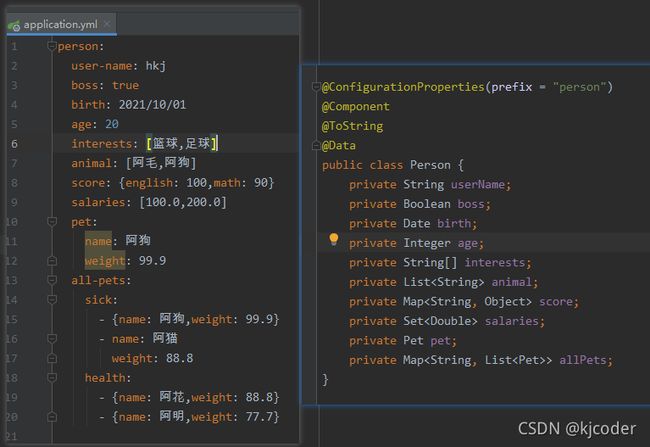
@ConfigurationProperties(prefix = "xxx"):在springboot底层大量使用了这个注解标注在类上,说明这个类中的所有属性是跟springboot核心配置文件中该注解指定的前缀进行绑定的
@Component + @ConfigurationProperties(prefix = "xxxx")
- 用在要给某个类中的属性赋值的类上
public class Car {
    private String brand;
    private Integer price;
    ..........
}
@EnableConfigurationProperties + @ConfigurationProperties(prefix = "xxxx")
- 用法://把当前的Car类中的属性和主配置文件进行绑定//1、开启Car配置绑定功能//2、把这个Car这个组件自动注册到容器中
@EnableConfigurationProperties(Car.class)
public class MyConfig {
}
@ConfigurationProperties(prefix = "mycar")
public class Car {
    private String brand;
    private Integer price;
    ..........
}
@SpringJUnitConfig(配置类.class):测试类和测试方法都不用 public 修饰,指定加载的配置即可
SpringBoot的核心功能
依赖管理:父项目(spring-boot-dependencies)做依赖管理,就是对jar包的管理过程
自动配置:Spring Boot的自动配置是一个运行时(更准确地说,是应用程序启动时)的过程就帮我们把Tomcat等都自动配置好,当我们引入了某场景的启动器,Spring Boot也会将其关联的依赖自动导入到项目中
- 各种配置拥有默认值
- 默认配置最终都是映射到某个类上
- 配置文件的值最终会绑定到每个配置类中的字段上,这个类会在容器中创建对象
- 按需加载所有自动配置项
- 有非常多的场景启动器,引入了哪些场景这个场景的自动配置才会开启
- SpringBoot所有的自动配置功能都在 spring-boot-autoconfigure 包里面,按照条件装配规则(@Conditional),最终会按需配置
自动配置原理
- 虽然springboot中的127个场景的所有自动配置(xxxxAutoConfiguration)启动的时候默认会自动读取jar包中的META-INF路径下的spring.factories文件,但是按照条件装配规则(@Conditional),最终会按需配置
- 每个自动配置类按照条件(条件装配)进行生效,默认都会绑定配置文件指定的值。xxxxProperties里面取。xxxProperties和配置文件进行了绑定
- 生效的配置类就会给容器中装配很多组件
- 只要容器中有这些组件,相当于这些功能就有了
- 定制化配置
- 用户直接自己写@Bean替换底层的组件
- 用户去看这个组件是绑定的配置文件中某个前缀就去springboot主配置文件中进行修改
xxxxxAutoConfiguration —> 组件 —> xxxxProperties里面拿值 —> application.properties
总结
- Spring Boot的自动配置是一个运行时(更准确地说,是在应用程序启动时)的过程就帮我们把Tomcat等东西都自动配置好,然后@EnableAutoConfiguration会扫描spring-boot-autoconfigure下META-INF下的spring.factories 文件中的所有自动配置类
- 虽然springboot中的127个场景的所有自动配置类(xxxxAutoConfiguration)启动的时候默认会自动加载,但是每一个XxxxAutoConfiguration自动配置类都是在某些条件下才会生效的,按照条件装配规则(@Conditional),最终会按需配置
- 每一个XxxxxxAutoConfiguration自动配置类都会通过EnableConfigurationProperties注解开启配置属性,负责将XxxProperties类导入到spring容器中
- 在每一个xxxProperties类中又有一个ConfigurationProperties注解,作用就是将主配置文件中的值绑定到对应的xxxProperties配置类中的字段上,并且各种配置拥有默认值,如果要修改就去主配置文件中根据xxxProperties配置类中指定的前缀进行相应值的修改
核心功能
yml配置文件
web开发
静态资源
访问静态资源springboot默认无前缀(虚拟目录),我们可以在springboot核心配置文件中进行相应值的修改,当我们访问静态资源时就必须加上该前缀
#访问静态资源时指定访问前缀spring: mvc: static-path-pattern: /res/** #改变静态资源的存放路径 resources: static-locations: [classpath:/yoona/]
静态映射/**
原理:请求进来,先去找Controller看能不能处理。不能处理的所有请求又都交给静态资源处理器,静态资源处理器也找不到则响应404页面


