Android组件通信——Intent(二十三)
1. 认识Intent
1.1 知识点
(1)了解Intent的主要作用;
(2)掌握Activity程序对Intent操作的支持;
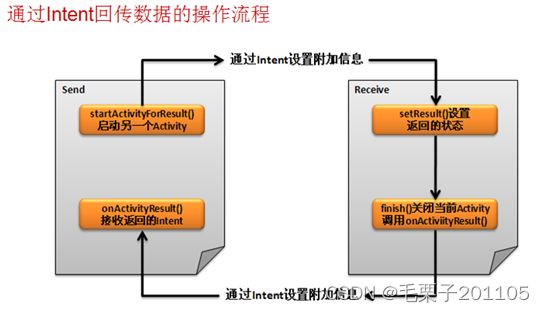
(3)可以使用Intent完成Activity程序间的跳转,也可以通过Intent接收返回数据
1.2 具体内容
以下用一个intent在Activity之间进行跳转的例子说明:
package com.example.intentproject;

import android.app.Activity;
import android.content.Intent;
import android.os.Bundle;
import android.view.View;
import android.view.View.OnClickListener;
import android.widget.Button;

public class IntentActivity extends Activity {
	Button but = null;
	@Override
	protected void onCreate(Bundle savedInstanceState) {
		super.onCreate(savedInstanceState);
		setContentView(R.layout.activity_intent_first);
		but = (Button) super.findViewById(R.id.but_first);
		but.setOnClickListener(new OnClickListener() {

			@Override
			public void onClick(View v) {
				Intent intent = new Intent(IntentActivity.this,SecondActivity.class);//创建Intent对象,并指定跳转的Activity
				intent.putExtra("msg", "你好,我是来自毛栗子的第一个Activity");
				startActivity(intent);
			}
		});
	}

}
package com.example.intentproject;

import android.app.Activity;
import android.content.Intent;
import android.os.Bundle;
import android.widget.TextView;

public class SecondActivity extends Activity {
    TextView tv = null;
	@Override
	protected void onCreate(Bundle savedInstanceState) {
		super.onCreate(savedInstanceState);
		setContentView(R.layout.activity_intent_second);
		Intent intent = getIntent();//接收Intent对象
		String msg = intent.getStringExtra("msg");
		tv = (TextView) super.findViewById(R.id.tv_second);
		tv.setText(msg);//显示信息
	}


}
完成以上程序编写之后,不要忘记去主配文件当中去查看,新建的Activity是否已经注册。
package com.example.intentproject;

import android.app.Activity;
import android.content.Intent;
import android.os.Bundle;
import android.view.View;
import android.view.View.OnClickListener;
import android.widget.Button;
import android.widget.TextView;

public class IntentActivity extends Activity {
	Button but = null;
	@Override
	protected void onCreate(Bundle savedInstanceState) {
		super.onCreate(savedInstanceState);
		setContentView(R.layout.activity_intent_first);
		but = (Button) super.findViewById(R.id.but_first);
		but.setOnClickListener(new OnClickListener() {

			@Override
			public void onClick(View v) {
				Intent intent = new Intent(IntentActivity.this,SecondActivity.class);//创建Intent对象,并指定跳转的Activity
				intent.putExtra("msg", "你好,我是来自毛栗子的第一个Activity");
			    IntentActivity.this.startActivityForResult(intent, 1);//启动intent对象
			}
		});
	}

	@Override
	protected void onActivityResult(int requestCode,int resultCode,Intent data){
		switch(resultCode){
		    case RESULT_OK:
			     TextView tv = (TextView) super.findViewById(R.id.tv_first);
		         tv.setText(data.getStringExtra("returnmsg"));
		         break;
		    case RESULT_CANCELED:
		    	 break;
		    default:
		    	 break;
		}
	}

}
package com.example.intentproject;

import android.app.Activity;
import android.content.Intent;
import android.os.Bundle;
import android.view.View;
import android.view.View.OnClickListener;
import android.widget.Button;
import android.widget.TextView;

public class SecondActivity extends Activity {
    TextView tv = null;
    Button but = null;
    Intent intent = null;
	@Override
	protected void onCreate(Bundle savedInstanceState) {
		super.onCreate(savedInstanceState);
		setContentView(R.layout.activity_intent_second);
		Intent intent = getIntent();//接收Intent对象
		String msg = intent.getStringExtra("msg");
		tv = (TextView) super.findViewById(R.id.tv_second);
		tv.setText(msg);//显示信息
		but = (Button) super.findViewById(R.id.but_second);
		but.setOnClickListener(new OnClickListener() {

			@Override
			public void onClick(View v) {
				Intent intent =  SecondActivity.this.getIntent();
				intent.putExtra("returnmsg", "你好,是卡哇伊吗?");
				setResult(RESULT_OK,intent);
				finish();
			}
		});
	}


}
1.3 课程小结
(1)Intent可以用于多个Activity间的跳转操作;
(2)使用Intent也可以接收Activity回传的数据。
2. Intent深入
2.1 知识点
(1)掌握内置Intent的调用操作。
2.2 具体内容
通过Intent跳转到网页:
package com.example.intentproject;

import android.app.Activity;
import android.content.Intent;
import android.net.Uri;
import android.os.Bundle;
import android.view.View;
import android.view.View.OnClickListener;
import android.widget.Button;
import android.widget.TextView;

public class IntentActivity extends Activity {
	Button but = null;
	@Override
	protected void onCreate(Bundle savedInstanceState) {
		super.onCreate(savedInstanceState);
		setContentView(R.layout.activity_intent_first);
		but = (Button) super.findViewById(R.id.but_first);
		but.setOnClickListener(new OnClickListener() {

			@Override
			public void onClick(View v) {
				Uri uri = Uri.parse("http://www.baidu.com");
				Intent it =new Intent();
				it.setAction(Intent.ACTION_VIEW);//指定action
			    it.setData(uri);//设置数据
			    startActivity(it);
			}
		});
	}


}
以下使用Intent跳转到拨号页面:
package com.example.intentproject;

import android.app.Activity;
import android.content.Intent;
import android.net.Uri;
import android.os.Bundle;
import android.view.View;
import android.view.View.OnClickListener;
import android.widget.Button;
import android.widget.EditText;

public class IntentActivity extends Activity {
	Button but = null;
	EditText edt = null;
	@Override
	protected void onCreate(Bundle savedInstanceState) {
		super.onCreate(savedInstanceState);
		setContentView(R.layout.activity_intent_first);
		but = (Button) super.findViewById(R.id.but_first);
		edt = (EditText) super.findViewById(R.id.edt);
		but.setOnClickListener(new OnClickListener() {

			@Override
			public void onClick(View v) {
				String num = edt.getText().toString().trim();
				Uri uri = Uri.parse("tel:"+num);
				Intent it =new Intent();
				it.setAction(Intent.ACTION_CALL);//指定action
			    it.setData(uri);//设置数据
			    startActivity(it);
			}
		});
	}


}
拨号还需要进行权限的配置:
通过intent发送短信:
package com.example.intentproject;

import android.app.Activity;
import android.content.Intent;
import android.net.Uri;
import android.os.Bundle;
import android.view.View;
import android.view.View.OnClickListener;
import android.widget.Button;
import android.widget.EditText;

public class IntentActivity extends Activity {
	Button but = null;
	EditText edt = null;
	@Override
	protected void onCreate(Bundle savedInstanceState) {
		super.onCreate(savedInstanceState);
		setContentView(R.layout.activity_intent_first);
		but = (Button) super.findViewById(R.id.but_first);
		edt = (EditText) super.findViewById(R.id.edt);
		but.setOnClickListener(new OnClickListener() {

			@Override
			public void onClick(View v) {
				String num = edt.getText().toString().trim();
				String note ="这是短信的内容";
				Uri uri = Uri.parse("smsto:"+num);
				Intent it =new Intent();
				it.setAction(Intent.ACTION_SENDTO);//指定action
				it.putExtra("sms_body", note);//指定附加信息
				it.setType("vndd.android-dir/mms-sms");//设置MIME类型,对方手机将以短信形式打开我们这发生的信息
			    it.setData(uri);//设置数据
			    startActivity(it);
			}
		});
	}


}
2.3 小结
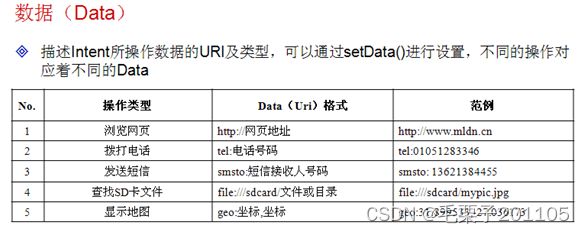
(1)在Android系统之中提供了多种Intent,用户只需要设置好URL以及附加的数据就可以完成这些Intent的操作。


