zabbix监控配置流程
zabbix监控配置流程
文章目录
- zabbix监控配置流程
-
- zabbix监控配置流程详解
-
- 编辑仪表盘
- 1.zabbix监控实例
-
- 1.1配置服务开机自启的service文件
- 1.2在要监控的主机上安装agent
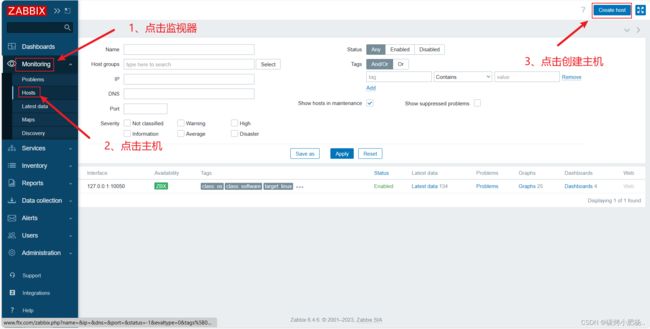
- 1.3添加主机/主机组
- 1.4添加监控项
-
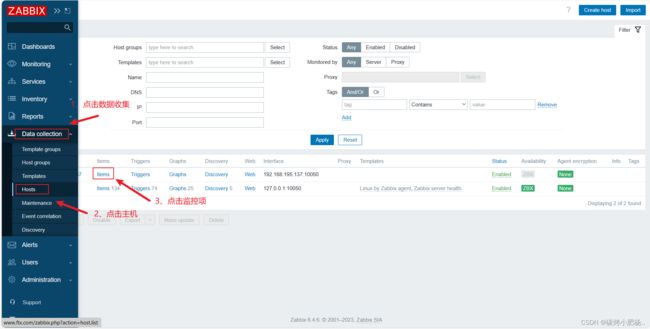
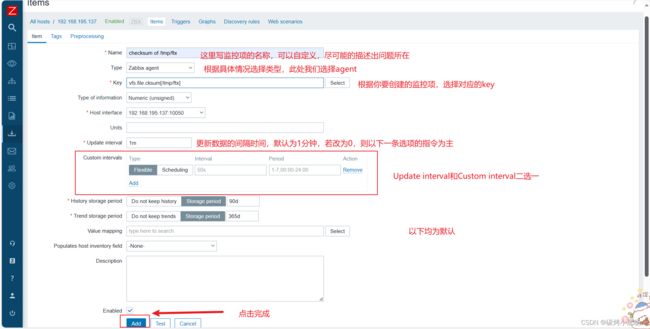
- 1.4.1手动添加监控项
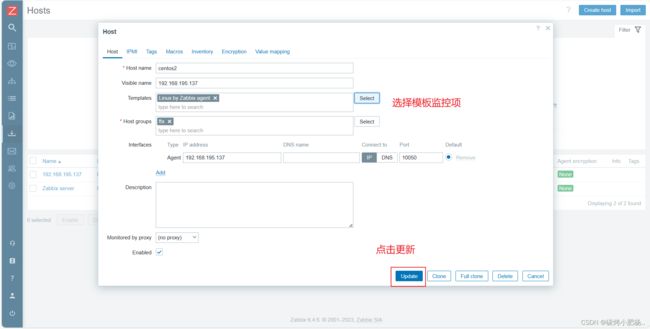
- 1.4.2模板添加监控项
- 1.5添加触发器trigger
- 1.6手动触发并验证
- 错误排查报告
zabbix监控配置流程详解
-
添加主机/主机组
-
添加监控项
——手动添加监控项 ——模板添加监控项 -
添加触发器trigger
-
定义媒介(告警通知的方式)
-
配置动作(告知、处理)
-
手动触发并验证
编辑仪表盘
在上一篇博客中我们已经将zabbix安装成功并成功访问到zabbix页面
在此页面我们将我们所需要的,最主要的通知栏进行调整
1.zabbix监控实例
客户端我们以一台centos主机为实例进行演练
环境说明:
| 环境 | IP | 要安装的应用 |
|---|---|---|
| 服务器 | 172.16.12.128 | lamp架构 zabbix server zabbix agent |
| 客户端 | 172.16.12.129 | zabbix agent |
1.1配置服务开机自启的service文件
为了让zabbix能够开机自启,我们需要配置zabbix_server和zabbix_agentd的service文件,来使用systemctl命令让zabbix服务能够开机自启
[root@client ~]# cp /usr/lib/systemd/system/sshd.service /usr/lib/systemd/system/zabbix_server.service
[root@client ~]# cp /usr/lib/systemd/system/sshd.service /usr/lib/systemd/system/zabbix_agentd.service
[root@client ~]# vim /usr/lib/systemd/system/zabbix_server.service
[root@client ~]# cat /usr/lib/systemd/system/zabbix_server.service
[Unit]
Description=zabbix server daemon
After=network.target sshd-keygen.target

[Service]
Type=forking
ExecStart=/usr/local/sbin/zabbix_server
ExecStop=pkill zabbix_server
ExecReload=/bin/kill -HUP $MAINPID

[Install]
WantedBy=multi-user.target
[root@client ~]# vim /usr/lib/systemd/system/zabbix_agentd.service
[root@client ~]# cat /usr/lib/systemd/system/zabbix_agentd.service
[Unit]
Description=zabbix agentd daemon
After=network.target

[Service]
Type=forking
ExecStart=/usr/local/sbin/zabbix_agentd
ExecStop=pkill zabbix_agentd
ExecReload=/bin/kill -HUP $MAINPID

[Install]
WantedBy=multi-user.target

//重新加载service文件
[root@client ~]# systemctl daemon-reload

//设置zabbix服务开机自启,启动前先使用pkill zabbix_server和pkill zabbix_agentd将zabbix服务都关闭
[root@client ~]# pkill zabbix_server
[root@client ~]# systemctl enable --now  zabbix_server
[root@client ~]# systemctl status zabbix_server
● zabbix_server.service - zabbix server daemon
   Loaded: loaded (/usr/lib/systemd/system/zabbix_server.service; enabled; vendor preset: disabled)
   Active: active (running) since Sat 2023-09-23 15:32:52 CST; 1s ago
  Process: 4561 ExecStart=/usr/local/sbin/zabbix_server (code=exited, status=0/SUCCESS)
 Main PID: 4563 (zabbix_server)
    Tasks: 48 (limit: 49595)
   Memory: 47.3M

[root@client ~]# pkill zabbix_agentd
[root@client ~]# systemctl enable --now  zabbix_agentd
Created symlink /etc/systemd/system/multi-user.target.wants/zabbix_agentd.service → /usr/lib/systemd/system/zabbix_agentd.service.
[root@client ~]# systemctl status zabbix_agentd
● zabbix_agentd.service - zabbix agentd daemon
   Loaded: loaded (/usr/lib/systemd/system/zabbix_agentd.service; enabled; vendor preset: disabled)
   Active: active (running) since Sat 2023-09-23 15:35:27 CST; 12s ago
  Process: 4649 ExecStart=/usr/local/sbin/zabbix_agentd (code=exited, status=0/SUCCESS)
 Main PID: 4651 (zabbix_agentd)
    Tasks: 6 (limit: 49595)
   Memory: 4.2M

//成功设置开机自启
1.2在要监控的主机上安装agent
centos主机
//关闭防火墙和selinux
[root@centos2 ~]# systemctl disable --now  firewalld.service
Removed /etc/systemd/system/multi-user.target.wants/firewalld.service.
Removed /etc/systemd/system/dbus-org.fedoraproject.FirewallD1.service.
[root@centos2 ~]# setenforce 0

//将服务端的zabbix包传到客户端
[root@client src]# scp zabbix-6.4.6.tar.gz [email protected]:/usr/src/
The authenticity of host '192.168.195.137 (192.168.195.137)' can't be established.
ECDSA key fingerprint is SHA256:uf52vmE+zUzs62mzyqzaaUZ+GqucI6wgFjMAhzKUi04.
Are you sure you want to continue connecting (yes/no/[fingerprint])? yes
Warning: Permanently added '192.168.195.137' (ECDSA) to the list of known hosts.
[email protected]'s password:
zabbix-6.4.6.tar.gz

//在客户端安装代理,创建zabbix用户用来运行zabbix
[root@centos2 ~]# useradd -r -M -s /sbin/nologin zabbix
[root@centos2 ~]# cd /usr/src
[root@centos2 src]# ls
debug  kernels  mariadb-10.5.22-rhel-8-x86_64-rpms  mariadb-10.5.22-rhel-8-x86_64-rpms.tar  zabbix-6.4.6.tar.gz
[root@centos2 src]# tar xf zabbix-6.4.6.tar.gz
[root@centos2 src]# ls
debug  kernels  mariadb-10.5.22-rhel-8-x86_64-rpms  mariadb-10.5.22-rhel-8-x86_64-rpms.tar  zabbix-6.4.6  zabbix-6.4.6.tar.gz

//安装编译安装所需要的软件包
[root@centos2 src]# yum -y install gcc gcc-c++ make

//进入zabbix-6.4.6的目录进行编译
[root@centos2 zabbix-6.4.6]# ./configure --help | grep agent
  --enable-agent          Turn on build of Zabbix agent and client utilities
  --enable-agent2         Turn on build of Zabbix agent 2
[root@centos2 zabbix-6.4.6]# ./configure --enable-agent
省略. . .
***********************************************************
*            Now run 'make install'                       *
*                                                         *
*            Thank you for using Zabbix!                  *
*              //www.zabbix.com>                    *
***********************************************************
最后报这个则表示编译成功,可直接使用make install安装

[root@centos2 zabbix-6.4.6]# make install

//修改zabbix客户端的配置文件
[root@centos2 yum.repos.d]# cd /usr/local/etc
[root@centos2 etc]# ls
zabbix_agentd.conf  zabbix_agentd.conf.d
[root@centos2 etc]# vim zabbix_agentd.conf
[root@centos2 etc]# grep -A2 '# ServerActive=' zabbix_agentd.conf
# ServerActive=

ServerActive=192.138.195.130    //改为server端的ip
[root@centos2 etc]# grep -A2 '# Server=' zabbix_agentd.conf
# Server=

Server=192.168.195.130          //改为server端的ip
[root@centos2 etc]# grep -A2 '# Hostname=' zabbix_agentd.conf
# Hostname=

Hostname=centos2                //修改主机名,必须全局唯一

//设置zabbix_agentd开机自启
[root@client src]# scp /usr/lib/systemd/system/zabbix_agentd.service [email protected]:/usr/lib/systemd/system/    //将服务端设置好了的zabbix_agentd的service文件传到客户端
root@192.168.195.137's password:
zabbix_agentd.service                                                                      100%  227   187.1KB/s   00:00

[root@centos2 zabbix-6.4.6]# systemctl daemon-reload
[root@centos2 zabbix-6.4.6]# systemctl enable --now zabbix_agentd
Created symlink /etc/systemd/system/multi-user.target.wants/zabbix_agentd.service → /usr/lib/systemd/system/zabbix_agentd.service.
[root@centos2 zabbix-6.4.6]# systemctl status zabbix_agentd
● zabbix_agentd.service - zabbix agentd daemon
   Loaded: loaded (/usr/lib/systemd/system/zabbix_agentd.service; enabled; vendor preset: disabled)
   Active: active (running) since Sat 2023-09-23 16:36:52 CST; 57s ago
  Process: 14957 ExecStart=/usr/local/sbin/zabbix_agentd (code=exited, status=0/SUCCESS)
 Main PID: 14959 (zabbix_agentd)
    Tasks: 6 (limit: 4880)
   Memory: 2.6M
[root@centos2 zabbix-6.4.6]# ss -antl
State           Recv-Q            Send-Q                        Local Address:Port                        Peer Address:Port
LISTEN          0                 128                                 0.0.0.0:22                               0.0.0.0:*
LISTEN          0                 128                                 0.0.0.0:10050                            0.0.0.0:*
LISTEN          0                 128                                    [::]:22                                  [::]:*
1.3添加主机/主机组
直接添加主机
添加主机组
1.4添加监控项
1.4.1手动添加监控项
在被监控主机上创建一个测试文件,监控这个文件
[root@centos2 ~]# echo "hello world" > /tmp/ftx
[root@centos2 ~]# cat /tmp/ftx
hello world
1.4.2模板添加监控项
1.5添加触发器trigger
1.6手动触发并验证
在被监控主机上修改/tmp/ftx文件
[root@centos2 ~]# echo "21006139" >> /tmp/ftx
[root@centos2 ~]# cat /tmp/ftx
hello world
21006139
手动触发后的仪表盘信息
错误排查报告
//出现此行错误
configure: error: cannot find pkg-config package for libpcre

//解决方法:
yum -y install pcre-devel
mp/ftx
hello world
21006139
**手动触发后的仪表盘信息**

出现告警信息

[外链图片转存中...(img-dXxGHlL6-1695623977349)]


同时,我们可以查看最新500条数据

[外链图片转存中...(img-d3wqTdhx-1695623977350)]


### 错误排查报告

~~~powershell
//出现此行错误
configure: error: cannot find pkg-config package for libpcre

//解决方法:
yum -y install pcre-devel


