VGG卷积神经网络实现Cifar10图片分类-Pytorch实战
前言
当涉足深度学习,选择合适的框架是至关重要的一步。PyTorch作为三大主流框架之一,以其简单易用的特点,成为初学者们的首选。相比其他框架,PyTorch更像是一门易学的编程语言,让我们专注于实现项目的功能,而无需深陷于底层原理的细节。
就像我们使用汽车时,更重要的是了解如何驾驭,而不是花费过多时间研究轮子是如何制造的。我将以一系列专门针对深度学习框架的文章,逐步深入理论知识和实践操作。但这需要在对深度学习有一定了解后才能进行,现阶段我们的重点是学会如何灵活使用PyTorch工具。深度学习涉及大量数学理论和计算原理,对于初学者来说可能会有些繁琐。然而,只有通过实际操作,我们才能真正理解所写代码在神经网络中的作用。我将努力将知识简化,转化为我们熟悉的内容,让大家能够理解和熟练使用神经网络框架。
如果你发现深度学习看似难以掌握,我将尽力简化知识,将其转化为我们更容易理解的内容。我会确保你能够理解知识并顺利运用到实践中。在后期,我将发布一系列专门解析深度学习框架的文章,但在开始学习之前,我们需要对深度学习的理论知识和实践操作有一定的熟悉度。
作为一个从事数据建模五年的专业人士,我参与了许多数学建模项目,了解各种模型的原理、建模流程和题目分析方法。我希望通过这个专栏让你能够快速掌握各类数学模型、机器学习和深度学习知识,并掌握相应的代码实现。每篇文章都包含实际项目和可运行的代码。我会紧跟各类数模比赛,将最新的思路和代码分享给你,保证你能够高效地学习这些知识。
博主非常期待与你一同探索这个精心打造的专栏,里面充满了丰富的实战项目和可运行的代码,希望你不要错过:专栏链接
一、VGGNet概述
VGGNet(Visual Geometry Group Network)是由牛津大学视觉几何组(Visual Geometry Group)提出的深度卷积神经网络架构,它在2014年的ImageNet图像分类挑战中取得了优异的成绩。VGGNet之所以著名,一方面是因为其简洁而高效的网络结构,另一方面是因为它通过深度堆叠的方式展示了深度卷积神经网络的强大能力。
VGGNet探索了卷积神经网络的深度与其性能之间的关系,成功地构筑了16~19层深的卷积神经网络,证明了增加网络的深度能够在一定程度上影响网络最终的性能,使错误率大幅下降,同时拓展性又很强,迁移到其它图片数据上的泛化性也非常好。到目前为止,VGG仍然被用来提取图像特征。
VGGNet包含两种结构,分别为16层和19层。VGGNet结构中,所有卷积层的kernel都只有3*3。VGGNet中连续使用3组3*3kernel的原因是它与使用1个7*7kernel产生的效果相同,然而更深的网络结构还会学习到更复杂的非线性关系,从而使得模型的效果更好。该操作带来的另一个好处是参数数量的减少,因为对于一个包含了C个kernel的卷积层来说,原来的参数个数为7*7*C,而新的参数个数为3*(3*3*C)。
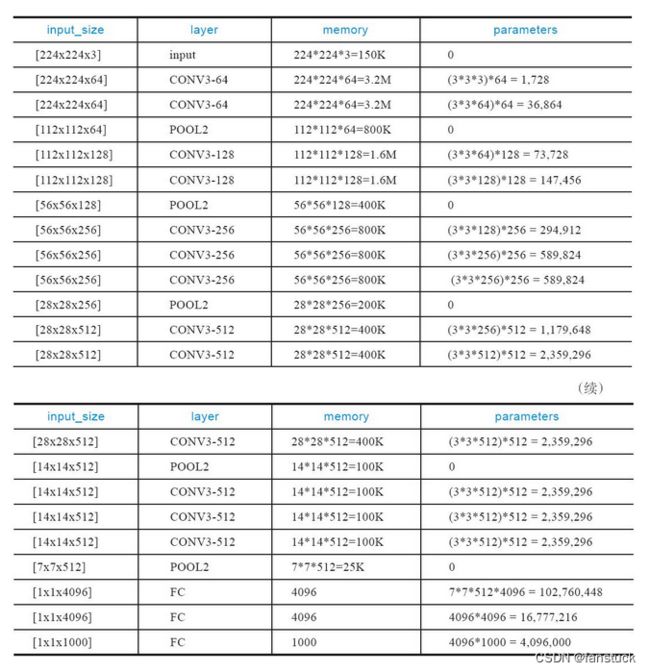
下图给出了VGG16的具体结构示意图:
根据VGG16进行具体分析,包含:
- 13个卷积层(Convolutional Layer)
- 3个全连接层(Fully connected Layer)
- 5个池化层(Pool layer)
其中,卷积层和全连接层具有权重系数,因此也被称为权重层,总数目为13+3=16,这即是VGG16中16的来源。
内存消耗主要来自早期的卷积,而参数量的激增则发生在后期的全连接层。由于采用了大量的卷积层,导致VGGNet的参数数量较大,训练和推理过程需要更多的计算资源。而且参数量较大,需要更多的数据来避免过拟合问题。
二、PyTorch网络搭建
我们参考上述网络结构,利用pytorch进行网络搭建,首先我们可以先搭建输出层,根据我上述提供的每一层具体的parameters搭建即可:
def __init__(self, num_classes=1000):
        super(VGG,self).__init()__
        self.features = self._make_layers()
        self.classifier = nn.Sequential(
            nn.Linear(512*7*7,4096),
            nn.ReLU(True),
            nn.Dropout(),
            nn,Linear(4096,4096),
            nn.ReLU(True),
            nn.Dropout(),
            nn.Linear(4096,num_classes)
        )
接下来我们来搭建卷积和全连接层,可以利用循环帮助我们省去每个步骤繁琐的写层:
def _make_layers(self):
    layers = []
    in_clannels = 3
    cfg =[64,64,'M',128,128,'M',256,256,256,'M',512,512,512,'M']
    for v in cfg:
        if v =='M':
            layers +=[nn.MaxPool2d(kernel_size=2,stride=2)]
        else:
            conv2d = nn.Conv2d(in_channels,v,kernel_size)
            layers +=[conv2d,nn.ReLU(inplace=True)]
            in_channels = v
    return nn.Sequential(*layers)
然后写入每个神经网络必备的传播:
def forward(self, x):
    x = self.features(x)
    x = x.view(x.size(0), -1)
    x = self.classifier(x)
    return x
总体网络结构为:
VGGNet(
  (features): Sequential(
    (0): Conv2d(3, 64, kernel_size=(3, 3), stride=(1, 1), padding=(1, 1))
    (1): ReLU(inplace=True)
    (2): Conv2d(64, 64, kernel_size=(3, 3), stride=(1, 1), padding=(1, 1))
    (3): ReLU(inplace=True)
    (4): MaxPool2d(kernel_size=2, stride=2, padding=0, dilation=1, ceil_mode=False)
    (5): Conv2d(64, 128, kernel_size=(3, 3), stride=(1, 1), padding=(1, 1))
    (6): ReLU(inplace=True)
    (7): Conv2d(128, 128, kernel_size=(3, 3), stride=(1, 1), padding=(1, 1))
    (8): ReLU(inplace=True)
    (9): MaxPool2d(kernel_size=2, stride=2, padding=0, dilation=1, ceil_mode=False)
    (10): Conv2d(128, 256, kernel_size=(3, 3), stride=(1, 1), padding=(1, 1))
    (11): ReLU(inplace=True)
    (12): Conv2d(256, 256, kernel_size=(3, 3), stride=(1, 1), padding=(1, 1))
    (13): ReLU(inplace=True)
    (14): Conv2d(256, 256, kernel_size=(3, 3), stride=(1, 1), padding=(1, 1))
    (15): ReLU(inplace=True)
    (16): MaxPool2d(kernel_size=2, stride=2, padding=0, dilation=1, ceil_mode=False)
    (17): Conv2d(256, 512, kernel_size=(3, 3), stride=(1, 1), padding=(1, 1))
    (18): ReLU(inplace=True)
    (19): Conv2d(512, 512, kernel_size=(3, 3), stride=(1, 1), padding=(1, 1))
    (20): ReLU(inplace=True)
    (21): Conv2d(512, 512, kernel_size=(3, 3), stride=(1, 1), padding=(1, 1))
    (22): ReLU(inplace=True)
    (23): MaxPool2d(kernel_size=2, stride=2, padding=0, dilation=1, ceil_mode=False)
  )
  (classifier): Sequential(
    (0): Linear(in_features=25088, out_features=4096, bias=True)
    (1): ReLU(inplace=True)
    (2): Dropout(p=0.5, inplace=False)
    (3): Linear(in_features=4096, out_features=4096, bias=True)
    (4): ReLU(inplace=True)
    (5): Dropout(p=0.5, inplace=False)
    (6): Linear(in_features=4096, out_features=1000, bias=True)
  )
)
定义损失函数和优化方法:
#定义损失函数和优化方式
criterion = nn.CrossEntropyLoss() #定义损失函数:交叉熵
optimizer = torch.optim.SGD(net.parameters(),lr=0.001,momentum=0.9)#定义优化方法,随机梯度下降
进行卷积网络训练,这里需要微调一下原来vgg的模型,Cifar10的数据集有10个类别而且图片转换的矩阵需要加入自适应池化层,要一些改进:
import torch.nn as nn

# 设置随机种子以保证实验的可复现性
torch.manual_seed(0)
torch.backends.cudnn.deterministic = True
torch.backends.cudnn.benchmark = False

class VGGNet(nn.Module):
    def __init__(self, num_classes=10):
        super(VGGNet, self).__init__()
        self.features = self._make_layers()
        self.avgpool = nn.AdaptiveAvgPool2d((7, 7))
        self.classifier = nn.Sequential(
            nn.Linear(512*7*7,4096),
            nn.ReLU(True),
            nn.Dropout(),
            nn.Linear(4096,4096),
            nn.ReLU(True),
            nn.Dropout(),
            nn.Linear(4096,num_classes)
        )

    def _make_layers(self):
        layers = []
        in_channels = 3
        cfg =[64,64,'M',128,128,'M',256,256,256,'M',512,512,512,'M',512, 512, 512, 'M']
        for v in cfg:
            if v =='M':
                layers +=[nn.MaxPool2d(kernel_size=2,stride=2)]
            else:
                conv2d = nn.Conv2d(in_channels,v,kernel_size=3, padding=1)
                layers +=[conv2d,nn.ReLU(inplace=True)]
                in_channels = v
        return nn.Sequential(*layers)

    def forward(self, x):
        x = self.features(x)
        x = self.avgpool(x)
        x = torch.flatten(x, 1)
        x = self.classifier(x)
        return x
需要注意到是我们需要初始化网络的权重,不更新权重的话10000张图片和实际不借助算法猜测图片的概率是一致的,我们先不初始化网络的权重进行训练:
for epoch in range(1):
    train_loss=0.0
    for batch_idx,data in enumerate(train_loader,0):

        #初始化
        inputs,labels = data #获取数据
        inputs = inputs.to(device)
        labels = labels.to(device)

        optimizer.zero_grad() #梯度置0
        #优化过程
        outputs = net(inputs) #将数据输入到网络,得到第一轮网络前向传播的预测结果outputs
        loss = criterion(outputs,labels) #预测结果outputs和labels通过之前定义的交叉熵计算损失
        loss.backward() #误差反向传播
        optimizer.step() #随机梯度下降优化权重
        #查看网络训练状态
        train_loss += loss.item()
        if batch_idx % 2000 == 1 :
            print(batch_idx)
            print('[%d,%5d] loss: %.3f' % (epoch + 1,batch_idx + 1,train_loss / 2000))
            train_loss = 0.0

    print('Saving epoch %d model ...'%(epoch + 1))
    state = {
        'net':net.state_dict(),
        'epoch':epoch+1,
    }
    if not os.path.isdir('checkpoint'):
        os.mkdir('checkpoint')
    #torch.save(state,'./checkpoint/cifar10_epoch_%d.ckpt'%(epoch+1))

print('Finished Training')
然后我们去计算整个测试集的预测效果:
#批量计算整个测试集的预测效果
correct= 0
total = 0
with torch.no_grad():
    for data in test_loader:
        images,labels = data
        images = images.to(device)
        labels = labels.to(device)
        outputs = net(images)
        _,predicted = torch.max(outputs.data,1)
        total += labels.size(0)
        correct += (predicted == labels ).sum().item() #当标记的label种类和预测的种类一致时认为正确,并计数

print('Accurary of the network on the 10000 test images : %d %%'%(100*correct/total))
很明显和实际猜测的概率是一模一样的,总共十个类别1/10很正常:
Accurary of the network on the 10000 test images : 10 %
我们需要先进行初始化网络权重在训练:
def initialize_weights(module):
    if isinstance(module, nn.Conv2d):
        nn.init.kaiming_normal_(module.weight, mode='fan_out', nonlinearity='relu')
        if module.bias is not None:
            nn.init.constant_(module.bias, 0)
    elif isinstance(module, nn.Linear):
        nn.init.normal_(module.weight, 0, 0.01)
        nn.init.constant_(module.bias, 0)
之后在训练预测一版:
Accurary of the network on the 10000 test images : 47 %
效果就十分明显了。
点关注,防走丢,如有纰漏之处,请留言指教,非常感谢
以上就是本期全部内容。我是fanstuck ,有问题大家随时留言讨论 ,我们下期见。


