Data Binding机制可以说是WPF实现MVVM的关键,与之配套的Dependency Property和DataTemplate共同完成了数据到UI的通路,让逻辑层与UI分离。
本文主要基于个人的理解,针对Data Binding简要概括其主要用法、特性及注意事项等。
--------------------------------------------------------------------------------------------------------------------------------------------------------------------------------------------------------------------
举个最简单的Data Binding的栗子:
(UI代码片段)
<StackPanel>
    <TextBox x:Name="textBox1" Margin="3" BorderBrush="Black"/>
StackPanel>
(定义用户类)
public class Student
{
    public int Id { get; set; }
    public string Name { get; set; }
    public int Age { get; set; }
}
(后台代码片段)
textBox1.SetBinding(TextBox.TextProperty,
    new Binding("Name")
    {
        Source = new Student { Name = "Jack" }
    }
);
运行程序,TextBox中显示了Jack字符串。
这样就实现了一个Student的对象和一个TextBox的binding,更加准确的说法是Student对象的Name属性和TextBox的Text属性进行了Binding。
观察SetBinding方法的两个参数:第一个参数是一个依赖属性,第二个参数是一个Binding类型的对象,它指定了数据源和需要进行关联的属性。
但是所谓绑定,应该对更改也有响应才对。那么下面对代码稍加更改加以验证:
(UI代码片段)
<StackPanel>
    <TextBox x:Name="textBox1" Margin="5" BorderBrush="Black"/>
    <Button Content="Show" Margin="5" Click="Button_Click"/>
    <Button Content="Change" Margin="5" Click="Button_Click_1"/>
StackPanel>
(后台代码)
private Student stu;

public MainWindow()
{
  InitializeComponent();
  textBox1.SetBinding(TextBox.TextProperty,
    new Binding("Name")
    {
      Source = stu = new Student { Name = "Jack" }
    }
  );
}

private void Button_Click(object sender, RoutedEventArgs e)
{
  MessageBox.Show(stu.Name);
}

private void Button_Click_1(object sender, RoutedEventArgs e)
{
  stu.Name += " Changed!";
}
运行代码:
(textBox1中显示stu的Name属性值)
(在修改文本框中的值时,对象中的属性也随之更改)
(但在对象属性更改时,textBox1中的文本并没有变化)
如果希望属性变化时UI元素也能响应,那就需要在属性的set索引器中激发一个PropertyChanged事件,它被定义在INotifyPropertyChanged接口中。
修改Student类:
public class Student : INotifyPropertyChanged
{
    public int Id { get; set; }

    private string name;

    public event PropertyChangedEventHandler PropertyChanged;

    public string Name
    {
        get { return name; }
        set
        {
            name = value;
            PropertyChanged?.Invoke(this, new PropertyChangedEventArgs("Name"));
        }
    }
    public int Age { get; set; }
}
测试:
(在stu.Name发生改变后,UI也响应了这一变化)
至此,基本实现了最简单的数据与UI绑定。
-------------------------------------------------------------------------------------------------------------------------------------------------------------------------------------------------------------------------
从上面的栗子,基本可以构建出从数据源到Binding对象到UI元素的Binding模型。
说得更具体些,是实现了INotifyPropertyChanged的普通对象,通过Binding对象,到依赖属性的关联。
其中普通对象是Binding的"source",依赖对象的依赖属性是"target"。这样的关联逻辑比较符合我们正常的程序设计的思维,但也并不绝对。
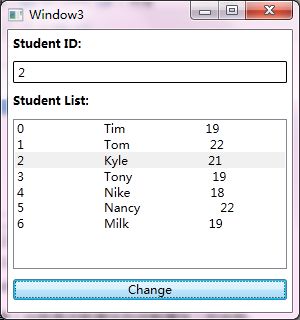
还是用栗子说明:
(UI代码片段)
<StackPanel>
    <TextBlock FontWeight="Bold" Margin="5">Student ID:TextBlock>
    <TextBox x:Name="txtStudentID" Margin="5" BorderBrush="Black" Text="{Binding SelectedItem.Id, ElementName=lbxStudentList}"/>
    <TextBlock Text="Student List:" FontWeight="SemiBold" Margin="5"/>
    <ListBox x:Name="lbxStudentList" Margin="5" Height="150">
        <ListBox.ItemTemplate>
            <DataTemplate>
                <StackPanel Orientation="Horizontal">
                    <TextBlock Text="{Binding Id}"/>
                    <TextBlock Text="{Binding Name}"/>
                    <TextBlock Text="{Binding Age}"/>
                StackPanel>
            DataTemplate>
        ListBox.ItemTemplate>
    ListBox>
    <Button Content="Change" Margin="5" Click="Button_Click"/>
StackPanel>
(后台代码片段)
(为ListBox设置Binding源)
stus = new ObservableCollection{ new Student { Id = 0, Name = "Tim", Age = 19 }, new Student { Id = 1, Name = "Tom", Age = 22 }, new Student { Id = 2, Name = "Kyle", Age = 21 }, new Student { Id = 3, Name = "Tony", Age = 19 }, new Student { Id = 4, Name = "Nike", Age = 18 }, new Student { Id = 5, Name = "Nancy", Age = 22 } }; this.lbxStudentList.ItemsSource = stus;
(添加按钮事件,改变stus集合)
private void Button_Click(object sender, RoutedEventArgs e)
{
    stus.Add(new Student { Id = 6, Name = "Milk", Age = 19 });
}
测试:
(txtStudentID中实时显示lbxStudentList中选中项的Id值)
(单击Change按钮,lbxStudentList实时反映数据的变化)
这里就涉及到了UI元素到UI元素(也就是依赖属性到依赖属性)的关联。
注意到:当依赖属性作为Binding的source时并不需要实现INotifyPorpertyChanged接口就可以让Binding对象监测到其发生变化。
初次之外,还注意到:
1、为ItemsControl设置数据源时,只要给ItemSource属性赋值就好;
2、当使用集合类作为数据源时,一般会使用ObservableCollection
3、Student类型中的Id字段是int类型,但TextProperty是string类型,这实际上经过了一个类型转换。
-------------------------------------------------------------------------------------------------------------------------------------------------------------------------------------------------------------------------
在实际开发中,数据通常以集合为主,所以ItemsControl经常被使用,这里要单独说一下。
上一个栗子中我们直接给ItemSource属性赋值,这好像不太符合之前所述的Binding规则,好像这样写才对:
this.lbxStudentList.SetBinding(ListBox.ItemsSourceProperty, new Binding() { Source = stus });
实际上,这样也是可以的。
这里顺带提一下,上述的Binding是没有Path的,因为source本身就是数据。
甚至还可以把source也省略。做法就是把source直接丢给目标属性的对象的DataContext属性:
this.lbxStudentList.DataContext = stus;
this.lbxStudentList.SetBinding(ListBox.ItemsSourceProperty, new Binding());
有的时候,我们会把DataTable直接作为ItemsControl的数据源。直接把DataTable的DefaultView属性赋给ItemsSource即可。
而且不需要实现INotifyCollectionChanged和INotifyPropertyChanged接口就可以让关联目标直接反映数据变化。
this.lbxStudentList.ItemsSource = (new DataTable()).DefaultView;
或:
this.lbxStudentList.DataContext = new DataTable();
this.lbxStudentList.SetBinding(ListBox.ItemsSourceProperty, new Binding());
# 以上整理了一些Binding的常规用法,后续可能会补上Binding的一些其他不太常用的功能,以及转换器和校验器的用法。
(完)


