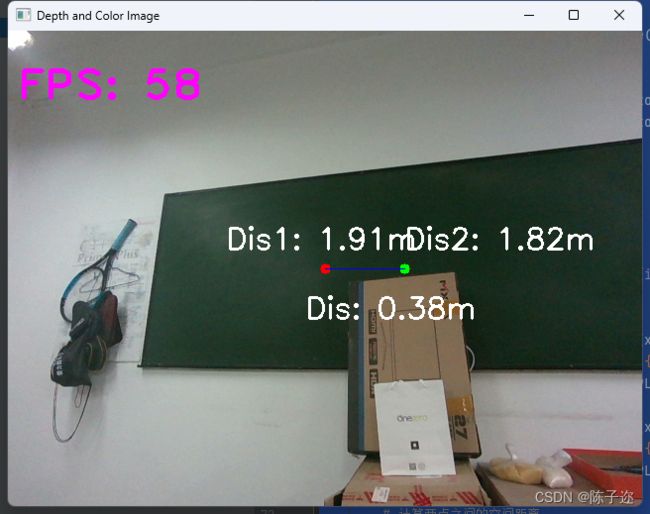
基于intel D4系列深度相机 (D455)的单点测距和两点距离测量(代码讲解超详细)
目录
1.简介
1.1 intel D4系列深度相机 (D455)
1.2结构光(Structured-light)
2.基于深度相机的单点测距和两点距离测量
2.1函数详解
2.2 全部代码
1.简介
1.1 intel D4系列深度相机 (D455)
Intel RealSense D435、D455等D4系列:
Intel D4系列深度相机是由英特尔(Intel)公司推出的一款深度感知摄像头,专为实现计算机视觉和深度学习应用而设计。这款相机使用了英特尔的深度感知技术,结合了摄像头和红外(IR)传感器,可以提供高质量的深度图像和 RGB 彩色图像,为开发者提供了丰富的数据源,用于各种应用,包括虚拟现实(VR)、增强现实(AR)、手势识别、人脸识别、姿势识别、3D 扫描等。
以下是Intel D4系列深度相机的一些主要特点和优势:
1. 深度感知技术:
D4系列相机具备高质量的深度感知功能,能够获取场景中各个物体的精确距离信息,而不仅仅是RGB图像。
2. 多模式操作:
相机支持多种操作模式,包括手势识别、人脸识别、物体追踪等。这使得它非常适合于需要人机交互的应用领域。
3. 低光环境适应:
D4系列深度相机在低光环境下也能够提供准确的深度信息,这使得它在各种不同的环境中都能够稳定工作。
4. 易于集成:
相机提供了丰富的软件开发工具,开发者可以方便地将其集成到自己的应用中,快速开发深度感知应用。
5. 多平台支持:
D4系列深度相机支持多种操作系统,包括Windows、Linux等,也提供了各种开发语言的API,方便开发者在不同平台上使用。
6. 精准度和稳定性:
相机具有高精度和稳定性,能够在不同距离范围内提供准确的深度信息,这对于需要精确度的应用非常重要。
1.2结构光(Structured-light)
基本原理是,通过近红外激光器,将具有一定结构特征的光线投射到被拍摄物体上,再由专门的红外摄像头进行采集。这种具备一定结构的光线,会因被摄物体的不同深度区域,而采集不同的图像相位信息,然后通过运算单元将这种结构的变化换算成深度信息,以此来获得三维结构。通常采用特定波长的不可见的红外激光作为光源,它发射出来的光经过一定的编码投影在物体上,通过一定算法来计算返回的编码图案的畸变来得到物体的位置和深度信息。
结构光的优点主要有:
1)方案成熟,相机基线可以做的比较小,方便小型化。
2)资源消耗较低,单帧 IR 图就可计算出深度图,功耗低。
3)主动光源,夜晚也可使用。
4)在一定范围内精度高,分辨率高,分辨率可达 1280x1024,帧率可达 60FPS。
结构光的缺点:
1)容易受环境光干扰,室外体验差。
2)随检测距离增加,精度会变差。
2.基于深度相机的单点测距和两点距离测量
2.1函数详解
-
rs.pipeline():创建一个相机管道对象。- 用法:
pipeline = rs.pipeline() - 功能:创建一个相机管道对象,用于管理和控制相机的数据流。
- 用法:
-
rs.config():创建一个相机配置对象。- 用法:
config = rs.config() - 功能:创建一个相机配置对象,用于设置相机的参数。
- 用法:
-
config.enable_stream(stream_type, width, height, format, fps):启用相机流。- 用法:
config.enable_stream(rs.stream.depth, 640, 480, rs.format.z16, 30) - 功能:启用指定类型的相机流,设置流的分辨率、格式和帧率。
- 用法:
-
pipeline.start(config):开始相机流。- 用法:
pipeline.start(config) - 功能:根据指定的配置对象开始相机数据流。
- 用法:
-
pipeline.wait_for_frames():等待一对连贯的深度和彩色帧。- 用法:
frames = pipeline.wait_for_frames() - 功能:阻塞程序,等待并获取一对连贯的深度帧和彩色帧。
- 用法:
-
frames.get_depth_frame():获取深度帧。- 用法:
depth_frame = frames.get_depth_frame() - 功能:从帧集中获取深度帧。
- 用法:
-
frames.get_color_frame():获取彩色帧。- 用法:
color_frame = frames.get_color_frame() - 功能:从帧集中获取彩色帧。
- 用法:
-
depth_frame.get_data():获取深度图像数据。- 用法:
depth_image = np.asanyarray(depth_frame.get_data()) - 功能:将深度帧的数据转换为numpy数组。
- 用法:
-
color_frame.get_data():获取彩色图像数据。- 用法:
color_image = np.asanyarray(color_frame.get_data()) - 功能:将彩色帧的数据转换为numpy数组。
- 用法:
-
depth_frame.profile.as_video_stream_profile().intrinsics:获取深度图的内参。- 用法:
intrinsics = depth_frame.profile.as_video_stream_profile().intrinsics - 功能:获取深度图像的内参,包括相机的焦距、原点和畸变参数等。
- 用法:
-
depth_frame.get_distance(x, y):获取指定像素位置的深度值。- 用法:
depth_value = depth_frame.get_distance(x, y) - 功能:获取指定像素位置的深度值,单位为米。
- 用法:
-
rs.rs2_deproject_pixel_to_point(intrinsics, [x, y], depth):将像素坐标转换为相机坐标系下的坐标。- 用法:
point = rs.rs2_deproject_pixel_to_point(intrinsics, [x, y], depth) - 功能:根据内参和指定的像素坐标及深度值,将其转换为相机坐标系下的坐标。
- 用法:
-
time.time():返回当前时间的时间戳。- 用法:
current_time = time.time() - 功能:获取当前时间的时间戳,用于计算帧率。
- 用法:
-
cv2.putText(image, text, org, fontFace, fontScale, color, thickness):在图像上绘制文本。- 用法:
cv2.putText(color_image, f"FPS: {int(fps)}", (10, 70), cv2.FONT_HERSHEY_PLAIN, 3, (255, 0, 255), 3) - 功能:在图像上绘制指定文本,并设置字体、大小、颜色和粗细等属性。
- 用法:
-
cv2.circle(image, center, radius, color, thickness):在图像上绘制圆形。- 用法:
cv2.circle(color_image, (x1, y1), 5, (0, 0, 255), -1) - 功能:在图像上绘制指定位置和大小的圆形,并设置颜色和粗细等属性。
- 用法:
-
cv2.line(image, pt1, pt2, color, thickness):在图像上绘制直线。- 用法:
cv2.line(color_image, (x1, y1), (x2, y2), (255, 0, 0), 1) - 功能:在图像上绘制指定起点和终点的直线,并设置颜色和粗细等属性。
- 用法:
-
cv2.imshow(window_name, image):显示图像窗口。- 用法:
cv2.imshow('Depth and Color Image', color_image) - 功能:创建一个指定名称的图像窗口,并显示图像。
- 用法:
-
cv2.waitKey(delay):等待键盘输入。- 用法:
key = cv2.waitKey(1) - 功能:等待指定毫秒数的键盘输入,并返回按下的键值。
- 用法:
-
cv2.destroyAllWindows():关闭所有图像窗口。- 用法:
cv2.destroyAllWindows() - 功能:关闭所有打开的图像窗口。
- 用法:
2.2 全部代码
import pyrealsense2 as rs
import numpy as np
import cv2
import time

# 初始化相机
pipeline = rs.pipeline()
config = rs.config()
config.enable_stream(rs.stream.depth, 640, 480, rs.format.z16, 30)  # 设置深度图像流参数
config.enable_stream(rs.stream.color, 640, 480, rs.format.bgr8, 60)  # 设置彩色图像流参数
profile = pipeline.start(config)

pTime = 0

# 等待深度传感器稳定
for i in range(20):
    pipeline.wait_for_frames()

try:
    while True:
        # 等待一对连贯的帧:深度和彩色
        frames = pipeline.wait_for_frames()
        depth_frame = frames.get_depth_frame()  # 获取深度帧
        color_frame = frames.get_color_frame()  # 获取彩色帧

        if not depth_frame or not color_frame:
            continue

        # 将图像转换为numpy数组
        depth_image = np.asanyarray(depth_frame.get_data())
        color_image = np.asanyarray(color_frame.get_data())

        # 获取深度图的内参
        intrinsics = depth_frame.profile.as_video_stream_profile().intrinsics

        # 第一个点的像素坐标
        x1, y1 = 320, 240
        # 第二个点的像素坐标
        x2, y2 = 400, 240

        # 在彩色图上绘制第一个点
        cv2.circle(color_image, (x1, y1), 5, (0, 0, 255), -1)  # 红色圆点
        # 在彩色图上绘制第二个点
        cv2.circle(color_image, (x2, y2), 5, (0, 255, 0), -1)  # 绿色圆点

        # 获取第一个点的深度值
        depth1 = depth_frame.get_distance(x1, y1)
        print(depth1)
        # 获取第二个点的深度值
        depth2 = depth_frame.get_distance(x2, y2)

        # 将像素坐标转换为相机坐标系下的坐标
        point1 = rs.rs2_deproject_pixel_to_point(intrinsics, [x1, y1], depth1)
        point2 = rs.rs2_deproject_pixel_to_point(intrinsics, [x2, y2], depth2)

        cTime = time.time()
        fps = 1 / (cTime - pTime)
        pTime = cTime

        # 在彩色图上显示帧率
        cv2.putText(color_image, f"FPS: {int(fps)}", (10, 70), cv2.FONT_HERSHEY_PLAIN, 3, (255, 0, 255), 3)

        # 计算单点的距离
        dist1 = depth_image[int(y1), int(x1)] / 1000  # 将深度值从mm转换为m
        cv2.putText(color_image, f"Dis1: {dist1:.2f}m", (int(x1 - 100), int(y1 - 20)),
                    cv2.FONT_HERSHEY_SIMPLEX, 1, (255, 255, 255), 2)

        dist2 = depth_image[int(y2), int(x2)] / 1000  # 将深度值从mm转换为m
        cv2.putText(color_image, f"Dis2: {dist2:.2f}m", (int(x2), int(y2 - 20)),
                    cv2.FONT_HERSHEY_SIMPLEX, 1, (255, 255, 255), 2)

        # 计算两点之间的空间距离
        distance = np.linalg.norm(np.array(point2) - np.array(point1))
        cv2.line(color_image, (x1, y1), (x2, y2), (255, 0, 0), 1)
        cv2.putText(color_image, f"Dis: {distance:.2f}m", (int(x2 - 100), int(y2 + 50)),
                    cv2.FONT_HERSHEY_SIMPLEX, 1, (255, 255, 255), 2)

        # 显示彩色图像
        cv2.imshow('Depth and Color Image', color_image)

        key = cv2.waitKey(1)
        # 按下q键或Esc键,关闭图像窗口
        if key & 0xFF == ord('q') or key == 27:
            cv2.destroyAllWindows()
            break

finally:
    # 停止相机流
    pipeline.stop()
