使用github actions CICD到aws的ecs服务
使用github actions CICD to aws ecs服务
本文记录从头搭建一个简单web后端环境配置gihub actions到最终运行至aws ecs集群。
参考文档:
- github actions官方文档
- aws ecs搭建官方文档
- aws task definition参数官方文档
Step 1 本地项目配置
-
根据github官方文档中提供的demo示例添加workflow文件,因为github actions会自动扫描
./github/workflows/目录下的workflow文件,所以命名随意,我这里命名未CICD.yml。以下是CICD.yml内容。
文件中的on:触发操作需要按照自己项目需求修改,文件中的env配置信息需要按照自己项目需求修改
# This workflow uses actions that are not certified by GitHub.
# They are provided by a third-party and are governed by
# separate terms of service, privacy policy, and support
# documentation.

# GitHub recommends pinning actions to a commit SHA.
# To get a newer version, you will need to update the SHA.
# You can also reference a tag or branch, but the action may change without warning.

name: Deploy to Amazon ECS

on:
  push:
    branches:
      - yourBranch                     # push to yourBranch will toggle this workflow

env:
  AWS_REGION: yourAwsRegion                 # set this to your preferred AWS region, e.g. us-west-1
  ECR_REPOSITORY: yourEcrRepository           # set this to your Amazon ECR repository name
  ECS_SERVICE: yourEcsService                 # set this to your Amazon ECS service name
  ECS_CLUSTER: yourEcsCluster                 # set this to your Amazon ECS cluster name
  ECS_TASK_DEFINITION: yourTaskDefinitionFileName # set this to the path to your Amazon ECS task definition
  # file, e.g. task-definition.json
  CONTAINER_NAME: yourContainerName
  # set this to the name of the container in the
  # containerDefinitions section of your task definition

jobs:
  deploy:
    name: Deploy
    runs-on: ubuntu-latest
    environment: production

    steps:
      - name: Checkout
        uses: actions/checkout@v3

      - name: Configure AWS credentials
        uses: aws-actions/configure-aws-credentials@0e613a0980cbf65ed5b322eb7a1e075d28913a83
        with:
          aws-access-key-id: ${{ secrets.AWS_ACCESS_KEY_ID }}
          aws-secret-access-key: ${{ secrets.AWS_SECRET_ACCESS_KEY }}
          aws-region: ${{ env.AWS_REGION }}

      - name: Login to Amazon ECR
        id: login-ecr
        uses: aws-actions/amazon-ecr-login@62f4f872db3836360b72999f4b87f1ff13310f3a

      - name: Build, tag, and push image to Amazon ECR
        id: build-image
        env:
          ECR_REGISTRY: ${{ steps.login-ecr.outputs.registry }}
          IMAGE_TAG: ${{ github.sha }}
        run: |
          # Build a docker container and
          # push it to ECR so that it can
          # be deployed to ECS.
          docker build -t $ECR_REGISTRY/$ECR_REPOSITORY:$IMAGE_TAG .
          docker push $ECR_REGISTRY/$ECR_REPOSITORY:$IMAGE_TAG
          echo "image=$ECR_REGISTRY/$ECR_REPOSITORY:$IMAGE_TAG" >> $GITHUB_OUTPUT

      - name: Fill in the new image ID in the Amazon ECS task definition
        id: task-def
        uses: aws-actions/amazon-ecs-render-task-definition@c804dfbdd57f713b6c079302a4c01db7017a36fc
        with:
          task-definition: ${{ env.ECS_TASK_DEFINITION }}
          container-name: ${{ env.CONTAINER_NAME }}
          image: ${{ steps.build-image.outputs.image }}

      - name: Deploy Amazon ECS task definition
        uses: aws-actions/amazon-ecs-deploy-task-definition@df9643053eda01f169e64a0e60233aacca83799a
        with:
          task-definition: ${{ steps.task-def.outputs.task-definition }}
          service: ${{ env.ECS_SERVICE }}
          cluster: ${{ env.ECS_CLUSTER }}
          wait-for-service-stability: true
- 根据aws官方文档添加task-definition.json文档。文档内容如下:
需要修改
- family -> aws ecs服务中配置的task definitions名
- taskRoleArn -> aws iam服务中配置的role名
- executionRoleArn -> aws iam服务中配置的role名
- containerDefinitions:image -> ecr服务中配置的镜像全路径:版本号(latest使用最后一个镜像,因为每次CD过程都会推送新的镜像,所以这里用latest)
- cpu, memory, containerDefinitions:cpu, containerDefinitions:memory -> 根据实际情况设置,设置值参考官方文档
- containerDefinitions:portMappings:containerPort, containerDefinitions:portMappings:hostPort -> 容器端口映射
- containerDefinitions:logConfiguration:options:awslogs-group -> cloudWatch配置的日志group名
- containerDefinitions:logConfiguration:options:awslogs-region -> 地区
{
  "family": "{yourTaskDefinitionsName}",
  "taskRoleArn": "arn:aws:iam::{yourUserId}:role/{yourRoleName}",
  "executionRoleArn": "arn:aws:iam::{yourUserId}:role/{yourRoleName}",
  "networkMode": "awsvpc",
  "containerDefinitions": [
    {
      "name": "{containerName}",
      "image": "{yourUserId}.dkr.ecr.{yourAwsRegion}.amazonaws.com/{yourEcrName}:latest",
      "cpu": 512,
      "memory": 1024,
      "portMappings": [
        {
          "containerPort": 8080,
          "hostPort": 8080,
          "protocol": "tcp"
        }
      ],
      "essential": true,
      "entryPoint": [],
      "command": [],
      "environment": [],
      "privileged": false,
      "dnsServers": [],
      "dnsSearchDomains": [],
      "extraHosts": [],
      "dockerSecurityOptions": [],
      "dockerLabels": {},
      "ulimits": [],
      "logConfiguration": {
        "logDriver": "awslogs",
        "options": {
          "awslogs-group": "/ecs/{yourCloudWatchGroupName}",
          "awslogs-region": "{yourAwsRegion}",
          "awslogs-stream-prefix": "ecs"
        },
        "secretOptions": []
      }
    }
  ],
  "placementConstraints": [
  ],
  "compatibilities": [
    "FARGATE",
    "EC2"
  ],
  "requiresCompatibilities": [
    "FARGATE"
  ],
  "cpu": "512",
  "memory": "1024",
  "tags": [
  ]
}
- 添加Dockerfile文档
文档中openjdk版本根据项目版本自行修改,JAR_FILE根据项目jar名称自行修改
FROM maven:3-openjdk-8 as build

WORKDIR /build

COPY pom.xml .

RUN mvn dependency:go-offline

COPY src ./src

RUN mvn package -Dmaven.test.skip=true

ARG JAR_FILE=demo-0.0.1-SNAPSHOT.jar

WORKDIR /app

RUN cp /build/target/${JAR_FILE} /app/app.jar

ENTRYPOINT java -jar /app/app.jar
Step 2 aws配置
aws需要配置iam权限和搭建ecs环境
- iam权限配置
当前用户需要配置以下最小权限集
aws默认权限集
- AmazonEC2ContainerRegistryFullAccess
- AmazonEC2ContainerRegistryReadOnly
- AmazonEC2ContainerServiceforEC2Role
- AmazonSESFullAccess
需要自定义权限
policies名称随意,也可以组合成一个,这里是调试阶段一个个补充的,所以是分成多份,可以自行整合成一个policty
- {
“Version”: “2012-10-17”,
“Statement”: [
{
“Effect”: “Allow”,
“Action”: “ecs:DescribeServices”,
“Resource”: “*”
}
]
} - {
“Version”: “2012-10-17”,
“Statement”: [
{
“Effect”: “Allow”,
“Action”: [
“ecs:RegisterTaskDefinition”
],
“Resource”: [
“*”
]
}
]
} - {
“Version”: “2012-10-17”,
“Statement”: [
{
“Effect”: “Allow”,
“Action”: [
“ecs:CreateCluster”,
“ecs:DeregisterContainerInstance”,
“ecs:DiscoverPollEndpoint”,
“ecs:Poll”,
“ecs:RegisterContainerInstance”,
“ecs:StartTelemetrySession”,
“ecs:Submit*”,
“logs:CreateLogStream”,
“logs:PutLogEvents”,
“logs:DescribeLogStreams”
],
“Resource”: “*”
}
]
} - {
“Version”: “2012-10-17”,
“Statement”: [
{
“Effect”: “Allow”,
“Action”: “ecs:UpdateService”,
“Resource”: “*”
}
]
} - {
“Version”: “2012-10-17”,
“Statement”: [
{
“Effect”: “Allow”,
“Action”: “iam:PassRole”,
“Resource”: “*”
}
]
}
创建新的role,Step 1中yourRoleName为此处配置roleName
下面为role配置,直接照搬即可
trust relationships
- {
“Version”: “2012-10-17”,
“Statement”: [
{
“Effect”: “Allow”,
“Principal”: {
“Service”: [
“ecs-tasks.amazonaws.com”,
“lambda.amazonaws.com”
]
},
“Action”: “sts:AssumeRole”
}
]
}
permissions
- {
“Version”: “2012-10-17”,
“Statement”: [
{
“Effect”: “Allow”,
“Action”: [
“ecs:CreateCluster”,
“ecs:DeregisterContainerInstance”,
“ecs:DiscoverPollEndpoint”,
“ecs:Poll”,
“ecs:RegisterContainerInstance”,
“ecs:StartTelemetrySession”,
“ecs:Submit*”,
“logs:CreateLogStream”,
“logs:PutLogEvents”,
“logs:DescribeLogStreams”
],
“Resource”: “*”
}
]
} - {
“Version”: “2012-10-17”,
“Statement”: [
{
“Effect”: “Allow”,
“Action”: [
“ecr:GetAuthorizationToken”,
“ecr:BatchCheckLayerAvailability”,
“ecr:GetDownloadUrlForLayer”,
“ecr:GetRepositoryPolicy”,
“ecr:DescribeRepositories”,
“ecr:ListImages”,
“ecr:DescribeImages”,
“ecr:BatchGetImage”
],
“Resource”: “*”
}
]
}
- 参考aws ecs官方文档构建ecr,ecs,task definition。
Step 3 配置github actions secrets
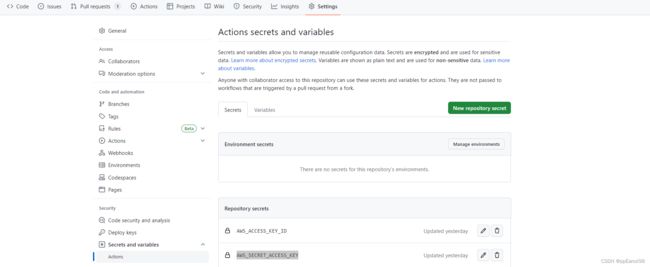
进入github,新建一个仓库,将本地代码上传至仓库,进入github仓库管理页配置环境变量。
操作步骤如下:
- github进入仓库setting页。
- 左边栏选择Secrets and variables/actions。
- 点击New repository secret按钮添加环境变量(AWS_ACCESS_KEY_ID, AWS_SECRET_ACCESS_KEY),变量名可自定义,只需要保持和项目中CICD.yml里面参数名一致即可。
AWS_SECRET_ACCESS_KEY_ID是刚才配置的aws用户权限的那个用户ACCESS_KEY_ID
AWS_SECRET_ACCESS_KEY是刚才配置的aws用户权限的哪个用户ACCESS_KEY
如截图所示:

Step 4 上传代码测试CD流程即可
本地项目push到github仓库指定分支(CICD.yml中配置的触发CD workflow的分支),即可触发action。
全部成功,使用curl测试心跳接口成功


