Spring是怎么解决Bean之间的循环依赖?
前言
在面试的时候这两年有一个非常高频的关于spring的问题,那就是spring是如何解决循环依赖的。这个问听着就是轻描淡写的一句话,其实考察的内容还是非常多的,主要还是考察的应聘者有没有研究过spring的源码。但是说实话,spring的源码其实非常复杂的,研究起来并不是个简单的事情,所以我们此篇文章只是为了解释清楚Spring是如何解决循环依赖的这个问题。
什么样的依赖算是循环依赖?
用过Spring框架的人都对依赖注入这个词不陌生,一个Java类A中存在一个属性是类B的一个对象,那么我们就说类A的对象依赖类B,而在Spring中是依靠的IOC来实现的对象注入,也就是说创建对象的过程是IOC容器来实现的,并不需要自己在使用的时候通过new关键字来创建对象。
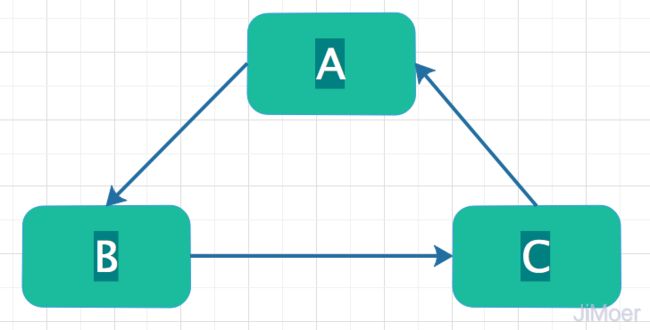
那么当类A中依赖类B的对象,而类B中又依赖类C的对象,最后类C中又依赖类A的对象的时候,这种情况最终的依赖关系会形成一个环,这就是循环依赖。

循环依赖的类型
根据注入的时机可以分为两种:
- 构造器循环依赖
依赖的对象是通过构造方法传入的,在实例化bean的时候发生。 - 赋值属性循环依赖
依赖的对象是通过setter方法传入的,对象已经实例化,在属性赋值和依赖注入的时候发生。
构造器循环依赖,本质上是无解的,实例化A的时候调用A的构造器,发现依赖了B,又去实例化B,然后调用B的构造器,发现又依赖的C,然后调用C的构造器去实例化,结果发起C的构造器里依赖了A,这就是个死循环无解。所以Spring也是不支持构造器循环依赖的,当发现存在构造器循环依赖时,会直接抛出BeanCurrentlyInCreationException异常。
赋值属性循环依赖,Spring只支持bean在单例模式下的循环依赖,其他模式下的循环依赖Spring也是会抛出BeanCurrentlyInCreationException异常的。Spring通过对还在创建过程中的单例bean,进行缓存并提前暴露该单例,使得其他实例可以提前引用到该单例bean。
Spring为什么只支持单例模式下的bean的赋值情况下的循环依赖
在prototype的模式下的bean,使用了一个ThreadLocal变量prototypesCurrentlyInCreation来记录当前线程正在创建中的bean,这个变量在AbtractBeanFactory类里。在创建前用beanName记录bean,在创建完成后删除bean。在prototypesCurrentlyInCreation里采用了一个Set对象来存储正在创建中的bean。我们都知道Set是不允许存在重复对象的,这样就能保证同一个bean在一个线程中只能有一个正在创建。
下面是prototypesCurrentlyInCreation变量在删除bean时的操作,在AbtractBeanFactory的beforePrototypeCreation操作里。
protected void afterPrototypeCreation(String beanName) {
      Object curVal = this.prototypesCurrentlyInCreation.get();
      if (curVal instanceof String) {
          this.prototypesCurrentlyInCreation.remove();
      }
      else if (curVal instanceof Set) {
          Set<String> beanNameSet = (Set<String>) curVal;
          beanNameSet.remove(beanName);
          if (beanNameSet.isEmpty()) {
              this.prototypesCurrentlyInCreation.remove();
          }
      }
  }
从上面的代码中看出,当变量为一个的时候采用了一个String对象来存储,节省了一些内存空间。
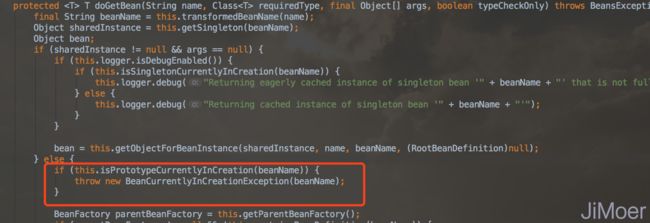
在AbstractBeanFactory类的doGetBean方法里先判断是否为单例对象,不是单例对象,则直接判断当前线程是否已经存在了正在创建的bean。存在的话直接抛出异常。

这个isPrototypeCurrentlyInCreation()方法的实现代码如下:
protected boolean isPrototypeCurrentlyInCreation(String beanName) {
        Object curVal = this.prototypesCurrentlyInCreation.get();
        return curVal != null && (curVal.equals(beanName) || curVal instanceof Set && ((Set)curVal).contains(beanName));
    }
因为有了这个机制,spring在原型模式下是解决不了bean的循环依赖的,当发现有循环依赖的时候会直接抛出BeanCurrentlyInCreationException异常的。
那么为什么spring在单例模式下的构造赋值也不支持循环依赖呢?
其实原理和原型模式下的情况类似,在单例模式下,bean也会用一个Set集合来保存正在创建中的bean,在创建前保存,创建完成后删除。
这个对象在DefaultSingletonBeanRegistry类下变量名为:singletonsCurrentlyInCreation
public class DefaultSingletonBeanRegistry extends SimpleAliasRegistry implements SingletonBeanRegistry {
	 private final Set<String> singletonsCurrentlyInCreation = Collections.newSetFromMap(new ConcurrentHashMap(16));
}
判定代码在DefaultSingletonBeanRegistry类的beforeSingletonCreation方法下。
protected void beforeSingletonCreation(String beanName) {
    if (!this.inCreationCheckExclusions.contains(beanName) && !this.singletonsCurrentlyInCreation.add(beanName)) {
        throw new BeanCurrentlyInCreationException(beanName);
    }
}
在上面这个方法中,判定singletonsCurrentlyInCreation是否能成功的保存一个单例bean。如果不能成功保存,那么就会直接抛出BeanCurrentlyInCreationException异常。
单例模式下的Setter赋值循环依赖
终于到了我们的重点,Spring是如何解决单例模式下的Setter赋值的循环依赖了。
其实主要的就是靠提前暴露创建中的单例实例。
那么具体是一个怎样的过程呢?
例如:上面那个图的例子,A依赖B,B依赖C,C又依赖B。
过程如下:
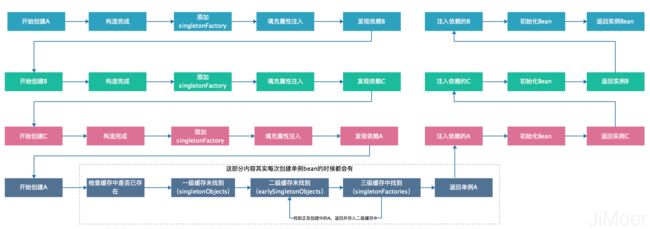
创建A,调用构造方法,完成构造,进行属性赋值注入,发现依赖B,去实例化B。创建B,调用构造方法,完成构造,进行属性赋值注入,发现依赖C,去实例化C。- 创建C,调用构造方法,完成构造,进行属性赋值注入,发现依赖A。
这个时候就是解决循环依赖的关键了,因为A已经通过构造方法已经构造完成了,也就是说已经将Bean的在堆中分配好了内存,这样即使A再填充属性值也不会更改内存地址了,所以此时可以提前拿出来A的引用,来完成C的实例化。
这样上面创建C过程就会变成了: 创建C,调用构造方法,完成构造,进行属性赋值注入,发现依赖A,A已经构造完成,直接引用,完成C的实例化。C完成实例化后,注入B,B也完成了实例化,然后B注入A,A也完成了实例化。
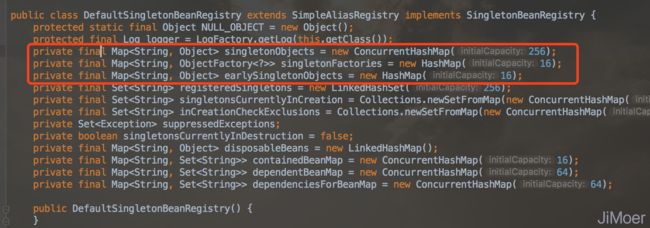
为了能获取到创建中单例bean,spring提供了三级缓存来将正在创建中的bean提前暴露。
在类DefaultSingletonBeanRegistry下,即下图红框中的三个Map对象。

这三个缓存Map的作用如下:- 一级缓存,
singletonObjects单例缓存,存储已经实例化的单例bean。 - 二级缓存,
earlySingletonObjects提前暴露的单例缓存,这里存储的bean是刚刚构造完成,但还会通过属性注入bean。 - 三级缓存,
singletonFactories生产单例的工厂缓存,存储工厂。
首先在创建bean的时候会先创建一个和bean同名的单例工厂,并将bean先放入到单例工厂中。代码在AbstractAutowireCapableBeanFactory类的doCreateBean方法中。
protected Object doCreateBean(final String beanName, final RootBeanDefinition mbd, Object[] args) throws BeanCreationException {
	......
	this.addSingletonFactory(beanName, new ObjectFactory<Object>() {
        public Object getObject() throws BeansException {
            return AbstractAutowireCapableBeanFactory.this.getEarlyBeanReference(beanName, mbd, bean);
        }
    });
	.....
}
而上面的代码中的addSingletonFactory方法的代码如下:
protected void addSingletonFactory(String beanName, ObjectFactory<?> singletonFactory) {
    Assert.notNull(singletonFactory, "Singleton factory must not be null");
    Map var3 = this.singletonObjects;
    synchronized(this.singletonObjects) {
        if (!this.singletonObjects.containsKey(beanName)) {
            this.singletonFactories.put(beanName, singletonFactory);
            this.earlySingletonObjects.remove(beanName);
            this.registeredSingletons.add(beanName);
        }

    }
}
addSingletonFactory方法的作用通过代码就可以看到是将存在了正在创建中的bean的单例工厂,放在三级缓存里,这样保证了在循环依赖查找的时候是可以找到bean的引用的。
具体读取缓存获取bean的过程在类DefaultSingletonBeanRegistry的getSingleton方法里。
如下源码:
protected Object getSingleton(String beanName, boolean allowEarlyReference) {
     Object singletonObject = this.singletonObjects.get(beanName);
     if (singletonObject == null && this.isSingletonCurrentlyInCreation(beanName)) {
         Map var4 = this.singletonObjects;
         synchronized(this.singletonObjects) {
             singletonObject = this.earlySingletonObjects.get(beanName);
             if (singletonObject == null && allowEarlyReference) {
                 ObjectFactory<?> singletonFactory = (ObjectFactory)this.singletonFactories.get(beanName);
                 if (singletonFactory != null) {
                     singletonObject = singletonFactory.getObject();
                     this.earlySingletonObjects.put(beanName, singletonObject);
                     this.singletonFactories.remove(beanName);
                 }
             }
         }
     }

     return singletonObject != NULL_OBJECT ? singletonObject : null;
 }
通过上面的源码我们可以看到,在获取单例Bean的时候,会先从一级缓存singletonObjects里获取,如果没有获取到(说明不存在或没有实例化完成),会去第二级缓存earlySingletonObjects中去找,如果还是没有找到的话,就会三级缓存中获取单例工厂singletonFactory,通过从singletonFactory中获取正在创建中的引用,将singletonFactory存储在earlySingletonObjects 二级缓存中,这样就将创建中的单例引用从三级缓存中升级到了二级缓存中,二级缓存earlySingletonObjects,是会提前暴露已完成构造,还可以执行属性注入的单例bean的。
这个时候如何还有其他的bean也是需要属性注入,那么就可以直接从earlySingletonObjects中获取了。
上面的例子中的过程中的A,在注入C的时候,其实并没有真正的初始化完成,等到顺利的注入了B才算是真正的初始化完成。
整个过程如下图:
