Java学习-SpringBoot
文章目录
- SpringBoot
-
- 1、什么是Spring?
- 2、Spring是如何简化Java开发的?
- 3、什么是SpringBoot?
- 4、微服务
-
- 4.1、什么是微服务?
- 5、第一个SpringBoot程序
-
- 5.1、官网
- 5.2、IDEA
- 6、SpringBoot原理初探
-
- 6.1、@SpringBootApplication
- 6.2、SpringApplication
- 7、SpringBoot配置
-
- 7.1、YAML
- 7.2、application.yaml路径
- 7.3、多环境切换
- 7.4、自动配置原理
- 8、SpringBoot web开发
-
- 8.1、静态资源
- 9、Thymeleaf
- 10、扩展SpringMVC
- 11、web
-
- 11.1、首页
- 11.2、国际化
- 11.3、提示
- 11.4、拦截器
- 11.5、代码复用
- 11.6、显示高亮(thymeleaf传参)
- 11.7、CRUD
- 11.8、404
- 12、test
- 13、Druid数据源
- 14、整合mybatis
- 15、SpringSecurity(安全)
-
- 15.1、权限认证
- 15.2、注销
- 15.3、Security与thymeleaf整合
- 15.4、自定义登录页面
- 15.5、记住我
- 16、Shiro简介
- 17、Shiro整合Mybatis
-
- 171、用户认证
- 17.2、用户授权
- 17.3、Shiro整合thymeleaf
微服务阶段
- javaweb:独立开发MVC三层架构的网站:原始
- ssm:框架:简化了我们的开发流程,配置也开始较为复杂;
- war:以上项目的打包是打war包,程序在tomcat中运行
- spring再简化:SpringBoot打的是Jar包,内嵌了tomcat;微服务架构!
- 服务越来越多:SpringCloud
SpringBoot
1、什么是Spring?
Spring是一个开源框架,2003年兴起的一个轻量级的Java开发框架,作者:Rod Johnson。
Spring是为了解决企业级应用开发的复杂性而创建的,简化开发
2、Spring是如何简化Java开发的?
为了降低Java开发的复杂性,Spring采用了以下4种关键策略:
1、基于POJO的轻量级和最小侵入性编程,所有东西都是bean;
2、通过IOC,依赖注入(DI)和面向接口实现松耦合;
3、基于切面(AOP)和惯例进行声明式编程;
4、通过切面和模版减少样式代码,RedisTemplate,xxxTemplate;
3、什么是SpringBoot?
SpringBoot就是一个javaweb的开发框架,和SpringMVC类似,对比于其他javaweb框架的好处,官方说是简化开发,约定大于配置,能迅速地开发web应用,一行代码开发一个http接口。
SpringBoot以约定大于配置的核心思想,帮我们进行了很多设置,多数SpringBoot应用只需要很少的Spring配置。
Spring Boot的主要优点:
- 为所有Spring开发者更快的入门
- 开箱即用,提供各种默认配置来简化项目配置
- 内嵌式容器简化Web项目
- 没有冗余代码生成和XML配置的要求
4、微服务
4.1、什么是微服务?
微服务是一种架构风格,他要求我们在开发一个应用的时候,这个应用必须构建成一系列小服务的组合。要说微服务架构,先得说说过去的单体应用架构。
**单体应用架构(all in one)**是指,我们将一个应用中的所有应用服务都封装在一个应用中。
无论是ERP、CRM或是其它系统,都可以把数据库访问、web访问等功能放在一个war包内,
这样做的好处是,易于开发和测试,也十分方便部署;当需要扩展时,只需要将war复制多份,然后放到多个服务器上,再做个负载均衡就可以了。
缺点是,哪怕我要修改一个非常小的部分,都要停掉整个服务,重新打包、部署这个应用war包。特别是对于大型应用,不可能把所有的内容都放在一个应用中,这样维护,分工合作都是问题。
微服务架构打破之前all in one的架构方式,把每个功能元素独立出来。把独立出来的功能元素动态组合,需要的功能元素才去拿来组合,需要多一些时可以整合多个功能元素。所以微服务架构是对功能元素进行复制,而没有对整个应用进行复制。
好处是:
- 节省了调用资源;
- 每个功能元素的服务都是一个可替换的,可独立升级的软件代码。
5、第一个SpringBoot程序
5.1、官网
[https://spring.io/projects/spring-boot#overview]
直接在官网快速搭建一个SpringBoot项目

5.2、IDEA
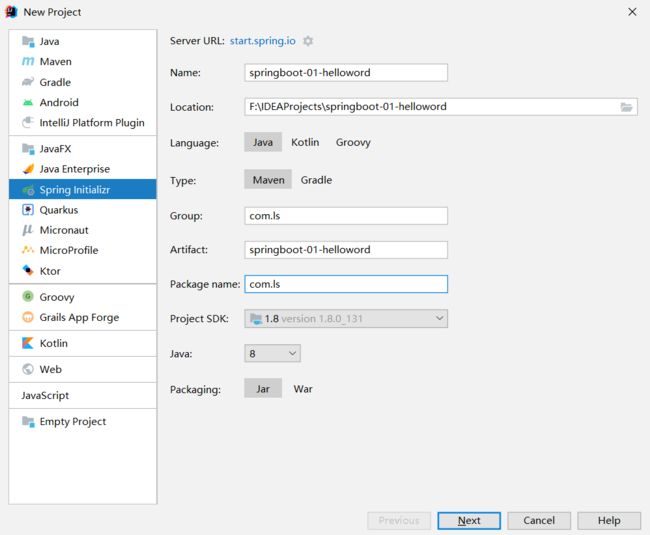
添加Spring WEB依赖。
创建第一个程序
@Controller
@RequestMapping("/hello")
public class HelloController {

    @RequestMapping("/h1")
    @ResponseBody
    public String hello() {
        return "Hello SpringBoot";
    }

}
6、SpringBoot原理初探
[https://www.bilibili.com/video/BV1PE411i7CV?p=12&spm_id_from=pageDriver]
自动配置:
pom.xml
- spring-boot-dependencies:核心依赖在父工程中
- 我们在写或者引入一些SpringBoot中依赖的时候,不需要指定版本,就因为有这些版本仓库
**启动器:**SpringBoot的启动场景
-
<dependency> <groupId>org.springframework.bootgroupId> <artifactId>spring-boot-starterartifactId> <version>2.5.6version> <scope>compilescope> dependency> -
springboot会将所有的功能场景,都变成一个个的启动器。
-
要使用什么功能,就只需找到对应的
starter
主程序:
//@SpringBootApplication : 标注这个类是一个SpringBoot的应用,启动类下的所有资源被导入
@SpringBootApplication
public class Springboot01HellowordApplication {

    public static void main(String[] args) {
        //将SpringBoot应用启动,通过反射加载类的对象
        SpringApplication.run(Springboot01HellowordApplication.class, args);
    }

}
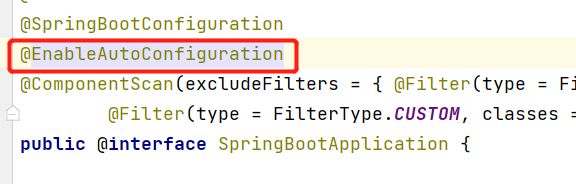
6.1、@SpringBootApplication
-
@SpringBootApplication ->@SpringBootConfiguration:SpringBoot的配置 ->@Configuration:Spring配置类 ->@Component:说明这也是一个Spring的组件 -
@SpringBootApplication ->@EnableAutoConfiguration:自动导入配置 ->@AutoConfigurationPackage:自动配置包 ->@Import(AutoConfigurationPackages.Registrar.class):自动配置“包注册” @Import(AutoConfigurationImportSelector.class):自动配置导入选择-
AutoConfigurationImportSelector.class中
//获取所有的配置 List<String> configurations = getCandidateConfigurations(annotationMetadata, attributes); -> //获取候选的配置 protected List<String> getCandidateConfigurations(AnnotationMetadata metadata, AnnotationAttributes attributes) { List<String> configurations = SpringFactoriesLoader.loadFactoryNames(getSpringFactoriesLoaderFactoryClass(), getBeanClassLoader()); Assert.notEmpty(configurations, "No auto configuration classes found in META-INF/spring.factories. If you " + "are using a custom packaging, make sure that file is correct."); return configurations; } -

-
-

-
自动配置的核心文件
-
@SpringBootApplication :
标注这个类是一个SpringBoot的应用,启动类下的所有资源被导入
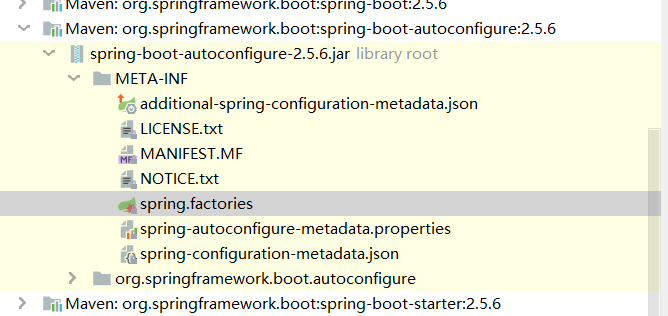
结论:SpringBoot所有自动配置都是在启动的时候扫描并加载(spring.factories),所有的自动配置类都在这里面,但是不一定生效,要判断条件是否成立,只要导入了对应的start,就有对应的启动器了,有了启动器,我们的自动装配就会生效,然后就配置成功。
- SpringBoot在启动的时候,从类路径下/META-INF/spring.factories获取指定的值;
- 将这些自动配置的类导入容器,自动配置就会生效,帮我们进行自动配置;
- 以前我们需要自动配置的东西,springboot帮我们做了;
- 整合JavaEE,解决方案和自动配置的东西都在spring-boot-autoconfigure-2.5.6.jar这个包下;
- 它会把所有需要导入的组件,以类名的方式返回,这些组件就会被添加到容器;
- 容器中也会存在非常多的xxxAutoConfiguration的文件(@Bean),就是这些类给容器中导入了这个场景需要的组件;并且自动配置,@Configuration;
- 有了自动配置类,免去了我们手动编写配置文件的工作。
6.2、SpringApplication
//将SpringBoot应用启动,通过反射加载类的对象
SpringApplication.run(Springboot01HellowordApplication.class, args);
该方法主要由两个部分,一部分是SpringApplication的实例化,一部分是run方法的执行。
这个类主要做了以下四件事情:
- 推断应用的类型是普通的项目还是web项目(如果是普通项目,执行完就结束,如果是web项目,就会一直启动);
- 查找并加载所有可用初始化器,设置到initializers属性中;
- 找出所有的应用程序监听器,设置到linsteners属性中;
- **推断并设置main方法的定义类,找到运行的主类,因为他如果不知道主类的话,是没有办法加载的。 **
关于SpringBoot,谈谈你的理解:
- 自动装配
- run()
- 推断应用的类型是普通的项目还是web项目(如果是普通项目,执行完就结束,如果是web项目,就会一直启动);
- 推断并设置main方法的定义类,找到运行的主类,因为他如果不知道主类的话,是没有办法加载的。
- run()里面有一些监听器,这个监听器是全局存在的,它会去获取上下文处理一些Bean,
7、SpringBoot配置
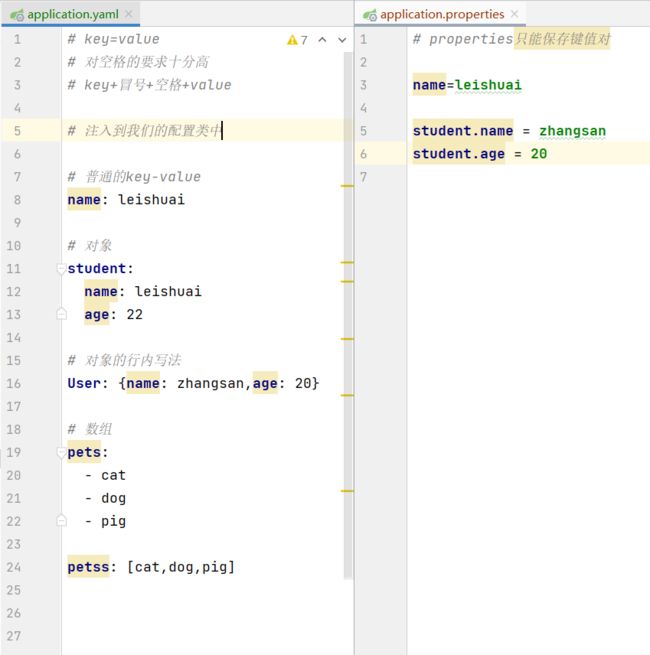
7.1、YAML
语法
SpringBoot使用一个全局的配置文件,配置文件名称是固定的
- application.properties
- 语法结构:key = value
- application.yml
- 语法结构:key:空格value
yaml可以直接给实体类赋值
-
Spring的赋值方式
@Component
public class Dog {

    @Value("旺财")
    private String name;
    @Value("3")
    private Integer age;
}
@SpringBootTest class Springboot01HellowordApplicationTests { @Autowired private Dog dog; @Test void contextLoads() { System.out.println(dog);//Dog{name='旺财', age=3} } } -
yaml给实体类赋值
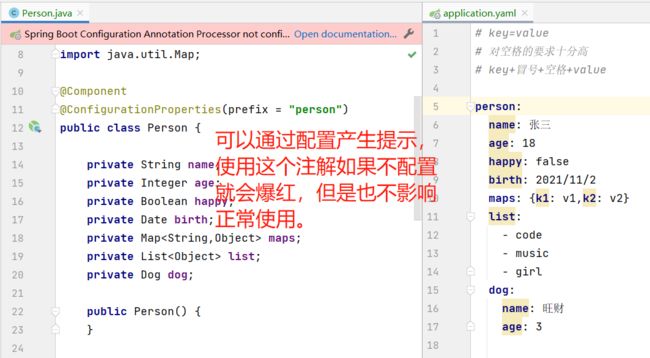
输出:
Person{name='张三', age=18, happy=false, birth=Tue Nov 02 00:00:00 CST 2021, maps={k1=v1, k2=v2}, list=[code, music, girl], dog=Dog{name='旺财', age=3}}添加依赖即可解决爆红问题:
<dependency> <groupId>org.springframework.bootgroupId> <artifactId>spring-boot-configuration-processorartifactId> <optional>trueoptional> dependency> -
加载指定的配置文件
@PropertySource(value = "classpath:application.properties")//加载指定的配置文件
public class Person {
    //SPEL表达式取出配置文件中的值
    @Value("${name}")
    private String name;
    private Integer age;
    private Boolean happy;
    private Date birth;
    private Map<String,Object> maps;
    private List<Object> list;
    private Dog dog;
}
@ConfigurationProperties和@Value对比:
| @ConfigurationProperties | @Value | |
|---|---|---|
| 功能 | 批量注入配置文件中的属性 | 一个个指定 |
| 松散绑定(松散语法) | 支持 | 不支持 |
| SpEL | 不支持 | 支持 |
| JSR303数据校验 | 支持 | 不支持 |
| 复杂类型封装 | 支持 | 不支持 |
松散绑定:
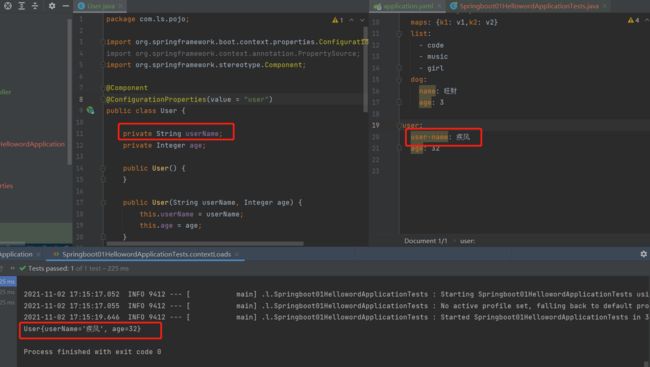
结论:
- 配置yml和配置properties都可以获取到值,强烈推荐yml
- 如果我们在某个业务中,只需要获取配置文件中的某个值,可以使用@Value
- 如果我们专门编写了一个JavaBean来和配置文件进行映射,就直接使用@ConfigurationProperties。
7.2、application.yaml路径
application.yaml(.properties)这个文件可以放在四个不同的位置,位置不同执行的优先级不同,从上往下优先级降低:
file:./config/file:./classpath:/configclasspath:/
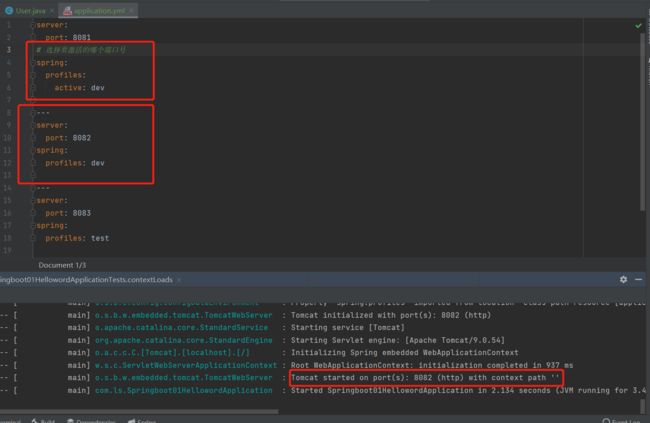
7.3、多环境切换
properties的多配置文件
我们在主配置文件编写的时候,文件名可以是 application-{profile}.properties/yml , 用来指定多个环境版本;
例如:
application-test.properties 代表测试环境配置
application-dev.properties 代表开发环境配置
但是Springboot并不会直接启动这些配置文件,它默认使用application.properties主配置文件;
我们需要通过一个配置来选择需要激活的环境:
#比如在配置文件中指定使用dev环境,我们可以通过设置不同的端口号进行测试;#我们启动SpringBoot,就可以看到已经切换到dev下的配置了;
spring.profiles.active=dev
yaml的多文档模块
和properties配置文件中一样,但是使用yml去实现不需要创建多个配置文件,更加方便了 !这也是SpringBoot推荐使用yaml的原因。
7.4、自动配置原理
application.properties/yml配置文件到底能写什么?怎么写?
分析自动配置原理:以HttpEncodingAutoConfiguration为例解释自动配置原理

//@Configuration 表示这是一个配置类,和以前编写的配置文件一样,也可以给容器中添加组件
@Configuration(proxyBeanMethods = false)
//启动指定类的ConfigurationProperties功能;
	//进入这个Properties查看,将配置文件中对应的值和HttpProperties绑定起来
	//并把HttpProperties加入到ioc容器中。
@EnableConfigurationProperties(ServerProperties.class)
//Spring底层@Conditional注解:
	//根据不同的条件判断,如果满足指定的条件,整个配置类里的配置就会生效;
	//这里的意思就是判断当前应用是否是web应用,如果是,当前配置类生效。
@ConditionalOnWebApplication(type = ConditionalOnWebApplication.Type.SERVLET)
@ConditionalOnClass(CharacterEncodingFilter.class)
@ConditionalOnProperty(prefix = "server.servlet.encoding", value = "enabled", matchIfMissing = true)
public class HttpEncodingAutoConfiguration {

	private final Encoding properties;

	public HttpEncodingAutoConfiguration(ServerProperties properties) {
		this.properties = properties.getServlet().getEncoding();
	}

	@Bean
	@ConditionalOnMissingBean
	public CharacterEncodingFilter characterEncodingFilter() {
		CharacterEncodingFilter filter = new OrderedCharacterEncodingFilter();
		filter.setEncoding(this.properties.getCharset().name());
		filter.setForceRequestEncoding(this.properties.shouldForce(Encoding.Type.REQUEST));
		filter.setForceResponseEncoding(this.properties.shouldForce(Encoding.Type.RESPONSE));
		return filter;
	}

	@Bean
	public LocaleCharsetMappingsCustomizer localeCharsetMappingsCustomizer() {
		return new LocaleCharsetMappingsCustomizer(this.properties);
	}

	static class LocaleCharsetMappingsCustomizer
			implements WebServerFactoryCustomizer<ConfigurableServletWebServerFactory>, Ordered {

		private final Encoding properties;

		LocaleCharsetMappingsCustomizer(Encoding properties) {
			this.properties = properties;
		}

		@Override
		public void customize(ConfigurableServletWebServerFactory factory) {
			if (this.properties.getMapping() != null) {
				factory.setLocaleCharsetMappings(this.properties.getMapping());
			}
		}

		@Override
		public int getOrder() {
			return 0;
		}

	}

}
精髓
1、SpringBoot启动会加载大量的自动配置类
2、我们看我们需要的功能有没有在SpringBoot默认写好的自动配置类当中;
3、我们再来看这个自动配置类中到底配置了哪些组件;(只要我们要用的组件存在在其中,我们就不需要再手动配置了)
4、给容器中自动配置类添加组件的时候,会从properties类中获取某些属性。我们只需要在配置文件中指定这些属性的值即可;
**xxxxAutoConfigurartion:自动配置类;**给容器中添加组件
xxxxProperties:封装配置文件中相关属性;
那么多的自动配置类,必须在一定的条件下才能生效;也就是说,我们加载了这么多的配置类,但不是所有的都生效了。
我们可以通过启用 debug=true属性;来让控制台打印自动配置报告,这样我们就可以很方便的知道哪些自动配置类生效;
#开启springboot的调试类
debug=true
8、SpringBoot web开发
SpringBoot到底帮我们配置了什么?我们能不能进行修改?能修改哪些东西?能不能扩展?
答案是都是可以的。
- xxxAutoConfiguration:向容器中自动配置组件
- xxxProperties:自动配置类,装配配置文件中自定义的一些内容
要解决的问题:
- 导入静态资源
- 首页
- 没有jsp页面,使用模板引擎Thymeleaf
- 装配扩展SpringMVC
- 增删改查
- 拦截器
- 国际化
8.1、静态资源
双击shift找到WebMvcAutoConfiguration
分析源码:WebMvcAutoConfiguration.java
//资源处理器
@Override
public void addResourceHandlers(ResourceHandlerRegistry registry) {
    if (!this.resourceProperties.isAddMappings()) {
        logger.debug("Default resource handling disabled");
        return;
    }
    addResourceHandler(registry, "/webjars/**", "classpath:/META-INF/resources/webjars/");
    addResourceHandler(registry, this.mvcProperties.getStaticPathPattern(), (registration) -> {
        registration.addResourceLocations(this.resourceProperties.getStaticLocations());
        if (this.servletContext != null) {
            ServletContextResource resource = new ServletContextResource(this.servletContext, SERVLET_LOCATION);
            registration.addResourceLocations(resource);
        }
    });
}
private static final String[] CLASSPATH_RESOURCE_LOCATIONS = { "classpath:/META-INF/resources/",
                                                              "classpath:/resources/", "classpath:/static/", "classpath:/public/" };
也可以在application.properties中自定义目录,这也系统默认寻找静态资源的路径就会失效(一般不建议这样使用)。
spring.mvc.static-path-pattern=/hello/,classpath:/lei/
总结:
- 在SpringBoot中,可以使用以下方式处理静态资源
- webjars
localhost:8080/webjars/ - public, static, /**, resource
localhost:8080/
- webjars
- 优先级:resource > static(默认) > public
9、Thymeleaf
[https://docs.spring.io/spring-boot/docs/2.2.5.RELEASE/reference/htmlsingle/#using-boot-starter ]
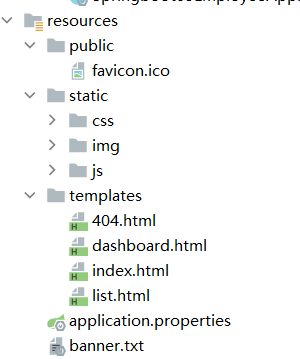
需要使用Thymeleaf,首先要导入对应的依赖,将html页面放在templates中。

<dependency>
    <groupId>org.springframework.bootgroupId>
    <artifactId>spring-boot-starter-thymeleafartifactId>
dependency>
模板引擎的作用就是写一个页面模板,比如有些值是动态的。
Thymeleaf所有的模板引擎写在templates下
thymeleaf的自动配置类由之前的结论可知:ThymeleafProperties
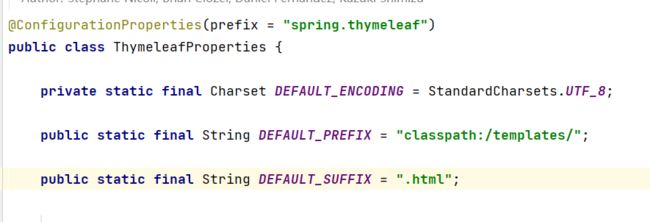
由此可知,前缀、后缀、默认编码,视图解析器,在calsspath:/templates/路径下创建一个后缀为.html的页面。
使用Thymeleaf,在html头文件中导入约束。
@RequestMapping("/test1")
public String test1(Model model) {
    model.addAttribute("msg", "hello SpringBoot");
    model.addAttribute("users", Arrays.asList("张三", "李四", "王五"));
    return "test";
}
DOCTYPE html>
<html lang="en" xmlns:th="http://www.thymeleaf.org">
    <head>
        <meta charset="UTF-8">
        <title>Titletitle>
    head>
    <body>

        <div th:text="${msg}">div>
    body>
html>
-
取值
<div th:text="${msg}">div> -
遍历
<div th:each="user:${users}" th:text="${user}">div> -
简单的表达式
- 普通的变量:${…}
- message表达(国际化消息):*{…}
- url:@{…}
- 片段表达式:~{…}
10、扩展SpringMVC
在SpringBoot中有非常多的xxxConfiguration帮助我们进行扩展配置,只要看见了这个配置,就需要特别注意,关注一下扩展了什么功能。
package com.ls.config;

import org.springframework.context.annotation.Configuration;
import org.springframework.web.servlet.config.annotation.ViewControllerRegistry;
import org.springframework.web.servlet.config.annotation.WebMvcConfigurer;

//如果需要扩展SpringMVC,官方建议我们这样去做
@Configuration
public class MyMvcConfig implements WebMvcConfigurer {

    //视图跳转
    @Override
    public void addViewControllers(ViewControllerRegistry registry) {
        registry.addViewController("/lei").setViewName("test");
    }
}
注意:如果需要扩展SpringMVC,使用@Configuration注解之后就不能在添加@EnableWebMvc这个注解。
//如果需要扩展SpringMVC,官方建议我们这样去做,但是接管MVC的时候不能加@EnableWebMvc这个注解。
@Configuration
/*
    @EnableWebMvc这个注解就是导入一个类(DelegatingWebMvcConfiguration 作用:从容器中获取所有的webmvcconfigura),
    public class DelegatingWebMvcConfiguration extends WebMvcConfigurationSupport {...}
    只要加了这个注解容器中就存在了WebMvcConfigurationSupport

    但是在WebMvcAutoConfiguration中
    @ConditionalOnMissingBean(WebMvcConfigurationSupport.class)
    ConditionalOnMissingBean意思是如果这个Bean不存在它才会生效;如果存在,那么WebMvcAutoConfiguration的全部自动配置就会全部失效
 */
@EnableWebMvc
public class MyMvcConfig implements WebMvcConfigurer {

    //视图跳转
    @Override
    public void addViewControllers(ViewControllerRegistry registry) {
        registry.addViewController("/lei").setViewName("test");
    }
}


11、web
# 关闭默认头像

spring.mvc.favicon.enable=false

# 关闭thymeleaf缓存
spring.thymeleaf.cache=false

# http://localhost:8080/lei/
server.servlet.context-path=/lei
首页配置
注意点:所有页面的静态资源都需要使用thymeleaf接管,@{}
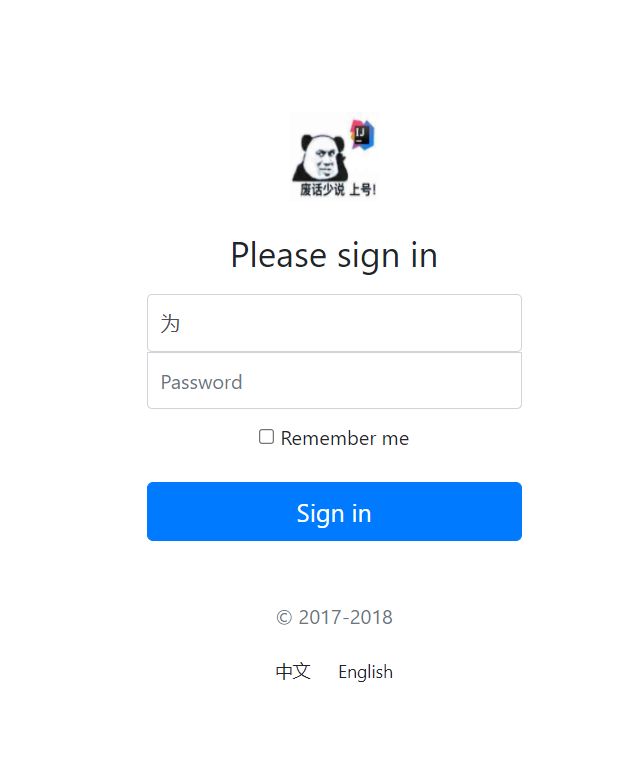
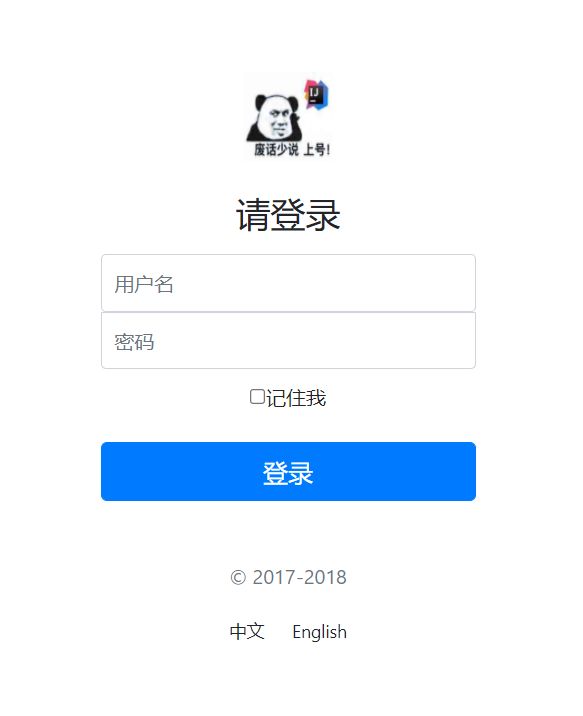
11.1、首页
DOCTYPE html>
<html lang="en" xmlns:th="http://www.thymeleaf.org">
    <head>
        <meta http-equiv="Content-Type" content="text/html; charset=UTF-8">
        <meta name="viewport" content="width=device-width, initial-scale=1, shrink-to-fit=no">
        <meta name="description" content="">
        <meta name="author" content="">
        <title>Signin Template for Bootstraptitle>


        <link th:href="@{/css/bootstrap.min.css}" rel="stylesheet">

        <link th:href="@{/css/signin.css}" rel="stylesheet">
    head>

    <body class="text-center">
        <form class="form-signin" action="dashboard.html">
            <img class="mb-4" th:src="@{/img/1.jpg}" alt="" width="72" height="72">
            <h1 class="h3 mb-3 font-weight-normal">Please sign inh1>
            <label class="sr-only">Usernamelabel>
            <input type="text" class="form-control" placeholder="Username" required="" autofocus="">
            <label class="sr-only">Passwordlabel>
            <input type="password" class="form-control" placeholder="Password" required="">
            <div class="checkbox mb-3">
                <label>
                    <input type="checkbox" value="remember-me"> Remember me
                label>
            div>
            <button class="btn btn-lg btn-primary btn-block" type="submit">Sign inbutton>
            <p class="mt-5 mb-3 text-muted">© 2017-2018p>
            <a class="btn btn-sm">中文a>
            <a class="btn btn-sm">Englisha>
        form>

    body>

html>
11.2、国际化
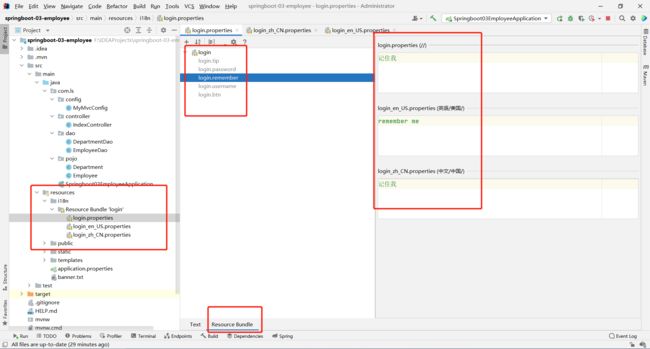
在application中配置login的目录
# 国际化配置文件的目录
spring.messages.basename=i18n/login
之后再html页面中用 th:text="#{}"或者[[#{}]]取值
[外链图片转存失败,源站可能有防盗链机制,建议将图片保存下来直接上传(img-3cmRSBGy-1637377596110)(D:\Typora\img\image-20211103165001770.png)]
添加中英切换的链接
<a class="btn btn-sm" th:href="@{/index.html(l='zh_CN')}">中文a>
<a class="btn btn-sm" th:href="@{/index.html(l='en_US')}">Englisha>
自定义国际化组件
public class MyLocalResolver implements LocaleResolver {
    @Override
    public Locale resolveLocale(HttpServletRequest request) {
        //获取请求中的语言参数
        String language = request.getParameter("l");
        System.out.println("language = " + language);
        //如果没有就使用默认的
        Locale locale = Locale.getDefault();
        //如果请求的链接携带了国际化的参数
        if (!StringUtils.isEmpty(language)) {
            String[] split = language.split("_");
            //国家,地区
            locale = new Locale(split[0], split[1]);
        }
        return locale;
    }

    @Override
    public void setLocale(HttpServletRequest request, HttpServletResponse response, Locale locale) {

    }
}
将写好的组件注入到容器中(MyMvcConfig),这样自定义的国际化组件就生效了
//往容器中注入组件,自定义的国际化组件就生效了
@Bean
public LocaleResolver localeResolver() {
    return new MyLocalResolver();
}
注意点:
- 需要配置i8n文件
- 如果在项目中需要进行按钮自动切换,需要自定义一个组件
LocaleResolver - 然后将组件配置到spring容器中
@Bean - #{}和@{}
11.3、提示
//通过自定义的方式扩展MVC
@Configuration
public class MyMvcConfig implements WebMvcConfigurer {


    @Override
    public void addViewControllers(ViewControllerRegistry registry) {
        registry.addViewController("/").setViewName("index");
        registry.addViewController("/index.html").setViewName("index");
        //真实的页面是dashboard.html,相当于给它起了个别名。
        //http://localhost:8080/lei/main.html
        registry.addViewController("/main.html").setViewName("dashboard");
    }

    //往容器中注入组件,自定义的国际化组件就生效了
    @Bean
    public LocaleResolver localeResolver() {
        return new MyLocalResolver();
    }
}
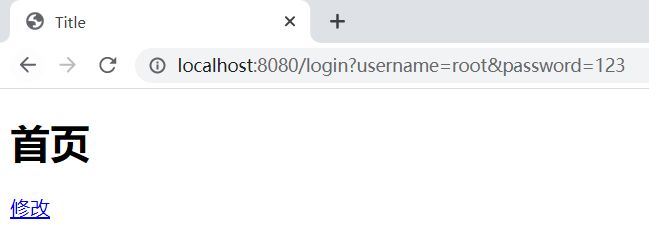
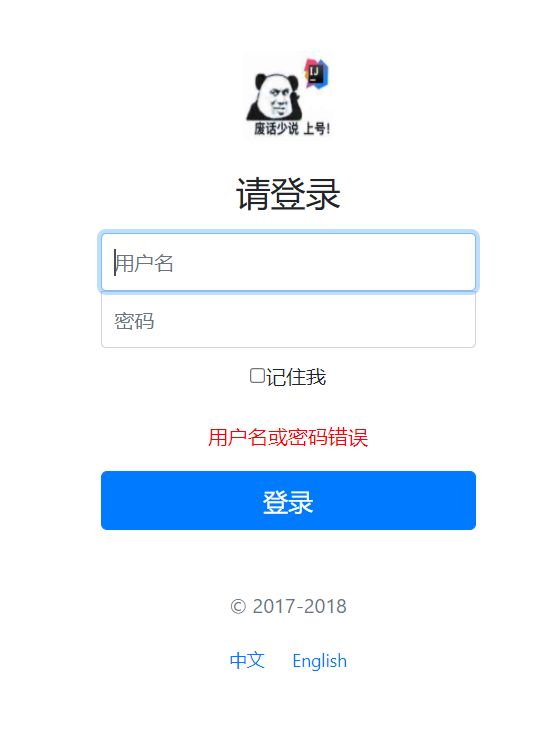
@RequestMapping("/login")
public String login(@RequestParam("username") String username, @RequestParam("password") String password, Model model, HttpSession session) {
    //如果username不为空并且密码为123
    System.out.println(username + password);
    if (!StringUtils.isEmpty(username) && "123".equals(password)) {
        return "redirect:/main.html";
    } else {
        model.addAttribute("error", "用户名或密码错误");
        return "index";
    }
}
<p style="color: red" th:text="${error}" th:if="${not #strings.isEmpty(error)}">p>
11.4、拦截器
-
添加Session
@RequestMapping("/login") public String login(@RequestParam("username") String username, @RequestParam("password") String password, Model model, HttpSession session) { //如果username不为空并且密码为123 System.out.println(username + password); if (!StringUtils.isEmpty(username) && "123".equals(password)) { session.setAttribute("loginUser", username); return "redirect:/main.html"; } else { model.addAttribute("error", "用户名或密码错误"); return "index"; } } -
实现接口
//只要实现了HandlerInterceptor这个类就是一个拦截器 public class LoginHandlerInterceptor implements HandlerInterceptor { @Override public boolean preHandle(HttpServletRequest request, HttpServletResponse response, Object handler) throws Exception { Object loginUser = request.getSession().getAttribute("loginUser"); if (loginUser == null) { request.setAttribute("error","没有权限,请先登录!"); request.getRequestDispatcher("/index.html").forward(request, response); return false; } else { return true; } } } -
注册到自定义配置容器中
@Override public void addInterceptors(InterceptorRegistry registry) { registry.addInterceptor(new LoginHandlerInterceptor()).addPathPatterns("/**") .excludePathPatterns("/index.html","/","/user/login","/css/**","/img/**","/js/**"); } -
添加拦截器之后在访问main.htm就会提示

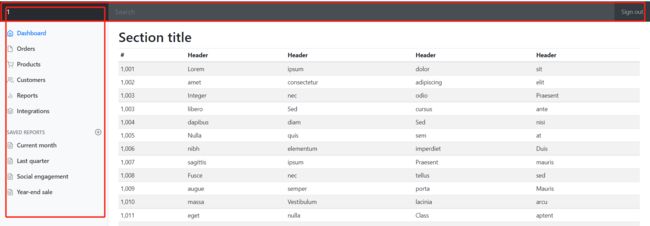
11.5、代码复用
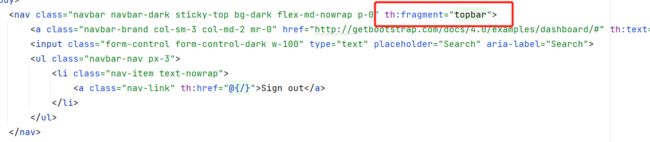
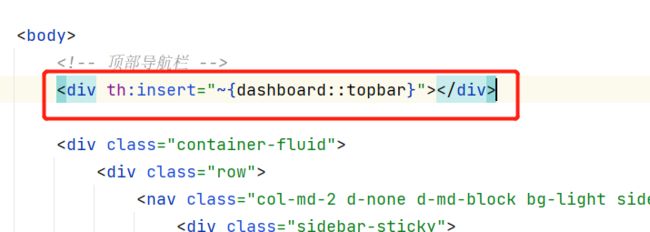
在list.html和dashbard.html中有顶部和侧部导航栏都是相同的内容,看起来很繁琐,所以需要使用th:fragment来实现代码复用

[外链图片转存失败,源站可能有防盗链机制,建议将图片保存下来直接上传(img-bn6m0Zgl-1637377596114)(D:\Typora\img\image-20211103204802492.png)]
解决办法:
-
删除list的顶部导航栏
-
添加fragment
-
在list原来的位置插入
-
效果和原来一样
侧边栏也是一样
-
删除list.html相同的侧边栏
-
在dashboard.html的侧边添加
th:fragment="leftbar"<nav class="col-md-2 d-none d-md-block bg-light sidebar" th:fragment="leftbar"> -
在list.html原来的位置导入
<div th:insert="~{dashboard::leftbar}">div>
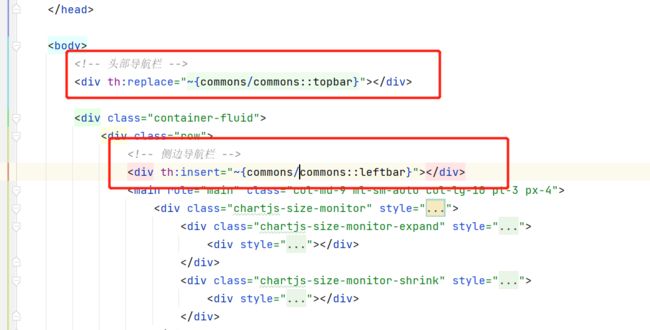
代码复用再升级
将顶部和侧边的导航栏提取出来,放在新建的一个html中。
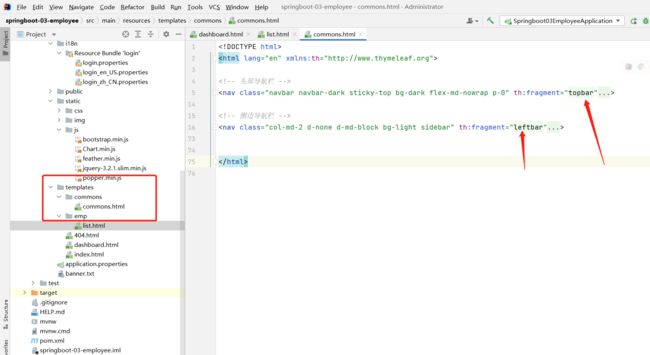
在需要使用的html中分别插入或者替换
11.6、显示高亮(thymeleaf传参)
需求:点击首页或者员工管理让对应按钮显示高亮,如果要传递参数,可直接使用()传参,接收判断即可。
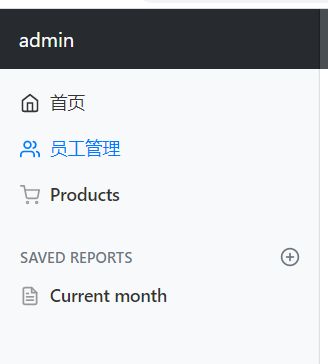
<div th:insert="~{commons/commons::leftbar(active='list.html')}">div>
<a th:class="${active=='list.html'?'nav-link active':'nav-link'}" th:href="@{/emps}">
11.7、CRUD
-
查询所有
@RequestMapping("/emps") public String list(Model model) { Collection<Employee> employees = employeeDao.getAll(); model.addAttribute("emps", employees); return "emp/list"; }<table class="table table-striped table-sm"> <thead> <tr> <th>编号th> <th>姓名th> <th>emailth> <th>性别th> <th>部门th> <th>生日th> <th>操作th> tr> thead> <tbody> <tr th:each="emp:${emps}"> <td th:text="${emp.getId()}">td> <td th:text="${emp.getLastName()}">td> <td th:text="${emp.getEmail()}">td> <td>[[${emp.getGender()==0?'女':'男'}]]td> <td th:text="${emp.department.getName()}">td> <td th:text="${#dates.format(emp.getBirth(), 'yyyy-MM-dd HH:mm:ss')}">td> <td> <button class="btn btn-sm btn-primary">编辑button> <button class="btn btn-sm btn-danger">删除button> td> tr> tbody> table>
增加的时候注意:
<select class="form-control" name="department.id">
    <option th:each="department:${departments}" th:text="${department.getName()}" th:value="${department.getId()}">option>
select>
修改传参时:
<a class="btn btn-sm  btn-primary" th:href="@{/goUpdate/} + ${emp.id}">编辑a>
或者
<a class="btn btn-sm  btn-primary" th:href="@{/goUpdate(id=${emp.getId()})}">编辑a>
后台接收
//以restful风格传参,就要以restful风格接收
//去员工的修改页面
@RequestMapping("/goUpdate/{id}")
public String doUpdate(@PathVariable int id,Model model) {
    System.out.println("id========>" + id);
    Employee employee = employeeDao.getEmployeeById(id);
    model.addAttribute("employee", employee);
    return "/emp/update";
}
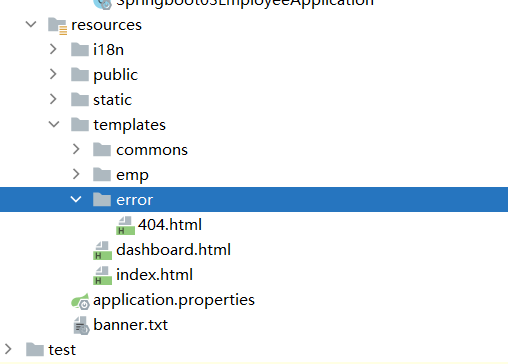
11.8、404
只需在templates下建一个error文件夹,将404.html放进去。
12、test
-
连接数据库
spring: datasource: driver-class-name: com.mysql.cj.jdbc.Driver url: jdbc:mysql://localhost:3306/mybatis?useUnicode=true&characterEncoding=utf-8 username: root password: 171684 -
测试数据库连接
@RestController
public class JDBCController {

    @Autowired
    JdbcTemplate jdbcTemplate;

    //查询数据库中所有的信息
    //没有实体类,数据库中的数据,从哪里获取?
    @GetMapping("/userList")
    public List<Map<String, Object>> getUser() {
        String sql = "select * from user";
        List<Map<String, Object>> user_maps = jdbcTemplate.queryForList(sql);
        return user_maps;
    }

    @RequestMapping("/delete/{id}")
    public String delete(@PathVariable("id") Integer id) {
        String sql = "delete from user where id = ?";
        jdbcTemplate.update(sql, id);
        return "delete";
    }

}
13、Druid数据源
HikariDataSource号称Java WEB当前最快的数据源,相比于传统的c3p0,DBCP,Tomcat JDBC等连接池更加优秀。
Druid数据源
<dependency>
    <groupId>com.alibabagroupId>
    <artifactId>druidartifactId>
    <version>1.2.8version>
dependency>
指定需要使用的数据源:
spring:
  datasource:
    driver-class-name: com.mysql.cj.jdbc.Driver
    url: jdbc:mysql://localhost:3306/mybatis?useUnicode=true&characterEncoding=utf-8&serverTimeZone=UTC
    username: root
    password: 171684
    type: com.alibaba.druid.pool.DruidDataSource
Druid配置类
//Druid后台监控硬性配置
@Configuration
public class DruidConfig {


    @ConfigurationProperties(prefix = "spring.datasource")
    @Bean
    public DataSource dataSource() {
        return new DruidDataSource();
    }

    @Bean
    //后台监控(相当于web.xml)
    public ServletRegistrationBean statViewServlet() {
        ServletRegistrationBean<StatViewServlet> bean = new ServletRegistrationBean<>(new StatViewServlet(),"/druid/*");

        //后台需要有人登录,账号密码设置
        HashMap<String, String> initParameters = new HashMap<>();
        //增加配置
        //登录的loginUsername和loginPassword是固定好的,不能更改
        initParameters.put("loginUsername","admin");
        initParameters.put("loginPassword","123456");
        //允许谁可以访问
        // ""代表所有人可以访问,localhost代表只有本机可以访问
        initParameters.put("allow","");
        //禁止谁可以访问
//        initParameters.put("leishuai","120.55.168.89");
        //设置初始化参数
        bean.setInitParameters(initParameters);
        return bean;
    }
}
配置好DruidConfig之后,在浏览器访问localhost:8080/druid会显示一个登录的信息,输入设置好的用户名和密码,就进入到首页。
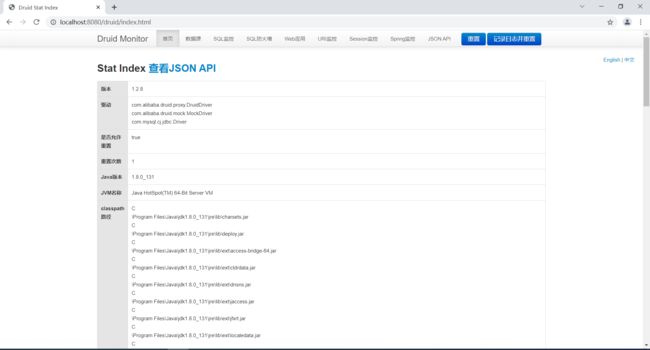
执行任意一条sql,测试:http://localhost:8080/userList

会记录所执行的一些SQL信息。
14、整合mybatis
springboot整合mybatis
导入依赖


<dependency>
    <groupId>org.mybatis.spring.bootgroupId>
    <artifactId>mybatis-spring-boot-starterartifactId>
    <version>2.2.0version>
dependency>
测试连接
@SpringBootTest
class Springboot05MybatisApplicationTests {


    @Autowired
    private DataSource dataSource;

    @Test
    void contextLoads() throws SQLException {

        System.out.println(dataSource.getClass());
        System.out.println(dataSource.getConnection());

    }

}
声明mapper的注解@Mapper,两种方式
-
//这个注解表示了这是一个mybatis的 mapper类 @Mapper public interface userMapper { } -
@SpringBootApplication
@MapperScan("com.ls.Mapper")
public class Springboot05MybatisApplication {

    public static void main(String[] args) {
        SpringApplication.run(Springboot05MybatisApplication.class, args);
    }

}
编写User的接口
//这个注解表示了这是一个mybatis的 mapper类
@Mapper
@Repository
public interface userMapper {

    List<User> queryUserList();

    User queryById(int id);

    int addUserUser(User user);

    int updateUser(User user);

    int deleteUser(int id);

}
在resources下建立mybatis/mapper/UserMapper.xml
DOCTYPE mapper
        PUBLIC "-//mybatis.org//DTD Mapper 3.0//EN"
        "http://mybatis.org/dtd/mybatis-3-mapper.dtd">

<mapper namespace="com.ls.mapper.UserMapper">
    <select id="queryUserList" resultType="User">
        select * from user
    select>
mapper>
application.properties
# 整合mybatis
mybatis.type-aliases-package=com.ls.pojo

mybatis.mapper-locations=classpath:mybatis/mapper/*.xml
测试
@RestController
public class UserController {

    @Autowired
    private UserMapper userMapper;

    @GetMapping("/userList")
    public List<User> queryAll() {
        List<User> userList = userMapper.queryUserList();
        for (User user : userList) {
            System.out.println(user);
        }
        return userList;
    }

}
结果

15、SpringSecurity(安全)
Spring Security是针对spring项目的一个安全框架,也是SpringBoot底层安全模块默认的技术选型,它可以实现强大的web安全控制,对于安全控制,进需要引入spring-boot-start-security模块,进行少量的配置,即可实现强大的安全管理。
记住几个类:
- WebSecurityConfigurationAdapter:自定义Sercurity策略
- AuthenticationManagerBuiler:自定义认证策略
- @EnableWebSecurity:开启WebSecurity模式
Spring Security的两个主要目标就是“认证”和”授权(访问控制)“
认证:Authentication
授权:Authorization
以横切(aop)的思想进去,不用改变源码还能加很多的拦截操作。
Spring Security是一个专注于为Java应用程序提供身份验证和授权的框架。与所有Spring项目一样,Spring Security的真正强大之处在于它可以很容易地扩展以满足定制需求
在web开发中,安全第一位!
安全并不是一个功能性需求。
做网站:安全应该在什么时候考虑?设计之初!
- 漏洞,隐私泄露
- 架构一旦确定就不好在考虑安全问题
shiro,SpringSecurity:很像,除了类不一样,名字不一样
15.1、权限认证
-
导入依赖
<dependency> <groupId>org.springframework.bootgroupId> <artifactId>spring-boot-starter-securityartifactId> <version>2.5.6version> dependency> -
编写配置类
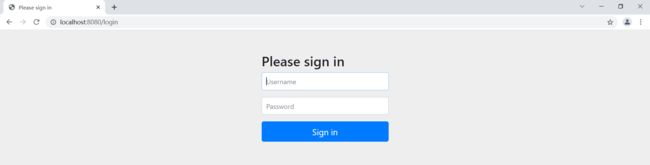
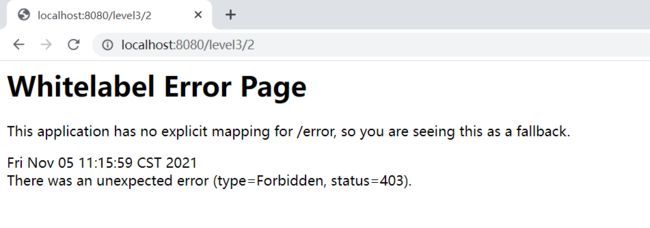
@EnableWebSecurity//开启WebSecurity模式,@Enablexxx,开启某个功能
public class SecurityConfig extends WebSecurityConfigurerAdapter {

    //授权
    protected void configure(HttpSecurity http) throws Exception {
        http.authorizeRequests()
            .antMatchers("/").permitAll()
            .antMatchers("/level1/**").hasRole("vip1")
            .antMatchers("/level2/**").hasRole("vip2")
            .antMatchers("/level3/**").hasRole("vip3");

        //没有权限会默认跳转到登录页面,需要开启登录的页面
        //http://localhost:8080/login
        http.formLogin();
    }
}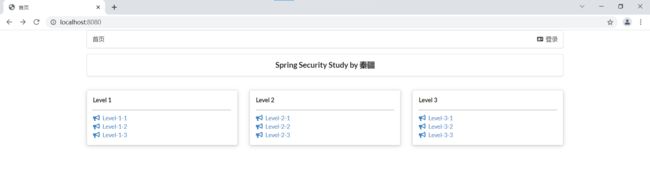
点击跳转功能,没有权限的人会默认跳转到登录页面
-
添加权限认证
//认证
//报错:There is no PasswordEncoder mapped for the id "null"
//在Spring Security 5.0+版本以上新增了很多的加密方法
//new BCryptPasswordEncoder().encode("123456") 密码加密,防止反编译破解。
@Override
protected void configure(AuthenticationManagerBuilder auth) throws Exception {
    auth.inMemoryAuthentication().passwordEncoder(new BCryptPasswordEncoder())
        .withUser("leishuai").password(new BCryptPasswordEncoder().encode("123456")).roles("vip1","vip2","vip3")
        .and()
        .withUser("root").password(new BCryptPasswordEncoder().encode("123456")).roles("vip1","vip2")
        .and()
        .withUser("user").password(new BCryptPasswordEncoder().encode("123456")).roles("vip1");
}
用不同的Username和Password登录,用户只能访问拥有对应权限的页面
-
此时用root,123456登录
-
他只能访问level1和level2底下的页面

-
访问level3下的页面会报错
-
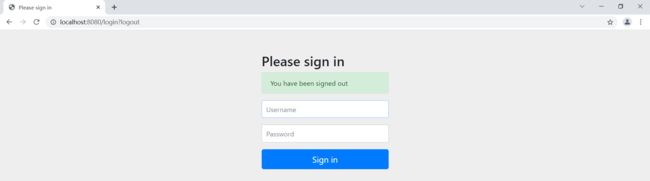
15.2、注销
-
添加注销按钮
<a class="item" th:href="@{/logout}"> <i class="sign-out icon">i> 注销 a> -
添加注销
http.logout();//授权 @Override protected void configure(HttpSecurity http) throws Exception { //首页所有人可以访问,功能页只有对应有权限的人可以访问 //请求授权的规则 http.authorizeRequests() .antMatchers("/").permitAll() .antMatchers("/level1/**").hasRole("vip1") .antMatchers("/level2/**").hasRole("vip2") .antMatchers("/level3/**").hasRole("vip3"); //没有权限会默认跳转到登录页面,需要开启登录的页面 //http://localhost:8080/login http.formLogin(); //http://localhost:8080/logout //注销,开启了注销功能,跳转到首页 http.logout().logoutSuccessUrl("/"); }测试,登录之后点击注销按钮

15.3、Security与thymeleaf整合
security与thymeleaf整合,可以完成不同的人登录进入首页所看到的模块是不相同的
<dependency>
    <groupId>org.thymeleaf.extrasgroupId>
    <artifactId>thymeleaf-extras-springsecurity4artifactId>
    <version>3.0.4.RELEASEversion>
dependency>
权限控制,根据不同的角色显示不同的页面
-
导入sec命名空间
<html lang="en" xmlns:th="http://www.thymeleaf.org" xmlns:sec="http://www.thymeleaf.org/thymeleaf-extras-springsecurity4"> -
在需要显示的地方加sec
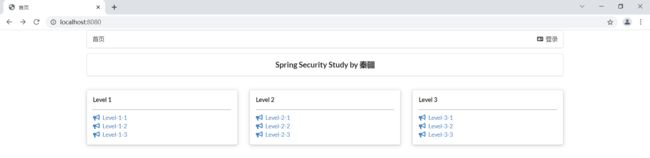
<div class="right menu">

    <div sec:authorize="!isAuthenticated()">
        <a class="item" th:href="@{/toLogin}">
            <i class="address card icon">i> 登录
        a>
    div>

    <div sec:authorize="isAuthenticated()">
        <a class="item">
            用户名:<span sec:authentication="name">span>
            角色:<span sec:authentication="principal.authorities">span>
        a>
        <a class="item" th:href="@{/logout}">
            <i class="sign-out icon">i> 注销
        a>
    div>
div>


<div class="column" sec:authorize="hasRole('vip1')">
    <div class="ui raised segment">
        <div class="ui">
            <div class="content">
                <h5 class="content">Level 1h5>
                <hr>
                <div><a th:href="@{/level1/1}"><i class="bullhorn icon">i> Level-1-1a>div>
                <div><a th:href="@{/level1/2}"><i class="bullhorn icon">i> Level-1-2a>div>
                <div><a th:href="@{/level1/3}"><i class="bullhorn icon">i> Level-1-3a>div>
            div>
        div>
    div>
div>

<div class="column" sec:authorize="hasRole('vip2')">
    <div class="ui raised segment">
        <div class="ui">
            <div class="content">
                <h5 class="content">Level 2h5>
                <hr>
                <div><a th:href="@{/level2/1}"><i class="bullhorn icon">i> Level-2-1a>div>
                <div><a th:href="@{/level2/2}"><i class="bullhorn icon">i> Level-2-2a>div>
                <div><a th:href="@{/level2/3}"><i class="bullhorn icon">i> Level-2-3a>div>
            div>
        div>
    div>
div>
15.4、自定义登录页面

http.formLogin().loginPage("/toLogin");//请求跳转
controller
@RequestMapping("/toLogin")
public String toLogin() {
    return "/views/login";
}
15.5、记住我
开启记住我功能
//开启记住我功能,cookie,默认保存两周,自定义接收前端的参数
http.rememberMe().rememberMeParameter("remember");
<div class="field">
    <input type="checkbox" name="remember"/>记住我
div>
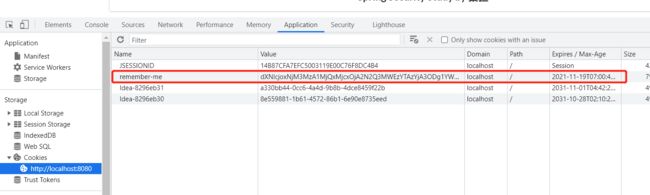
再次打开浏览器,cookie信息依然存在。
总结
@EnableWebSecurity//开启WebSecurity模式,@Enablexxx,开启某个功能
public class SecurityConfig extends WebSecurityConfigurerAdapter {

    //授权
    @Override
    protected void configure(HttpSecurity http) throws Exception {
        //首页所有人可以访问,功能页只有对应有权限的人可以访问
        //请求授权的规则
        http.authorizeRequests()
            .antMatchers("/").permitAll()
            .antMatchers("/level1/**").hasRole("vip1")
            .antMatchers("/level2/**").hasRole("vip2")
            .antMatchers("/level3/**").hasRole("vip3");

        //没有权限会默认跳转到登录页面,需要开启登录的页面
        //http://localhost:8080/login
        http.formLogin().loginPage("/toLogin");//请求跳转

        //防止网站攻击
        http.csrf().disable();//关闭csrf功能,登陆失败可能存在的原因

        //注销,开启了注销功能,跳转到首页
        http.logout().logoutSuccessUrl("/");

        //开启记住我功能,cookie,默认保存两周,自定义接收前端的参数
        http.rememberMe().rememberMeParameter("remember");

    }

    //认证
    //报错:There is no PasswordEncoder mapped for the id "null"
    //在Spring Security 5.0+版本以上新增了很多的加密方法
    //new BCryptPasswordEncoder().encode("123456") 密码加密,防止反编译破解。
    @Override
    protected void configure(AuthenticationManagerBuilder auth) throws Exception {
        auth.inMemoryAuthentication().passwordEncoder(new BCryptPasswordEncoder())
            .withUser("leishuai").password(new BCryptPasswordEncoder().encode("123456")).roles("vip1","vip2","vip3")
            .and()
            .withUser("root").password(new BCryptPasswordEncoder().encode("123456")).roles("vip1","vip2")
            .and()
            .withUser("user").password(new BCryptPasswordEncoder().encode("123456")).roles("vip1");
    }
}
16、Shiro简介
- 什么是Shiro?
- Apache Shiro是一个Java的安全(权限)框架
- Shiro可以非常容易的开发出足够好的应用,其不仅可以在JavaSE环境,也可以用在JavaEE环境
- Shiro可以完成认证、授权、加密,会话管理,Web集成,缓存等。
- 下载地址:[http://shiro.apache.org/]
// 获取当前的用户对象Subject
Subject currentUser = SecurityUtils.getSubject();

// 通过当前用户拿到Session
Session session = currentUser.getSession();

// 当前用户是否被认证
currentUser.isAuthenticated()

// 获得当前用户的认证
currentUser.getPrincipal()

// 用户是否拥有xxx角色
currentUser.hasRole("schwartz")

// 获得当前用户的一些权限,参数不同,效果不同
currentUser.isPermitted("lightsaber:wield")
currentUser.isPermitted("winnebago:drive:eagle5")
Shiro架构:Subject(用户),SecurityManager(管理所有用户),Realm(连接数据)
-
导入Shrio整合Spring的包
<dependency> <groupId>org.apache.shirogroupId> <artifactId>shiro-springartifactId> <version>1.8.0version> dependency> -
编写配置类
// 自定义的Realm,只需要继承AuthorizingRealm
public class UserRealm extends AuthorizingRealm {
    // 授权
    @Override
    protected AuthorizationInfo doGetAuthorizationInfo(PrincipalCollection principalCollection) {
        System.out.println("执行了授权" + principalCollection);
        return null;
    }

    // 认证
    @Override
    protected AuthenticationInfo doGetAuthenticationInfo(AuthenticationToken authenticationToken) throws AuthenticationException {
        System.out.println("执行了认证" + authenticationToken);
        return null;
    }
}
,,
@Configuration public class ShiroConfig { // 第三步ShiroFilterFactoryBean @Bean public ShiroFilterFactoryBean shiroFilterFactoryBean(@Qualifier("defaultWebSecurityManager") DefaultWebSecurityManager defaultWebSecurityManager) { ShiroFilterFactoryBean factoryBean = new ShiroFilterFactoryBean(); // 设置Shiro的安全管理器 factoryBean.setSecurityManager(defaultWebSecurityManager); // 添加Shiro的内置过滤器 /* anon:无需认证就可以访问 authc:必须认证了才可以访问 user:必须拥有“记住我”功能才能用 perms:又有对某个资源的权限时才可访问 role:拥有每个角色权限才可访问 */ Map<String, String> filterMap = new LinkedHashMap<>(); //filterMap.put("/user/add", "authc");//必须认证了才可以访问 //filterMap.put("/user/update", "authc"); filterMap.put("/user/*", "authc"); factoryBean.setFilterChainDefinitionMap(filterMap); // 设置登录的请求 factoryBean.setLoginUrl("/toLogin"); return factoryBean; } // 第二步:DefaultWebSecurityManager @Bean public DefaultWebSecurityManager defaultWebSecurityManager(@Qualifier("userRealm") UserRealm userRealm) { DefaultWebSecurityManager securityManager = new DefaultWebSecurityManager(); //关联UserRealm securityManager.setRealm(userRealm); return securityManager; } //自己写的类就被Spring容器托管,@UserRealm注册成组件 // 第一步:创建Realm对象,需要自定义类 @Bean public UserRealm userRealm() { return new UserRealm(); } } -
controller
@Controller public class IndexController { @RequestMapping({"/", "/index"}) public String toIndex(Model model) { model.addAttribute("msg", "Hello,Shiro"); return "index"; } @RequestMapping("/user/add") public String add() { return "/user/add"; } @RequestMapping("/user/update") public String update() { return "/user/update"; } @RequestMapping("/toLogin") public String toLogin() { return "login"; } } -
结果,如果用户在没有登陆的情况下点击添加或者修改,就会跳转到登录页面
[外链图片转存失败,源站可能有防盗链机制,建议将图片保存下来直接上传(img-AMC8yDbP-1637377596135)(D:\Typora\img\image-20211105202953239.png)]

17、Shiro整合Mybatis

171、用户认证
准备工作:写一个根据用户name获取用户的方法,并测试:
@Autowired
UserService userService;

@Test
void contextLoads() {

    User user = userService.queryUserByName("root");
    System.out.println(user);//User(id=5, name=root, pwd=123)

}
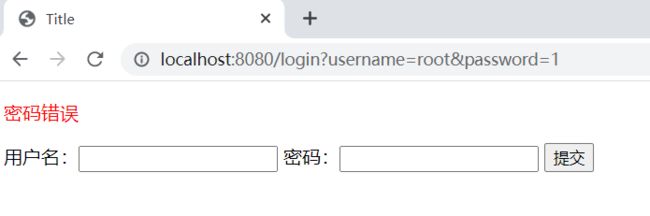
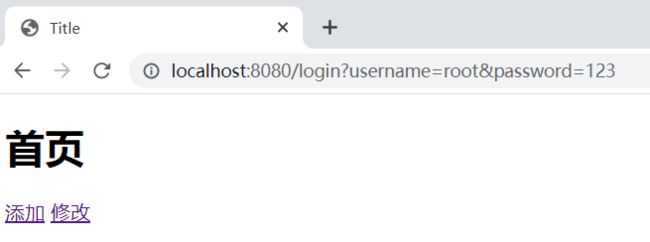
@RequestMapping("/login")
public String login(String username, String password, Model model) {
    //获取当前的用户
    Subject subject = SecurityUtils.getSubject();
    // 封装用户的登录数据
    UsernamePasswordToken token = new UsernamePasswordToken(username, password);

    try {
        subject.login(token);
        return "index";
    } catch (UnknownAccountException e) {//用户名不存在
        model.addAttribute("msg", "用户名不存在");
        return "login";
    } catch (IncorrectCredentialsException e) {// 密码错误
        model.addAttribute("msg", "密码错误");
        return "login";
    }
}
@Autowired
private UserService userService;

// 只要点击了登录就会进入这个方法
// 认证
@Override
protected AuthenticationInfo doGetAuthenticationInfo(AuthenticationToken token) throws AuthenticationException {
    System.out.println("执行了认证" + token);

    UsernamePasswordToken userToken = (UsernamePasswordToken) token;

    // 从真实数据库中获取用户名、密码
    User user = userService.queryUserByName(userToken.getUsername());

    if (user == null) {
        return null;// 抛出异常 UnknownAccountException,用户名不存在
    }

    // 密码认证,Shiro做
    return new SimpleAuthenticationInfo("", user.getPwd(), "");
}
<p th:text="${msg}" style="color: red">p>
<form th:action="@{/login}">
    用户名:<input type="text" name="username">
    密码:<input type="password" name="password">
    <input type="submit">
form>
17.2、用户授权
// 添加Shiro的内置过滤器
/*
anon:无需认证就可以访问
authc:必须认证了才可以访问
user:必须拥有“记住我”功能才能用
perms:拥有对某个资源的权限时才可访问
role:拥有每个角色权限才可访问
*/
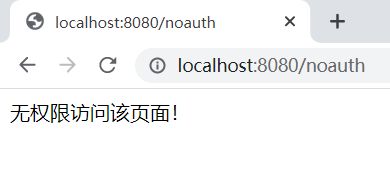
// 授权,正常的情况下,没有授权会跳到未授权的页面
// perms[user:add],user:add只有带了这个权限(user:add)的用户才可以访问
// 如果没有权限,就会(type=Unauthorized, status=401)
filterMap.put("/user/add","perms[user:add]");
// 未授权页面,如果没有权限访问该页面,就会跳转
factoryBean.setUnauthorizedUrl("/noauth");
如果没有授权点击add就会跳转到未授权页面
@RequestMapping("/noauth")
@ResponseBody
public String noauth() {
    return "无权限访问该页面!";
}
接下来给用户授予add的权利,
// 给登入的用户授权,
info.addStringPermission("user:add");
但这是一个硬编码,每个用户登录都会走这个方法,所以要解决这个问题就要改造数据库,给数据库添加一个perms
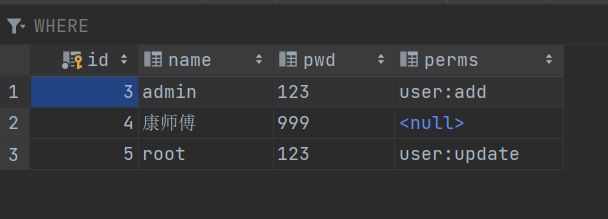
User类也需要改
private String perms;
解决:
-
在认证中添加返回的user
return new SimpleAuthenticationInfo(user, user.getPwd(), ""); -
给登录的用户授权
// 拿到当前用户的登录对象 Subject subject = SecurityUtils.getSubject(); User currentUser = (User) subject.getPrincipal();//拿到user对象 // 设置当前用户的权限 info.addStringPermission(currentUser.getPerms()); -
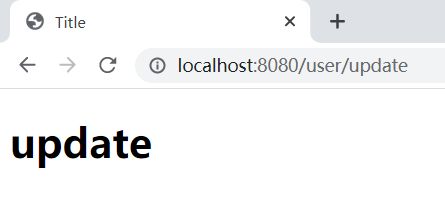
在配置类中添加update权限
filterMap.put("/user/add","perms[user:add]"); filterMap.put("/user/update","perms[user:update]"); -
测试
-
使用root登录(root用户只有update权限)
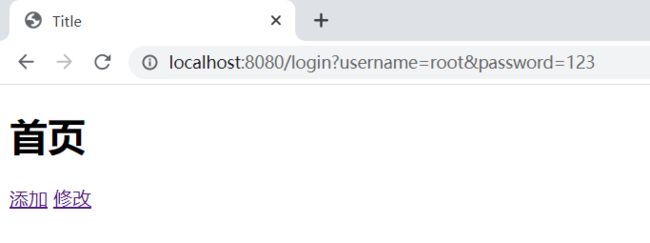
-
点击添加

-
点击修改
-
17.3、Shiro整合thymeleaf
用户登录进入只可以看到对应权限的按钮,没有权限的不进行展示。
-
导入Shiro整合thymeleaf包
<dependency> <groupId>com.github.theborakompanionigroupId> <artifactId>thymeleaf-extras-shiroartifactId> <version>2.1.0version> dependency> -
配置类
// 整合ShiroDialect,用来整合thymeleaf和Shiro @Bean public ShiroDialect getShiroDialect() { return new ShiroDialect(); } -
将登陆后的user存放入session中
Subject subject = SecurityUtils.getSubject(); Session session = subject.getSession(); session.setAttribute("loginUser",user); -
前端
<div th:if="${session.loginUser == null}"> <a th:href="@{/toLogin}">登录a> div> <p th:text="${msg}">p> <div shiro:hasPermission="user:add"> <a th:href="@{/user/add}">添加a> div> <div shiro:hasPermission="user:update"> <a th:href="@{/user/update}">修改a> div> -